Testing an Electrolux dryer heating element is primarily an electrical continuity and resistance check performed with a multimeter after the dryer is fully de-energized. In most cases, an element that has failed open will show no continuity (infinite resistance), while a healthy element will show a stable resistance reading that is not infinite. A second essential safety test is verifying the element does not have continuity to the dryer chassis (a ground fault/short). This guide provides a safe workflow, what readings mean, how to avoid false conclusions, and what to check next if the element tests good but there is still no heat.
Internal navigation: Heating Element, Heating Element manufacturer, Heating Element Factory, Die Casting Heating Solutions.
- Safety first: de-energize and prevent accidental power-up
- Heating element basics (what is being tested)
- Tools and prep
- Step-by-step multimeter tests (continuity, resistance, and ground fault)
- How to interpret readings (decision tables)
- Common false results and how to avoid them
- If the element tests good: what to test next
- FAQ (6 questions)
- References and outbound links
Safety first: de-energize and prevent accidental power-up
A dryer heating circuit involves high current and high temperature. Safe testing starts by removing all electrical power and confirming the machine cannot start. This is consistent with general “element replacement” safety principles used in other heating appliances: power is not restored until the system is in a safe, ready condition.
Minimum safety requirements before any test
- Unplug the dryer (or switch off the dedicated breaker and verify power is off).
- Allow the appliance to cool fully if it was recently running.
- Do not rely on the control panel being “off” as proof the circuit is de-energized.
- If uncertain, a qualified technician should perform the inspection.
The goal is to eliminate shock risk and prevent “accidental energization” while hands are inside the cabinet.
LSI keywords: electrical safety, lockout/tagout, multimeter continuity test, resistance measurement, ground fault.
Heating element basics (what is being tested)
A heating element is not just a piece of “hot wire.” Engineering guidance describes it as a component made of electrically conductive material and insulating/support material, built to serve a specific heating purpose. The conductive core converts electrical energy into heat via resistive (Joule) heating.
In many appliances, resistance alloys (commonly Ni-Cr or Fe-Cr-Al families) are used because they can operate at red-hot temperatures when required. The conductive path is integrated into a structure that keeps it electrically isolated and mechanically stable.
Tools and prep
Tools
- Digital multimeter (with continuity beeper and resistance/ohms ranges)
- Basic hand tools for panel access (model-dependent)
- Phone/camera for wire routing photos before disconnecting anything
- Work gloves and flashlight
Prep steps
- Confirm power is disconnected.
- Pull the dryer away from the wall for safe access.
- Document wire locations with clear photos.
- Access the heating element terminals (location varies by Electrolux/Frigidaire-built models).
- Inspect wiring for overheating (darkened spades, brittle insulation, loose connectors).
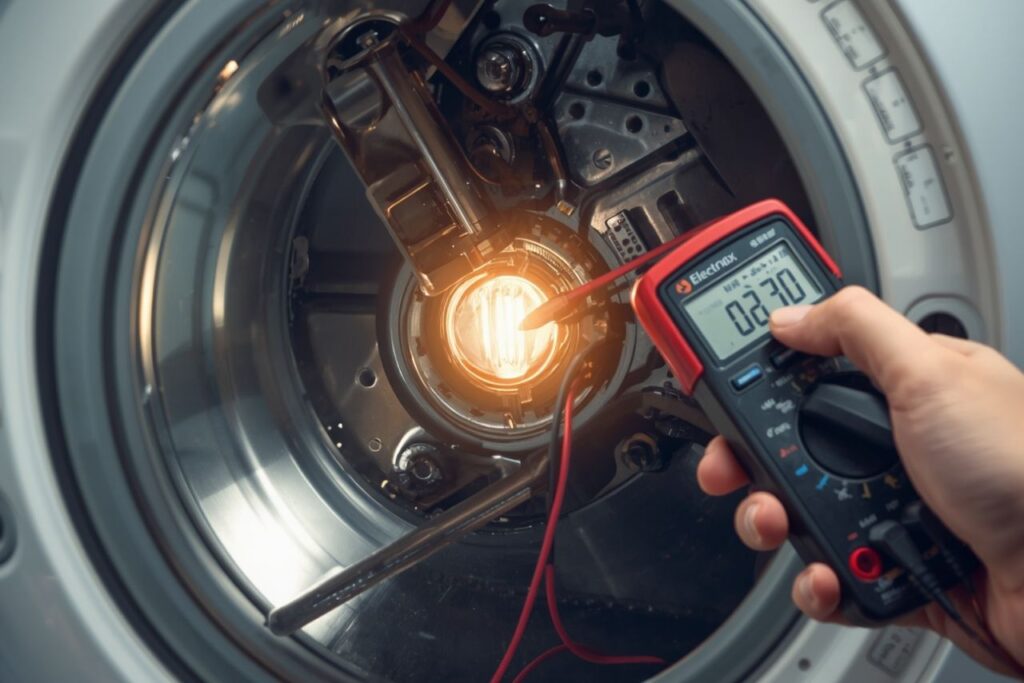
Step-by-step multimeter tests (continuity, resistance, and ground fault)
Test A: Continuity across the heating element terminals
The first test checks whether the resistive path is intact. In simplest terms, the element should behave like a resistor—not an open break.
- Set the multimeter to continuity mode (beep) or a low ohms range.
- Disconnect at least one element wire to avoid reading back through other components.
- Place one probe on each heating element terminal.
- Record results: beep/no beep and the resistance number (if shown).
Section summary
This test determines whether the element is electrically continuous. No continuity is strongly indicative of an element that has failed open.
Test B: Resistance (ohms) measurement across the element
Resistance provides a more informative reading than a simple beep. While exact ohms depend on element wattage and dryer design, the key diagnostic point is whether the reading is finite and stable versus infinite/open.
- Set the multimeter to an appropriate ohms range.
- Measure across the same two element terminals.
- If the reading fluctuates wildly, check probe contact and terminal oxidation.
Section summary
A healthy element should show a stable, finite resistance; an open element typically reads OL/infinite.
Test C: Ground fault / short-to-chassis test
The next test checks whether the element is unintentionally contacting metal. This is a safety-critical condition.
- Keep the element electrically isolated (wires removed from terminals).
- Place one probe on an element terminal and the other on bare metal chassis.
- Repeat for the other element terminal.
- Any continuity/beep to chassis suggests a short/ground fault condition.
If continuity to chassis is found
The dryer should not be operated until the short is corrected. A short can create shock risk and can also damage control components.
Section summary
This test verifies electrical isolation between the heating element circuit and the metal cabinet.
How to interpret readings (decision tables)
Chart 1: Quick interpretation table
| Finding | Meaning | Recommended next step |
|---|---|---|
| No continuity across element terminals (OL/infinite) | Element likely failed open (broken resistive path) | Replace heating element assembly; inspect connectors for heat damage |
| Continuity present and finite resistance | Element is likely electrically intact | Proceed to thermostats, thermal fuse, airflow, and power-supply checks |
| Continuity to chassis from either terminal | Short to ground / insulation failure / physical contact | Stop use; replace element/housing as appropriate; inspect mounting and insulation |
| Continuity present but reading is unstable | Poor probe contact, oxidized terminals, or partial connector failure | Clean terminals; retest with firm contact; check spade tightness |
Chart 2: “Why a resistance number matters” (conceptual)
Heating elements convert electrical energy to heat in the conductive alloy. The resistance value depends on the design target: power and voltage. An external illustration of how products specify wattage is a 1000W plug-in heating element listing; while it is not a dryer part, it shows how wattage is a defining specification.
| Concept | Practical interpretation for dryer testing |
|---|---|
| Wattage | Higher wattage at a given voltage typically means lower resistance; element must match the dryer design. |
| Voltage compatibility | Using the wrong element rating can cause inadequate heat or overheating; always match manufacturer specifications. |
| Element is a component assembly | The resistive core plus insulation/support is what is being tested; mechanical deformation can contribute to shorts. |
Common false results and how to avoid them
False “bad element” result: testing through the circuit
If the element wires remain connected, the meter may read through other paths (thermostats, control circuitry), confusing the diagnosis. Isolating the element (removing at least one wire) reduces this risk.
False “good element” result: loose or heat-damaged terminals
A terminal can make intermittent contact: the element may test fine while disconnected, yet fail under current due to a poor spade connection. Visual inspection is essential—look for darkened connectors, softened insulation, or a terminal that slides on too easily.
False “short to chassis”: probe contact error
Continuity to chassis must be tested with the element isolated and with the probe touching bare metal. Painted surfaces and oxidized screws can give inconsistent results.
Section summary
The most frequent testing mistakes are (1) not isolating the element, and (2) overlooking connector damage that mimics a heating element failure.
If the element tests good: what to test next
When the heating element is electrically intact, “no heat” symptoms commonly shift to control and safety devices or airflow constraints. The next checks are typically performed in this order:
1) Thermal fuse / thermal cutoff devices
Many dryers include a one-time thermal fuse that opens if overheating occurs. If it is open, the heating circuit cannot energize even if the element is healthy.
2) High-limit thermostat and cycling thermostat
A failed thermostat can prevent heating or cause rapid cycling. Continuity testing (cold) can identify devices that are stuck open.
3) Airflow and lint restrictions
Restricted airflow increases operating temperatures and can trigger cutoffs. Even with a “good” element, poor airflow prevents efficient heat delivery.
4) Power supply conditions (especially if the drum runs but there is no heat)
Some “runs but no heat” complaints are actually supply issues: the motor can run while the heater circuit does not receive the proper supply condition. A qualified technician can verify supply voltage at the terminal block.
Engineering context: why environment matters
Heating element performance and longevity depend on operating environment. Engineering guidance highlights that contaminants and conditions influence life and behavior; in dryers, lint and restricted airflow can function as the “environmental stressor” that causes overheating events.
FAQ
Does continuity always mean the heating element is good?
Not always. Continuity means the element is not fully open, but it does not guarantee the element is safe (it could be shorting to chassis) or that it performs under load. Connector integrity and ground-fault testing are still required.
Should the element be tested with the dryer plugged in?
No. Resistance/continuity testing is performed with the appliance de-energized. Live testing should be reserved for qualified technicians with appropriate procedures and instruments.
What reading indicates a failed element?
The most definitive indicator is an “open” reading (OL/infinite) across the element terminals, meaning the conductive path is broken.
What indicates a dangerous short?
Continuity (or a low-ohms path) from either element terminal to the metal chassis suggests a short-to-ground condition and the dryer should not be operated.
If the element is fine, why is there still no heat?
The most common reasons are an open thermal fuse/cutoff, failed thermostat, airflow restriction, or a supply condition that prevents the heater circuit from energizing.
Can the wrong replacement element be installed?
Yes. Heating components are designed for specific voltage and wattage targets. Replacement parts should match the dryer’s specifications to avoid poor performance or overheating.
Conclusion
A correct Electrolux dryer heating element test focuses on three outcomes: (1) continuity/resistance across the element, (2) absence of continuity to chassis, and (3) inspection for connector and wiring damage that can mimic element failure. When the element tests good, attention should shift to thermal cutoffs, thermostat controls, airflow restrictions, and supply verification. Safety is non-negotiable: all testing should be performed with the dryer de-energized and cooled.
References and outbound links
Heating element definition, materials/alloys, and framework classifications:
https://tutco.com/conductive/heating-elements
Safety sequencing and “do not energize under unsafe conditions” principle (used as a safety-method parallel):
https://www.whirlpoolwaterheaters.com/support/help/element-was-out-of-range/24
Manufacturer context for heating-element categories (tubes/plates/films) and integrated modules:
https://jinzho.com/
https://jinzho.com/product-category/heating-element/
https://jinzho.com/product-category/heating-element/heating-tubes/
https://jinzho.com/product-category/heating-element/heating-plate/
https://jinzho.com/product-category/heating-element/heating-film/
https://jinzho.com/product-category/die-casting-heating-solutions/
Example of how heating elements are specified by wattage and approvals in product listings (contextual):
https://usa.hudsonreed.com/1000-plug-in-watt-electric-heating-element-76309
Disclosure: This article is original instructional content. The sources above were used to ground terminology, safety sequencing concepts, and specification context.

