
Você pode testar os elementos do aquecedor de água desligando a energia, acessando o elemento e usando um multímetro para verificar a resistência adequada.
⚠️ Sempre desligue a energia no disjuntor e confirme com um testador de tensão antes de tocar em qualquer fio.
Testes de rotina ajudam seu aquecedor de água a funcionar com eficiência e evitam substituições desnecessárias.
- O acúmulo de sedimentos e a corrosão forçam seu aquecedor a trabalhar mais, aumentando as contas de energia.
- Testes regulares do aquecedor de água identificam problemas menores antes que eles levem a falhas dispendiosas.
| Fator Ambiental | Impacto na Falha do Elemento do Aquecedor de Água |
|---|---|
| Água Dura | Aumenta sedimentos, corrosão e falha do elemento |
| Instalação Externa/Úmida | Acelera a corrosão e reduz a vida útil |
Etapas Essenciais de Segurança Antes de Testar os Elementos do Aquecedor de Água
Testar um elemento do aquecedor de água exige atenção rigorosa à segurança. Eletricidade e água criam um ambiente perigoso. Você deve seguir cada etapa cuidadosamente para proteger a si mesmo e sua casa.
Desligamento e Verificação de Energia
Localizando e Desligando o Disjuntor
Antes de tocar em qualquer parte do seu aquecedor de água elétrico, você precisa desconectá-lo do fornecimento elétrico. Localize o painel elétrico da sua casa. Encontre o disjuntor identificado para o seu aquecedor de água e coloque-o na posição “desligado”. Esta etapa evita choques elétricos acidentais.
Usando um Testador de Tensão para Segurança
Desligar o disjuntor não é suficiente. Você deve confirmar que o aquecedor de água está completamente desenergizado. Siga estas etapas para verificar se a energia está desligada:
- Desligue a energia no disjuntor.
- Remova as placas de cobertura metálicas para acessar os termostatos e os elementos de aquecimento.
- Use um testador de tensão sem contato para verificar a presença de tensão em todas as conexões elétricas.
- Se os fios estiverem dentro de um conduíte metálico, remova a tampa do termostato e o isolamento para alcançar os fios próximos ao interruptor de corte de alta temperatura.
- Segure o testador contra o invólucro metálico do aquecedor de água para uma verificação extra de segurança.
- Prossiga somente se o testador não indicar tensão em nenhum lugar.
⚠️ Nunca pule o teste de tensão. Mesmo um pequeno erro pode causar ferimentos graves.
Medidas de Proteção Pessoal
Equipamento de Segurança Recomendado
Você deve sempre usar o equipamento de proteção individual (EPI) adequado ao trabalhar em um aquecedor de água elétrico. Luvas isoladas protegem suas mãos contra choques elétricos. Óculos de segurança protegem seus olhos de faíscas ou detritos. Roupas com classificação de arco elétrico adicionam outra camada de proteção.
Criando uma Área de Trabalho Segura
Um espaço de trabalho limpo e seco reduz riscos. Remova qualquer água do piso ao redor do aquecedor de água. Mantenha suas ferramentas organizadas e ao alcance. Certifique-se de que a área esteja bem iluminada para que você possa ver todas as conexões claramente.
Manuseio de Componentes Elétricos e de Água
Prevenção de Choque Elétrico
Reparos em aquecedores de água elétricos apresentam vários perigos. Os riscos mais comuns e suas soluções incluem:
| Perigo Elétrico | Descrição | Estratégias de Mitigação |
|---|---|---|
| Ambientes Úmidos ou Molhados | A água conduz eletricidade, aumentando o risco de choque, especialmente com isolamento danificado. | Mantenha as áreas de trabalho secas; certifique-se de que as mãos estejam secas antes do manuseio; não opere equipamentos molhados; consulte eletricistas se o equipamento estiver molhado. |
| Equipamento Defeituoso ou Danificado | Rachaduras, cortes, fios desfiados ou isolamento danificado podem causar choques ou eletrocussão. | Inspecione ferramentas e equipamentos antes do uso; remova itens danificados do serviço; não use fita isolante como reparo; siga os procedimentos de Bloqueio e Etiquetagem (LOTO) durante a manutenção. |
| Falta de Aterramento Adequado | Aterramento inadequado leva a choques elétricos; é responsável por aproximadamente 30% das fatalidades elétricas. | Certifique-se de que todos os equipamentos estejam devidamente aterrados ou com isolamento duplo; inspecione os pinos de aterramento; use ferramentas com isolamento duplo. |
| Trabalho em Condições Úmidas | A umidade pode energizar superfícies de equipamentos, aumentando o risco de choque. | Use Interruptores de Circuito com Proteção contra Falha de Aterramento (GFCIs) em áreas úmidas; seque as mãos antes do manuseio; use apenas equipamentos projetados para condições úmidas. |
| Práticas Gerais de Segurança | A energização acidental de equipamentos durante a manutenção pode causar ferimentos. | Desenergize o equipamento e aplique procedimentos de Bloqueio/Etiquetagem; use EPI não condutor; somente pessoal treinado deve manusear fios energizados; realize inspeções regulares. |
Evitando Danos por Água
Vazamentos de água podem danificar seu aquecedor de água elétrico e criar riscos de escorregamento. Sempre verifique se há vazamentos antes de começar. Coloque toalhas ou uma bandeja rasa sob a unidade para capturar qualquer gotejamento. Se for necessário drenar o tanque, siga as instruções do fabricante para evitar inundações.
Dica: Mantenha um extintor de incêndio e um kit de primeiros socorros por perto ao trabalhar em qualquer aparelho elétrico.
Ferramentas e Materiais para Testar os Elementos do Aquecedor de Água

Selecionar as ferramentas e materiais corretos garante que você possa testar os elementos do aquecedor de água com segurança e precisão. Você precisa se preparar antes de iniciar qualquer trabalho de diagnóstico ou reparo.
Escolhendo o Multímetro Certo
Selecionando um Multímetro para Teste de Resistência
Você deve usar um multímetro digital para testar os elementos do aquecedor de água. Os modelos digitais fornecem leituras precisas e são mais fáceis de interpretar do que os tipos analógicos. Ao escolher um multímetro, priorize estes recursos:
- Capacidade de faixa automática para operação simples e resultados precisos.
- Classificações de segurança CAT III ou superiores para proteção contra picos de tensão.
- Funções essenciais, como teste de resistência (ohms) e continuidade.
Alicates amperímetros focam na medição de corrente e não são adequados para teste de resistência em elementos de aquecimento. Sempre ajuste seu multímetro digital para a configuração mais baixa de ohms para verificações precisas de continuidade e resistência.
Configurando o Multímetro
Antes de testar, desligue a energia e verifique se não há tensão presente. Remova os painéis de acesso para alcançar o elemento. Desconecte os fios do elemento para isolá-lo. Ajuste seu multímetro para a faixa de resistência mais baixa. Coloque as pontas de prova nos terminais do elemento para verificar continuidade e resistência. Uma leitura de zero ohms indica continuidade adequada. Se você não observar continuidade ou resistência anormal, deve substituir o elemento.
Ferramentas Manuais Essenciais
螺丝刀和扳手
Você precisa de um chave de fenda, chata ou Phillips, para remover painéis de acesso e desconectar fios. Uma chave para elemento de aquecimento se ajusta perfeitamente ao elemento e permite afrouxá-lo ou apertá-lo sem causar danos. Chaves de cano ajudam com conexões, e uma chave para válvula de dreno auxilia na remoção ou aperto da válvula de dreno.
Ferramentas Opcionais para Acesso Facilitado
Algumas situações exigem ferramentas extras para conveniência e segurança:
- 特氟龙胶带 para vedar conexões rosqueadas e prevenir vazamentos.
- Luvas de proteção e óculos de segurança para proteger mãos e olhos de queimaduras, cortes ou detritos.
- Uma bandeja rasa ou toalhas para capturar gotejamentos de água durante a manutenção.
Dica: Mantenha suas ferramentas organizadas e ao alcance para agilizar o processo e reduzir o risco de acidentes.
Peças de Reposição e Acessórios
Identificando Elementos de Aquecimento Compatíveis
Quando você precisar substituir elementos de aquecimento, sempre corresponda aos valores de resistência e siga as especificações do fabricante. A maioria dos aquecedores de água usa dois elementos por tanque—um superior e um inferior. Sinais de que você precisa de um novo elemento incluem temperatura inconsistente da água, redução de água quente ou ruídos estranhos. Inspecione os terminais quanto a corrosão ou danos antes de substituir.
Você pode garantir a compatibilidade usando ferramentas de consulta do fabricante ou verificadores de compatibilidade de varejistas. Insira seu modelo ou número da peça para encontrar os elementos de aquecimento corretos. Compre apenas de varejistas autorizados ou sites oficiais do fabricante para garantir autenticidade.
Juntas e Selantes
As juntas previnem vazamentos ao instalar novos elementos de aquecimento. Sempre use uma junta nova a cada substituição. Fita de Teflon ou selantes aprovados ajudam a criar uma vedação à prova d'água em conexões rosqueadas. Verifique a embalagem quanto à marca oficial e números de peça para confirmar a autenticidade.
Nota: Revise as políticas de garantia e devolução antes de comprar peças de reposição. Entre em contato com o suporte ao cliente se tiver preocupações sobre autenticidade.
Preparando-se para Testar os Elementos do Aquecedor de Água
Antes de começar o teste, você deve preparar seu aquecedor de água e o espaço de trabalho. A preparação cuidadosa garante sua segurança e ajuda a evitar danos à unidade ou aos seus elementos de aquecimento.
Desligando o Aquecedor de Água
Desligando a Energia e Permitindo o Resfriamento
Comece desconectando o fornecimento de energia do seu aquecedor de água. Localize o disjuntor e desligue-o. Confirme que a energia está desligada com um multímetro ou testador de tensão. Este passo previne choque elétrico e está alinhado com as diretrizes de segurança do fabricante. Para modelos elétricos, desconecte a unidade da tomada, se possível. Em seguida, Abra água quente de uma torneira próxima por 10 a 30 minutos. Esse processo resfria o tanque e reduz o risco de queimaduras. Use sempre luvas grossas para proteger as mãos do calor residual.
⚠️ Nunca pule a etapa de resfriamento. Água quente dentro do tanque pode causar queimaduras graves.
Drenando o Tanque (Se Necessário)
Quando e Como Drenar com Segurança
Talvez seja necessário drenar o tanque se os elementos de aquecimento estiverem abaixo da linha d'água. Feche a válvula de abastecimento de água fria do aquecedor de água. Conecte uma mangueira de jardim à válvula de drenagem na base do tanque. Direcione a mangueira para uma área de drenagem segura ou um balde grande. Abra a válvula de drenagem e deixe a água fluir até que o nível caia abaixo dos elementos de aquecimento. Essa etapa evita que a água derrame ao remover os elementos. Sempre feche a válvula de drenagem ao terminar.
Dica: Abra uma torneira de água quente em sua casa durante a drenagem. Essa ação ajuda o ar a entrar no tanque e acelera o processo de drenagem.
Acessando o Elemento de Aquecimento
Removendo os Painéis de Acesso
Localize os painéis de acesso na lateral do seu aquecedor de água. Use uma chave de fenda para remover os parafusos e levante o painel. Dobre o isolamento para expor os elementos de aquecimento e a fiação. Guarde todos os parafusos e painéis em um local seguro para a remontagem.
Identificando e Desconectando os Fios dos Elementos
Antes de tocar em qualquer fio, verifique novamente se não há energia chegando à unidade usando seu multímetro. Identifique os fios conectados aos elementos de aquecimento. Tire uma foto ou anote suas posições para facilitar a reinstalação. Afrouxe os parafusos dos terminais e desconecte os fios com cuidado. Manuseie todos os componentes elétricos com cuidado para evitar danificar as conexões.
Nota: Se você não se sentir seguro ao lidar com fiação elétrica, considere consultar um profissional licenciado.
Seguindo essas etapas, você cria um ambiente seguro para testes e garante que seu aquecedor de água permaneça em boas condições.
Guia Passo a Passo para Testar os Elementos do Aquecedor de Água
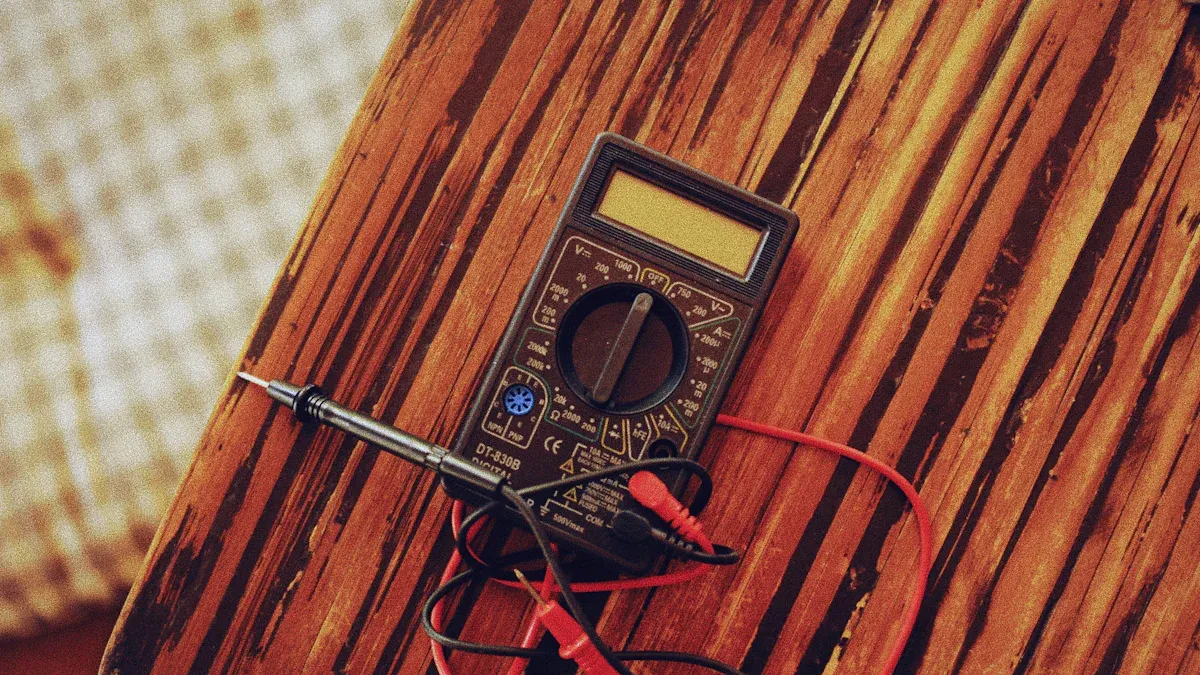
Testar os elementos do seu aquecedor de água exige configuração cuidadosa e atenção aos detalhes. Seguindo essas etapas, você garante resultados precisos e se protege de perigos.
Configurando o Multímetro
Selecionando a Configuração Correta de Ohms
Você deve configurar seu multímetro para a configuração correta de ohms (Ω) antes de começar. Essa configuração permite medir a resistência dos elementos de aquecimento com precisão. A maioria dos multímetros digitais possui um recurso de faixa automática, mas se o seu não tiver, selecione a faixa de resistência mais baixa disponível. Essa etapa garante que você possa detectar até pequenas variações na resistência.
Testando a Função do Multímetro
Antes de testar os elementos do aquecedor de água, Verifique se o seu multímetro funciona corretamente. Toque as duas pontas de prova juntas. O display deve mostrar uma leitura próxima de zero, confirmando que o dispositivo está pronto. Se você não vir nenhuma mudança ou um erro, substitua as baterias ou consulte o manual. Sempre verifique sua ferramenta antes de prosseguir.
Dica: Nunca tente testar elementos de aquecimento com a energia ligada. Esse erro pode danificar seu multímetro e colocá-lo em risco de choque elétrico.
Medindo Resistência e Continuidade
Posicionando as Pontas de Prova nos Terminais dos Elementos
Para testar os elementos do aquecedor de água, Siga estas etapas:
- Desligue a energia no disjuntor e confirme com um testador de tensão.
- Remova o painel de acesso e o isolamento para expor os elementos de aquecimento.
- Desconecte ambos os fios dos terminais dos elementos. Mantenha os fios separados uns dos outros e de qualquer parte metálica.
- Ajuste seu multímetro para a configuração de ohms.
- Coloque uma ponta de prova em cada terminal (parafuso) do elemento de aquecimento.
Esse processo isola o elemento e garante que você obtenha uma leitura precisa.
Lendo e Registrando os Valores de Resistência
Depois de colocar as pontas de prova, leia o valor de resistência exibido no multímetro. Um elemento funcional normalmente mostra um valor entre resistência entre 10 e 30 ohms, dependendo da potência e da tensão. Registre o valor para os elementos superior e inferior. Se você vir uma leitura de zero, o elemento está em curto. Se o display mostrar resistência infinita ou “OL”, o elemento está aberto ou queimado.
Erros comuns incluem deixar os fios conectados ou testar apenas um elemento. Sempre desconecte os fios e teste ambos os elementos para evitar perder um problema oculto.
Interpretação dos Resultados do Teste
Faixas Normais de Resistência por Potência
A O valor de resistência que você mede depende da potência e da tensão do elemento do seu aquecedor de água. Use a tabela abaixo para comparar suas leituras:
| Potência (W) | Tensão (V) | Resistência Típica (Ohms) |
|---|---|---|
| 750 | 120 | ~19 |
| 1000 | 120 | ~14 |
| 1500 | 120 | ~10 |
| 2000 | 120 | ~7 |
| 2500 | 120 | ~6 |
| 3000 | 120 | ~5 |
| 1500 | 240 | ~38 |
| 2000 | 240 | ~28 |
| 3500 | 240 | ~16 |
| 4500 | 240 | ~13 |
| 5500 | 240 | ~10.5 |
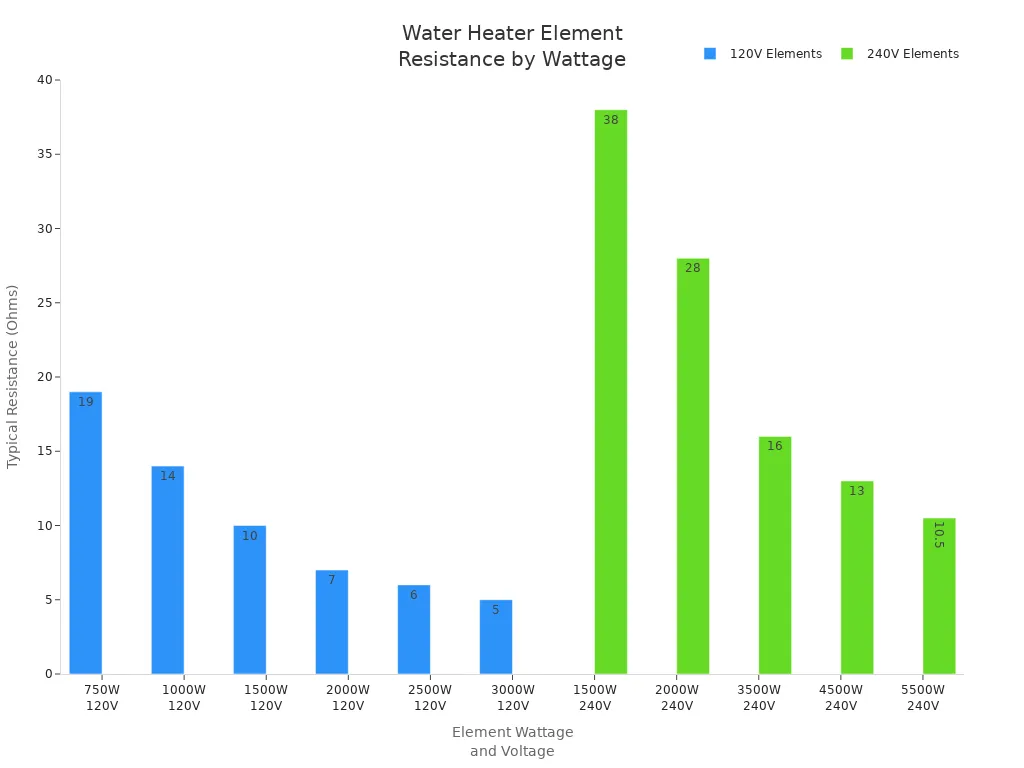
Uma leitura de resistência dentro dessas faixas significa que seu elemento provavelmente está em boas condições. Se sua leitura ficar fora desses valores, talvez seja necessário substituir o elemento.
Sinais de um Elemento Defeituoso ou Quebrado
Você pode identificar um elemento defeituoso por estes sinais:
- Uma leitura de resistência abaixo de 5 ohms sugere um curto-circuito.
- Uma leitura acima de 25-38 ohms (dependendo da potência) ou resistência infinita significa que o elemento está queimado.
- Sem continuidade (sem bipe no modo de continuidade) indica um circuito rompido.
- Se você detectar resistência entre o terminal do elemento e o tanque metálico, o elemento está em curto com o aterramento e deve ser substituído.
Se você observar Corrosão visível ou danos no elemento tornam a substituição necessária. Em caso de dúvida, consulte um profissional para evitar danos adicionais ao seu aquecedor de água.
Seguindo essas etapas, você pode testar os elementos do aquecedor de água com confiança e garantir que seu sistema opere com eficiência. Verificações regulares ajudam você a identificar problemas cedo e prolongar a vida útil dos seus elementos de aquecimento.
Solução de Problemas ao Testar os Elementos do Aquecedor de Água
Sem Leitura ou Resistência Infinita
Causas Comuns e Soluções
Quando você testa um elemento do aquecedor de água e não vê leitura ou vê resistência infinita no multímetro, você enfrenta um sinal clássico de elemento com falha. Vários problemas podem causar esse resultado:
- A Bobina quebrada 元件内部的断路会导致电路开路,因此电流无法流通。.
- 元件护套上的腐蚀或针孔允许水分进入,从而导致故障。.
- 如果发现护套上有孔洞,则该元件存在缺陷,需要更换。.
- 有时,跳闸的接地故障断路器(GFCI)表明存在因水侵入引起的短路。.
- 水箱内残留的水垢或水分可能导致异常读数,因此请务必根据需要排水。.
进行故障排查时,务必先断开电源和导线再进行测试。将万用表设置为欧姆档,测量元件端子之间的电阻。如果读数为无穷大或无导通性,则说明元件已损坏。如果两个元件均测试正常,请检查温控器,因为故障温控器也可能中断电源供应。请同时测试上部和下部元件,以确保系统正常运行。.
提示:更换工具价格实惠,更换故障元件是常见的维修操作。.
低电阻或高电阻读数
这些结果的含义
如果万用表显示的电阻读数超出正常 10–30欧姆范围, ,则很可能存在问题。低电阻读数通常表明元件内部存在短路。高电阻或无穷大读数则表明电路开路或线圈断裂。.
请按照以下故障排查步骤操作:
- Desligue a energia do aquecedor de água.
- 断开每个加热元件上的导线。.
- 将万用表设置为欧姆档。.
- Meça a resistência entre os terminais.
- 将测量结果与10–30欧姆的标准范围进行比较。.
- 如果读数超出此范围,请更换元件。.
- 测试两个元件,因为一个元件故障可能导致热水供应不足。.
- 如果两个元件均测试正常,接下来请检查温控器。.
Decidindo Quando Substituir o Elemento
如果出现以下情况,请更换元件:
- Resistência infinita (circuito aberto)
- 电阻极低(短路)
- 任何超出正常范围的读数
如果元件测试正常但仍存在问题,请检查温控器并排查其他故障,如水垢堆积、水压过高或腐蚀。请始终遵守安全预防措施,如有不确定,请联系专业人员。.
元件故障的其他迹象
Ruídos ou Odores Incomuns
您可能会注意到热水器水箱发出异常声响。爆裂声通常意味着矿物质沉积导致蒸汽闪爆。嗡嗡声可能表明元件松动。噼啪声可能来自冷凝水,而嘶嘶声则表明存在漏水。尖啸声通常意味着进水阀部分关闭。这些噪音有助于您在问题恶化之前发现隐患。.
Água Quente Inconsistente ou Ausente
元件故障的其他迹象包括:
- Água morna 水龙头和淋浴处出水异常
- Água quente acabando rapidamente
- 加热时间比平时更长
- 水温波动或不稳定
目视检查还可能发现元件上的熔化或烧焦区域、针孔、锈蚀或严重的水垢堆积。这些症状结合电阻测试,可为您提供明确的诊断结果。.
注意:如果发现多个警示信号或感到不确定,请联系持证技术人员,以防止对电热水器造成进一步损坏。.
测试热水器后的重新组装与恢复供电
重新安装检修面板和组件
完成测试或更换热水器元件后,必须小心地重新组装设备。正确的重新组装可确保安全、维持效率并防止未来隐患。.
固定所有部件并检查是否漏水
请按照以下步骤固定所有部件,并将热水器恢复至原始状态:
- 使用非接触式电路测试仪或电压表确认电源仍处于关闭状态。此步骤可保护您免受意外触电。.
- 重新安装接线盒盖. 。将其牢固拧紧,以最大程度降低火灾和触电风险。.
- 重新安装上部加热元件盖板。确保其紧密贴合元件和导线。.
- 将保温材料恢复至原位。将其塞回热水器外壳下方,以保持能源效率并防止热量损失。.
- 更换测试期间拆下的任何塑料保护罩或其他盖板。.
🛠️ Dica: 再次确认所有螺丝和紧固件均已拧紧。松动的面板可能导致 rattling 噪音并降低保温效果。.
完成重新组装后,检查加热元件周围区域是否有任何漏水迹象。如果发现湿气,请根据需要拧紧元件或接头。工作区域干燥表明所有密封均已正确完成。.
Restaurando a Energia com Segurança
恢复热水器供电需要仔细关注细节。在给元件通电之前,必须确保水箱已注满水且无空气。.
重新合上断路器
在恢复供电之前,打开最近的热水水龙头,让其 持续流出,直到看到稳定无气泡的水流. 。此步骤可排出系统中的空气,防止新加热元件干烧,干烧可能在数秒内烧毁元件。确认水箱已满且空气全部排出后,返回配电盘并将断路器重新合上。.
⚡ Alerta: 切勿在水箱为空或部分注水时通电。干烧元件将立即造成损坏。.
Monitoramento da Operação Inicial
Após restaurar a energia, monitore atentamente o funcionamento do aquecedor de água. Ouça se há ruídos incomuns e verifique se há vazamentos ao redor do elemento e dos painéis de acesso. Toque na torneira de água quente para confirmar se a água está aquecendo conforme o esperado. Se notar qualquer problema, desligue a energia imediatamente e inspecione seu trabalho.
Você também deve verificar a área em busca de umidade residual ou sinais de superaquecimento. Um aquecedor de água devidamente remontado e energizado operará de forma silenciosa e eficiente, fornecendo água quente confiável para sua residência.
✅ Nota: O monitoramento regular após a remontagem ajuda você a identificar pequenos problemas antes que se tornem reparos maiores.
Quando Chamar um Profissional para Testes do Aquecedor de Água
Problemas Elétricos ou Hidráulicos Complexos
Os testes do aquecedor de água às vezes revelam problemas que vão além da solução básica de problemas. Você pode encontrar situações em que sua segurança ou a integridade de sua casa estejam em risco. Nesses casos, você deve sempre contatar um profissional licenciado.
Sinais de que Você Precisa de Ajuda Especializada
Você pode realizar muitas tarefas de manutenção de rotina, mas alguns problemas exigem habilidades especializadas e equipamentos adequados. Fique atento a estes sinais de alerta:
- Vazamentos no tanque geralmente indicam a necessidade de substituição completa do aquecedor de água. Somente um profissional pode instalar uma nova unidade com segurança e em conformidade com os códigos locais.
- Problemas relacionados a gás, como cheiro de gás ou luz-piloto com mau funcionamento, exigem atenção imediata de um técnico licenciado. Tentar corrigir problemas de gás por conta própria coloca você e sua família em sério risco.
- Falhas elétricas em aquecedores de água elétricos, incluindo disjuntores desarmados, fios queimados ou perda persistente de energia, devem levá-lo a chamar um eletricista. Se você se sentir inseguro em relação a qualquer componente elétrico, não prossiga sozinho.
- Problemas persistentes ou não resolvidos após concluir a solução básica de problemas indicam problemas mais profundos. Falhas complexas podem envolver termostatos, fiação ou conexões hidráulicas que somente um especialista pode diagnosticar e reparar.
⚠️ Alerta: Nunca ignore odores incomuns, danos visíveis ou falhas repetidas do sistema. A intervenção profissional protege sua segurança e evita danos adicionais à propriedade.
Considerações sobre Garantia e Seguro
Você deseja proteger seu investimento no aquecedor de água. Compreender como garantias e apólices de seguro tratam reparos feitos por conta própria ajuda você a evitar erros dispendiosos.
Protegendo Seu Investimento
A maioria das garantias residenciais e apólices de seguro estabelece diretrizes claras para manutenção e reparos do aquecedor de água. Considere estes pontos importantes:
- As garantias residenciais geralmente cobrem reparos e substituições devido ao desgaste normal. No entanto, elas frequentemente excluem problemas causados por negligência, manutenção inadequada ou instalação incorreta.
- A cobertura da garantia normalmente exige que todos os reparos e manutenções sejam realizados por profissionais licenciados. Se você tentar fazer reparos por conta própria, corre o risco de anular sua garantia e perder a cobertura para reivindicações futuras.
- Testes e reparos feitos por conta própria não são recomendados nem cobertos pela maioria dos provedores de garantia. O serviço profissional garante que você atenda a todos os requisitos da apólice.
- Você pode precisar fornecer comprovante de manutenção regular, como descargas anuais do tanque, para manter sua garantia válida.
- As apólices de seguro geralmente não cobrem reparos ou substituições do aquecedor de água, tratando-os como manutenção padrão. Elas podem cobrir danos causados por vazamentos somente se estes forem provocados por um sinistro coberto, como incêndio ou desastre natural.
- As reivindicações podem ser negadas se a seguradora encontrar evidências de desgaste excessivo, falta de manutenção ou instalação inadequada. O trabalho feito por conta própria raramente atende aos padrões exigidos para cobertura.
型号和序列号直接关联到您热水器的规格参数。制造商使用这些编码来追踪设计变更和兼容零件。您可以使用型号在制造商数据库或交叉参考工具中搜索正确的元件。 Dica: Mantenha sempre registros da manutenção e dos reparos profissionais. Esses documentos ajudam você a respaldar reivindicações de garantia ou seguro e demonstram propriedade responsável.
Ao reconhecer quando chamar um profissional, você protege sua casa, sua segurança e seu investimento financeiro.
Dicas de Manutenção Após Testar os Elementos do Aquecedor de Água
Cronograma de Inspeção e Testes Regulares
Com Que Frequência Testar e o Que Observar
Você deve inspecionar e testar os elementos do seu aquecedor de água regularmente para manter o desempenho máximo e prolongar a vida útil da unidade. Especialistas recomendam no mínimo uma inspeção por ano para a maioria dos aquecedores de água elétricos com tanque. No entanto, se sua casa utiliza muita água quente ou você mora em uma região com água dura, pode ser necessário verificar seu sistema a cada três a seis meses.
- Inspeções semestrais ajudam você a identificar sinais precoces de desgaste, corrosão ou acúmulo de sedimentos.
- Calibração anual do termostato garante que seu aquecedor mantenha a temperatura correta.
- Verificações trimestrais podem ser necessárias para residências de alto consumo ou aquelas com água dura.
Durante cada inspeção, verifique:
- Sinais de corrosão nos elementos de aquecimento e no tanque
- Evidências de vazamentos ao redor de válvulas e conexões
- Acúmulo de sedimentos no fundo do tanque
- Ruídos ou odores incomuns durante a operação
- Flutuações na temperatura da água ou redução no fornecimento de água quente
🛠️ Dica: Agende uma inspeção profissional uma vez por ano. Um técnico licenciado pode verificar elementos de aquecimento, termostatos, hastes de ânodo e válvulas de alívio de pressão para garantir que seu sistema opere com segurança e eficiência.
Prevenção de Problemas Futuros
Descarga do Tanque
O acúmulo de sedimentos é uma das principais causas de falha dos elementos do aquecedor de água. Você pode evitar isso descarregando o tanque pelo menos uma vez por ano. A descarga remove minerais e detritos que se acumulam no fundo, o que melhora a transferência de calor e reduz o consumo de energia.
冲洗水箱的步骤:
- Desligue o fornecimento de energia ou gás e aguarde a água esfriar.
- Feche a válvula de abastecimento de água fria.
- Conecte uma mangueira de jardim à válvula de drenagem e direcione-a para uma área de drenagem segura.
- 打开排水阀,让水流至清澈为止。.
- Feche a válvula, remova a mangueira e restaure o fornecimento de água.
💡 Nota: Descarregar o tanque regularmente ajuda a prevenir superaquecimento, prolonga a vida útil dos elementos de aquecimento e mantém seu aquecedor de água funcionando com eficiência.
Lidando com Problemas de Água Dura
A água dura acelera o acúmulo de sedimentos e a corrosão, o que pode reduzir a vida útil dos elementos do seu aquecedor de água. Se você notar incrustações frequentes ou eficiência reduzida, considere estas etapas:
- Instale um amaciador de água para reduzir o teor de minerais.
- Inspecione e substitua a haste de anodo anualmente para proteger contra corrosão interna.
- Aumente a frequência de inspeção para trimestral se a sua região tiver água muito dura.
- Ajuste o termostato para cerca de 120°F para minimizar incrustações e o consumo de energia.
Você também deve isolar o tanque do aquecedor de água e os canos para reduzir a perda de calor e melhorar a eficiência. Corrija prontamente qualquer vazamento encontrado durante as inspeções para evitar danos por água e manter a integridade do sistema.
✅ Dica: A manutenção consistente e a atenção à qualidade da água ajudarão você a evitar reparos dispendiosos e garantir água quente confiável por muitos anos.
Testar os elementos do seu aquecedor de água com segurança e eficiência requer um processo claro:
- Desligue a energia para evitar riscos elétricos.
- Use um multímetro ajustado para ohms para verificar a continuidade do elemento.
- Substitua os elementos apenas por aqueles que correspondam à voltagem e à potência corretas.
Você protege sua casa e mantém a eficiência seguindo estas etapas. A manutenção regular—como a remoção de sedimentos, a inspeção das hastes de anodo e o teste das válvulas de segurança—previne falhas e prolonga a vida útil do seu sistema. Se você se sentir inseguro ou enfrentar problemas complexos, consulte sempre um profissional licenciado.
FAQ
Com que frequência você deve testar os elementos do aquecedor de água?
Você deve testar os elementos do seu aquecedor de água pelo menos uma vez por ano. Se notar água quente inconsistente ou viver em uma área de água dura, aumente a frequência para a cada seis meses.
Você pode testar o elemento do aquecedor de água sem removê-lo?
Sim, você pode testar o elemento sem removê-lo. Desconecte os fios dos terminais e, em seguida, use um multímetro para verificar a resistência diretamente no elemento instalado.
Qual leitura de resistência indica que você precisa substituir o elemento?
Uma leitura de zero ou resistência infinita significa que o elemento está com defeito. Substitua o elemento se a sua leitura estiver fora da faixa típica para o seu modelo, geralmente entre 10 e 30 ohms.
É seguro testar o elemento do aquecedor de água por conta própria?
Você pode testar o elemento com segurança se desligar a energia no disjuntor e verificar com um testador de voltagem. Use sempre luvas isoladas e óculos de segurança para proteção adicional.
Quais ferramentas você precisa para testar o elemento do aquecedor de água?
Você precisa de um multímetro digital, uma chave de fenda e luvas isoladas. Ferramentas opcionais incluem uma chave para elemento de aquecimento e um testador de voltagem para maior segurança.
Por que o elemento do seu aquecedor de água falha com tanta frequência?
Água dura, acúmulo de sedimentos e corrosão causam falhas frequentes nos elementos. A manutenção regular, como a remoção de sedimentos do tanque e a verificação da haste de anodo, ajuda a prolongar a vida útil do elemento.
Um elemento com defeito pode causar contas de energia altas?
Sim. Um elemento com defeito ou parcialmente funcional força o seu aquecedor de água a operar por mais tempo, o que aumenta o consumo de energia e eleva as suas contas de serviços públicos.
Você deve substituir os dois elementos ao mesmo tempo?
Você não precisa substituir ambos os elementos, a menos que ambos apresentem sinais de falha. Se um falhar e o outro for antigo ou estiver corroído, substituir ambos pode prevenir problemas futuros.

