
Puoi sostituire la resistenza di riscaldamento nella tua asciugatrice Whirlpool con gli strumenti giusti e prestando attenzione alla sicurezza. Whirlpool progetta i suoi elettrodomestici per riparazioni facili da eseguire, quindi non sono necessarie competenze avanzate per ripristinare le prestazioni dell'asciugatrice. Scollegare sempre l'asciugatrice Whirlpool dall'alimentazione prima di iniziare. Questo approccio aiuta a prevenire infortuni e garantisce risultati affidabili quando si sostituiscono i componenti della resistenza di riscaldamento.
Segnali che indicano la necessità di sostituire la resistenza di riscaldamento nella tua asciugatrice Whirlpool
Sintomi comuni di guasto della resistenza di riscaldamento nelle asciugatrici Whirlpool
Un'asciugatrice Whirlpool malfunzionante mostra spesso segnali chiari che indicano una resistenza di riscaldamento difettosa. È possibile individuare questi sintomi precocemente e prevenire ulteriori danni all'elettrodomestico.
L'asciugatrice non riscalda
Potresti notare che la tua asciugatrice Whirlpool funziona ma non produce calore. Questo è il sintomo più comune di una resistenza di riscaldamento difettosa. Quando la resistenza si rompe internamente, crea un circuito aperto. Di conseguenza, i tuoi vestiti rimangono umidi dopo un ciclo completo. Secondo i dati sulle riparazioni degli elettrodomestici, la resistenza di riscaldamento causa il 38% dei problemi di mancanza di calore nelle asciugatrici Whirlpool, rendendola la causa principale.
i capi impiegano troppo tempo ad asciugare
Se la tua asciugatrice Whirlpool impiega molto più tempo del solito per asciugare i vestiti, dovresti sospettare un problema con la resistenza di riscaldamento. Una resistenza parzialmente guasta o una resistenza a più bobine con una bobina rotta può ridurre l'efficienza di riscaldamento. Ciò comporta tempi di asciugatura prolungati e un maggiore consumo energetico.
L'asciugatrice si spegne a metà ciclo
Un'asciugatrice Whirlpool che si spegne prima di completare un ciclo potrebbe avere un problema di surriscaldamento. Il surriscaldamento spesso deriva da una resistenza di riscaldamento difettosa o da una ventilazione ostruita. Asciugatrici sovraccariche e scarsa manutenzione possono anche causare il guasto prematuro della resistenza di riscaldamento.
Danni visibili alla resistenza di riscaldamento
A volte, è possibile vedere danni fisici alla resistenza di riscaldamento. Cerca bobine rotte o bruciate all'interno dell'alloggiamento della resistenza. Tuttavia, non tutti i guasti mostrano segni visibili. Potrebbe essere necessario testare l'elemento riscaldante per confermare il problema.
Suggerimento: Una manutenzione regolare aiuta a prevenire molte cause comuni di guasto della resistenza di riscaldamento, come prese d'aria ostruite e asciugatrici sovraccariche.
Come confermare una resistenza di riscaldamento difettosa nell'asciugatrice Whirlpool
Dovresti confermare una resistenza di riscaldamento difettosa prima di sostituirla. Gli esperti di elettrodomestici raccomandano due metodi diagnostici principali.
Ispezione visiva dell’elemento riscaldante
Inizia scollegando l'asciugatrice Whirlpool e rimuovendo il pannello posteriore. Ispeziona la resistenza di riscaldamento per individuare rotture visibili, bruciature o altri danni. Se vedi una bobina rotta o un punto bruciato, hai trovato una resistenza difettosa. Tuttavia, alcuni guasti non sono visibili, quindi è necessario utilizzare un multimetro per una diagnosi più accurata.
Utilizzo di un multimetro per testare la continuità
Per testare la resistenza di riscaldamento, segui questi passaggi:
- Scollega i cavi dalla resistenza di riscaldamento dell'asciugatrice Whirlpool .
- Imposta il multimetro sulla modalità di continuità o ohm.
- Posiziona le sonde sui terminali della resistenza.
- Se il multimetro mostra continuità, la resistenza è integra. In caso contrario, hai una resistenza difettosa.
- Testa tra ciascun terminale e l'involucro metallico. Non dovresti trovare continuità qui. Se la trovi, la resistenza è a massa e deve essere sostituita.
- Se la resistenza supera questi test ma la tua asciugatrice Whirlpool continua a non riscaldare, controlla componenti correlati come il fusibile termico, il termostato e la scheda di controllo.
Nota: Utilizza sempre ricambi di qualità per la resistenza di riscaldamento della tua asciugatrice Whirlpool per evitare guasti ripetuti.
Puoi prevenire la maggior parte dei guasti della resistenza di riscaldamento mantenendo la tua asciugatrice Whirlpool. Evita il sovraccarico, pulisci regolarmente il filtro lanugine e la ventola e affronta tempestivamente eventuali rumori insoliti o problemi di prestazioni. Questi passaggi aiutano a prolungare la vita della tua asciugatrice Whirlpool e a mantenerla efficiente.
Strumenti e componenti necessari per sostituire la resistenza di riscaldamento dell'asciugatrice Whirlpool
Prima di iniziare per sostituire la resistenza di riscaldamento della tua asciugatrice Whirlpool, devi procurarti gli strumenti giusti e i ricambi necessari. Utilizzare l'attrezzatura corretta garantisce un processo di riparazione fluido, sicuro ed efficiente. Riduci anche il rischio di danneggiare l'asciugatrice Whirlpool o i suoi componenti.
Strumenti essenziali per la riparazione dell'asciugatrice
Dovresti preparare un set di strumenti di base prima di iniziare la riparazione della tua asciugatrice Whirlpool. Questi strumenti ti aiutano ad accedere, rimuovere e installare la resistenza di riscaldamento senza causare danni all'elettrodomestico.
Cacciaviti a croce e a testa piatta
Utilizzerai sia cacciaviti a croce che a testa piatta per rimuovere e riattaccare i pannelli della tua asciugatrice Whirlpool. Questi cacciaviti si adattano alla maggior parte delle viti presenti sull'esterno e sull'interno dell'elettrodomestico.
Chiave a bussola da 1/4″ o set di prese
Un avvitatore a bussola da 1/4" o un set di chiavi a bussola ti consente di rimuovere dadi e bulloni che fissano l'alloggiamento della resistenza di riscaldamento. Le asciugatrici Whirlpool utilizzano spesso questi elementi di fissaggio per montare i componenti interni.
Multimetro
Un multimetro è essenziale per testare la resistenza di riscaldamento dell'asciugatrice Whirlpool e i componenti correlati. Puoi verificare la continuità della resistenza, del fusibile termico e del termostato. Questo passaggio ti aiuta a confermare quale componente deve essere sostituito.
Guanti da lavoro
I guanti da lavoro proteggono le mani da bordi taglienti e superfici calde all'interno dell'asciugatrice Whirlpool. Indossa sempre i guanti per prevenire infortuni durante la riparazione.
Suggerimento: Organizza i tuoi strumenti prima di iniziare. Posizionali a portata di mano per evitare ritardi inutili durante la riparazione.
Parti di ricambio per asciugatrice Whirlpool
La selezione delle parti di ricambio corrette è fondamentale per ripristinare le prestazioni della tua asciugatrice Whirlpool. Scegli sempre parti OEM (Original Equipment Manufacturer) per la migliore vestibilità e durata.
Elemento riscaldante compatibile per asciugatrice Whirlpool (es. parte 279838)
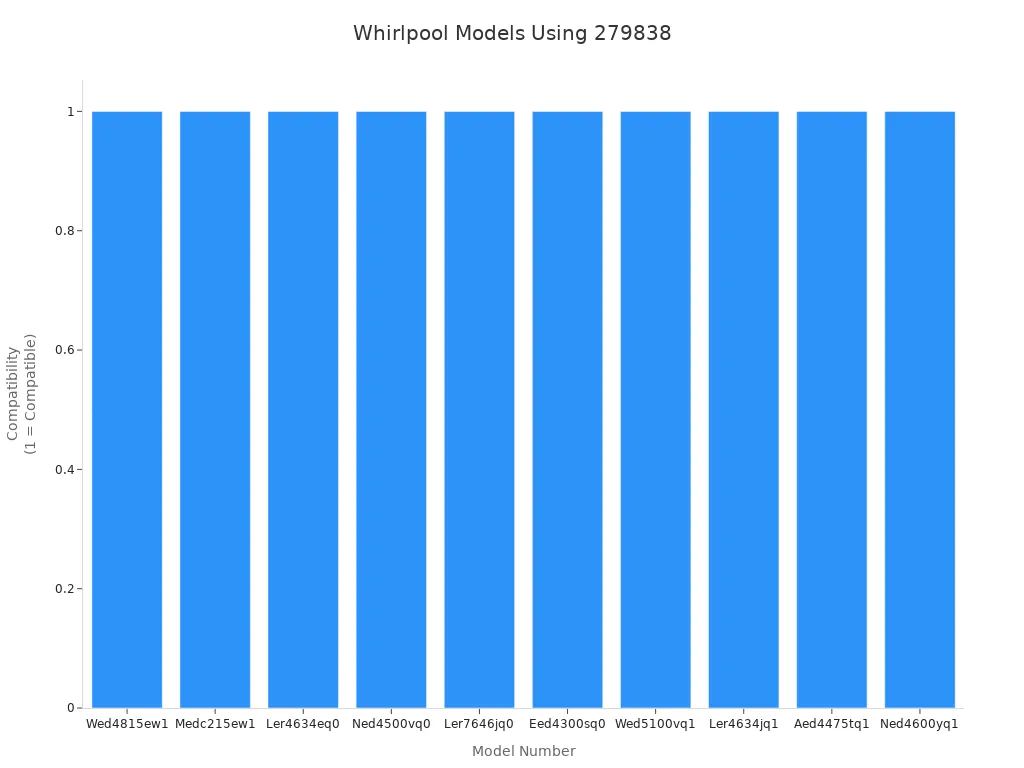
L'elemento riscaldante più comune per asciugatrice Whirlpool è la parte 279838. Questo elemento riscaldante si adatta a molti modelli popolari di asciugatrici Whirlpool, inclusi Wed4815ew1, Medc215ew1 e Ler4634eq0. Puoi anche trovare alternative compatibili come W10724237, 8565582 e 279838VP. Questi elementi riscaldanti sono realizzati con materiale in nichel di alta qualità per durata e facile installazione. Molti kit includono un fusibile termico, un termistore e un termostato per una riparazione completa.
Puoi acquistare parti originali dell'elemento riscaldante per asciugatrice Whirlpool da fonti ufficiali come WhirlpoolParts.com. Questo distributore offre un'ampia selezione di parti OEM, spedizione in giornata successiva e una politica di reso di 365 giorni. Troverai anche video didattici e supporto clienti per guidarti attraverso il processo.
| Parte di ricambio | Descrizione e note |
|---|---|
| Gruppo elemento riscaldante | Componente principale da sostituire quando l'asciugatrice non riscalda correttamente; spesso presenta una rottura nella bobina se difettoso. |
| Elemento radiante di superficie | Parte del sistema di riscaldamento, talvolta sostituito insieme all'elemento riscaldante. |
| Termostato riscaldatore | Controlla la temperatura; si consiglia di verificarlo e sostituirlo se difettoso. |
| Fusibile Termico | Causa comune di guasto al riscaldamento; deve essere controllato prima di sostituire l'elemento riscaldante. |
| Interruttore termico di sicurezza | Dispositivo di sicurezza che potrebbe richiedere sostituzione se i problemi di riscaldamento persistono. |
| Terminali di cablaggio | Potrebbero richiedere sostituzione se danneggiati durante la manutenzione. |
Opzionale: nuovo fusibile termico o termostato
Potrebbe essere necessario sostituire il fusibile termico o il termostato se la tua asciugatrice Whirlpool continua ad avere problemi di riscaldamento. Questi componenti spesso si guastano insieme all'elemento riscaldante. Testarli con un multimetro ti aiuta a identificare le parti difettose. Molti kit di riparazione includono questi articoli per tua comodità.
Nota: Scollega sempre la tua asciugatrice Whirlpool prima della manutenzione. Scollega con attenzione i cavi e annota le loro posizioni per garantire un corretto riassemblaggio.
Preparando gli strumenti e le parti giuste, ti prepari per una riparazione Whirlpool di successo Sostituzione elemento riscaldante asciugatrice. Questo approccio fa risparmiare tempo e ti aiuta a ripristinare le prestazioni ottimali della tua asciugatrice Whirlpool.
Passaggi di sicurezza prima di rimuovere l'elemento riscaldante dalla tua asciugatrice
Prima di iniziare qualsiasi riparazione sulla tua asciugatrice Whirlpool, devi adottare importanti misure di sicurezza. Queste precauzioni ti proteggono da scosse elettriche, perdite di gas e lesioni accidentali. Seguire le migliori pratiche garantisce un processo di riparazione fluido e sicuro.
Scollegamento dell'alimentazione e preparazione dell'asciugatrice Whirlpool
Scollegare l'asciugatrice e garantire nessuna connessione elettrica
Devi sempre scollegare l'asciugatrice dalla fonte di alimentazione prima di iniziare qualsiasi riparazione. Questo passaggio previene i pericoli elettrici e ti mantiene al sicuro durante il processo. Segui questi passaggi per garantire che la tua asciugatrice sia completamente isolata dall'elettricità:
- Staccare la spina dell'asciugatrice dalla presa elettrica.
- Scollega il cavo di messa a terra per ridurre ulteriormente il rischio di scosse elettriche.
- Indossa dispositivi di protezione, come guanti e occhiali di sicurezza, per proteggere mani e occhi da lesioni.
Suggerimento: Non tentare mai di testare o maneggiare cavi sotto tensione. Usa guanti isolanti e strumenti non conduttivi quando lavori vicino a componenti elettrici.
Precauzioni per asciugatrici a gas, se applicabile
Se hai un'asciugatrice a gas, devi adottare precauzioni extra per prevenire perdite di gas o incidenti. Spegni sempre l'alimentazione del gas prima di spostare o riparare l'elettrodomestico. Ecco i passaggi consigliati:
- Chiudi la valvola di alimentazione del gas sul tubo di alimentazione.
- Assicurati che il gas sia completamente spento prima di scollegare la linea del gas o spostare l'asciugatrice.
- Spegni sempre l'alimentazione del gas prima di eseguire qualsiasi lavoro elettrico.
Nota: Consulta il tuo manuale utente per istruzioni specifiche relative al modello della tua asciugatrice a gas.
Allestimento di uno spazio di lavoro sicuro per la riparazione dell'asciugatrice
Liberare l'area intorno all'asciugatrice
Uno spazio di lavoro pulito e organizzato ti aiuta a evitare incidenti e rende il processo di riparazione più efficiente. Segui i seguenti passaggi per preparare la tua area:
- Libera l'area intorno all'asciugatrice da qualsiasi ingombro, strumenti o biancheria.
- Tieni bambini e animali domestici lontani dallo spazio di lavoro.
- Assicurati che l'area sia ben illuminata per poter vedere chiaramente tutti i componenti.
- Consentire all'asciugatrice di raffreddarsi se è stata utilizzata di recente.
Organizzare gli attrezzi e i pezzi di ricambio
Un'organizzazione corretta degli attrezzi e dei pezzi di ricambio semplifica la riparazione e riduce il rischio di smarrire componenti di piccole dimensioni. Seguire queste buone pratiche:
- Disporre tutti gli attrezzi necessari, come cacciaviti, chiavi a bussola e un multimetro, a portata di mano.
- Posizionare i pezzi di ricambio, come l'elemento riscaldante e il fusibile termico, su una superficie pulita.
- Indossare guanti isolanti per proteggere le mani da bordi taglienti e rischi elettrici.
- Maneggiare tutti i componenti con delicatezza per evitare danni.
Promemoria di sicurezza: Consultare sempre il manuale d'uso dell'asciugatrice per eventuali istruzioni di sicurezza o installazione specifiche per il modello.
Seguendo questi passaggi di sicurezza, si riducono al minimo i rischi e si creano le condizioni per un intervento Sostituzione dell'elemento riscaldante dell'asciugatrice Whirlpool.
Come rimuovere l'elemento riscaldante da un'asciugatrice Whirlpool
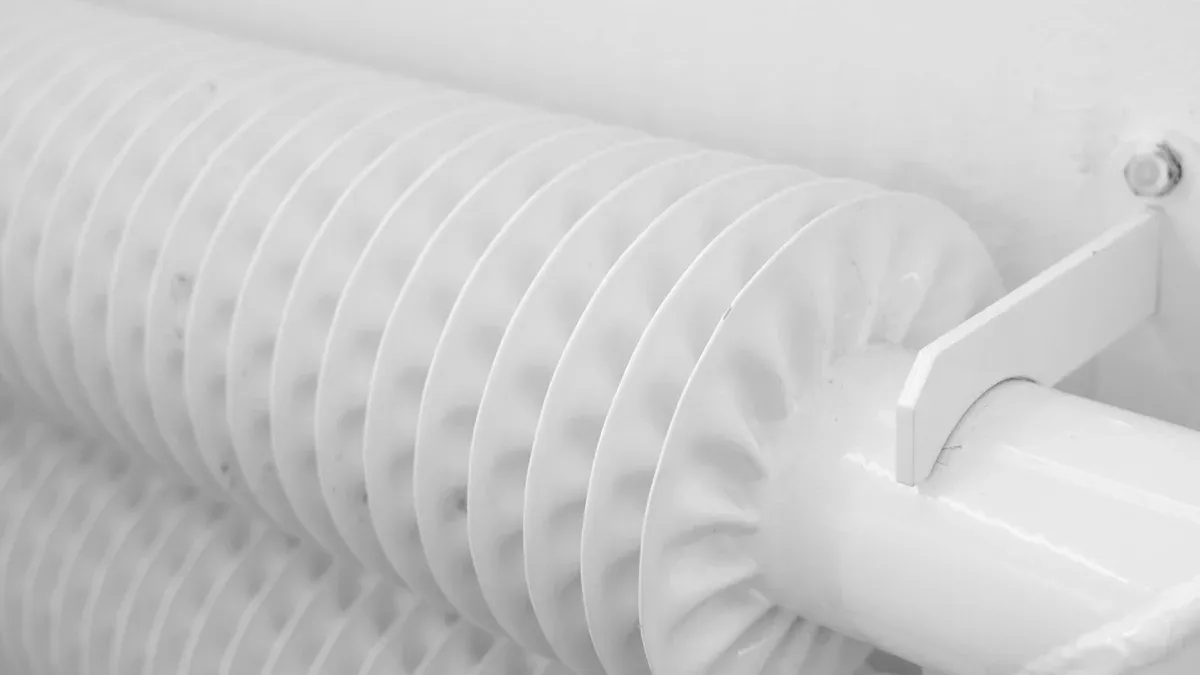
Quando è necessario rimuovere l'elemento riscaldante dall'asciugatrice Whirlpool, è necessario seguire un approccio sistematico. Le asciugatrici Whirlpool sono disponibili in diversi modelli, ma la maggior parte condivide punti di accesso e fasi di rimozione simili. È possibile completare questa riparazione con attrezzi di base e attenzione ai dettagli.
Accesso all'elemento riscaldante dell'asciugatrice Whirlpool
Rimozione del pannello posteriore o sollevamento del pannello superiore/anteriore
È necessario innanzitutto accedere all'interno dell'asciugatrice Whirlpool. Il metodo dipende dal modello specifico, ma la maggior parte delle asciugatrici Whirlpool consente l'accesso tramite il pannello posteriore o il pannello superiore/anteriore.
- Scollegare l'asciugatrice dalla fonte di alimentazione. Iniziare sempre scollegando l'asciugatrice per prevenire scosse elettriche.
- Allontanare l'asciugatrice dalla parete per creare spazio di lavoro sufficiente.
- Per molti modelli Whirlpool, è possibile rimuovere il pannello di accesso anteriore inferiore. Inserire una spatola sotto lo sportello dell'asciugatrice per rilasciare le clip su ciascun lato. Rimuovere delicatamente il pannello facendo leva.
- Alcuni modelli richiedono la rimozione del filtro per lanugine e delle viti che fissano il pannello superiore. Dopo aver rimosso queste viti, sollevare delicatamente il pannello superiore e ribaltarlo all'indietro.
- Se il modello richiede l'accesso posteriore, rimuovere le viti che fissano il pannello posteriore. Mettere da parte il pannello con cura.
Suggerimento: Scattare foto a ogni fase durante l'intervento. Queste immagini aiutano a ricordare come rimontare l'asciugatrice Whirlpool in seguito.
Individuazione dell'alloggiamento dell'elemento riscaldante
Una volta aperta l'asciugatrice, è necessario individuare l'alloggiamento dell'elemento riscaldante. Nella maggior parte delle asciugatrici Whirlpool, l'elemento riscaldante si trova sul lato destro o nella parte posteriore inferiore dell'apparecchio. L'alloggiamento ha spesso l'aspetto di un contenitore o supporto metallico. Potrebbero essere visibili cavi collegati ai termostati e all'elemento riscaldante stesso.
- Cercare un alloggiamento metallico con diversi cavi collegati.
- Identificare le viti di montaggio o le clip che fissano l'alloggiamento in posizione.
- Assicurarsi di avere un accesso chiaro all'elemento riscaldante prima di procedere.
Nota: L'alloggiamento dell'elemento riscaldante potrebbe essere caldo se l'asciugatrice è stata utilizzata di recente. Lasciarlo raffreddare prima di toccare qualsiasi componente.
Fasi per rimuovere l'elemento riscaldante difettoso
Scollegamento dei cavi e rimozione delle viti di montaggio o delle clip
È necessario scollegare l'elemento riscaldante dall'asciugatrice prima di poterlo rimuovere. Seguire questi passaggi per un processo sicuro ed efficiente:
- Contrassegnare o fotografare i collegamenti dei cavi. Questo passaggio garantisce di ricollegare correttamente i cavi durante il rimontaggio.
- Scollegare con attenzione tutti i cavi collegati all'elemento riscaldante, al termostato di limite massimo e al fusibile termico. Utilizzare pinze a becco lungo se necessario, evitando di tirare direttamente i cavi.
- Individuare le viti o le clip che fissano l'alloggiamento dell'elemento riscaldante. La maggior parte delle asciugatrici Whirlpool utilizza viti da 1/4" o 5/16".
- Rimuovere le viti o rilasciare le clip che tengono in posizione l'elemento riscaldante. Mettere da parte l'hardware per il riutilizzo.
Avviso di sicurezza: Indossare sempre guanti da lavoro e occhiali di sicurezza quando si opera all'interno dell'asciugatrice Whirlpool. I bordi affilati e i componenti elettrici possono causare lesioni.
Estrazione accurata del vecchio elemento riscaldante
Dopo aver scollegato i cavi e rimosso l'hardware di montaggio, è possibile rimuovere l'elemento riscaldante dall'asciugatrice.
- Estrarre delicatamente l'elemento riscaldante dal suo alloggiamento. Evitare di piegare o danneggiare il contenitore metallico.
- Ispezionare l'elemento per individuare segni visibili di danni, come bobine rotte o segni di bruciatura. Se si notano questi problemi, è confermato che l'elemento riscaldante è difettoso.
- Mettere da parte il vecchio elemento riscaldante per lo smaltimento o il riciclaggio.
Il processo di rimozione dell'elemento riscaldante dall'asciugatrice Whirlpool è ora completato. Questo passaggio prepara all'installazione di un nuovo elemento riscaldante Whirlpool e al ripristino del funzionamento dell'apparecchio. .
Consiglio professionale: Conservare tutte le viti, le clip e i piccoli componenti in un contenitore. Questa pratica previene lo smarrimento e facilita notevolmente il rimontaggio.
Come sostituire l'elemento riscaldante nell'asciugatrice Whirlpool
Sostituzione dell'elemento riscaldante nell'asciugatrice Whirlpool Ripristina un'asciugatura efficiente e prolunga la durata del tuo elettrodomestico. È necessario seguire un approccio sistematico per garantire una sostituzione sicura e riuscita dell'elemento riscaldante. Questa sezione ti guida nell'installazione del nuovo componente e nel riassemblaggio dell'asciugatrice per prestazioni ottimali.
Installazione del nuovo elemento riscaldante per asciugatrice Whirlpool
Trasferimento del termostato di limite massimo, se necessario
Prima di installare il nuovo elemento riscaldante, verifica se il vecchio termostato di limite massimo deve essere trasferito. Molti modelli Whirlpool utilizzano un termostato fissato direttamente al gruppo elemento riscaldante. Se il tuo elemento riscaldante di ricambio non include un nuovo termostato, devi spostare quello esistente.
- Rimuovere le viti che fissano il termostato di limite massimo al vecchio elemento riscaldante.
- Sollevare delicatamente il termostato dal vecchio gruppo.
- Allineare il termostato con i fori di montaggio sul nuovo elemento riscaldante.
- Fissarlo utilizzando le viti originali.
Suggerimento: Maneggiare il termostato con cura. Evitare di piegare i terminali o danneggiare il sensore.
Il trasferimento del termostato garantisce che l'asciugatrice mantenga temperature di esercizio sicure dopo la sostituzione dei componenti dell'elemento riscaldante.
Posizionamento e fissaggio del nuovo elemento riscaldante
Una volta preparato il nuovo elemento riscaldante, posizionarlo all'interno dell'asciugatrice. Whirlpool consiglia i seguenti passaggi per un'installazione corretta:
- Far scorrere il nuovo elemento riscaldante nel tubo o alloggiamento di riscaldamento, assicurandosi che si inserisca saldamente.
- Allineare i fori di montaggio sull'elemento riscaldante con quelli sull'alloggiamento dell'asciugatrice.
- Inserire e serrare le viti o le clip per fissare l'elemento riscaldante in posizione.
Evitare di serrare eccessivamente le viti. Ciò previene danni all'alloggiamento metallico e garantisce una tenuta stabile. Un elemento riscaldante montato correttamente riduce le vibrazioni e migliora la distribuzione del calore.
Ricollegamento dei cavi e dell'hardware di montaggio
Dopo aver fissato il nuovo elemento riscaldante, ricollegare tutti i cavi e l'hardware. Utilizzare le foto o le etichette create durante lo smontaggio per abbinare ogni cavo al terminale corretto.
- Collegare i cavi ai terminali dell'elemento riscaldante, al termostato di limite massimo e al fusibile termico, se presente.
- Verificare che ogni collegamento sia saldo e completamente inserito.
- Ricontrollare che nessun cavo sia schiacciato o a contatto con superfici metalliche.
Nota: Un cablaggio corretto è fondamentale per un funzionamento sicuro. Collegamenti errati possono causare malfunzionamenti dell'asciugatrice o creare un rischio di incendio.
Il completamento di questi passaggi garantisce che la sostituzione dell'elemento riscaldante sia sia sicura che efficace. Hai ora terminato la parte principale del processo per sostituire i componenti dell'elemento riscaldante nella tua asciugatrice Whirlpool.
Riassemblaggio dell'asciugatrice dopo la sostituzione dell'elemento riscaldante
Riaggancio dei pannelli e ricontrollo dei collegamenti
Con il nuovo elemento riscaldante installato, è necessario riassemblare l'asciugatrice. Whirlpool consiglia un approccio attento per evitare di tralasciare qualsiasi passaggio.
- Riagganciare il pannello posteriore o anteriore allineandolo con le clip di montaggio o i fori delle viti.
- Fissare il pannello utilizzando le viti originali. Serrare ciascuna vite in modo uniforme per evitare spazi vuoti.
- Abbassare il pannello superiore se era stato sollevato in precedenza e bloccarlo in posizione.
- Reinstallare l'alloggiamento del filtro per lanugine e inserire lo schermo per lanugine.
- Ispezionare ancora una volta tutti i collegamenti elettrici. Assicurarsi che ogni terminale sia saldo e corrisponda alla sua posizione originale.
Controllo di Sicurezza: Prima di ripristinare l'alimentazione, eseguire un'ispezione visiva finale. Cercare viti allentate, cavi fuori posto o componenti posizionati erroneamente.
Una volta terminato il riassemblaggio, riportare l'asciugatrice nella sua posizione. Ricollegare il tubo di ventilazione e collegare l'asciugatrice alla presa di corrente. Per i modelli a gas, riaprire l'alimentazione del gas.
Ora, eseguire un ciclo di prova con l'asciugatrice vuota. Impostare un ciclo con calore e lasciarlo funzionare per alcuni minuti. Verificare il corretto riscaldamento e ascoltare eventuali rumori insoliti. Se l'asciugatrice si riscalda e funziona senza problemi, la sostituzione dell'elemento riscaldante è riuscita.
Se si notano problemi, scollegare l'asciugatrice e rivedere i passaggi di installazione. Ricontrollare tutti i collegamenti e l'hardware di montaggio.
Hai ora completato il processo per sostituire i componenti dell'elemento riscaldante nella tua asciugatrice Whirlpool. Questo approccio attento garantisce prestazioni affidabili e prolunga la durata del tuo elettrodomestico.
Verifica dell'asciugatrice dopo la sostituzione dell'elemento riscaldante
Dopo aver installare un nuovo elemento riscaldante nella tua asciugatrice Whirlpool, è necessario verificare che la riparazione sia riuscita. Una verifica adeguata garantisce che l'asciugatrice funzioni in modo sicuro ed efficiente. Confermi inoltre che non esistano altri problemi prima di riportare l'elettrodomestico all'uso regolare.
Esecuzione di un ciclo di prova sulla tua asciugatrice Whirlpool
Accensione e verifica del corretto riscaldamento
È necessario seguire un approccio sistematico quando si accende l'asciugatrice per la prima volta dopo una riparazione. Questo processo aiuta a individuare tempestivamente eventuali problemi e previene ulteriori danni.
- Collegare l'asciugatrice alla presa elettrica. Per i modelli a gas, riaprire l'alimentazione del gas.
- Avviare un ciclo di asciugatura a tempo con l'asciugatrice vuota. Ascoltare eventuali suoni insoliti e controllare eventuali odori anomali. Questi segnali possono indicare un problema con l'installazione.
- Osservare l'asciugatrice durante il funzionamento. Si dovrebbe percepire la temperatura all'interno del tamburo aumentare costantemente. Posizionare la mano vicino allo sfiato per verificare il flusso d'aria calda. Questo passaggio conferma che l'elemento riscaldante funziona come previsto.
- Eseguire un piccolo carico di biancheria per testare l'elemento riscaldante in condizioni normali. Monitorare il tempo di asciugatura. I capi dovrebbero asciugarsi entro un ciclo tipico.
- Osservare i segni di surriscaldamento. Se l'asciugatrice diventa eccessivamente calda o si spegne inaspettatamente, interrompere il ciclo e ispezionare il termostato e i componenti correlati.
- Ripetere il ciclo di prova più volte. Prestazioni costanti su più cicli dimostrano che l'asciugatrice è affidabile e che la riparazione è completa.
Suggerimento: Rimanere sempre nelle vicinanze durante il primo ciclo di prova. Un'attenzione immediata a qualsiasi problema può prevenire ulteriori complicazioni.
Risoluzione dei problemi se l'asciugatrice non riscalda ancora
Anche dopo aver sostituito l'elemento riscaldante, l'asciugatrice potrebbe non riscaldare correttamente. È necessario utilizzare un processo strutturato di risoluzione dei problemi per identificare la causa. Questo approccio fa risparmiare tempo e aiuta a evitare riparazioni non necessarie.
Ispezione del fusibile termico, del termostato e del cablaggio
Se l'asciugatrice non produce calore, iniziare la risoluzione dei problemi controllando il fusibile termico. Un fusibile bruciato interrompe il circuito e impedisce all'asciugatrice di riscaldare. Utilizzare un multimetro per testare la continuità. Se il fusibile è difettoso, sostituirlo.
Successivamente, ispezionare il termostato. Un termostato difettoso può causare surriscaldamento o mancato riscaldamento dell'asciugatrice. Testare il termostato con un multimetro e sostituirlo se necessario.
Esaminare tutte le connessioni del cablaggio. Fili allentati o danneggiati possono interrompere l'alimentazione all'elemento riscaldante. Fissare eventuali connessioni allentate e sostituire i fili danneggiati. Testare nuovamente l'elemento riscaldante per confermare che funzioni correttamente.
Nota: Scollegare sempre l'asciugatrice prima di eseguire qualsiasi fase di risoluzione dei problemi che coinvolga componenti elettrici.
Quando chiamare un professionista per la riparazione dell'asciugatrice
Alcuni problemi dell'asciugatrice richiedono una risoluzione avanzata o strumenti specializzati. Se si sono controllati il fusibile termico, il termostato e il cablaggio ma l'asciugatrice non riscalda ancora, potrebbe essere necessario l'aiuto di un professionista. Chiamare un tecnico certificato per elettrodomestici se si incontrano:
- Problemi di riscaldamento persistenti dopo più riparazioni
- Problemi elettrici che non si riescono a risolvere in sicurezza
- Segni di perdite di gas nelle asciugatrici a gas
- Rumori insoliti o odori di bruciato durante il funzionamento
Un professionista può diagnosticare problemi complessi e garantire che l'asciugatrice funzioni in sicurezza. Si protegge il proprio investimento e si evitano ulteriori danni cercando assistenza esperta quando necessario.
Promemoria di sicurezza: Non ignorare mai problemi persistenti dell'asciugatrice. Una risoluzione tempestiva e il supporto professionale aiutano a mantenere un funzionamento sicuro ed efficiente.
Costo di sostituzione dell'elemento riscaldante dell'asciugatrice Whirlpool, durata e valore
Costi tipici per parti e strumenti
Fascia di prezzo per elementi riscaldanti e strumenti
Quando si pianifica di sostituire un elemento riscaldante nell'asciugatrice, è necessario comprendere i costi tipici sia per le parti che per gli strumenti. La maggior parte degli elementi riscaldanti per asciugatrici Whirlpool costa tra $59 e $170, a seconda del modello e della fonte. Alcune parti specializzate, come la WP8182528, possono raggiungere fino a $191,30. Sono inoltre necessari strumenti di base come un cacciavite multiplo e una spatola. Questi strumenti costano solitamente tra $28,92 e $63,40.
| Descrizione articolo | Fascia di Prezzo (USD) | Note |
|---|---|---|
| Elemento riscaldante per asciugatrice Whirlpool (OEM 279838) | $59.00 | Gruppo elemento riscaldante con bobina e isolatori |
| Elemento riscaldante per asciugatrice Whirlpool (varie parti OEM) | $59,00 – $170+ | I prezzi variano in base al numero di parte e alla fonte |
| Cacciavite multiplo (strumento necessario) | Circa $28,92 | Strumento richiesto per l'installazione |
| Spatola (strumento necessario) | $28,92 – $63,40 | Utile per la rimozione dei pannelli e la pulizia dello sfiato |
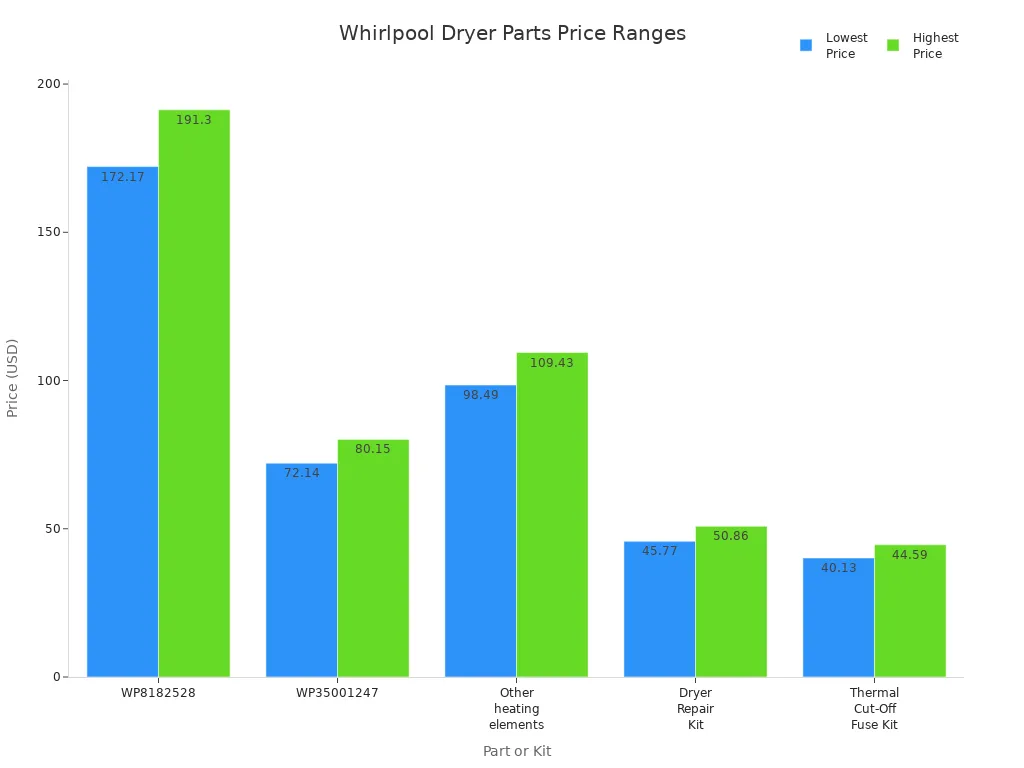
Confronto dei costi tra riparazione fai-da-te e professionale
È possibile risparmiare denaro sostituendo da soli l'elemento riscaldante dell'asciugatrice. La parte costa solitamente $70 a $150. Non si pagherà la manodopera se si esegue il lavoro. Al contrario, un servizio di riparazione professionale addebita $60 a $150 all'ora per la manodopera, con costi totali che vanno da $100 a $350. La maggior parte dei proprietari di casa paga circa $230 per una riparazione professionale dell'asciugatrice. La tabella seguente confronta le due opzioni:
| Aspetto | Sostituzione fai-da-te | Servizio di riparazione professionale |
|---|---|---|
| Costo dei componenti | $70 a $150 (solo elemento riscaldante) | Incluso nel costo totale |
| Costo della manodopera | $0 (eseguito da sé) | $60 a $150 all'ora |
| Fascia di Costo Totale | $70 a $150 | $100 a $350 (media circa $230) |
| Note Aggiuntive | Richiede diagnosi e competenza tecnica | Possono applicarsi spese di manodopera e costi minimi; garantisce sicurezza ed efficacia |
Se si dispone di strumenti di base e si seguono le fasi di sicurezza, si può completare la sostituzione dell'elemento riscaldante dell'asciugatrice a un costo inferiore rispetto all'assunzione di un professionista.
Durata dell'Elemento Riscaldante dell'Asciugatrice Whirlpool
Anni medi di utilizzo e fattori che influenzano la longevità
Un tipico elemento riscaldante di un'asciugatrice Whirlpool dura tra i 5 e i 15 anni. La durata effettiva dipende da come si utilizza e si mantiene l'asciugatrice. Se si pulisce il filtro per i pelucchi dopo ogni carico, si contribuisce a prevenire il surriscaldamento. La pulizia annuale dello sfiato di scarico riduce inoltre il rischio di accumulo di pelucchi, che può causare il guasto dell'elemento riscaldante. Si dovrebbe evitare di sovraccaricare l'asciugatrice e utilizzare le impostazioni di calore corrette per ridurre lo stress sull'elemento. Se il fusibile termico si guasta, l'elemento riscaldante può bruciarsi ripetutamente. La sostituzione del fusibile termico e la manutenzione delle parti correlate, come i condotti di sfiato e i rulli, contribuiranno a prolungare la vita dell'asciugatrice.
La manutenzione regolare e un uso corretto sono i modi migliori per massimizzare la durata dell'elemento riscaldante dell'asciugatrice.
Vale la pena sostituire l'elemento riscaldante nella propria asciugatrice?
Quando riparare o sostituire l'asciugatrice Whirlpool
Si dovrebbero considerare diversi fattori prima di decidere se riparare o sostituire l'asciugatrice. Se l'asciugatrice è relativamente nuova e in buone condizioni, la sostituzione dell'elemento riscaldante è di solito la scelta migliore. Il costo della riparazione, inclusi ricambi e manodopera, varia spesso da $100 a $200, che è molto inferiore all'acquisto di una nuova asciugatrice. Se l'asciugatrice presenta altri componenti usurati o ha più di 10 anni, la sostituzione può essere più pratica. Si dovrebbe anche considerare l'efficienza energetica. Le asciugatrici più recenti consumano meno energia e possono far risparmiare denaro nel tempo. Controllare sempre termostato, cablaggio e ventilazione prima di prendere una decisione. Se l'asciugatrice ha una storia di prestazioni affidabili e viene mantenuta bene, la sostituzione dell'elemento riscaldante può ripristinare la piena funzionalità per molti altri anni.
Si può spesso prolungare la vita dell'asciugatrice con una semplice sostituzione dell'elemento riscaldante, ma se l'elettrodomestico mostra molteplici segni di invecchiamento, investire in un nuovo modello può offrire un valore migliore.
Consigli di manutenzione per l'elemento riscaldante dell'asciugatrice Whirlpool
Una corretta manutenzione dell'elemento riscaldante dell'asciugatrice garantisce che l'elettrodomestico funzioni in modo efficiente e sicuro. Si possono prevenire la maggior parte dei guasti dell'elemento riscaldante seguendo alcune routine essenziali di pulizia e cura.
Pulizia e cura per prevenire problemi futuri
Manutenzione del filtro per pelucchi e dello sfiato
Si dovrebbe sempre mantenere puliti il filtro per pelucchi e il sistema di sfiato. L'accumulo di pelucchi limita il flusso d'aria, causando il surriscaldamento dell'asciugatrice e aumentando il rischio di guasto dell'elemento riscaldante. Seguire questi passaggi per mantenere prestazioni ottimali:
- Pulisci il filtro lanugine prima e dopo ogni carico. Questa semplice abitudine impedisce ai pelucchi di entrare nel sistema di sfiato e riduce i rischi di incendio.
- Ispezionare e pulire il sistema di sfiato dell'asciugatrice almeno una volta all'anno. Rimuovere pelucchi e detriti dall'intero condotto, incluso lo sfiato di scarico all'esterno dell'abitazione.
- Utilizzare solo materiali metallici per i condotti di sfiato. I condotti metallici resistono ai danni e riducono l'accumulo di pelucchi rispetto ai tubi in plastica o pellicola.
- Mantenere lo sfiato il più corto e dritto possibile. I condotti lunghi o curvi intrappolano più pelucchi e limitano il flusso d'aria.
- Evitare di spingere l'asciugatrice troppo vicino alla parete. Questo previene pieghe o schiacciamenti del tubo di collegamento, che possono bloccare il flusso d'aria.
Il flusso d'aria regolare è fondamentale. Le asciugatrici richiedono circa 120 piedi cubi al minuto (CFM) di flusso d'aria, e i sistemi di sfiato sono progettati per circa 150 CFM attraverso un condotto da 4 pollici.
La tabella seguente riassume gli intervalli di pulizia consigliati:
| Componente | Frequenza di pulizia | Note |
|---|---|---|
| Filtro per lanugine | Dopo ogni carico | La rimozione regolare previene l'accumulo e mantiene l'efficienza di asciugatura. |
| Alloggiamento del filtro per pelucchi | Circa ogni 6 mesi | Si consiglia una pulizia più profonda, soprattutto se le prestazioni di asciugatura diminuiscono. |
| Sfiato dell'asciugatrice | Ogni 1-3 anni (linea guida generale) | La frequenza dipende dall'uso, dalla lunghezza dello sfiato e dalle specifiche del sistema. |
| Sfiato dell'asciugatrice | Annualmente (requisito di garanzia di alcuni produttori) | Per mantenere la copertura della garanzia, può essere richiesta una pulizia annuale. |
| Sfiato dell'asciugatrice | Ogni 6-9 mesi (uso intenso o condotti lunghi) | È necessaria una pulizia più frequente per un uso intenso o sistemi di sfiato più lunghi. |
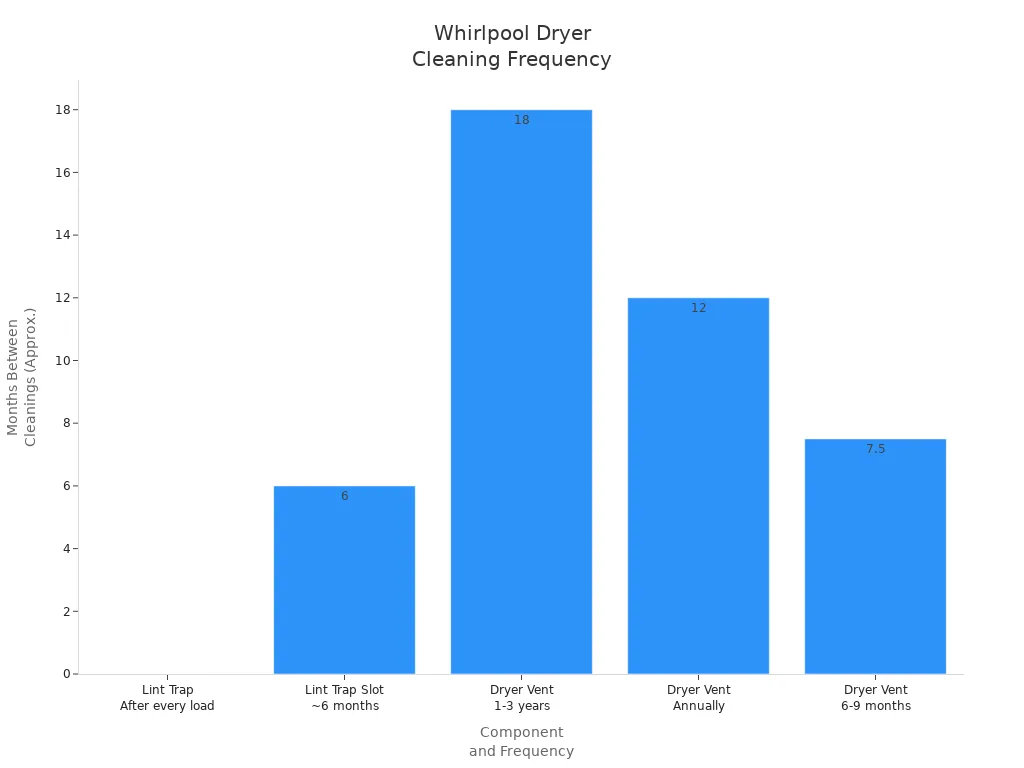
Whirlpool raccomanda di pulire lo sfiato dell'aria dell'asciugatrice almeno una volta ogni due anni. Se si hanno animali domestici, condotti lunghi o un volume elevato di bucato, aumentare la frequenza.
Pulizia interna periodica
Si dovrebbe programmare una pulizia interna periodica per rimuovere i pelucchi che sfuggono al filtro e si depositano all'interno dell'asciugatrice. La manutenzione professionale annuale aiuta a rimuovere i pelucchi in eccesso con l'aspirapolvere, ispezionare lo sfiato e controllare i componenti elettrici, incluso l'elemento riscaldante. Questa cura preventiva mantiene l'asciugatrice funzionante in sicurezza e riduce il rischio di guasti futuri.
Buone pratiche per l'uso dell'asciugatrice Whirlpool
Evitare sovraccarichi e monitorare i tempi di asciugatura
Puoi prolungare la durata dell'elemento riscaldante dell'asciugatrice utilizzando correttamente l'elettrodomestico. Segui queste buone pratiche:
- Evitare di sovraccaricare l’asciugatrice. I carichi di grandi dimensioni costringono l'elemento riscaldante a lavorare di più, aumentando il rischio di surriscaldamento.
- Monitora i tempi di asciugatura. Se i capi impiegano più tempo ad asciugarsi, verifica la presenza di ostruzioni nel flusso d'aria o accumuli di lanugine.
- Mantieni un flusso d'aria adeguato pulendo regolarmente le prese d'aria e i filtri della lanugine.
- Non lasciare mai l'asciugatrice in funzione incustodita. Ciò riduce il rischio di incendio e ti consente di rispondere rapidamente a qualsiasi problema.
- Pianifica ispezioni di routine per individuare i primi segni di usura dell'elemento riscaldante o di ostruzione delle prese d'aria.
- Utilizza il modello corretto di elemento riscaldante per la tua asciugatrice Whirlpool per garantire prestazioni affidabili.
- Garantisci un'alimentazione di tensione stabile per proteggere la bobina dell'elemento riscaldante e i collegamenti dei terminali.
Una manutenzione costante dell'elemento riscaldante dell'asciugatrice e abitudini di utilizzo intelligenti ti aiutano a evitare riparazioni costose e a mantenere l'elettrodomestico efficiente per anni.
Puoi sostituire l'elemento riscaldante di un'asciugatrice Whirlpool con sicurezza seguendo ogni passaggio e dando priorità alla sicurezza. La manutenzione regolare dell'asciugatrice offre molti vantaggi:
- Prolunga la durata dell'asciugatrice da 7–10 anni a quasi 20 anni
- Migliora il flusso d'aria, riduce i tempi di asciugatura e abbassa le bollette energetiche
- Previene costose riparazioni d'emergenza e riduce il rischio di incendio
Quando mantieni la tua asciugatrice, risparmi denaro ed eviti guasti imprevisti. Fai riferimento a questa guida ogni volta che hai bisogno di assistenza con le riparazioni dell'asciugatrice.
FAQ
Come fai a sapere se la resistenza di riscaldamento della tua asciugatrice Whirlpool è difettosa?
Noti che la tua asciugatrice non riscalda, impiega troppo tempo ad asciugare o si spegne a metà ciclo. Puoi confermarlo ispezionando visivamente l'elemento o testandolo con un multimetro per verificarne la continuità.
Puoi sostituire da solo la resistenza di riscaldamento di un'asciugatrice Whirlpool?
Sì, puoi sostituirlo da solo con strumenti di base e precauzioni di sicurezza. Scollega sempre prima l'asciugatrice. Segui le istruzioni passo passo per il tuo modello specifico.
Quanto tempo richiede la sostituzione dell'elemento riscaldante di un'asciugatrice Whirlpool?
La maggior parte delle sostituzioni richiede da 30 a 60 minuti. Il processo potrebbe richiedere più tempo se è necessario pulire l'interno o sostituire componenti aggiuntivi.
Quali strumenti sono necessari per sostituire l'elemento riscaldante di un'asciugatrice Whirlpool?
Servono un cacciavite a croce, un cacciavite a testa piatta, un avvitatore con punta da 1/4″, un multimetro e guanti da lavoro. Questi strumenti ti aiutano ad accedere e sostituire l'elemento riscaldante in sicurezza.
L'asciugatrice funzionerà se l'elemento riscaldante è guasto?
L'asciugatrice funzionerà comunque, ma non produrrà calore. I capi rimarranno umidi al termine del ciclo. È necessario sostituire l'elemento riscaldante per ripristinare un'asciugatura corretta.
È necessario sostituire il fusibile termico quando si sostituisce l'elemento riscaldante?
Molti esperti raccomandano di sostituire il fusibile termico se presenta segni di danneggiamento o non supera il test di continuità. Ciò previene futuri problemi di riscaldamento e protegge il nuovo elemento.
Quanto costa sostituire l'elemento riscaldante di un'asciugatrice Whirlpool?
In genere si spendono tra $70 e $150 per il ricambio se si procede da soli. I costi di riparazione professionale variano da $100 a $350, inclusa la manodopera.
Una presa d'aria ostruita può causare il guasto dell'elemento riscaldante?
Sì, una presa d'aria ostruita limita il flusso d'aria e provoca surriscaldamento. Questo può danneggiare l'elemento riscaldante. Pulisci regolarmente la presa d'aria per prevenire questo problema.

