
您可以使用正確的工具並謹慎注意安全,即可更換 Whirlpool 烘衣機中的加熱元件。Whirlpool 將其家電設計為易於使用者自行維修,因此您無需具備進階技能即可恢復烘衣機的性能。開始前,請務必先將 Whirlpool 烘衣機斷開電源。這樣做有助於防止受傷,並確保您在更換加熱元件零件時獲得可靠的結果。.
需要更換 Whirlpool 烘衣機加熱元件的徵兆
Whirlpool 烘衣機加熱元件故障的常見症狀
故障的 Whirlpool 烘衣機通常會顯示出明顯的徵兆,指向加熱元件故障。您可以及早發現這些症狀,並防止對家電造成進一步的損壞。.
乾衣機不加熱
您可能會注意到您的 Whirlpool 烘衣機有運轉但無法產生熱能. 。這是加熱元件故障最常見的症狀。當加熱元件內部斷裂時,會形成開路。結果,您的衣物在完整行程結束後仍然潮濕。根據家電維修數據,加熱元件導致了 38% 的無熱問題 發生在 Whirlpool 烘衣機中,使其成為最主要的元兇。.
衣物烘干时间过长
如果您的 Whirlpool 烘衣機烘乾衣物的時間比平常長得多,您應該懷疑加熱元件有問題。部分故障的加熱元件或 多線圈元件中有一個線圈斷裂 會降低加熱效率。這會導致烘乾時間延長並增加能源消耗。.
烘衣機在行程中途自動關機
在完成行程之前就自動關機的 Whirlpool 烘衣機可能有過熱問題。過熱通常是由加熱元件故障或通風口堵塞所導致。. 烘衣機過載及缺乏保養 也可能導致加熱元件過早故障。.
加熱元件有可見的損壞
有時,您可以看到加熱元件的物理損壞。請檢查加熱元件外殼內部是否有斷裂或燒毀的線圈。然而,並非所有故障都會顯示出可見的跡象。您可能需要 測試加熱元件 來確認問題。.
提示: 定期保養有助於預防許多常見的加熱元件故障原因,例如通風口堵塞和烘衣機過載。.
如何確認 Whirlpool 烘衣機加熱元件故障
在更換加熱元件之前,您應該先確認其是否故障。家電專家建議兩種主要的診斷方法。.
目視檢查加熱元件
首先拔掉 Whirlpool 烘衣機的電源插頭,並拆下後面板。檢查加熱元件是否有明顯的斷裂、燒焦或其他損壞。如果您看到斷裂的線圈或燒焦的痕跡,即表示加熱元件故障。然而,有些故障是肉眼無法看見的,因此您需要使用萬用電表進行更精確的診斷。.
使用萬用電表測試導通性
若要測試加熱元件,請依照以下步驟操作:
- 斷開 Whirlpool 烘衣機加熱元件上的 電線。.
- 將萬用電表設定為導通性或歐姆檔位。.
- 將探針放置在加熱元件的接線端子上。.
- 如果萬用電表顯示導通,表示元件完好。如果沒有,則表示加熱元件故障。.
- 在每個端子與金屬外殼之間進行測試。此處不應有導通。如果有,則表示元件已接地,必須更換。.
- 如果加熱元件通過這些測試,但您的 Whirlpool 烘衣機仍然不加熱,請檢查相關零件,例如熱熔斷器、恆溫器和 控制板.
備註: 請務必使用 優質的更換零件 來更換您的 Whirlpool 烘衣機加熱元件,以避免重複故障。.
您可以透過保養您的 Whirlpool 烘衣機來預防大多數 加熱元件故障. 。避免過載、定期清潔棉絮過濾網和通風口,並及時處理任何異常噪音或性能問題。這些步驟有助於延長 Whirlpool 烘衣機的使用壽命,並使其保持高效運轉。.
更換 Whirlpool 烘衣機加熱元件所需的工具和零件
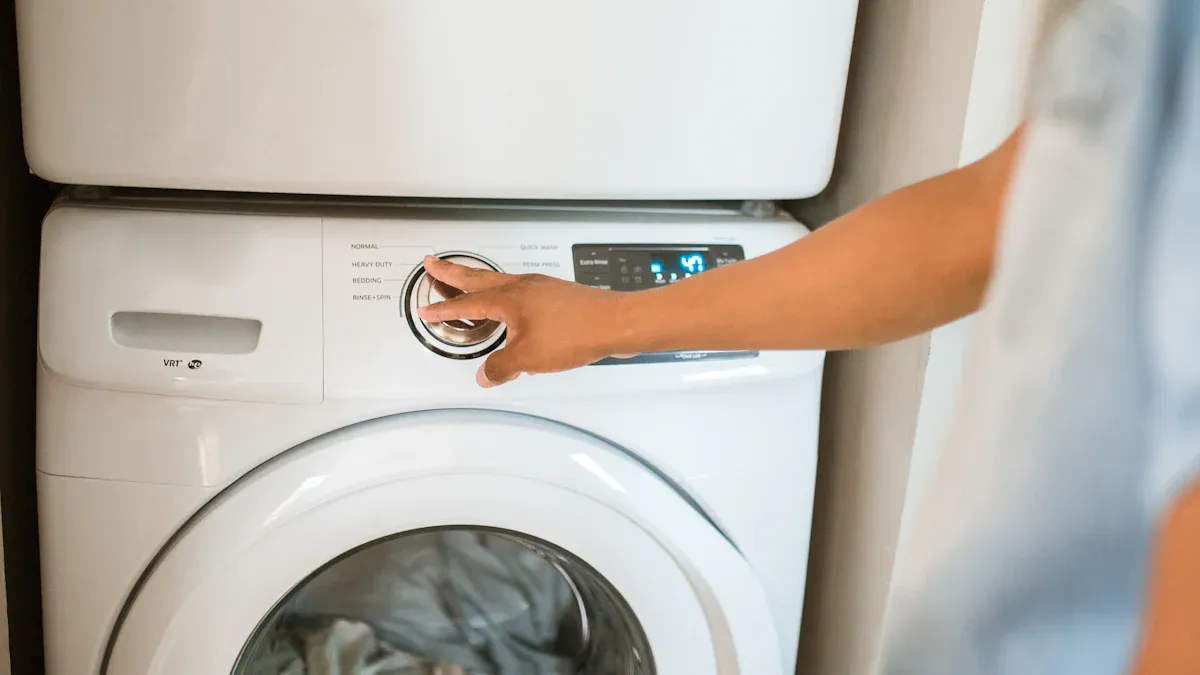
在您開始 更換您的 Whirlpool 烘衣機加熱元件時, ,您需要準備正確的工具和更換零件。使用正確的設備可確保維修過程順利、安全且高效。您也可以降低損壞 Whirlpool 烘衣機或其零件的風險。.
烘衣機維修的基本工具
在開始維修 Whirlpool 烘衣機之前,您應該準備一套基本工具。這些工具可幫助您在不損壞家電的情況下,存取、拆卸和安裝加熱元件。.
十字和一字螺絲起子
您將需要使用十字和一字螺絲起子來拆卸和重新安裝 Whirlpool 烘衣機的面板。這些螺絲起子適用於家電外部和內部的大多數螺絲。.
1/4吋套筒扳手或套筒組
1/4 吋的螺帽起子或套筒組可讓您拆卸固定加熱元件外殼的螺帽和螺栓。Whirlpool 烘衣機經常使用這些緊固件來安裝內部零件。.
萬用電表
萬用電表對於測試 Whirlpool 烘衣機加熱元件及相關零件至關重要。您可以檢查加熱元件、熱熔斷器和恆溫器的導通性。此步驟有助於您確認哪個零件需要更換。.
工作手套
工作手套可保護您的雙手免受 Whirlpool 烘衣機內部銳利邊緣和高溫表面的傷害。維修期間請務必佩戴手套,以防止受傷。.
提示: 在開始之前整理好您的工具。將工具放在隨手可及之處,以避免維修過程中不必要的延誤。.
Whirlpool 烘衣機的更換零件
選擇正確的更換零件對於恢復您的 Whirlpool 烘衣機性能至關重要。請務必選擇 OEM(原廠設備製造商)零件,以確保最佳的密合度與耐用性。.
相容的 Whirlpool 烘衣機加熱元件(例如零件編號 279838)
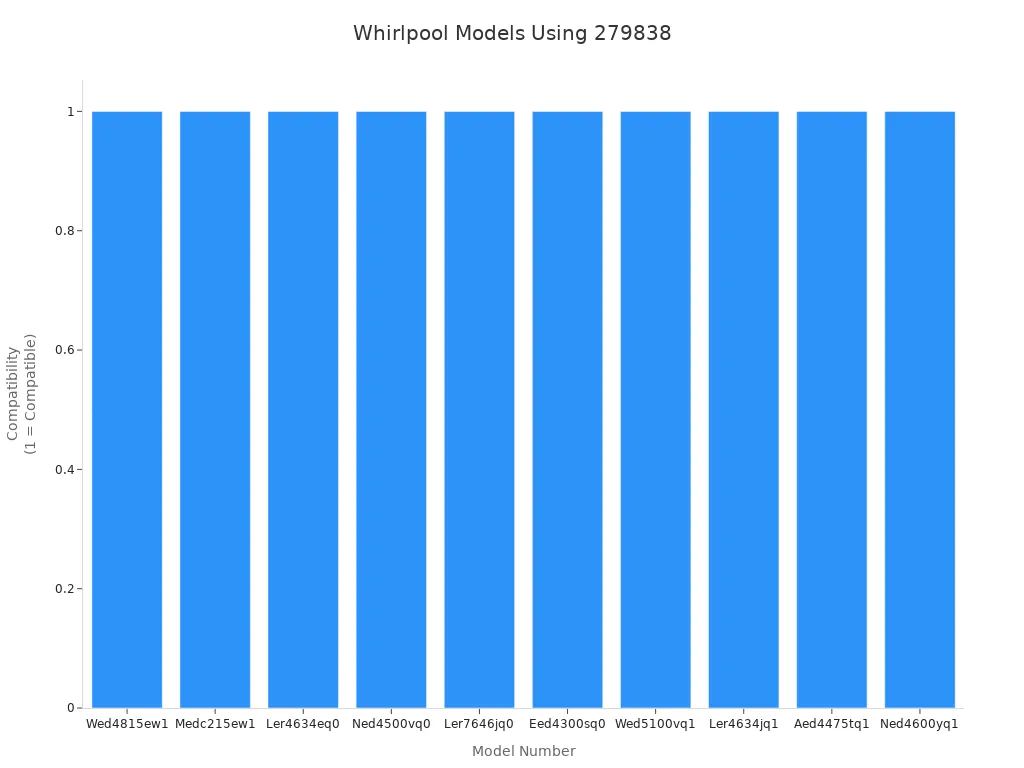
最常見的 Whirlpool 烘衣機加熱元件是 零件編號 279838. 。此加熱元件適用於許多熱門的 Whirlpool 烘衣機型號,包括 Wed4815ew1、Medc215ew1 和 Ler4634eq0。您也可以找到相容的替代品,例如 W10724237、8565582 和 279838VP。這些加熱元件採用高品質鎳材質,經久耐用且易於安裝。許多套件包含熱熔斷器、熱敏電阻和恆溫器,以完成完整的維修。.
您可以從 官方來源(例如 WhirlpoolParts.com). 購買正品的 Whirlpool 烘衣機加熱元件零件。該經銷商提供種類齊全的 OEM 零件、次日送達服務以及 365 天退貨政策。您還可以找到教學影片和客戶支援,以引導您完成整個過程。.
| 更換零件 | 說明與備註 |
|---|---|
| 加熱元件總成 | 當烘衣機無法正常加熱時所更換的主要元件;若故障,線圈通常會有斷裂的情況。. |
| 輻射式表面加熱元件 | 加熱系統的一部分,有時會與加熱元件一同更換。. |
| 恆溫器加熱器 | 控制溫度;建議檢查並在故障時更換。. |
| 熱熔斷器 | 加熱故障的常見原因;應在更換加熱元件前進行檢查。. |
| 熱斷路器 | 若加熱問題持續存在,可能需要更換的安全裝置。. |
| 接線端子 | 若在維修過程中損壞,可能需要更換。. |
選配:新的熱熔斷器或恆溫器
如果您的 Whirlpool 烘衣機持續出現加熱問題,您可能需要更換熱熔斷器或恆溫器。這些元件通常會與加熱元件一同故障。使用萬用電表進行測試可以幫助您識別故障零件。許多維修套件已包含這些項目,以方便您使用。.
備註: 在進行維修前,請務必拔掉您的 Whirlpool 烘衣機電源插頭. 。小心地斷開電線並記下它們的位置,以確保正確地重新組裝。.
透過準備正確的工具和零件,您將為成功維修您的 Whirlpool 烘衣機做好準備 乾衣機加熱元件更換. 。這種方法可以節省時間,並幫助您將 Whirlpool 烘衣機恢復到最佳性能。.
從烘衣機上拆下加熱元件前的安全步驟
在開始對您的 Whirlpool 烘衣機進行任何維修之前,您必須採取重要的安全步驟。這些預防措施可保護您免受觸電、瓦斯外洩和意外傷害。遵循最佳實務做法可確保維修過程順利且安全。.
切斷電源並準備 Whirlpool 烘衣機
拔掉烘衣機電源插頭並確保沒有電氣連接
在開始任何維修之前,您必須始終將烘衣機與電源斷開。此步驟可防止電氣危險,並在過程中確保您的安全。請遵循以下步驟,確保您的烘衣機完全與電力隔離:
- 將烘衣機的電源插頭從電源插座拔下.
- 斷開接地線,以進一步降低觸電風險。.
- 穿戴防護裝備,例如手套和護目鏡,以保護您的手和眼睛免受傷害。.
提示: 切勿嘗試測試或處理帶電線路。在電氣元件附近工作時,請使用絕緣手套和非導電工具。.
瓦斯烘衣機注意事項(如適用)
如果您使用的是瓦斯烘衣機,則需要採取額外的預防措施,以防止瓦斯外洩或事故。在移動或維修設備之前,請務必關閉瓦斯供應。以下是建議的步驟:
- 關閉供應管路上的瓦斯供應閥.
- 在斷開瓦斯管線或移動烘衣機之前,請確保瓦斯已完全關閉。.
- 在進行任何電氣工作之前,請務必關閉瓦斯供應。.
備註: 請查閱您的用戶手冊,以獲取與您的瓦斯烘衣機型號相關的具體說明。.
為烘衣機維修設置安全的工作區域
清理烘衣機周圍的區域
乾淨且井然有序的工作區域有助於您避免事故,並使維修過程更有效率。請採取以下步驟來準備您的區域:
- 清理烘衣機周圍的區域 ,清除任何雜物、工具或衣物。.
- 讓兒童和寵物遠離工作區域。.
- 確保該區域光線充足,以便您能清楚地看到所有元件。.
- 如果烘衣機最近使用過,請讓其冷卻。.
整理工具和更換零件
妥善整理您的工具和更換零件可使維修更順暢,並降低遺失小型零件的風險。請採用以下最佳實務做法:
- 將所有必要的工具,例如螺絲起子、螺母起子和萬用電表,擺放在隨手可及之處。.
- 將更換零件(如加熱元件和熱熔斷器)放置在乾淨的表面上。.
- 佩戴絕緣手套,以保護雙手免受銳利邊緣和電氣危害。.
- 輕柔處理所有零件,以避免損壞。.
安全提醒: 請務必查閱烘衣機的使用手冊,以了解任何特定型號的安全或安裝說明。.
遵循這些安全步驟,您能將風險降至最低,並為成功做好準備。 Whirlpool 烘衣機加熱元件更換.
如何從 Whirlpool 烘衣機中移除加熱元件
當您 需要從您的 Whirlpool 烘衣機中移除加熱元件, ,您必須遵循系統性的方法。Whirlpool 烘衣機有多種型號,但大多數具有相似的存取點和移除步驟。您可以使用基本工具並仔細注意細節來完成此維修。.
存取 Whirlpool 烘衣機加熱元件
移除後面板或掀開頂部/前面板
您必須首先存取 Whirlpool 烘衣機的內部。方法取決於您的具體型號,但大多數 Whirlpool 烘衣機可透過後面板或頂部/前面板進行存取。.
- 將烘衣機從電源上拔下。務必先斷開烘衣機的電源,以防止觸電。.
- 將烘衣機從牆壁拉開,以創造足夠的工作空間。.
- 對於許多 Whirlpool 型號,您可以 移除下方的前檢修面板. 。將油灰刀插入烘衣機門下方,以鬆開兩側的卡扣。輕輕撬開面板。.
- 某些型號需要您移除絨毛濾網和固定頂部面板的螺絲。移除這些螺絲後,輕輕抬起頂部面板並將其向後鉸開。.
- 如果您的型號需要從後方存取,, 請移除固定背面板的螺絲. 。小心地將面板放置在一旁。.
提示: 在操作過程中為每個步驟拍照。這些圖像有助於您日後記住如何重新組裝您的 Whirlpool 烘衣機。.
定位加熱元件外殼
打開烘衣機後,您需要定位加熱元件外殼。在大多數 Whirlpool 烘衣機中,您會在設備的右側或底部後方找到加熱元件。外殼通常看起來像一個金屬罐或支架。您可能會看到連接到恆溫器和加熱元件本身的電線。.
- 尋找帶有數條連接電線的金屬外殼。.
- 識別固定外殼的安裝螺絲或卡扣。.
- 在繼續操作前,確保您可以清楚地接觸到加熱元件。.
備註: 如果您最近使用過烘衣機,加熱元件外殼可能會感到溫熱。在觸碰任何組件之前,請讓其冷卻。.
移除故障加熱元件的步驟
斷開電線並移除安裝螺絲或卡扣
您必須先將加熱元件與烘衣機斷開,才能將其移除。請遵循以下步驟以確保安全且高效的過程:
- 標記或拍攝接線連接. 。此步驟可確保您在重新組裝時正確地重新連接電線。.
- 小心地拔下連接到加熱元件、高溫限制恆溫器和熱熔斷器的所有電線。如有需要,可使用尖嘴鉗,但避免拉扯電線本身。.
- 找到固定加熱元件外殼的螺絲或卡扣。大多數 Whirlpool 烘衣機使用 1/4 英吋或 5/16 英吋的螺絲。.
- 移除固定加熱元件的螺絲或鬆開卡扣。將五金零件放置一旁,以備重新安裝。.
安全警示: 在 Whirlpool 烘衣機內部操作時,請務必佩戴工作手套和護目鏡。銳利邊緣和電氣組件可能造成傷害。.
小心地拉出舊加熱元件
斷開電線並移除安裝五金零件後,您可以從烘衣機中取出加熱元件。.
- 輕輕地將加熱元件從其外殼中拉出。避免彎曲或損壞金屬罐。.
- 檢查元件是否有明顯的損壞跡象,例如線圈斷裂或燒焦痕跡。如果您看到這些問題,則已確認加熱元件故障。.
- 將舊加熱元件放置一旁,以進行丟棄或回收。.
您現在已完成從 Whirlpool 烘衣機中移除加熱元件的過程。此步驟為您安裝新的 Whirlpool 烘衣機加熱元件並恢復設備功能做好準備。 效能。.
專業提示: 將所有螺絲、卡扣和小零件放入容器中。此做法可防止遺失,並使重新組裝更加容易。.
如何更換 Whirlpool 烘衣機中的加熱元件
更換 Whirlpool 烘衣機中的加熱元件 可恢復高效的烘乾效果並延長設備的使用壽命。您應遵循系統性的方法,以確保安全且成功的加熱元件更換。本節將引導您安裝新零件並重新組裝烘衣機,以達到最佳性能。.
安裝新的 Whirlpool 烘衣機加熱元件
如有需要,轉移高溫限制恆溫器
在安裝新的加熱元件之前,請檢查是否需要轉移舊的高溫限制恆溫器。許多 Whirlpool 型號使用直接安裝在加熱元件組件上的恆溫器。如果您的更換用加熱元件未附帶新的恆溫器,則必須移轉現有的恆溫器。.
- 卸下將高溫限制恆溫器固定於舊加熱元件上的螺絲。.
- 輕輕地將恆溫器從舊組件上提起。.
- 將恆溫器與新加熱元件上的安裝孔對齊。.
- 使用原來的螺絲將其固定。.
提示: 請小心處理恆溫器。避免彎曲接線端子或損壞感測器。.
轉移恆溫器 可確保您的乾衣機在更換加熱元件零件後,維持安全的運作溫度。.
定位並固定新的加熱元件
準備好新的加熱元件後,將其定位在乾衣機內部。Whirlpool 建議遵循以下步驟以正確安裝:
- 將新的加熱元件滑入加熱管或外殼中,確保其緊密貼合。.
- 將加熱元件上的安裝孔與乾衣機外殼上的安裝孔對齊。.
- 插入並鎖緊螺絲或夾具,以將加熱元件固定到位。.
應避免過度鎖緊螺絲。這可防止損壞金屬外殼,並確保穩固的貼合。正確安裝的加熱元件可減少震動並改善熱量分佈。.
重新連接電線與安裝五金
固定新的加熱元件後,重新連接所有電線與五金。使用拆卸過程中拍攝的照片或製作的標籤,將每條電線對應到正確的接線端子。.
- 將電線連接到加熱元件端子、高溫限制恆溫器,以及(若有的話)熱熔斷器上。.
- 確認每個連接都緊固且完全就位。.
- 再次檢查確保沒有電線被夾住或接觸金屬表面。.
備註: 正確的接線對於安全運作至關重要。錯誤的連接可能導致乾衣機故障或造成火災危險。.
完成這些步驟可確保您的加熱元件更換既安全又有效。您現在已完成以下程序的核心部分: 更換您的 Whirlpool 乾衣機中的加熱元件零件.
更換加熱元件後重新組裝乾衣機
重新安裝面板並再次檢查連接
安裝新的加熱元件後,您需要重新組裝乾衣機。Whirlpool 建議採取謹慎的方式,以避免遺漏任何步驟。.
- 將後面板或前面板對齊安裝夾具或螺絲孔,然後重新安裝。.
- 使用原來的螺絲固定面板。均勻地鎖緊每顆螺絲,以防止出現縫隙。.
- 如果您先前抬起頂部面板,請將其放下並鎖定到位。.
- 重新安裝棉絮過濾器外殼 並插入濾網。.
- 再次檢查所有電線連接。確保每個端子都牢固並與其原始位置相符。.
安全檢查: 在恢復電源之前,進行最後的目視檢查。檢查是否有鬆動的螺絲、雜散的電線或錯置的零件。.
完成重新組裝後,將乾衣機移回原位。重新連接通風管,並將乾衣機插頭插入電源插座。對於瓦斯型號,請重新開啟瓦斯供應。.
現在,在乾衣機空載的情況下執行一次測試運轉。將其設定為加熱行程並讓其運轉幾分鐘。檢查加熱是否正常,並聆聽是否有異常噪音。如果乾衣機能正常加熱且運轉平穩,則表示您的加熱元件更換成功。.
如果您發現任何問題,請拔掉乾衣機電源插頭並檢視您的安裝步驟。再次檢查所有連接和安裝五金。.
您現已完成 更換您的 Whirlpool 乾衣機中的加熱元件零件. 這種謹慎的做法可確保可靠的性能並延長設備的使用壽命。.
更換加熱元件後測試您的乾衣機
安裝新的烤箱加熱元件 在您的 Whirlpool 乾衣機中安裝新的加熱元件後, ,您需要確認維修是否成功。適當的測試可確保您的乾衣機安全且有效率地運作。在將設備恢復正常使用前,您也可以確認沒有其他問題存在。.
在您的 Whirlpool 乾衣機上執行測試運轉
開啟電源並檢查加熱是否正常
在維修後首次開啟乾衣機電源時,您應遵循系統性的方法。此過程有助於您及早發現任何問題,並防止進一步的損壞。.
- 將乾衣機插頭插入電源插座。對於瓦斯型號,請重新開啟瓦斯供應。.
- 在乾衣機空載的情況下啟動定時乾燥行程。聆聽是否有任何異常聲音,並檢查是否有奇怪氣味。這些跡象可能表示安裝有問題。.
- 觀察乾衣機運轉情況。您應該會感覺到滾筒內的溫度穩定上升。將手靠近通風口以檢查是否有熱氣流。此步驟可確認加熱元件正常運作。.
- 運行少量衣物以在正常條件下測試加熱元件。監控乾燥時間。衣物應在一個典型行程內烘乾。.
- 注意是否有過熱的跡象。如果乾衣機變得過熱或意外關機,請停止行程並檢查恆溫器及相關零件。.
- 重複測試行程數次。多次行程中表現一致,表示您的乾衣機可靠且維修已完成。.
提示: 在第一次測試行程期間,請務必在附近待命。立即處理任何問題可以防止進一步的併發症。.
如果您的乾衣機仍然不加熱時的故障排除
即使您更換了加熱元件,乾衣機仍可能無法正常加熱。您需要採用結構化的故障排除流程來找出原因。這種方法能節省時間,並幫助您避免不必要的維修。.
檢查熱熔斷器、恆溫器和接線
如果您的乾衣機無法產生熱量,請先檢查熱熔斷器來開始故障排除。燒斷的保險絲會中斷電路,阻止乾衣機加熱。請使用萬用電表測試導通性。如果保險絲故障,請予以更換。.
接下來,檢查恆溫器。有缺陷的恆溫器可能導致乾衣機過熱或完全無法加熱。請使用萬用電表測試恆溫器,必要時予以更換。.
檢查所有接線連接。鬆動或損壞的電線可能會中斷加熱元件的電源。請固定任何鬆動的連接並更換損壞的電線。您也應再次測試加熱元件,以確認其正常運作。.
備註: 在執行任何涉及電子元件的故障排除步驟之前,請務必拔掉乾衣機的電源插頭。.
何時應聯絡專業人員進行乾衣機維修
某些乾衣機問題需要進階故障排除或專業工具。如果您已檢查熱熔斷器、恆溫器和接線,但乾衣機仍然無法加熱,您可能需要專業協助。若您遇到以下情況,請聯絡認證的家電技術人員:
- 多次維修後仍持續存在的加熱問題
- 您無法安全解決的電子問題
- 瓦斯型乾衣機出現瓦斯外洩的跡象
- 運作期間出現異常噪音或燒焦氣味
專業人員可以診斷複雜的問題,並確保您的乾衣機安全運作。在需要時尋求專家協助,您能保護您的投資並避免進一步的損壞。.
安全提醒: 切勿忽視持續存在的乾衣機問題。及時的故障排除和專業支援有助於維持安全且高效的運作。.
Whirlpool 乾衣機加熱元件更換成本、使用壽命與價值
零件與工具的一般成本
加熱元件與工具的價格範圍
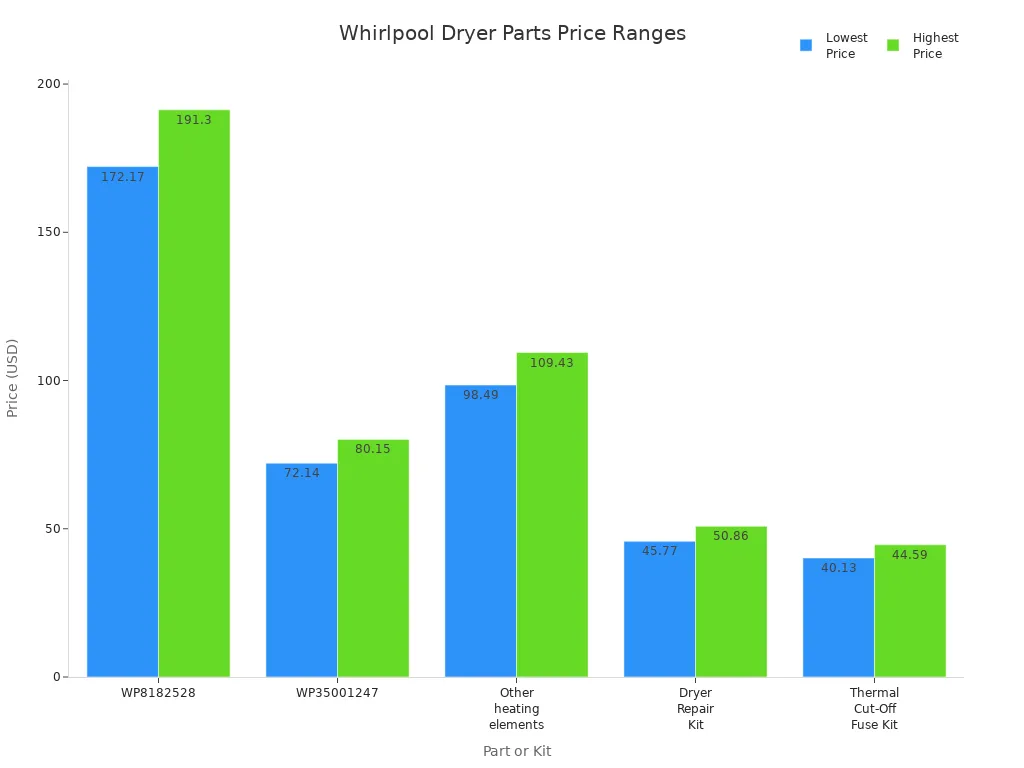
當您計劃更換乾衣機中的加熱元件時,您應了解零件和工具的一般成本。大多數 Whirlpool 乾衣機加熱元件的價格為 $59 至 $170, ,視型號和來源而定。某些特殊零件,例如 WP8182528, ,價格可高達 $191.30。您還需要基本工具,如多功能螺絲起子和油灰刀。這些工具通常花費在 $28.92 至 $63.40 之間。.
| 項目說明 | 價格範圍(美元) | 备注 |
|---|---|---|
| Whirlpool 乾衣機加熱元件(OEM 279838) | $59.00 | 含線圈和絕緣體的加熱元件總成 |
| Whirlpool 乾衣機加熱元件(各種 OEM 零件) | $59.00 – $170+ | 價格因零件編號和來源而異 |
| 多功能螺絲起子(所需工具) | 約 $28.92 | 安裝所需的工具 |
| 油灰刀(所需工具) | $28.92 – $63.40 | 適用於拆卸面板和清潔通風口 |
DIY 與專業維修成本比較
您可以自行更換乾衣機中的加熱元件來節省金錢。零件通常花費 $70 至 $150. 。如果您自行動手,則無需支付人工費用。相比之下,專業維修服務每小時收取 $60 至 $150 的人工費用,總成本介於 $100 至 $350 之間。大多數屋主支付約 $230 進行專業乾衣機維修。下表比較了兩種選擇:
| 面向 | DIY 更換 | 專業維修服務 |
|---|---|---|
| 零件費用 | $70 至 $150(僅加熱元件) | 包含在總成本中 |
| 人工費用 | $0(自行執行) | 每小时$60至$150 |
| 總費用範圍 | $70 至 $150 | $100 至 $350(平均約 $230) |
| 其他備註 | 需要診斷和技術技能 | 可能收取人工費用和最低收費;確保安全和有效性 |
如果您擁有基本工具並遵循安全步驟,您能以低於聘請專業人員的成本 完成乾衣機加熱元件更換 。.
Whirlpool 乾衣機加熱元件使用壽命
平均使用年限及影響壽命的因素
典型的 Whirlpool 乾衣機加熱元件可使用 5 至 15 年。實際使用壽命取決於您如何使用和維護乾衣機。如果您在每次使用後 清潔棉絮濾網 ,即有助於防止過熱。每年清潔排氣通風口也能降低棉絮堆積的風險,棉絮堆積可能導致加熱元件故障。您應避免過度裝載乾衣機,並使用正確的熱度設定以減少元件的壓力。如果 熱熔斷器故障, ,加熱元件可能會反覆燒毀。更換熱熔斷器並維護相關零件,例如通風管道和滾輪,將有助於延長乾衣機的使用壽命。.
定期維護與正確使用是最大化 乾衣機加熱元件使用壽命的最佳方式.
更換乾衣機的加熱元件是否值得?
何時應維修或更換您的惠而浦乾衣機
在決定維修或更換乾衣機之前,您應考慮多項因素。如果您的乾衣機相對較新且狀況良好,更換加熱元件通常是最佳選擇。 維修費用(包括零件與人工)通常在100至200美元之間, ,遠低於購買新乾衣機的費用。如果您的乾衣機有其他磨損零件或已使用超過10年,更換新機可能更為實際。您也應考量能源效率。較新的乾衣機能耗更低,長遠來看可能為您節省開支。在做出決定前,請務必檢查恆溫器、線路與通風系統。如果您的乾衣機過往效能可靠且您維護得當,更換加熱元件可讓其恢復完整功能並再使用多年。.
您通常可以透過簡單的更換加熱元件來延長乾衣機的使用壽命,但如果您的設備出現多種老化跡象,投資購買新型號可能更具價值。.
惠而浦乾衣機加熱元件維護秘訣
正確的乾衣機加熱元件維護可確保設備高效且安全運作。遵循幾項必要的清潔與保養程序,即可預防大多數加熱元件故障。.
清潔與保養以防止未來問題
棉絮濾網與通風管維護
您應始終保持棉絮濾網與通風系統清潔。棉絮堆積會限制氣流,導致乾衣機過熱並增加加熱元件故障的風險。請遵循以下步驟以維持最佳效能:
- 在每次負載前後清潔棉絮過濾網. 。這個簡單的習慣可防止棉絮進入通風系統並降低火災風險。.
- 每年至少檢查並清潔乾衣機通風系統一次。清除整個通風管內的棉絮與碎屑,包括屋外的排氣口。.
- 僅使用金屬通風材料。與塑膠或鋁箔軟管相比,金屬風管更能抵抗損壞並減少棉絮堆積。.
- 盡量保持通風管短而直。過長或彎曲的通風管會累積更多棉絮並限制氣流。.
- 避免將乾衣機過度靠近牆壁。這可防止過渡軟管彎折或壓扁,以免阻礙氣流。.
穩定的氣流至關重要。乾衣機需要約 每分鐘120立方英尺(CFM)的氣流量, ,而通風系統設計為可透過4英吋風管提供約150 CFM的氣流。.
下表總結了 建議的清潔頻率:
| 組件 | 清潔頻率 | 备注 |
|---|---|---|
| 棉絮濾網 | 每次使用後 | 定期清除可防止堆積並維持乾燥效率。. |
| 棉絮濾網槽 | 約每6個月 | 建議進行更深層清潔,尤其是在乾燥效能下降時。. |
| 乾衣機通風管 | 每1至3年(一般準則) | 頻率取決於使用量、通風管長度及系統具體情況。. |
| 乾衣機通風管 | 每年(部分製造商的保固要求) | 為維持保固效力,可能要求每年清潔。. |
| 乾衣機通風管 | 每6至9個月(重度使用或長通風管) | 重度使用或較長通風系統需要更頻繁的清潔。. |
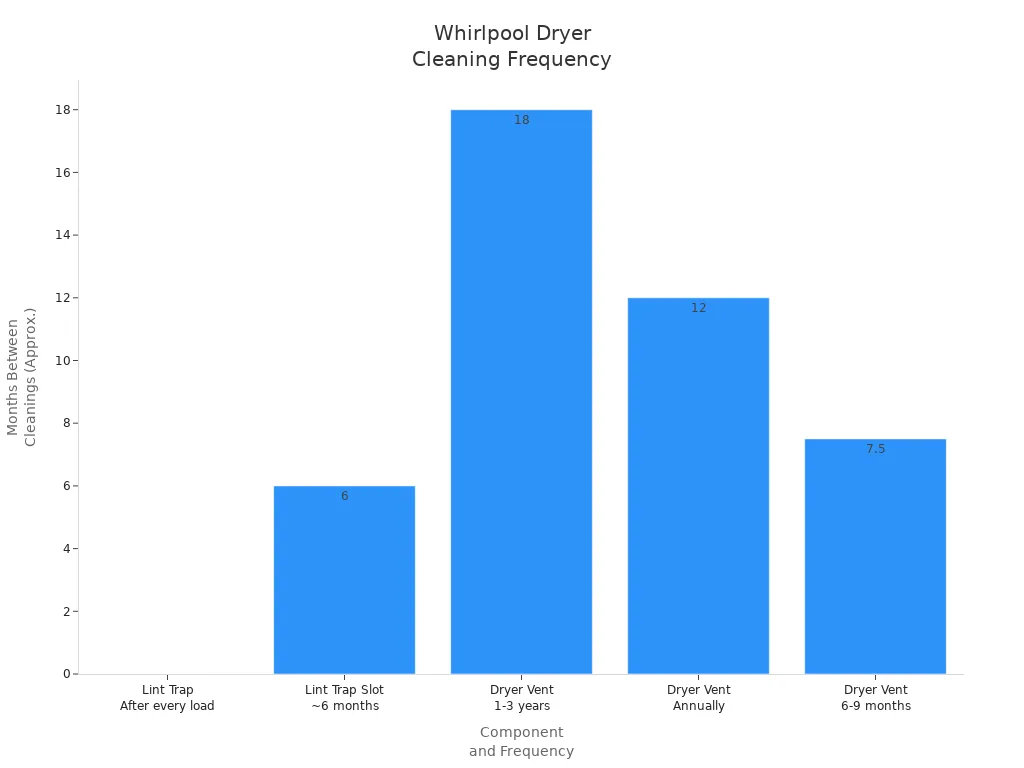
惠而浦建議 至少每兩年清潔一次乾衣機排氣通風管. 如果您有寵物、長通風管或高洗衣量, ,請增加清潔頻率。.
定期內部清潔
您應安排定期內部清潔,以清除從濾網逸出並積聚在乾衣機內部的棉絮。. 每年進行專業維護 有助於吸除多餘棉絮、檢查通風系統,並檢查包括加熱元件在內的電氣零件。這種預防性保養可確保乾衣機安全運作,並降低未來故障的風險。.
使用惠而浦乾衣機的最佳做法
避免過載並監控烘乾時間
您可以透過正確使用設備來延長乾衣機加熱元件的使用壽命。請遵循以下最佳做法:
- 避免過度裝載烘乾機. 。過大的衣物量會迫使加熱元件更吃力地運作,增加過熱風險。.
- 監控烘乾時間。如果衣物需要更長時間才能烘乾,請檢查是否有氣流受阻或棉絮堆積。.
- 透過定期清潔通風管與棉絮濾網來維持適當氣流。.
- 切勿讓烘乾機在無人看管的情況下運行。這可降低火災風險,並讓您能迅速應對任何問題。.
- 安排定期檢查,以及早發現加熱元件磨損或通風口堵塞的跡象。.
- 為您的惠而浦烘乾機使用正確型號的加熱元件,以確保性能可靠。.
- 確保穩定的電壓供應,以保護加熱元件的線圈和端子連接。.
持續的烘乾機加熱元件維護和明智的使用習慣,有助於您避免高昂的維修費用,並讓設備在多年內保持高效運行。.
只要遵循每個步驟並優先考慮安全,您就能有信心更換惠而浦烘乾機加熱元件。定期保養烘乾機有許多好處:
- 將烘乾機的使用壽命從 7 至 10 年延長至近 20 年
- 改善氣流、縮短烘乾時間並降低能源帳單
- 防止代價高昂的緊急維修並降低火災風險
當您保養烘乾機時,您既能省錢,又能避免意外故障。每當您需要烘乾機維修方面的協助時,請參考本指南。.
常見問題
如何判斷您的惠而浦乾衣機加熱元件是否故障?
您注意到烘乾機不加熱、烘乾時間過長,或在運轉中途關閉。您可以透過目視檢查元件,或使用萬用電表測試其連續性來確認。.
您可以自行更換惠而浦乾衣機加熱元件嗎?
是的,您可以使用基本工具並採取安全預防措施自行更換。務必先拔掉烘乾機的電源插頭。請按照適用於您特定型號的逐步說明進行操作。.
更換惠而浦烘乾機加熱元件需要多長時間?
大多數更換作業需要 30 至 60 分鐘。如果您需要清潔內部或更換其他零件,過程可能會花費更長時間。.
更換惠而浦烘乾機加熱元件需要哪些工具?
您需要一把十字螺絲起子、一把平頭螺絲起子、一個 1/4 吋套筒起子、一個萬用電表和一副工作手套。這些工具可協助您安全地拆裝並更換加熱元件。.
如果加熱元件故障,烘乾機還會運轉嗎?
您的烘乾機仍會運轉,但不會產生熱量。衣物在運轉結束後仍會保持潮濕。您必須更換加熱元件才能恢復正常的烘乾功能。.
更換加熱元件時,是否也應更換熱熔斷器?
許多專家建議,如果熱熔斷器出現損壞跡象或未能通過連續性測試,則應予以更換。這可防止未來的加熱問題,並保護您的新元件。.
更換惠而浦烘乾機加熱元件的費用是多少?
如果您自行更換,零件費用通常在 70 美元至 150 美元之間。專業維修費用則介於 100 美元至 350 美元之間,包含人工費用。.
通風口堵塞會導致加熱元件故障嗎?
會的,通風口堵塞會限制氣流並導致過熱。這可能會損壞加熱元件。請定期清潔通風口以防止此問題發生。.

