A ceramic-element fan heater can be cleaned safely at home when the process is built around two priorities: electrical safety and airflow restoration. The correct approach is to disconnect power, remove dust from intake and exhaust paths, and avoid introducing moisture into the heater housing. When done properly, cleaning reduces odor, improves heat output consistency, and lowers the likelihood of overheating triggered by restricted airflow.
Related technical and product information: Heating Element | Heating Element manufacturer | Heating Element Factory | Die Casting Heating Solutions
- Before cleaning: identify what needs cleaning (and what should not be touched)
- Why dust matters in ceramic heaters (engineering explanation)
- Tools and materials checklist
- Standard cleaning procedure (safe for most ceramic fan heaters)
- Deeper cleaning for heavy lint and pet hair
- Data tables: symptoms, risks, and maintenance intervals
- Prevention: keeping airflow clean between seasons
- FAQ
- References and outbound links
Before cleaning: identify what needs cleaning (and what should not be touched)
A typical ceramic-element heater is a system, not just a hot part. In heater engineering terms, a heating element is an assembly that includes electrically conductive material plus an electrically insulating framework and lead connections. Ceramic is often part of that insulating and structural framework, or part of a PTC-style element package.
Safety boundary for consumer cleaning
- Do not open sealed electrical compartments unless the manufacturer’s service instructions explicitly allow it.
- Do not spray liquids into the grille or housing; moisture can reach electrical connections.
- Do not scrape heater parts with metal tools; abrasion can damage coatings and insulating supports.
- If the heater shows arcing, burning smell not associated with dust, or repeated shutoffs, discontinue use and seek service.
Why dust matters in ceramic heaters (engineering explanation)
Ceramic fan heaters rely on moving air. When lint and dust collect on the intake, fan blades, or internal airflow channels, the heater can experience airflow restriction. Restricted airflow changes heat transfer conditions and can raise internal temperatures. From an engineering viewpoint, element integration and heat transfer mode (convection/radiation/conduction) affect how sensitive a unit is to airflow loss.
Industrial heater references classify wire elements by how they contact their insulating framework—suspended, supported, or embedded. Space heaters primarily depend on convection (airflow), so contamination and blockage are not cosmetic issues; they affect performance and safety margins.
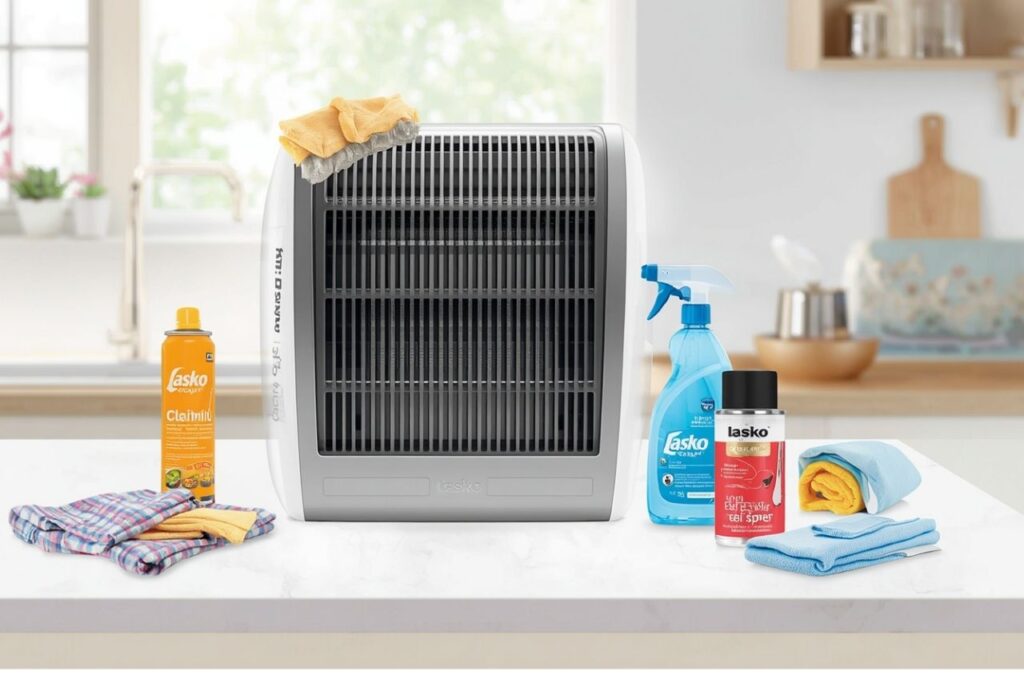
Tools and materials checklist
Recommended household kit
- Soft brush (paintbrush or detailing brush)
- Vacuum with brush attachment (preferred over compressed air in dusty rooms)
- Microfiber cloths
- Cotton swabs for grille corners
Optional (use cautiously)
- Compressed air (short bursts; keep distance; avoid spinning the fan aggressively)
- A screwdriver only if the unit’s user manual permits cover removal for cleaning
What to avoid
Avoid water spray, steam, wet wipes pushed through the grille, and abrasive pads. The goal is dry dust removal and restoring free airflow, not polishing the internal element.
Standard cleaning procedure (safe for most ceramic fan heaters)
Step 1: Power down and cool
- Turn the heater off and unplug it.
- Allow at least 30 minutes for complete cooling (longer if it was on high heat).
Step 2: Clean exterior intake and exhaust grilles
- Vacuum the grille surfaces with a brush attachment.
- Use a soft brush to loosen dust in corners, then vacuum again.
- Wipe the exterior housing with a dry microfiber cloth.
Step 3: Address the base and floor-level lint (often overlooked)
Ceramic heaters often sit where lint accumulates. Vacuum around the heater location and wipe the base. This reduces re-ingestion of dust immediately after cleaning.
Step 4: Controlled internal dust removal (only if permitted)
If the user manual allows opening a filter door or removable panel, remove dust using a brush + vacuum. Maintain a conservative approach: do not bend internal fins or disturb wiring. If the design includes a fan, avoid forcing the fan to spin at high speed with compressed air.
Post-cleaning check
- Confirm grilles are clear and panels are seated.
- Place the heater on a stable, non-obstructed surface with clearance around intake/exhaust.
- Run on low for a short period in a ventilated area; slight “first run” odor can be normal after dust removal.
Deeper cleaning for heavy lint and pet hair
In homes with pets, carpets, or high lint load, surface cleaning may not be enough. The most effective deep clean strategy remains dry: gradually remove buildup from the intake, fan area, and internal channels without introducing liquid.
Targeted approach (highest ROI)
- Intake first: most blockage begins at the intake grille and immediately behind it.
- Fan zone: dust on fan blades reduces airflow even if the grille looks clean.
- Exhaust path: check for lint mats that behave like a filter and trap heat.
If odor persists after cleaning
Persistent strong odor, repeated thermal shutoff, or electrical smells are not “normal dust burn-off.” The unit should be inspected or serviced rather than repeatedly run.
Data tables: symptoms, risks, and maintenance intervals
Symptom-to-cause quick table
| Observed symptom | Most likely cause | Recommended action |
|---|---|---|
| Reduced heat output | Airflow restriction from dust/lint | Vacuum intake/exhaust; brush and vacuum internal channels if permitted. |
| Heater shuts off frequently | Overheat protection triggered by poor airflow or dust insulation | Deep dry-clean; verify clearance and room ventilation. |
| Burning-dust smell at start of season | Dust accumulation on hot surfaces | Clean thoroughly before first use; run briefly in ventilated area. |
| Electrical/burning plastic odor | Electrical fault, damaged insulation, or overheated component | Stop use; seek qualified service. |
Maintenance interval guidance (rule-of-thumb)
| Household condition | Suggested exterior grille cleaning | Suggested deeper dust removal |
|---|---|---|
| Low dust, hard floors | Every 3–4 weeks during use season | Once per season |
| Pets or carpeted rooms | Weekly to biweekly | Every 4–8 weeks during heavy use |
| Workshop/garage use | Weekly | Monthly (or more often if airflow drops) |
Risk “chart”: what drives overheating complaints
Prevention: keeping airflow clean between seasons
Long-term reliability is driven by design and environment. Technical heater guidance emphasizes that environmental contaminants can shorten heater life, and airflow-dependent designs are particularly sensitive to blockage. In practical household terms:
- Store the heater covered (dust barrier) during the off-season.
- Vacuum the room area regularly; heaters draw in what the room air contains.
- Avoid running the heater in spaces with heavy aerosols or fine particulates.
Where ceramic elements fit in a broader heating-element landscape
Heating solutions span heating tubes, heating plates, and heating films, as well as integrated modules. Jinzhong describes tube constructions using resistance wire and magnesium oxide insulation within metal sheaths, and also references ceramic-substrate plate/film technologies used across appliances. Understanding these families helps explain why consumer heater cleaning should stay dry and non-invasive.
FAQ
Is it safe to use water or household spray cleaner on the heater grille?
It is safer to avoid liquids. Moisture can migrate into the housing toward electrical connections. Dry vacuuming and brushing are the preferred methods for airflow restoration.
Why does the heater smell after cleaning?
A brief odor can occur if residual dust is disturbed and then heated. Persistent strong odor may indicate remaining lint mats inside airflow channels or an electrical issue. If odor is sharp, plastic-like, or accompanied by malfunction, the unit should be inspected rather than repeatedly operated.
How does dust actually affect heater performance?
Dust reduces airflow and changes heat transfer conditions. Engineering references note that heater elements rely on their integration with insulating frameworks and surrounding environment. When airflow drops, internal temperatures can rise, increasing the chance of thermal cutoffs and premature wear.
References and outbound links
The explanation that a heating element is an assembly of conductive material plus insulating framework/lead connections, and that element integration
(suspended/supported/embedded) affects heat transfer and sensitivity to environment, is based on:
https://tutco.com/conductive/heating-elements
Manufacturer-level context about heating element families (tubes/plates/films), insulation approaches, and production capability references is based on:
https://jinzho.com/
https://jinzho.com/product-category/heating-element/heating-tubes/
https://jinzho.com/product-category/heating-element/heating-plate/
https://jinzho.com/product-category/heating-element/heating-film/
https://jinzho.com/product-category/die-casting-heating-solutions/
A consumer product example of a plug-in heating element (spec format: wattage, IP rating, UL approval, materials, warranty) is referenced here for context on how
heater components are specified in the market:
https://usa.hudsonreed.com/1000-plug-in-watt-electric-heating-element-76309
This page is informational and does not replace the heater’s printed user manual or manufacturer service instructions.

