
Su horno de recubrimiento en polvo no está calentando y la producción se ha detenido. Un elemento calefactor defectuoso es el problema más probable. La reparación suele ser sencilla. Puede probar la continuidad de los elementos calefactores y reemplazar los que estén dañados. Muchos principios de también se aplican aquí. Los principales fabricantes construyen estos componentes para garantizar la fiabilidad. Esta guía le proporciona los pasos exactos para diagnosticar el problema e instalar un reemplazo, permitiéndole volver a curar piezas rápidamente. Elemento calefactor (Continuación de la línea anterior) elementos calefactores de electrodomésticos (Continuación de la línea anterior) Fabricantes de elementos calefactores, como Calefacción eléctrica Jinzhong, (Continuación de la línea anterior).
¿Es un elemento calefactor defectuoso su verdadero problema?

Antes de solicitar una pieza de repuesto, debe confirmar que uno de los elementos calefactores es la verdadera fuente de la falla de su horno. Algunos síntomas clave apuntan directamente a un elemento defectuoso, pero otros problemas eléctricos pueden imitar el mismo síntoma. Este enfoque de diagnóstico le ahorra tiempo y dinero. (Continuación de la línea anterior) (Continuación de la línea anterior).
Señales reveladoras de un elemento en falla
Busque estos cuatro indicadores comunes. La presencia de uno o más sugiere fuertemente que un elemento ha llegado al final de su vida útil.
El horno no alcanza la temperatura objetivo
Su horno tiene dificultades para alcanzar la temperatura de curado establecida o no puede mantenerla. Este es el signo más común de un elemento fallido o debilitado. Los elementos funcionales restantes no pueden generar suficiente calor para compensar el que está averiado. (Continuación de la línea anterior) (Continuación de la línea anterior).
Los tiempos de curado se están alargando
Nota que las piezas requieren más tiempo en el horno para curarse adecuadamente. Un elemento en falla pierde eficiencia antes de romperse por completo. Esta disminución gradual en la producción de calor lo obliga a extender los tiempos de ciclo, lo que lleva a acabados inconsistentes como el efecto "cáscara de naranja" o una mala adhesión. (Continuación de la línea anterior).
Daño visible: grietas, ampollas o roturas
Una inspección visual rápida puede revelar una falla evidente. Apague el horno y busque cualquier defecto físico en la superficie del elemento.
- Grietas o roturas en la vaina del elemento son un signo definitivo de falla. (Continuación de la línea anterior).
- Ampollas o puntos abultados indican sobrecalentamiento interno y una falla inminente. (Continuación de la línea anterior).
El elemento no brilla en rojo
Durante un ciclo de calentamiento normal, debería ver que sus elementos tipo calrod brillan de un rojo opaco a brillante. Si puede observar los elementos de manera segura y nota que uno permanece oscuro mientras otros brillan, ha encontrado al culpable.
Descartando otros culpables comunes
No asuma que el elemento está defectuoso sin verificar primero estos otros componentes. Una simple falla eléctrica puede confundirse fácilmente con una falla grave de hardware. (Continuación de la línea anterior) (Continuación de la línea anterior).
Verificando la fuente de alimentación y el disyuntor
Comience con la solución más simple. Confirme que su horno esté enchufado a una toma de corriente activa. Luego, localice el disyuntor dedicado para el horno en su panel eléctrico. Asegúrese de que esté en la posición “Encendido” y que no se haya disparado. Un disyuntor disparado indica una sobrecarga eléctrica o un cortocircuito que debe investigar.
Inspeccionando fusibles y relés de estado sólido (SSR)
La caja de control de su horno contiene fusibles y relés que gestionan el flujo de energía. Un fusible fundido o un relé de estado sólido (SSR) defectuoso impedirá que la energía llegue al elemento.
Consejo profesional: verificación rápida del SSR Puede realizar una prueba básica en un SSR. Primero, verifique que el LED de entrada se encienda cuando el controlador solicite calor. Luego, use un multímetro para verificar el voltaje en el lado de salida y confirmar que está conmutando la energía correctamente., (Continuación de la línea anterior).
Verificando la función del termostato y el controlador PID
El termostato o el controlador PID es el cerebro del horno. Si funciona mal, es posible que no envíe la señal para encender los elementos. Problemas como sensores de temperatura defectuosos o configuraciones incorrectas del controlador pueden causar un curado desigual o impedir que el horno se caliente, incluso con elementos en perfecto estado.
Comprendiendo los elementos calefactores de su horno de recubrimiento en polvo
Para diagnosticar y reemplazar correctamente un componente defectuoso, primero debe comprender el hardware con el que está trabajando. Los elementos calefactores de su horno son más que simples cables; su tipo, potencia y configuración de cableado determinan el rendimiento de su horno. (Continuación de la línea anterior) (Continuación de la línea anterior).
Tipos de elementos calefactores utilizados en hornos
Los hornos utilizan diferentes tipos de elementos, cada uno con características únicas. Identificar el suyo es el primer paso.
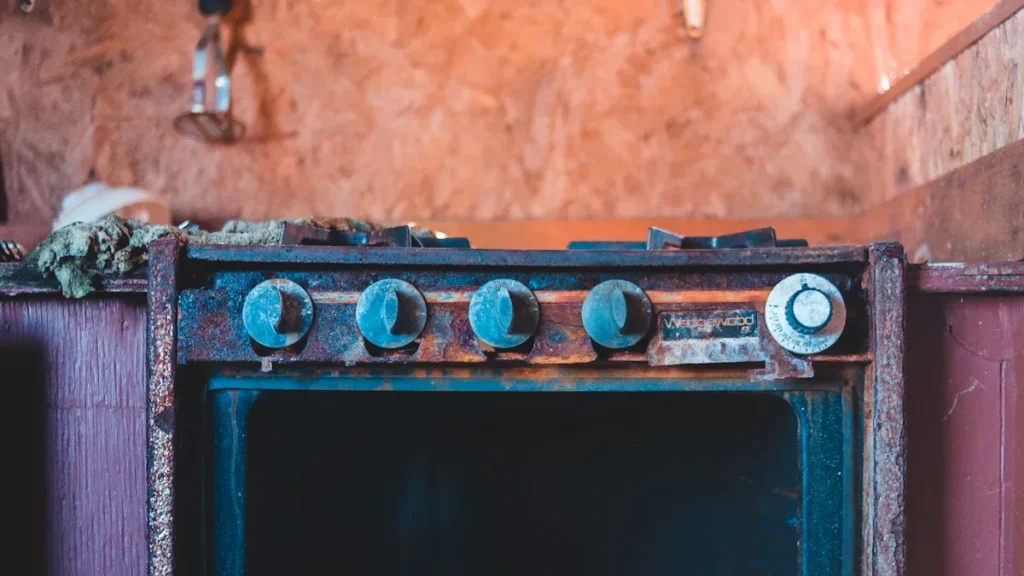
Elementos Calrod (vaina)
Estos son el tipo más común que encontrará. Un elemento Calrod tiene un cable resistivo encerrado en una vaina metálica protectora. Son conocidos por su durabilidad, versatilidad y tiempos de calentamiento rápidos. Los fabricantes los valoran porque son tanto económicos como eficientes, ofreciendo una transferencia de calor precisa para un curado consistente. (Continuación de la línea anterior). (Continuación de la línea anterior).
Elementos infrarrojos (IR) de halógeno
Los calentadores infrarrojos proporcionan un calentamiento rápido y directo. En lugar de calentar el aire, emiten radiación infrarroja que calienta directamente la superficie de la pieza. Esta tecnología ofrece una excelente eficiencia de conversión de energía eléctrica a energía radiante, lo que la convierte en una opción rápida y efectiva para ciertas aplicaciones. (Continuación de la línea anterior). (Continuación de la línea anterior).
Elementos de bobina abierta
Es poco probable que encuentre estos en equipos modernos. Los elementos calefactores de resistencia abierta son un diseño más antiguo con bobinas resistivas expuestas. La industria los ha eliminado en gran medida debido a su ineficiencia y riesgos significativos de seguridad, incluidos riesgos de descarga eléctrica y cortocircuitos. (Continuación de la línea anterior). (Continuación de la línea anterior) (Continuación de la línea anterior).
Cómo afectan el vataje y el tamaño al rendimiento
La potencia de sus elementos debe coincidir con el tamaño de su horno para un funcionamiento eficiente.
La regla de 100-150 vatios por pie cúbico
Como pauta general, la mayoría de los hornos de recubrimiento en polvo requieren entre 100 y 150 vatios de potencia de calefacción por cada pie cúbico de espacio interior. Este rango asegura que el horno pueda alcanzar y mantener las temperaturas de curado de manera efectiva.
Calculando las necesidades de su horno
Puede calcular fácilmente el volumen de su horno. Esto le ayuda a verificar si sus elementos están dimensionados correctamente.
Cálculo del Volumen del Horno
Largo Interior (pies) x Ancho Interior (pies) x Alto Interior (pies) = Pies Cúbicos (ft³)
Pies Cúbicos x 125 (vatios) = Potencia Total Objetivo
Por Qué el Voltaje (208V vs. 240V) es Importante
Debe hacer coincidir su elemento de repuesto con el suministro eléctrico de su edificio. Si bien muchos elementos están clasificados para 240V, muchos edificios comerciales suministran 208V. Un elemento de 240V funcionando a 208V producirá solo aproximadamente el 75% de su potencia nominal, lo que resultará en tiempos de calentamiento más lentos.
| Potencia del Elemento | Suministro eléctrico | Producción de Calor Real |
|---|---|---|
| 240V | 240V | 100% |
| 240V | 208V | ~75% |
Configuración y Cableado del Elemento
La forma en que los elementos están cableados entre sí impacta directamente en la producción total de calor.
Explicación del Cableado en Serie vs. en Paralelo
- Cableado en Serie: Los elementos se conectan uno tras otro, como las luces navideñas antiguas. La corriente eléctrica fluye a través de un elemento antes de pasar al siguiente.
- Cableado en Paralelo: Cada elemento se conecta directamente a la fuente de alimentación. La corriente se divide entre los elementos.
Cómo Afecta la Configuración a la Producción de Calor
Cablear los elementos en serie aumenta la resistencia total, lo que reduce la potencia general y la producción de calor. Por el contrario, cablearlos en paralelo disminuye la resistencia total, permitiendo que cada elemento consuma más corriente y produzca su calor nominal completo. La mayoría de los hornos utilizan una configuración en paralelo para un rendimiento máximo.
Reunir Sus Herramientas y la Pieza de Repuesto Correcta
Una reparación exitosa comienza con una preparación adecuada. Debe reunir las herramientas correctas y localizar la pieza de repuesto exacta antes de comenzar a desmontar su horno. Este enfoque garantiza un proceso fluido y eficiente y evita tiempos de inactividad innecesarios.
Lista de Verificación Esencial de Herramientas y Seguridad
Tener estos artículos a mano hará que el trabajo sea significativamente más fácil y seguro. Es probable que ya tenga la mayoría de estos en su taller.
Multímetro Digital
Esta es su herramienta de diagnóstico más crítica. Utilizará un multímetro digital para verificar la continuidad y confirmar que la alimentación eléctrica del horno está desconectada.
Juego de Destornilladores y Llaves de Dado
Necesita un buen juego de destornilladores para retirar los paneles de acceso del horno y el hardware de montaje que asegura el elemento en su lugar. Las puntas magnéticas son una ventaja útil.
Alicates de Punta Fina y Llaves
Estas herramientas son esenciales para trabajos eléctricos. Usará alicates para manipular cables y conectores pequeños. Las llaves son necesarias para aflojar las tuercas en los postes terminales del elemento.
Guantes y Gafas de Seguridad
Priorice siempre su seguridad. 🛡️
- Guantes Aislantes: Lo protegen de posibles descargas eléctricas.
- Gafas de Seguridad: Protegen sus ojos de residuos o arcos eléctricos accidentales.
Cómo Obtener los Elementos Calefactores de Repuesto Correctos
Debe instalar un elemento de repuesto que coincida con las especificaciones del original. Usar la pieza incorrecta puede provocar un rendimiento deficiente, daños en su horno o un peligro para la seguridad.
Cómo Encontrar el Número de Pieza en el Elemento Viejo
La forma más fácil de encontrar una pieza compatible es utilizando el número de pieza. Inspeccione la base metálica o la brida de montaje del elemento viejo. Los fabricantes suelen estampar o grabar el número de pieza, el voltaje y la potencia directamente en esta superficie.
Consejo profesional: Si los números son tenues, use un cepillo de alambre y una linterna para hacerlos más legibles. Tome una foto clara de la información con su teléfono para referencia.
Medición de Dimensiones y Soportes de Montaje
Si no puede encontrar un número de pieza, debe tomar medidas precisas. Anote la longitud, el ancho, la separación de los terminales y la configuración de los soportes de montaje del elemento. Estos detalles son cruciales para encontrar un repuesto compatible.
Dónde Comprar: Piezas OEM vs. Piezas de Mercado de Repuestos
Puede comprar piezas del Fabricante de Equipo Original (OEM) directamente al fabricante de su horno o a un distribuidor autorizado. Los elementos calefactores del mercado de repuestos ofrecen una alternativa rentable. Para piezas específicas, The Fab Shop ofrece elementos de 5,000 vatios diseñados para hornos de recubrimiento en polvo. Si está buscando una gama más amplia de proveedores, los directorios en línea pueden ser muy útiles.
- Heating-Elements.com proporciona listas de varios fabricantes y proveedores.
- PowderCoatingOnline.com es un directorio enfocado en equipos de recubrimiento y piezas de repuesto.
La Guía Definitiva para Probar Sus Elementos Calefactores
Ha identificado el problema potencial. Ahora realizará una prueba definitiva para confirmar un elemento defectuoso. Este proceso es metódico y requiere un enfoque en la seguridad. Siga estos pasos con precisión para obtener un diagnóstico preciso.
Paso 1: Seguridad Primero—Corte la Alimentación Eléctrica
Nunca debe trabajar en equipos eléctricos mientras estén energizados. Desenergizar su horno es el paso más crítico. Los profesionales utilizan un procedimiento formal de Bloqueo/Etiquetado (LOTO) para garantizar la seguridad. Puede seguir una versión simplificada de este estándar industrial.
- Informar a Otros: Notifique a cualquier personal cerca del horno que lo está apagando para mantenimiento.
- Apagar: Apague el horno usando su interruptor de alimentación principal o controles.
- Aislar la Energía: Desenchufe el horno y apague el disyuntor.
- Verificar el Aislamiento: Use su multímetro para confirmar que el horno esté completamente desenergizado.
Desenchufe el Horno de la Toma de Corriente
Su primera acción es desconectar físicamente el horno de su fuente de alimentación. Desenchufe el cable de alimentación principal de la toma de pared. Este paso elimina inmediatamente el flujo primario de electricidad.
Apague el disyuntor dedicado
A continuación, localice el panel eléctrico principal de su edificio. Encuentre el disyuntor dedicado al horno de recubrimiento en polvo. Coloque el disyuntor en la posición “Off” (Apagado). Esta acción proporciona una segunda capa de protección, asegurando que no llegue energía al tomacorriente. Puede aplicar un candado o una etiqueta al disyuntor para evitar que alguien lo vuelva a encender accidentalmente.
Use su multímetro para confirmar que no hay energía
Esta es su verificación final de seguridad. Configure su multímetro para medir voltaje de CA (V~). Toque con cuidado las puntas de prueba del multímetro a los terminales dentro de la caja de conexión de energía del horno.
Una lectura correcta para un circuito desenergizado es 0 voltios. Su multímetro debe mostrar ‘0’ o un valor muy cercano a este. Cualquier otra lectura indica la presencia de voltaje peligroso. Debe detenerse y volver a verificar los pasos anteriores antes de continuar.
Paso 2: Acceso a los terminales del elemento
Con la energía desconectada de forma segura, ahora puede acceder a los puntos de conexión del elemento. Estos generalmente se encuentran detrás de un panel extraíble en la parte posterior o superior del horno.
Retiro de los paneles de acceso del horno
Use su destornillador o llave de dados para retirar los tornillos que sujetan el panel de acceso principal. Coloque el panel y sus tornillos en un lugar seguro. Esto expondrá el cableado interno del horno, los relés y los terminales de los elementos calefactores.
Identificación de los puntos de conexión del elemento
Busque los extremos de los elementos que sobresalen a través de la pared interior del horno. Cada elemento tendrá dos postes roscados con cables sujetos por tuercas o conectores. Estos son los terminales a los que necesita acceder para realizar la prueba.
Consejo: Use una bandeja magnética para los tornillos
Un espacio de trabajo organizado es un espacio de trabajo seguro. Coloque todos los tornillos, tuercas y herrajes pequeños en una bandeja magnética para piezas. Este sencillo truco evita la pérdida de sujetadores y acelera el reensamblaje. 🧲
Paso 3: Realización de la prueba de continuidad
La prueba de continuidad determina si el cable interno de un elemento está intacto o roto. Un cable completo y sin roturas permite que fluya la electricidad y genere calor. Un cable roto crea un circuito abierto y el elemento no funcionará.
Configuración de su multímetro en ohmios (Ω)
Gire la perilla de su multímetro digital a la configuración de resistencia, marcada con el símbolo omega (Ω). Si su multímetro tiene varios rangos, seleccione la configuración de 200 ohmios. Antes de comenzar, toque las dos puntas de prueba juntas. El multímetro debe leer 0.0 o un valor muy cercano, confirmando que funciona correctamente.
Cómo colocar correctamente las puntas de prueba
Primero, debe desconectar los cables del elemento que está probando. Use una llave inglesa o un destornillador de dados para retirar con cuidado las tuercas y desconectar los conectores de los cables de los dos terminales. Ahora, presione firmemente una punta de prueba del multímetro contra cada uno de los dos terminales desnudos del elemento. La polaridad de las puntas de prueba no importa para esta prueba.
Qué significa la lectura: Continuidad vs. Circuito abierto
El número en la pantalla de su multímetro indica el estado del elemento.
- Continuidad: Una lectura numérica específica indica que la bobina interna está completa. La electricidad puede fluir a través de ella.
- Circuito abierto: Una lectura de “OL” o infinito (∞) significa que la bobina interna está rota. La electricidad no puede pasar.
Paso 4: Interpretación de los resultados
Los números en la pantalla de su multímetro proporcionan el veredicto final sobre el estado de su elemento calefactor. Una interpretación correcta es crucial. Le indica si debe proceder con un reemplazo o continuar su diagnóstico en otro lugar.
Una lectura buena (10-50 ohmios)
Tiene un elemento bueno si su multímetro muestra un valor de resistencia específico. Para la mayoría de los elementos de hornos de recubrimiento en polvo, esta lectura estará entre 10 y 50 ohmios (Ω).
Una lectura en este rango confirma que la bobina interna del elemento está intacta. Proporciona un camino completo y sin interrupciones para que la electricidad fluya y genere calor. El elemento es eléctricamente sólido.
Consejo profesional: ¿Por qué no es cero? El valor de resistencia está determinado por la longitud y el calibre del cable dentro del elemento. Un elemento más largo o más potente tendrá una resistencia diferente a uno más pequeño. La conclusión clave es que una lectura específica de baja resistencia indica un circuito continuo y saludable.
Si obtiene una lectura buena, es probable que su problema de calefacción esté en otro lugar. Debe reexaminar otros componentes como el SSR, el controlador o las conexiones de cableado.
Una lectura mala (OL o infinito)
Ha encontrado el culpable si la pantalla de su multímetro muestra “OL” (Circuito abierto), un símbolo de infinito (∞), o simplemente no cambia de su lectura predeterminada.
Este resultado significa que el cable interno se ha roto. Piense en ello como un puente que está fuera de servicio en una carretera; el tráfico (electricidad) no puede cruzar. No puede fluir corriente a través del elemento, por lo que no puede producir calor. Este elemento ha fallado y debe ser reemplazado.
| Lectura del multímetro | Interpretación | Acción requerida |
|---|---|---|
| 10-50 Ω | ✅ Elemento bueno (Continuidad) | Investigue otros componentes. |
| OL o ∞ | ❌ Elemento malo (Circuito abierto) | Reemplace el elemento calefactor. |
Cómo probar una falla a tierra
Una falla a tierra es una condición peligrosa donde el cable caliente interno del elemento hace contacto con su vaina metálica exterior. Esto puede causar un cortocircuito, disparar los disyuntores o crear un grave riesgo de descarga eléctrica. Debe probar esta falla antes de instalar un elemento nuevo o reutilizar uno viejo.
⚠️ Una falla a tierra presenta un riesgo de seguridad significativo. Debe identificar y reemplazar cualquier elemento con conexión a tierra de inmediato.
Siga este proceso para probar una falla a tierra:
- Asegúrese de que los cables aún estén desconectados de ambos terminales del elemento.
- Configure su multímetro en la configuración de resistencia más alta (Ohmios Ω).
- Toque firmemente una punta de prueba del multímetro a uno de los terminales del elemento.
- Toque la otra punta de prueba en un punto limpio y sin pintura de la vaina metálica del elemento o su soporte de montaje. Esta vaina es la tierra.
- Observe la lectura. Un elemento saludable y sin conexión a tierra debe mostrar “OL” o infinito (∞). Esto indica que no hay conexión eléctrica entre el cable interno y la vaina exterior.
- Repita la prueba usando el otro terminal del mismo elemento.
Si obtiene alguna lectura de resistencia numérica durante esta prueba, especialmente una baja, el elemento tiene una falla a tierra. Está comprometido y no es seguro. Debe desecharlo y reemplazarlo, incluso si pasó la prueba de continuidad inicial.
Paso a paso: Reemplazo del elemento calefactor defectuoso

Ha confirmado con éxito que el elemento está defectuoso. Ahora realizará el reemplazo. Este procedimiento es metódico y requiere atención cuidadosa a los detalles. Trabajar de manera sistemática garantiza una reparación segura y efectiva, restaurando su horno a su capacidad operativa completa.
Paso 1: Documentar y desconectar el elemento viejo
Antes de retirar cualquier pieza, debe crear un registro claro de las conexiones existentes. Esta documentación es su herramienta más valiosa durante el reensamblaje.
Tome una fotografía clara del cableado
Su teléfono inteligente es una herramienta esencial aquí. Tome varias fotografías claras y bien iluminadas del cableado del elemento desde diferentes ángulos. Capture exactamente cómo se conectan los cables a los bornes. Esta referencia visual elimina cualquier conjetura al instalar la pieza nueva.
Etiquete los cables si las conexiones son complejas
Para Hornos con múltiples elementos calefactores O cableado complejo, las fotografías por sí solas pueden no ser suficientes. Use cinta de pintor y un marcador para crear pequeñas etiquetas para cada cable. Un sistema de numeración simple (por ejemplo, “1A”, “1B”) correspondiente a cada borne evitará confusiones.
Afloje y retire los cables con cuidado
Use una llave o un destornillador de tuercas para aflojar las tuercas en los bornes del elemento. Los terminales de anillo que conectan los cables probablemente sean de acero niquelado. Este material está clasificado para uso continuo a altas temperaturas de hasta 482 °C (900 °F), lo que evita que se derritan o corroan. Una vez que las tuercas estén fuera, tire suavemente de los terminales de los cables para separarlos de los bornes.
Los cables en sí también están especializados para entornos de alta temperatura. Su horno probablemente utiliza uno de los siguientes tipos:
| Tipo de cable | Aislamiento/Cubierta | Temperatura Máxima |
|---|---|---|
| MG (Alta temperatura) | Cinta de mica reforzada con vidrio, cubierta trenzada de fibra de vidrio | 450 °C (842 °F) |
| TGGT (Estándar) | Hilo de fibra de vidrio envuelto sobre teflón, cubierta trenzada de fibra de vidrio | 250 °C (482 °F) |
Paso 2: Retire el elemento viejo del horno
Con las conexiones eléctricas desconectadas de forma segura, ahora puede retirar el elemento averiado de la cavidad del horno.
Desatornille los soportes de montaje interiores
Muévase al interior del horno. Localice los tornillos o pernos que fijan los soportes de montaje del elemento a la pared del horno. Use el destornillador o llave de tuercas adecuado para retirar este herraje. Recuerde colocar todos los sujetadores en su bandeja magnética.
Deslice suavemente el elemento viejo hacia afuera
Agarre firmemente el elemento viejo y deslícelo fuera del horno. Sea cuidadoso durante este proceso. Un elemento viejo puede ser frágil, especialmente cerca de las uniones soldadas, y debe retirarlo en una sola pieza. Tire de él hacia afuera en línea recta para evitar dañar los orificios de montaje.
Limpie el área de montaje y los bornes
Antes de instalar la pieza nueva, tómese un momento para limpiar el área. Use un cepillo de alambre para eliminar cualquier óxido, hollín o residuo de las superficies de montaje interiores. También limpie el área alrededor de los orificios de paso de los bornes en el exterior. Una superficie limpia garantiza una conexión mecánica y eléctrica sólida.
Paso 3: Instale el nuevo elemento calefactor
Ahora está listo para instalar la pieza de repuesto. Manipule el elemento nuevo con cuidado para evitar daños que puedan provocar una falla prematura.
Guíe con cuidado el nuevo elemento a su lugar
Deslice suavemente el nuevo elemento dentro del horno a través de los orificios de montaje. Alinee los bornes para que pasen limpiamente a través de la pared exterior. Asegúrese de que los soportes de montaje del elemento se alineen perfectamente con los orificios para tornillos en la pared interior.
Fije firmemente los soportes de montaje
Vuelva a instalar los tornillos o pernos para asegurar los soportes de montaje interiores. Apriételos hasta que queden ajustados y firmes. Esto asegura que el elemento se mantenga de forma segura y no vibre ni se desplace durante el funcionamiento. Evite apretar en exceso, ya que podría pelar los tornillos o dañar el soporte.
Asegúrese de que no toque las paredes del horno
Inspeccione visualmente el elemento recién instalado desde el interior del horno. Confirme que haya un espacio libre adecuado en todos los lados. El elemento no debe tocar las paredes interiores del horno ni ningún otro componente. El contacto directo puede crear un punto caliente, causar un cortocircuito y provocar un curado desigual.
Mejores prácticas de instalación 💡 Para garantizar una larga vida útil de su nuevo elemento, siga estos consejos profesionales de manipulación:
- Proporcione holgura: Deje una pequeña cantidad de holgura en los cables conductores del elemento. Esto permite la expansión y contracción durante los ciclos de calor, evitando tensiones en las conexiones.
- Evite tensionar las soldaduras: Manipule las áreas soldadas con especial cuidado. No tuerza ni flexione las varillas del elemento al apretar las conexiones, ya que esto puede agrietar las uniones frágiles.
- Doble los cables con cuidado: Si necesita doblar un cable conductor, use alicates de punta blanda para evitar dañar las conexiones internas.
Paso 4: Vuelva a conectar los cables de forma segura
Ahora ha llegado a la fase final y más crítica de la instalación. Una conexión eléctrica adecuada es primordial tanto para la seguridad como para el rendimiento. Debe volver a conectar los cables correctamente para garantizar que su horno funcione de manera confiable.
Consulte su fotografía del “antes”
Este es el momento en que su documentación anterior se vuelve invaluable. Abra las fotografías que tomó antes de desconectar el elemento viejo. Su fotografía sirve como el plano definitivo para el reensamblaje.
Su guía visual 📸 Compare su fotografía con el estado actual del cableado. Confirme la ruta de cada cable y su borne designado. Este simple paso de verificación evita un cableado incorrecto, que podría dañar el elemento nuevo o el sistema de control del horno.
Conecte los cables a los nuevos bornes
Ahora volverá a conectar los cables de alta temperatura al nuevo elemento. Trabaje metódicamente para replicar la configuración original.
- Recupere el cable para el primer borne, consultando su fotografía o etiqueta.
- Coloque el terminal de anillo del cable sobre el borne roscado del nuevo elemento.
- Enrosque la tuerca correspondiente en el borne. Apriétela primero con la mano para asegurarse de que no esté cruzada.
- Repita este proceso para el segundo borne.
Asegúrese de que los cables no estén estirados ni torcidos. Deben descansar de forma natural sin ejercer tensión sobre los puntos de conexión.
Asegúrese de que todas las conexiones estén apretadas
Una conexión floja es una causa principal de fallas eléctricas. Crea una alta resistencia, que genera calor intenso en el borne en lugar de dentro del elemento. Esto puede derretir los cables, dañar el elemento nuevo y crear un riesgo de incendio.
Use su llave o destornillador de tuercas para apretar las tuercas en ambos bornes. La conexión debe quedar ajustada y firme. Debe comprimir el terminal de anillo de forma segura contra el borne. Evite la fuerza excesiva, ya que apretar en exceso puede pelar las roscas o romper el borne.
La regla del “ajuste firme” 🔩 Apriete la tuerca hasta que se detenga, luego déle un cuarto de vuelta final. El terminal del cable no debe poder moverse ni girar sobre el borne.
| Calidad de la conexión | Resultado |
|---|---|
| ✅ Conexión Apretada | Baja resistencia, flujo de energía eficiente, operación segura. |
| ❌ Conexión Floja | Alta resistencia, acumulación de calor, riesgo de arco eléctrico y fallo. |
Después de apretar, realice una última verificación visual. Confirme que el metal descubierto de los terminales del cable no esté en contacto con el chasis del horno ni con ningún otro cable cercano. El espacio adecuado es esencial para prevenir un cortocircuito.
Verificaciones Finales y Encendido
Ha instalado exitosamente el nuevo componente. Ahora, realizará las verificaciones finales para garantizar un arranque seguro y exitoso. Este proceso cuidadoso y paso a paso valida su trabajo y prepara su horno para volver a funcionar.
Reensamblaje de su Horno de Pintura en Polvo
El reensamblaje adecuado es tan importante como la reparación en sí. Debe restaurar el horno a su condición original para garantizar una operación segura y eficiencia térmica.
Reemplace Todos los Paneles y Cubiertas
Comience reinstalando el panel de acceso que retiró anteriormente. Alinee correctamente el panel con sus orificios para tornillos. Inserte todos los tornillos y apriételos hasta que queden ajustados. Un horno correctamente sellado mantiene su temperatura interna de manera más efectiva y contiene el calor.
Realice una verificación final de todos los tornillos
Tómese un momento para dar un vistazo final al horno. Confirme que ha apretado todos los sujetadores del panel de acceso y de las soportes de montaje del elemento. Un ensamblaje seguro evita vibraciones y garantiza que todos los componentes permanezcan en su lugar de forma segura durante el funcionamiento.
El momento de la verdad: probando su trabajo
Con el horno completamente reensamblado, está listo para restablecer la energía y probar el nuevo elemento. Aquí es donde verá el resultado de sus esfuerzos.
Restablezca la energía del horno de forma segura
Siga una secuencia de encendido deliberada para mantener la seguridad.
- Primero, vuelva a conectar el cable de alimentación principal del horno al tomacorriente de la pared.
- A continuación, diríjase a su panel eléctrico y vuelva a colocar el interruptor de circuito dedicado en la posición “Encendido”.
Seguridad primero ⚠️.
Establezca una temperatura baja (por ejemplo, 200°F)
Encienda los controles principales del horno. Ajuste el controlador PID o termostato a una temperatura baja, como 200°F (93°C). Esto permite que el nuevo elemento se caliente gradualmente y le da la oportunidad de observar su funcionamiento inicial.
Confirme visualmente que el nuevo elemento brilla
Si puede ver el interior del horno de forma segura, observe que el nuevo elemento comienza a brillar en un rojo tenue. Esta confirmación visual es la señal más clara de que su reparación fue exitosa. El elemento está recibiendo energía y convirtiéndola en calor según lo previsto.
Ejecución de un ciclo de prueba completo
Un elemento que brilla es una gran señal, pero es necesario un ciclo de prueba completo para confirmar que el horno está listo para la producción.
Lleve el horno a una temperatura de curado estándar
Aumente el punto de ajuste en su controlador a una temperatura de curado típica, como 400°F (204°C). Permita que el horno alcance completamente la temperatura.
Monitoree para un calentamiento estable y uniforme
Observe la pantalla del controlador para asegurarse de que el horno alcance la temperatura objetivo y la mantenga estable. Una lectura de temperatura estable indica que el controlador, los relés y el nuevo elemento están funcionando correctamente en conjunto. Su horno ahora está reparado y listo para volver a curar piezas.
Felicitaciones. Ha diagnosticado y reemplazado exitosamente el elemento calefactor de su horno. Ha dominado un aspecto crítico del mantenimiento del equipo. Esta reparación de bricolaje le ahorra dinero y elimina costosos tiempos de inactividad. También le brinda una comprensión más profunda de su sistema de pintura en polvo. Su horno ahora funciona como nuevo. Es hora de volver a crear esos acabados duraderos e impecables.
PREGUNTAS FRECUENTES
¿Con qué frecuencia debo esperar reemplazar un elemento calefactor?
La vida útil del elemento varía según el uso y el entorno. Con un uso regular, puede esperar que los elementos duren varios años. Una operación pesada y continua o ciclos de encendido/apagado frecuentes pueden acortar esta vida útil. Debe realizar inspecciones anuales para detectar posibles fallas de manera temprana.
¿Puedo actualizar a un elemento de mayor vataje para un calentamiento más rápido?
Debe evitar esto. El cableado, los relés y el controlador de su horno están clasificados para una carga eléctrica específica. Instalar un elemento de mayor vataje puede sobrecargar estos componentes. Esto crea un grave riesgo de incendio y puede dañar su equipo. Siempre coincida con las especificaciones de la pieza original.
¿Por qué mi elemento calefactor nuevo falló tan rápidamente?
Una falla prematura a menudo apunta a un problema de instalación o a un problema externo.
Causas comunes:
- Una conexión eléctrica suelta creó un punto caliente.
- El elemento fue dañado durante la instalación.
- El voltaje de su horno es incorrecto para la pieza.
¿Es seguro alguna vez reparar un elemento calefactor agrietado?
No. Nunca debe intentar reparar un elemento agrietado o roto. Una vaina dañada expone la bobina interna bajo tensión, creando un riesgo grave de descarga eléctrica y cortocircuitos. Siempre debe reemplazar inmediatamente un elemento físicamente dañado por seguridad.
¿Qué pasa si todos los elementos prueban estar bien pero el horno aún no calienta?
Si sus elementos muestran buena continuidad, debe investigar otros componentes en el circuito de calefacción. Vuelva a verificar los relés de estado sólido (SSR), los fusibles y las conexiones del cableado. El problema también puede originarse en un controlador PID defectuoso o en un sensor de temperatura.
¿Cómo sé si mi taller tiene energía de 208V o 240V?
Puede usar su multímetro para determinar su voltaje. Ajústelo a Voltaje de CA (V~). Pruebe con cuidado el tomacorriente de pared que utiliza su horno. Una lectura alrededor de 208V indica una fuente de alimentación trifásica, mientras que una lectura cercana a 240V indica alimentación monofásica.

