If your water heater stops producing hot water, you often face a simple issue with the water heater element. You can quickly restore comfort by checking this component first. Many homeowners choose to replace a heating element themselves, saving both time and money.
- Repairing a water heater element costs between $200 and $300.
- The heating element itself is about $20.
- Labor and materials from heating element manufacturers or service providers can push costs up to $300.
Jinzhong Electric Heating supplies reliable household appliance heating elements, making do-it-yourself repairs accessible.
Why the Water Heater Element Is Often the Problem
When your water heater stops working, you often find the water heater element at fault. You rely on heating elements to warm the water in your tank. If these components fail, your electric water heater cannot deliver hot water. Appliance repair experts report that heating elements experience more frequent failures than other water heater parts.
Common Reasons for Water Heater Element Failure
Mineral Buildup on Heating Elements
Mineral buildup presents a major challenge for heating elements. Hard water contains minerals that settle inside your water heater tank. Over time, these minerals form a layer of sediment around the element. This sediment insulates the heating element, causing it to overheat and eventually burn out. You may hear popping or crackling noises from the tank when sediment builds up.
Tip: Flushing your water heater tank regularly helps reduce mineral buildup and extends the life of your heating element.
Age and Wear of Water Heater Element
Heating elements do not last forever. Wear and tear from constant heating cycles weaken the element. Most water heater elements last between six and ten years. As the element ages, it loses efficiency and may fail to heat water properly. Scaling or corrosion also accelerates wear, especially in older units.
Electrical Issues and Power Surges
Electrical issues often damage heating elements. Power surges, faulty wiring, or loose connections can cause the element to short out. If your circuit breaker trips repeatedly, you may have an electrical problem affecting the water heater element. Mechanical damage from improper installation or maintenance can also lead to failure.
Signs Your Water Heater Element Needs Attention
No Hot Water at All
You notice cold water coming from your taps. This usually means the water heater element has failed completely. If both heating elements stop working, your water heater cannot produce hot water.
Water Not Getting Hot Enough
You may experience inconsistent water temperature or only lukewarm water. A failing heating element cannot reach the set temperature. Reduced hot water volume or water taking longer to heat also points to a struggling element.
Tripped Breaker or Blown Fuse
A tripped breaker or blown fuse signals an electrical issue with your water heater. Repeated tripping often indicates a deteriorating element or faulty wiring. You should inspect the water heater element if you notice this problem.
Note: Newer water heaters may display error codes when the element malfunctions. Always check your unit’s manual for troubleshooting tips.
Safety Steps Before Testing the Heating Elements
Before you begin any work on your water heater, you must take safety seriously. Water heaters operate with high voltage and hot water, which can pose significant risks if you do not follow proper procedures. You can avoid accidents by following these essential safety steps.
Turning Off Power to the Water Heater
Locating and Flipping the Circuit Breaker
You should always power down your water heater before opening any panels or touching electrical components. Locate your home’s electrical panel and find the breaker labeled for your water heater. Flip the switch to the “off” position. This step prevents electrical shock and protects you from injury.
Double-Checking for Electrical Safety
After you power down your water heater at the breaker, confirm that no electricity flows to the unit. Use a non-contact voltage tester to check the wires inside the access panel. If the tester lights up or beeps, electricity remains present. Do not proceed until you verify the power is off. This extra check ensures your safety and prevents accidental shocks.
⚠️ Safety Alert: Testing or replacing water heater elements without proper precautions can lead to serious risks, including:
- Carbon monoxide poisoning
- Explosions (rare but possible)
- Gas leaks
- Scalding
These dangers highlight the importance of correct installation, regular maintenance, and strict adherence to safety guidelines. Always take the time to power down your water heater and double-check for electrical safety.
Gathering Tools for Testing the Heating Elements
Essential Tools and Supplies
You need the right tools to test your water heater element safely and accurately. Gather the following items before you start:
- Multimeter (for measuring electrical resistance and voltage)
- Flathead and Phillips screwdrivers (for removing access panels)
- Non-contact voltage tester (for confirming power is off)
- Electrical tape (for securing wires if needed)
- Torch or flashlight (for better visibility)
These tools help you perform the job efficiently and reduce the risk of mistakes.
Safety Gear for Working on Water Heater
Personal protective equipment keeps you safe during the process. Wear insulated gloves to protect your hands from electrical shock. Use eye protection to shield your eyes from debris or accidental splashes. Good lighting ensures you see all components clearly and avoid mishaps.
Tip: Always read and understand the manufacturer’s instructions and safety warnings before you begin. Never attempt repairs if your water heater appears damaged or leaks. Hire a licensed professional for installation or major repairs, and schedule regular inspections to keep your system safe.
By following these steps and using the correct tools, you create a safe environment for testing and replacing your water heater element. Remember to power down your water heater every time you work on it.
Accessing the Water Heater Element

When you need to access the elements inside your water heater, you must follow a systematic approach. This process helps you avoid damage and ensures your safety. You will start by removing the access panel and then locate the heating elements inside the tank.
Removing the Access Panel on the Water Heater
Finding the Correct Panel
You will find the access panel on the side of your electric water heater. Most units have two panels—one for the upper heating element and one for the lower. Look for panels secured with screws. Use a screwdriver to remove these screws. Place them in a safe spot so you do not lose them. Once you remove the screws, gently lift the panel away from the tank. This step allows you to access the elements for inspection or testing.
Handling Insulation and Covers Safely
After you remove the panel, you will see insulation covering the heating element. You must handle this insulation with care. Follow these best practices to ensure safety:
- Make sure all covers remain secured to reduce the risk of fire and electric shock.
- Replace the plastic protector after you finish your work.
- Put the insulation back in place once you complete your inspection.
- Reinstall the upper heating element cover before restoring power.
Tip: Wear gloves when handling insulation to protect your skin from irritation. Always keep the workspace clean to avoid losing small parts.
Locating the Heating Elements Inside the Water Heater
Identifying Upper and Lower Heating Elements
Inside the tank, you will find two heating elements. The upper heating element heats the water in the top portion of the tank first. Once the top reaches the desired temperature, the upper thermostat switches power to the lower element. The lower heating element maintains the temperature of stored water after the tank fills.
You can identify the elements by following this sequence:
- The upper heating element activates first when hot water is needed.
- After the upper portion reaches the set temperature, the thermostat activates the lower heating element.
- The lower heating element keeps the water in the tank hot.
This process ensures your water heater delivers hot water efficiently.
Recognizing the Water Heater Element
You will recognize the water heater element by its metal flange and electrical terminals. The element sits inside the tank, with wires connected to its terminals. You may see mineral deposits or discoloration if the element has failed. Use a flashlight to inspect the area closely. Make sure you access the elements only after confirming the power is off.
Note: If you cannot access the elements easily, consult your water heater’s manual for guidance. Some models have unique panel designs or insulation types.
By following these steps, you can access the elements safely and prepare for testing or replacement. Careful handling of panels and insulation protects both you and your water heater.
Testing the Heating Elements with a Multimeter
When your water heater stops producing hot water, you need to check the heating elements. Testing the heating elements with a multimeter helps you identify a faulty element quickly and safely. This process ensures you do not replace parts unnecessarily and helps restore your hot water efficiently.
Setting Up the Multimeter for Testing
Selecting the Correct Resistance Setting
You must set your multimeter to the lowest resistance setting, usually marked as Ω (ohms). This setting allows you to measure the electrical resistance of the heating element accurately. Most digital multimeters have a dial or button for this adjustment. Always double-check the setting before you begin testing.
Preparing the Water Heater Element for Testing
Before you start the testing process, follow these steps to ensure safety and accuracy:
- Turn off the circuit breaker for your water heater at the main electrical panel.
- Wait for the water in the tank to cool. You can run hot water from a tap until it feels lukewarm.
- Remove the metal access panel on the side of the water heater using a screwdriver.
- Put on rubber gloves and safety goggles. Remove the insulation inside the panel to expose the heating element.
- Identify the heating element. It looks like a round or hexagonal object with a plastic plate, held in place by screws.
- Loosen one screw on the heating element and disconnect the attached wire. This step isolates the element for accurate testing.
⚡ Tip: Always confirm the power is off with a non-contact voltage tester before touching any wires.
How to Test the Water Heater Element
Measuring Resistance of Heating Elements
To test the elements, follow this procedure:
- Place one probe of the multimeter on the loose screw of the heating element.
- Place the other probe on the remaining screw of the same element.
- Observe the reading on the multimeter display.
Repeat this process for both the upper and lower heating elements. Testing both ensures you do not miss a burned-out element.
What Resistance Readings Mean
A functional heating element typically shows a resistance reading between 10 and 30 ohms. If your multimeter displays a very low value, zero, or infinity, you likely have a faulty element. The exact resistance depends on the wattage and voltage of your water heater. Use the following table to compare your readings:
| Element Wattage | Resistance Range (Ohms) |
|---|---|
| 1500 watts, 240V | 33 to 43 |
| 2000 watts, 240V | 24 to 32 |
| 3500 watts, 240V | 13 to 19 |
| 4500 watts, 240V | 11 to 15 |
| 5500 watts, 240V | 9 to 12 |
| 750 watts, 120V | 16 to 22 |
| 1000 watts, 120V | 11.5 to 16.5 |
| 1500 watts, 120V | 8 to 12 |
| 2000 watts, 120V | 6 to 8 |
| 2500 watts, 120V | 5 to 7 |
| 3000 watts, 120V | 4 to 6 |
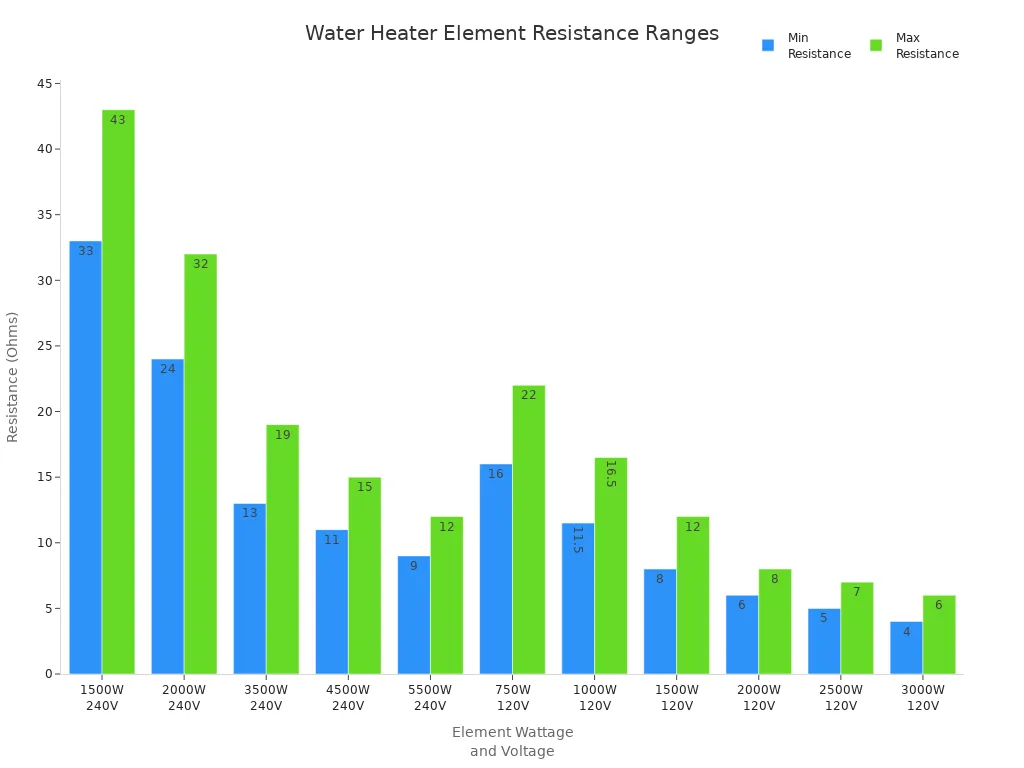
Note: If your reading falls outside the expected range, you have identified a faulty element.
Interpreting the Results of Testing the Heating Elements
Good vs. Faulty Water Heater Element Readings
You can interpret your test results using these guidelines:
- A good heating element will show a resistance between 10 and 30 ohms, or within the range listed for your specific wattage and voltage.
- A faulty element will show a reading of zero, infinity, or a value far outside the normal range.
- If your multimeter does not move or displays no reading, the element is defective.
🛠️ Alert: If you find a short circuit (the test buzzer sounds or the test light comes on when you connect a probe to the element bracket), do not attempt to replace the element yourself. Contact a professional for further repairs.
What to Do If the Element Is Bad
If your testing confirms a faulty element, you need to replace it. Reattach any wires you disconnected, replace the insulation, and secure the metal cover panels before restoring power. Do not turn the water heater back on until you have completed all repairs and ensured everything is safe.
Testing the heating elements with a multimeter gives you a clear answer about the condition of your water heater element. This step-by-step approach helps you avoid unnecessary replacements and keeps your water heater running efficiently.
Replacing a Faulty Water Heater Element
When you discover a faulty water heater element, you need to follow a precise process to ensure a safe and successful replacement. This section guides you through removing the old heating element, installing the new one, and restarting your water heater.
Removing the Old Water Heater Element
Draining the Water Heater Tank
Before you begin, you must drain the water heater tank. This step prevents water from spilling when you remove the heating element. You should always let the water run cool before draining the tank. This precaution reduces the risk of scalding. Use a volt meter or circuit tester to confirm the power is off, which protects you from electrical shock.
- Wait until the water inside the tank feels cool.
- Confirm the power is off by checking wires with a circuit tester.
- Attach a hose to the drain valve at the bottom of the tank.
- Direct the hose to a safe drainage area.
- Open the drain valve and allow the tank to empty completely.
Tip: Open a hot water faucet in your home to help the tank drain faster and release any vacuum pressure.
Unscrewing and Removing the Element
Once the tank is empty, you can remove the heating element. You want to avoid damaging the tank during this process. Use the following methods for best results:
- Apply penetrating oil to the base of the element and let it sit overnight if the element feels stuck.
- Use a proper heating element wrench to avoid stripping the threads.
- Tap gently around the element base with a rubber mallet to break any corrosion seals.
- If the element remains stuck, heat the surrounding metal slightly with a heat gun or torch to expand it.
- Use a high-quality socket and a long breaker-bar for extra leverage.
Careful removal ensures you do not harm the tank or surrounding components.
Installing the New Water Heater Element
Choosing the Right Replacement Element
Selecting a compatible replacement is essential for your water heater’s performance. You need to match the specifications of your unit. Use the table below to guide your selection:
| Criteria | Description |
|---|---|
| Element Flange Style | Determine the flange style (Screw-In, Flat, Universal, Round Head) to ensure compatibility. |
| Voltage/Wattage | Match the voltage (120v or 240v) and wattage (1000 to 6000 watts) to the specifications of the heater. |
| Watt Density | Consider the watt density to ensure efficient heating and compatibility with the water heater model. |
Check your water heater’s manual or the label on the tank for these details before you purchase a new heating element.
Securing and Sealing the New Element
Proper sealing prevents leaks and ensures long-term reliability. Follow these steps to secure the new heating element:
- Place a new gasket or O-ring on the base of the heating element. Never reuse the old gasket.
- If your model uses threaded connections, wrap Teflon tape around the threads.
- Insert the heating element into the tank and tighten it clockwise with a heating element wrench. Do not over-tighten.
- Reconnect the wires to the terminals in their original positions. Secure the connections with a screwdriver.
- Inspect all connections and seals before refilling the tank.
- Clean the tank opening with a rag or brush before installing the new heating element.
Note: Wrapping Teflon tape around threaded connections helps prevent leaks. Always check for dirt or debris before installation.
Refilling and Restarting the Water Heater
Refilling the Tank with Water
After you install the new heating element, you need to refill the tank. Follow these steps:
- Ensure the drain valve is securely closed.
- Turn the cold water supply back on to fill the tank.
- Open a hot water faucet to eliminate trapped air from the system.
Wait until water flows steadily from the faucet before you proceed.
Restoring Power to the Water Heater
Once the tank is full and all air is purged, you can restore power to the water heater. Switch on the circuit breaker or adjust the thermostat as needed. Monitor the unit for leaks and confirm that the water heats properly.
⚡ Safety Reminder: Never restore power to the water heater before the tank is full. Running the heating element dry can cause immediate damage.
By following these steps, you can replace the element safely and efficiently. You protect your water heater and ensure reliable hot water for your home.
What If the Water Heater Element Isn’t the Issue?
Sometimes, replacing the water heater element does not restore hot water. In these cases, you need to expand your troubleshooting process to other components. The thermostat often causes heating problems when the element works correctly. You should also consider issues with the power supply, wiring, or other internal parts.
Checking the Water Heater Thermostat
How to Test the Thermostat
You can test the thermostat using standard diagnostic tools. Start by turning off the power at the circuit breaker. Remove the metal cover plates to expose the thermostats and elements. Use a non-contact voltage tester to confirm that no electricity flows to the unit. This step keeps you safe.
Next, use a continuity tester to check the thermostat. Disconnect the wires from the thermostat terminals. Place the tester probes on the terminal screws. If the tester does not show continuity, the thermostat has failed. You should also check for short circuits by testing the screws against the mounting bracket.
Tools you need for this task:
- 4-in-1 screwdriver
- Needle-nose pliers
- Non-contact voltage tester
- Continuity tester
Adjusting or Replacing the Thermostat
If you find the thermostat out of adjustment, you can reset it. Use a flathead screwdriver to adjust the temperature setting. Most water heaters work best at 120°F. If the thermostat does not respond or shows no continuity, replace it with a new one that matches your model. Always reconnect the wires securely and reinstall the cover plates before restoring power.
When to Call a Professional for Water Heater Repair
Signs You Need Expert Help
Some problems require professional attention. You should contact a licensed technician if you notice any of the following:
- Frequent repairs
- Rising energy bills
- Bad smells from the water heater
- Low water pressure
- Persistent leaks around the tank
- Strange noises during operation
- Rusty or discolored water
- Inconsistent hot water supply
- The water heater is near or past its expected lifespan
⚠️ Tip: If you experience electrical issues, such as no voltage at the tank or faulty wiring connections, do not attempt repairs yourself. These situations pose serious safety risks.
Preventing Future Water Heater Problems
You can reduce the need for repairs by following a regular maintenance schedule. Flush the tank to remove sediment. Inspect the heating elements and thermostat annually. Address minor issues early to prevent costly breakdowns. If you notice unusual symptoms, act quickly to avoid further damage.
A thorough troubleshooting process helps you identify the real cause of water heater problems. When in doubt, rely on professional expertise to keep your system safe and efficient.
Preventing Future Water Heater Element Problems
Regular Maintenance for Heating Elements
Flushing the Water Heater Tank
You can extend the lifespan of your heating elements by flushing the tank regularly. Sediment and mineral deposits settle at the bottom of the tank over time. These deposits insulate the heating element, causing it to overheat and fail prematurely. Flushing the tank every 6 to 12 months removes this buildup and keeps your system running efficiently. In areas with hard water, you may need to flush the tank more often. Open the drain valve, attach a hose, and let the water flow until it runs clear. This simple task helps prevent costly repairs.
Tip: Schedule a complete tank flush every 12 months to maintain optimal performance.
Inspecting Heating Elements Annually
Annual inspections help you catch problems before they lead to unexpected failures. You should check the heating elements, thermostat, and anode rod each year. If your water heater is older or you live in an area with hard water, inspect the unit every six months. Look for signs of rust, corrosion, or leaks. Listen for strange noises and watch for inconsistent hot water supply. If you notice any of these issues, address them immediately to avoid further damage.
Recommended inspection schedule:
- Inspect annually if your water quality is good.
- Inspect every six to nine months in hard water areas.
- Inspect every six months for older units.
- Inspect immediately if you see leaks, rust, or hear unusual sounds.
Note: Regular maintenance, including inspections and flushing, can help your electric tank water heater last up to 15 years.
Reducing Mineral Buildup in Your Water Heater
Using a Water Softener
Hard water causes mineral buildup inside your tank and on the heating elements. Installing a water softener prevents scale from forming and eliminates sediment accumulation. This device removes calcium and magnesium from your water supply, which helps maintain heating efficiency and extends the life of your water heater. You will notice fewer repairs and more consistent hot water when you use a water softener.
Cleaning the Water Heater Tank
Cleaning the tank goes beyond flushing. You should also check the anode rod and replace it if needed. The anode rod attracts corrosive minerals, protecting the tank and elements from rust. Set your thermostat to 120 degrees Fahrenheit to reduce mineral precipitation. Insulate your tank and pipes to minimize heat loss and improve efficiency. Schedule annual maintenance with a plumbing professional for a thorough cleaning and inspection.
🛠️ Pro Tip: Combine flushing, water softening, and annual inspections for the best protection against mineral buildup and premature element failure.
Checking the water heater element first often solves most heating issues quickly. You can test and replace the element with basic tools and safety steps. Many homeowners make mistakes by skipping regular maintenance or misdiagnosing the element. Regular service keeps the element efficient and extends its lifespan.
- Regular maintenance ensures optimal performance and energy savings.
- Inspecting the element and anode rod prevents corrosion and costly repairs.
- Early detection of element problems leads to consistent hot water and lower bills.
FAQ
How often should you check your water heater element?
You should inspect the heating element at least once a year. If you live in an area with hard water, increase the frequency to every six months to prevent mineral buildup and ensure reliable performance.
What tools do you need to test a water heater element?
You need a multimeter, non-contact voltage tester, flathead and Phillips screwdrivers, insulated gloves, and safety goggles. These tools help you test and replace the element safely.
Can you replace a water heater element without draining the tank?
You must drain the tank before removing the heating element. This step prevents water from leaking and reduces the risk of burns or electrical shock.
What resistance reading indicates a bad water heater element?
A reading of zero, infinity, or a value outside the expected range signals a faulty element. Refer to your water heater’s specifications for the correct resistance range.
Why does your water heater element keep failing?
Mineral buildup, electrical issues, and age cause repeated failures. Regular maintenance, including flushing the tank and using a water softener, helps prevent these problems.
Is it safe to test a water heater element yourself?
You can test the element safely if you turn off the power, use proper tools, and wear protective gear. If you feel unsure, contact a licensed technician.
What should you do if replacing the element does not fix the problem?
Check the thermostat and wiring for faults. If you cannot identify the issue, call a professional for further diagnosis and repair.
Tip: Always consult your water heater’s manual before starting any repairs. This step ensures you follow manufacturer guidelines and maintain safety.

