Whirlpool electric dryer heater replacement succeeds when three conditions are met: the replacement element rating matches the appliance, the heater circuit is intact (thermal fuse/thermostats/wiring), and airflow is restored so the new element is not overheated. The steps below follow a technician-style workflow designed to reduce repeat failures and unnecessary parts returns.
- Tools, parts, and preparation
- Safety steps (non-negotiable)
- Confirm the element is actually the problem
- Replacement procedure (general Whirlpool layout)
- Post-repair validation (prevent callbacks)
- Common mistakes that burn out a new element
- For brands/OEM: why heater design & manufacturing matter
- FAQ (3)
- References & outbound links
- Screwdrivers (Phillips/flat), nut drivers or socket set
- Needle-nose pliers (for spade terminals)
- Vacuum + crevice tool (lint removal)
- Multimeter (continuity/ohms)
- Work gloves (sharp sheet metal edges)
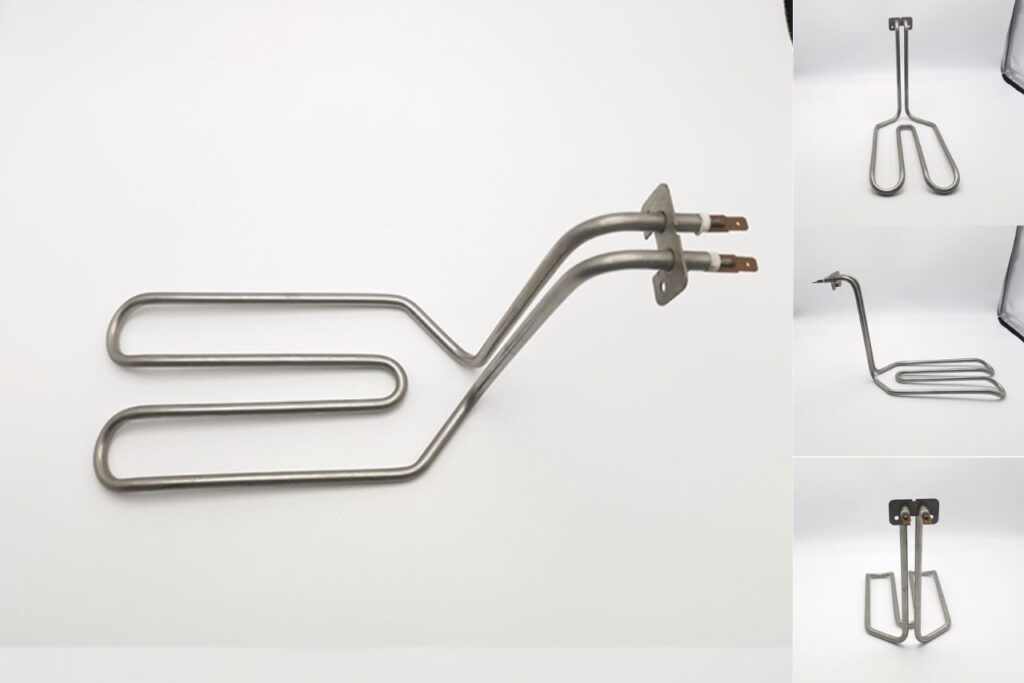
- Correct dryer Heating Element assembly (model-specific)
- High-limit thermostat / cycling thermostat (if failed)
- Thermal fuse (if open)
- Replacement spade terminals or pigtail harness (if heat-damaged)
Repair outcome depends heavily on correct specification. Whirlpool s heating-element replacement guidance for water heaters explicitly instructs verifying the new element against the unit s voltage and wattage data plate; the same verification mindset applies to dryer heaters even though the appliance is different. (Whirlpool support guidance)
Dryer heaters operate at high voltage/current. If there is any uncertainty about safe electrical testing, a qualified technician should be used. Covers must be reinstalled after service to reduce shock and fire risk an approach also emphasized in Whirlpool s heater replacement instructions for other appliances.
- Disconnect power: unplug the dryer or switch off the breaker.
- Confirm power is off using a multimeter or non-contact tester.
- Let the dryer cool if it was recently running.
- Do not energize heat until airflow is confirmed (blocked vents can overheat the heater and trip safeties).
Whirlpool warns that applying power before safe operating conditions are met can destroy an element ( dry fire in a water heater). In a dryer, the parallel unsafe condition is insufficient airflow, which drives element temperature higher and can lead to premature failure. (Reference)
A Whirlpool dryer can run (tumble) yet produce no heat for reasons unrelated to the element. A professional approach verifies the heater circuit before installing parts. The goal is to avoid parts swapping and to prevent repeat failures.
This priority is based on common field patterns: airflow restrictions and safety cutouts frequently cause no heat, even when the element is fine.
- Airflow check: confirm strong exhaust at the outdoor vent; clean lint screen housing and ducting.
- Thermal fuse continuity (often located on blower housing): should read closed/continuous.
- Thermostats (cycling/high-limit): verify continuity at room temperature if applicable.
- Heating element continuity: an open circuit indicates a broken coil.
- Visual wiring inspection: look for heat-discolored spade terminals, melted insulation, or loose connectors.
Engineering context: A heating element is an assembly of electrically conductive material and insulating/support material designed for a heating purpose; it is not only the wire. (See TUTCO s overview of heating element design and integration.) TUTCO Heating Elements
| Symptom | Most common cause | Fast check | Repair direction |
|---|---|---|---|
| No heat, tumbles normally | Open thermal fuse / open element / power issue | Continuity tests; verify supply | Replace failed component; fix airflow if overheated |
| Heats briefly then stops | Restricted venting overheating high-limit opens | Outdoor exhaust strength; duct inspection | Clean vent path; replace failed thermostat if needed |
| Long dry times | Airflow restriction | Vent run/termination; lint screen housing | Vent cleaning/re-route |
| Burning smell near rear | Loose/burnt terminals | Inspect spade connectors | Replace terminals/pigtail; ensure tight connections |
Table 1 Practical map from symptoms to checks. Model-specific service literature should still be followed.
Whirlpool dryer families vary in panel access and heater housing position. The steps below describe a common pattern (rear or lower access to heater housing), but the exact screw locations and bracketry depend on the model number.
- Power off at plug/breaker.
- Photograph wire routing and terminal positions before disconnecting anything.
- Remove the rear panel (common on many Whirlpool electric dryers) or front/lower access panel depending on design.
- Locate the heater can/housing and attached thermostats.
- Vacuum lint around the heater housing, blower path, and base.
- Inspect for heat damage: darkened terminals, brittle insulation, warped housings.
- Pull spade terminals straight off (do not twist aggressively).
- Remove mounting screws; slide out the heater/element assembly.
- Seat the element fully; ensure no coil contact with metal where it should not touch.
- Reinstall screws with firm, even pressure (avoid bending thin sheet metal housings).
- Reconnect wires to the correct terminals; confirm tight fit.
- Replace any overheated connectors instead of reusing them.
- Reinstall all panels and protective covers before powering on.
Whirlpool s heater replacement guidance in another product category states: Verify new element by referencing the data plate for voltage and wattage. This is a best-practice principle for any resistive heater: match electrical ratings and mechanical fit. (Whirlpool reference)
Visual checklist: items marked Required should be confirmed before the job is considered complete.
- Run a timed heat cycle for 10 C15 minutes.
- Confirm the dryer produces warm exhaust and does not rapidly overheat/shut down.
- Confirm strong airflow at the outdoor vent.
- Power down and carefully check for abnormal heat at terminals (a sign of loose connection).
If the element fails again quickly, airflow and terminal quality are the most common underlying causes.
- Restoring power before restoring airflow (blocked venting drives element overtemperature).
- Using a replacement with incorrect voltage/wattage or poor fitment.
- Reusing overheated or loose spade terminals (creates localized resistance heating).
- Allowing coil contact with the heater housing due to misalignment.
This topic is commonly searched with terms like Whirlpool dryer not heating, dryer heating element replacement, thermal fuse vs heating element, dryer vent clogged symptoms, and high-limit thermostat. The most reliable repairs address the heater as a system electrical ratings, controls, and airflow not as a single part swap.
In appliance design, heating element can refer to different constructions tubular heaters, heating plates, thick film heaters, and more. TUTCO notes that heater performance depends on material properties, integration framework, operating environment, and watt density factors that directly affect reliability and cost of quality. (TUTCO reference)
- Heating Tubes for ovens, liquid heating, and industrial heaters
- Heating Plate assemblies (kettles, coffee makers, dishwashers)
- Heating Film (thick film / thin film families for fast response)
- Electric Boiler Heater components for steam/boiler appliances
Jinzhong positions itself as a Heating Element manufacturer with 30+ years of experience, international certifications (ISO systems plus UL/VDE/RoHS listed), and scaled capacity (their pages cite multi?million units per month). Their product ecosystem spans general Heating Element categories and integrated Die Casting Heating Solutions.
These details are drawn from Jinzhong s published company and category content (experience, certifications, and capacity claims).
| Heater type | Typical heat transfer | Common appliance examples | Why it matters for reliability |
|---|---|---|---|
| Tubular heater | Conduction to sheath + convection/radiation | Ovens, water heating, industrial equipment | Sheath material and insulation quality affect corrosion resistance and life |
| Heating plate | Primarily conduction | Kettles, coffee makers, dishwashers | Uniformity and insulation reduce hot spots and leakage risk |
| Thick/thin film heater | Fast surface heating; controlled conduction | Compact appliances, rapid response heating | Power density and control loop design influence longevity |
Table 2 Heater families and design tradeoffs (general engineering view).
Some heater products are designed for radiators/towel warmers and list certifications and ingress protection (e.g., IP67, UL) and specific materials (ABS + stainless). Those specs illustrate application-specific design, but they do not make a part suitable for a dryer heater housing. Example: Hudson Reed s 1000W plug-in heating element listing. Reference
Yes. On many electric dryers the motor can run while the heater circuit is interrupted (open thermal fuse, failed thermostat, broken element, or supply issue). That is why continuity checks of the heater circuit are recommended before replacing parts.
The most common causes are unresolved airflow restriction, an incorrect replacement rating/fitment, or poor electrical connections (loose/oxidized terminals). Heater design references emphasize that operating environment and watt density strongly influence heater life. (TUTCO reference)
Not automatically. The fuse should be tested. If it is open, it must be replaced and the root cause (usually overheating from poor airflow) must be corrected to prevent recurrence.
- TUTCO-Farnam heating element definition, materials, integration (suspended/embedded/supported), heater life factors: https://tutco.com/conductive/heating-elements
- Whirlpool Water Heaters support replacement workflow principles (verify voltage/wattage; secure wiring; do not energize under unsafe conditions): https://www.whirlpoolwaterheaters.com/support/help/element-was-out-of-range/24
- Jinzhong (JINZHO) product categories and manufacturer capability statements (experience, certifications, capacity): https://jinzho.com/, Heating Element, Heating Plate, Heating Tubes, Heating Film, Die Casting Heating Solutions, Electric Boiler Heater
- Hudson Reed example heater listing with published specs (1000W, IP67, UL, materials, warranty): https://usa.hudsonreed.com/1000-plug-in-watt-electric-heating-element-76309
Citation note: This article is original and written for practical Whirlpool dryer repairs. References are used to support definitions (what a heating element is), safety principles (do not energize under unsafe conditions; verify correct ratings), and publicly stated product/manufacturer specifications.

