Guide étape par étape : Remplacer en toute sécurité un élément de chauffe-eau
Safe element replacement is a process discipline, not a single action. The most costly mistake is restoring power before the tank is completely full and air is removed Whirlpool warns this can burn out the upper element from chauffage à sec. This guide lays out a field-practical sequence that prioritizes evidence-based safety steps, minimizes leaks, and reduces rework.
- Fast checklist (before starting)
- Tools, parts, and data to collect
- Procedure: 20-step safe replacement workflow
- Critical failure points (dry fire, leaks, wrong ratings)
- Why elements fail and what reduces repeat failures
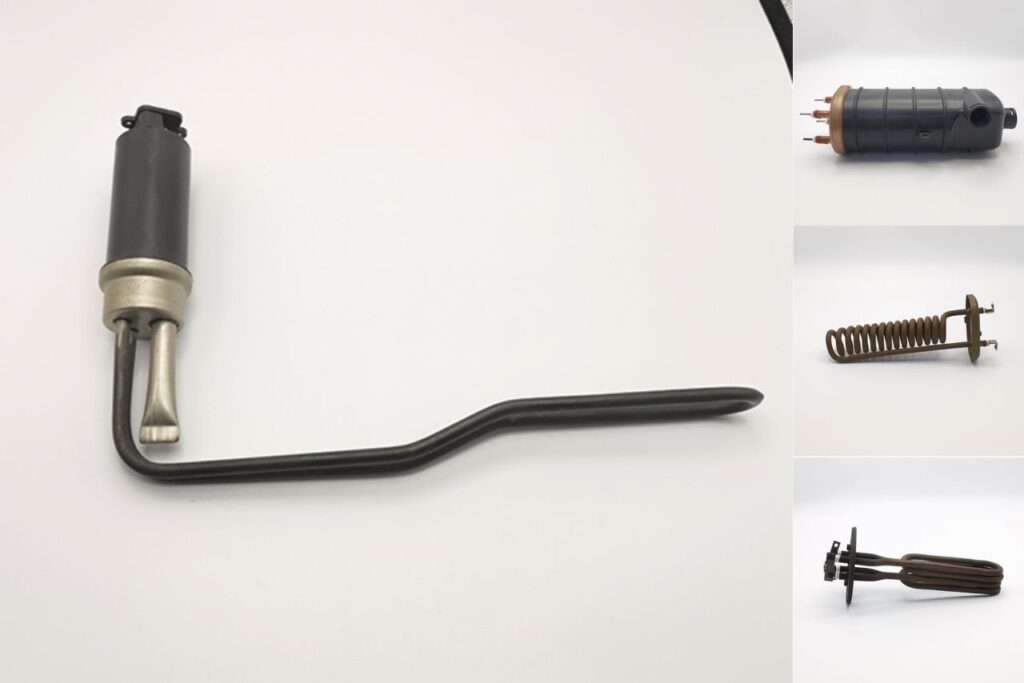
- Related heating technologies (tubes, plates, films, die-cast modules)
- FAQ
- Cited sources and outbound links
Fast checklist (before starting)
Scald control
Run hot water until cool
Drain control
Hose + drain valve
Correct part
Match data plate
Dry-fire prevention
Purge air 3 minutes
- Confirm the replacement Élément chauffant matches the unit s rated tension et puissance on the data plate.
- Plan drainage (hose route, bucket capacity, or floor drain).
- Confirm access to the element cover and wiring compartment.
- Allocate time for refill and air purge; do not rush the final steps.
Tools, parts, and data to collect
Minimum tools (per Whirlpool workflow)
- Garden hose (connect to drain valve)
- Element wrench or 1 1/2" deep well socket
- Rag (clean tank threads)
- Flat blade screwdriver (some drain valves)
Parts and consumables
- Correct replacement element + gasket
- Dishwashing liquid (Whirlpool suggests a drop to lubricate the gasket)
- Optional: spare gasket (helps avoid downtime if the first gasket is damaged)
What to document (EEAT: traceable evidence)
Before disassembly, record the data plate s voltage and wattage and take a clear photo of the wiring layout. Whirlpool explicitly requires verifying the new element against the data plate for voltage and wattage.
Procedure: 20-step safe replacement workflow
The sequence below mirrors Whirlpool s published steps because the order controls risk. It also supports consistent training and minimizes rework for service teams.
| Étape | Action | Why it matters (risk controlled) |
|---|---|---|
| 1 | Open a hot water faucet and run until the water is cool (may take 10+ minutes). | Reduces scalding risk before draining. |
| 2 | Turn the cold water supply OFF. | Prevents refill while draining. |
| 3 | Connect a garden hose to the drain valve and route to a drain/outside/bucket. | Controls discharge, reduces flooding. |
| 4 | Open drain valve. Opening a hot faucet helps drain faster. Drain completely as needed. | Creates safe conditions to remove the element; Whirlpool warns sediment may clog draining. |
| 5 | Remove old element using an element wrench or 1 1/2" deep well socket. | Correct tool reduces thread damage and rounding. |
| 6 | Verify the new element is correct by referring to the data plate for voltage and wattage. | Prevents mismatch, performance issues, and premature failure. |
| 7 | Clean tank threads with a rag. | Reduces leak risk from debris. |
| 8 | Install the gasket on the element. | Primary seal for the tank opening. |
| 9 | Lubricate gasket using a drop of hand dishwashing liquid. | Helps avoid gasket damage during tightening (leak prevention). |
| 10 | Install and hand-tighten element; tighten with wrench/socket. | Ensures seating without cross-threading; final torque seals gasket. |
| 11 | Replace power wires; ensure tight connections. Do not restore power until tank is completely full. | Prevents chauffage à sec and reduces overheating at loose terminals. |
| 12 | Close drain valve; turn cold water ON to refill the tank. | Restores water level to submerge elements. |
| 13 | Remove aerator at the nearest hot water faucet. | Allows debris to flush and supports air removal. |
| 14 | Open hot faucet; run until full stream, then run full stream for TROIS MINUTES. | Whirlpool states this removes air; powering on early can burn out the upper element (dry fire). |
| 15 | Close hot faucet and replace aerator. | Returns fixture to normal operation. |
| 16 | Check new element for leaks; if leaking, tighten. If leak persists, drain and inspect gasket, replace if damaged. | Stops water damage and prevents corrosion in the electrical compartment. |
| 17 | Replace plastic protector (if present). | Electrical protection and insulation management. |
| 18 | Replace insulation. | Reduces heat loss and protects wiring cavity. |
| 19 | Replace the heating element cover; secure all covers. | Whirlpool warns this reduces fire and electric shock risk. |
| 20 | Turn power back ON at breaker (or replace fuses). Allow up to two hours for heat-up. | Normal recovery; avoids premature no-heat conclusions. |
Critical failure points (dry fire, leaks, wrong ratings)
Dry fire (most expensive mistake)
Whirlpool s notice states not to restore electrical power unless all air is out and the tank is completely full. If power is applied early, the upper element will burn out (chauffage à sec). The purge instruction is explicit: run water full stream for TROIS MINUTES.
Leak reseat loop (common rework)
Whirlpool advises tightening until a leak stops; if it cannot be stopped, drain the tank and inspect the gasket for damage. A damaged gasket should be replaced and the element reinstalled.
Wrong part selection (preventable)
Whirlpool requires verifying the replacement element by referencing the data plate for voltage and wattage. This reduces mismatch risk and avoids wasted labor. In product sourcing terms, specifications and approvals can materially affect suitability Hudson Reed s plug-in element listing, for example, discloses la protection contre les intrusions IP67 et Approuvé UL for its application.
Why elements fail and what reduces repeat failures
Engineering context (why EEAT matters)
TUTCO defines a heating element as a component built from electrically conductive and insulating materials and emphasizes that it is more than the alloy alone; it is an assemblage including framework and lead connections. It also explains that alloy properties vary with temperature and that éléments traces can meaningfully change performance and life.
- Scale and sediment can reduce heat transfer and raise element temperature.
- Loose terminals increase contact resistance and local heating.
- Environmental contaminants can shorten life if the alloy is poorly matched.
Related heating technologies (tubes, plates, films, die-cast modules)
How heater families map to different products
In residential tank water heaters, the replaceable immersion element is typically a form of élément chauffant tubulaire. In the wider appliance ecosystem, heater designs broaden into tubes, plates, films, and integrated die-cast modules. Jinzhong s category structure illustrates this breadth across Tubes de chauffage, Plaque chauffante, Film chauffant, et Solutions de chauffage pour la coulée sous pression.
- Tubes de chauffage (e.g., water heating tube, boiler heating tube, fryer heating element)
- Plaque chauffante (e.g., kettle heating plate, coffee maker heating plate, dishwasher heater element)
- Film chauffant (e.g., thick film heater plate/tube, thin film heater)
- Solutions de chauffage pour la coulée sous pression (e.g., die-cast heater parts and boiler heat exchangers for compact appliances)
- Chaudière électrique (e.g., boilers/steam generators used in humidifiers, steam ovens, and coffee systems)
Internal navigation (required anchor texts)
For readers comparing options or sourcing at scale, the following pages provide a structured overview: Élément chauffant, Fabricant d'éléments chauffants, Usine d'éléments chauffants, Solutions de chauffage pour la coulée sous pression.
FAQ
How long should the tank heat after the element is replaced?
Whirlpool notes it may take two hours for the tank to heat up after power is restored, depending on starting water temperature and heater capacity.
What is the single most important safety step to prevent destroying a new element?
Do not restore electrical power until the tank is completely full and all air is removed. Whirlpool warns that if power is applied early, the upper element will burn out from chauffage à sec.
Why does Whirlpool require removing the aerator during refill?
Whirlpool states that removing the aerator at the nearest hot water faucet allows debris in the plumbing to be washed out while purging air and helps the tank fill completely.
What should be verified before purchasing a replacement element?
Whirlpool instructs verifying the correct replacement by referring to the water heater data plate for tension et puissance.
Why do similar-looking heating elements fail at different rates?
TUTCO notes that resistance alloys from different manufacturers can include different éléments traces (contaminants or enhancements) that materially change properties and service life, especially under challenging environmental conditions.
Cited sources and outbound links
- Whirlpool Chauffe-eau Replace the Heating Element (steps, dry-fire warning, purge time): https://www.whirlpoolwaterheaters.com/support/help/element-was-out-of-range/24
- TUTCO Heating element definition, material considerations, and reliability factors: https://tutco.com/conductive/heating-elements
- Hudson Reed Example of published heater component specs (1000W, IP67, UL Approved) and pricing: https://usa.hudsonreed.com/1000-plug-in-watt-electric-heating-element-76309
- Jinzhong category pages referenced for heater family context and internal navigation: Tubes de chauffage, Plaque chauffante, Film chauffant, Solutions de chauffage pour la coulée sous pression, Chaudière électrique

