- Comment fonctionne un élément chauffant de sèche-linge (et ce que « défectueux » signifie réellement)
- Symptômes courants d’absence de chaleur sur les sèche-linge Samsung et carte des causes racines
- Liste de contrôle de sécurité et de préparation (outils, documentation, correspondance des pièces)
- Processus de remplacement étape par étape (approche générique de type Samsung)
- Validation après réparation : débit d’air, température et prévention des pannes récurrentes
- Facteurs de coût et de qualité : pourquoi certains éléments durent plus longtemps que d’autres
- Technologies de chauffage connexes (tubes, plaques, films, modules moulés sous pression) pour le contexte OEM
- FAQ
- Sources citées et liens externes
En termes techniques, un élément chauffant est la partie résistive d’un chauffage électrique où l’énergie électrique est convertie en chaleur (chauffage résistif/par effet Joule). TUTCO souligne qu’un élément chauffant est plus qu’un « alliage chauffant seul » : c’est un assemblage qui comprend un matériau conducteur électrique et une structure de matériau isolant, ainsi que des connecteurs/terminaisons. Cette vue d’« assemblage » est utile pour les réparations de sèche-linge, car les défaillances peuvent survenir non seulement dans la bobine elle-même, mais aussi au niveau des connexions, des isolateurs et des composants de protection thermique adjacents.
Source : TUTCO Éléments chauffants Définition, matériaux et cadres d’intégration : https://tutco.com/conductive/heating-elements
- Circuit ouvert (ruptures de bobine) : le sèche-linge tourne mais ne produit pas de chaleur.
- Court-circuit au châssis (dommages mécaniques/d’isolation) : peut déclencher la protection ou provoquer une chaleur intermittente.
- Stress de surchauffe dû à un mauvais débit d’air : peut déformer, oxyder plus rapidement ou déclencher à plusieurs reprises les coupe-circuits thermiques.
- Défaillance de terminaison: des bornes desserrées ou surchauffées créent une résistance chauffant au niveau du connecteur plutôt que dans l’élément.
Mots-clés LSI utilisés naturellement : absence de chaleur sèche-linge, fusible thermique, thermostat de limite haute, restriction de débit d’air, obstruction par la peluche, continuité de l’élément chauffant.
Les conceptions des sèche-linge Samsung varient selon le modèle (électrique ou gaz, chargement frontal ou par le haut, disposition du conduit de chauffage), mais la logique de diagnostic reste cohérente :.
- Le sèche-linge chauffe au début, puis s’arrête et cycle à froid.
- Le temps de séchage augmente sur des semaines/mois.
- L’évacuation extérieure est faible, le clapet s’ouvre à peine.
LSI : nettoyage de l’évacuation, filtre à peluche, restriction du conduit, surchauffe.
- Chaleur absente de manière constante sur tous les cycles, avec un tambour tournant normalement.
- Les vérifications électriques révèlent une résistance de chauffage ouverte (absence de continuité).
- Rupture ou déformation visible de la résistance chauffante (si accessible).
- Débranchez l'alimentation avant d'ouvrir les panneaux ; vérifiez que l'appareil est hors tension à l'aide de méthodes appropriées.
- Ne travaillez pas sur un sol humide ou avec des mains moites ; maintenez la zone de travail sèche et bien éclairée.
- En présence de fils brûlés, de bornes fondues ou de déclenchements répétés du disjoncteur, envisagez de faire appel à un technicien qualifié.
- Jeu de tournevis / jeu de douilles (les vis des panneaux varient selon la région et le modèle)
- Pince à bec effilé (connecteurs)
- Multimètre (vérifications de continuité/résistance)
- Aspirateur et brosse (élimination des peluches)
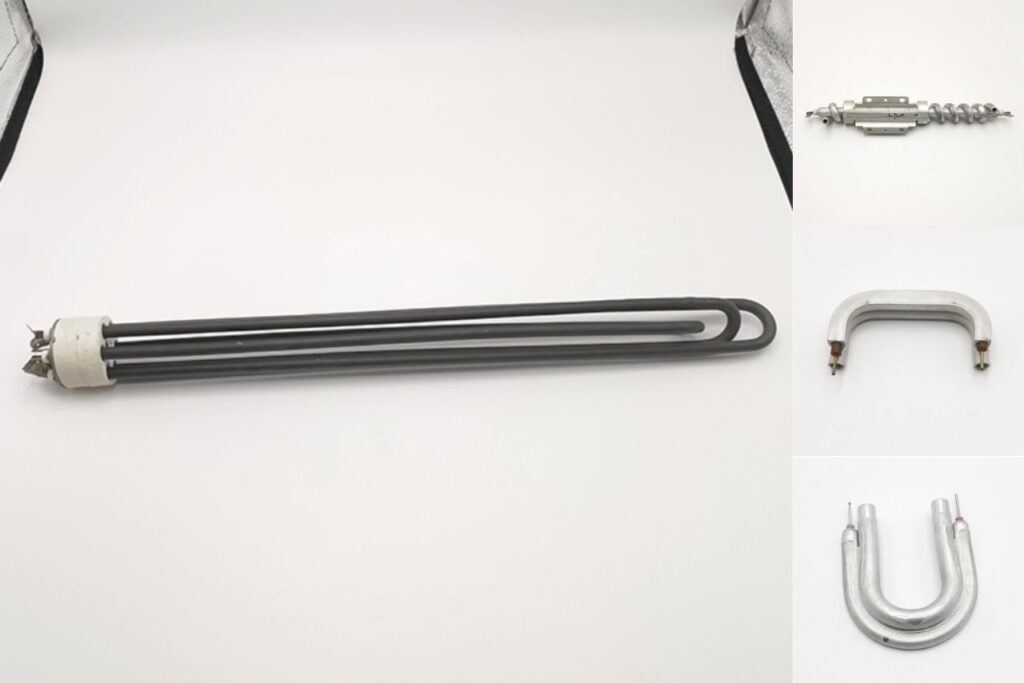
- Faites correspondre l'ensemble chauffant au numéro de modèle Samsung exact.
- Si vous remplacez un élément chauffant, évaluez les pièces voisines susceptibles de tomber en panne pour la même cause racine (fusible thermique, thermostat de limite haute, bornes de câblage).
- Corrigez la cause en amont — en particulier la restriction du flux d'air — pour éviter les pannes récurrentes.
Pour un contexte plus large d'approvisionnement en composants et de fabrication, voir : Élément chauffant, Fabricant d'éléments chauffants, Usine d'éléments chauffants, Solutions de chauffage pour la coulée sous pression.
L'ordre précis des panneaux varie selon le modèle Samsung. Le flux de travail ci-dessous est rédigé comme un processus contrôlé : documenter, accéder, tester, remplacer et vérifier. Pour le démontage spécifique au modèle, suivez la documentation de service du fabricant pour cet appareil exact.
- Confirmez que le tambour du sèche-linge tourne normalement et que l'absence de chaleur est constante.
- Vérifiez l'état du filtre à peluches et confirmez le flux d'air d'évacuation à la sortie extérieure.
- Si le flux d'air est faible, priorisez le nettoyage de l'évacuation avant d'installer un nouvel élément (la surchauffe peut détruire les pièces de remplacement).
- Débranchez l'alimentation.
- Retirez le(s) panneau(x) d'accès approprié(s) pour atteindre le boîtier/le conduit du chauffage.
- Photographiez le câblage avant de débrancher toute borne.
- Inspectez les bornes des fils pour déceler une décoloration, un jeu ou une isolation fondue.
- Retirez l'accumulation de peluches du conduit du chauffage et de la zone du ventilateur si accessible.
- Tout signe de surchauffe doit être traité comme une cause racine, et non seulement comme un symptôme.
Une approche professionnelle vérifie la panne avant l'installation des pièces. Si l'élément est en circuit ouvert, le remplacement est justifié. Si l'élément indique une valeur normale, le défaut peut être en amont (commande, coupe-circuits, câblage, logique des capteurs).
La discussion matérielle de TUTCO explique pourquoi la conception et les bornes sont importantes : l'« élément » est un système de composants conducteurs et isolants, et les pannes peuvent survenir à plusieurs points de ce système. https://tutco.com/conductive/heating-elements
- Retirez les fixations du boîtier du chauffage et retirez soigneusement l'ensemble de l'élément.
- Installez l'ensemble de remplacement correct pour le modèle.
- Rebranchez le câblage exactement comme documenté ; assurez-vous que les bornes sont serrées et sécurisées.
- Remontez les panneaux et confirmez qu'aucun outil ne reste à l'intérieur du boîtier.
- Rétablissez l'alimentation.
- Lancez un cycle de chauffe minuté et vérifiez l'élévation de température et le comportement normal du cycle.
- Confirmez un fort flux d'air d'évacuation à la sortie extérieure.
- Confirmez que le clapet de l'évacuation extérieure s'ouvre fortement pendant le fonctionnement.
- Assurez-vous que le filtre à peluches est propre et correctement installé.
- Inspectez le cheminement du conduit pour détecter des plis, des sections écrasées ou une longueur excessive.
- La chaleur doit cycler normalement (pas un motif de « chauffe puis arrêt » bref).
- Des odeurs anormales ou des arrêts répétés indiquent une surchauffe ou des problèmes électriques.
- Revérifiez le serrage des bornes en cas de suspicion d'arc électrique ou de dommages thermiques.
Le coût total est rarement minimisé en choisissant uniquement la pièce la moins chère. L'analyse de TUTCO sur le « coût de la qualité » souligne que les défaillances sur le terrain, les reprises et les retards de livraison peuvent dépasser le prix d'achat initial. Dans les sèche-linge, un élément de remplacement « bon marché » peut devenir coûteux s'il tombe en panne prématurément en raison de matériaux de qualité inférieure, de mauvaises terminaisons, ou parce que la restriction sous-jacente du flux d'air n'a pas été corrigée.
Hudson Reed répertorie un élément chauffant électrique enfichable de 1000 W à $209.95 et divulgue des caractéristiques telles que la protection IP67 et l'approbation UL. Il s'agit d'une application différente (radiateur/sèche-serviettes), mais cela démontre comment les approbations et les caractéristiques de protection environnementale influencent le prix des composants.
Source : https://usa.hudsonreed.com/1000-plug-in-watt-electric-heating-element-76309
Bien que les sèche-linge utilisent le plus souvent des ensembles de résistances chauffantes, de nombreux appareils emploient des facteurs de forme de chauffage différents. La structure de catégories de Jinzhong offre une vue claire des familles de chauffage utilisées dans les appareils électroménagers, utile pour les ingénieurs, les équipes d'approvisionnement et les lecteurs comparant des solutions de chauffage au-delà des sèche-linge.
La page d'accueil de Jinzhong décrit plus de 30 ans d'expérience, une capacité de chaîne complète (conception → moules → fabrication de précision) et de multiples certifications internationales (ISO9001/14001/45001, VDE, UL, RoHS). Pour les acheteurs OEM, ces attributs peuvent réduire les « coûts cachés » décrits par TUTCO : retours, reprises et défaillances sur le terrain.
Source : https://jinzho.com/
Comment peut-on confirmer que l'élément chauffant est la raison pour laquelle un sèche-linge Samsung ne chauffe pas ?
La confirmation nécessite de séparer le symptôme de la cause : vérifier un flux d'air puissant et tester la continuité du circuit du chauffage et les dispositifs de protection. Un sèche-linge peut « ne pas chauffer » en raison d'un élément ouvert, d'un fusible thermique ouvert ou de problèmes côté commande ; une évacuation faible peut également provoquer une surchauffe et des défaillances cycliques.
Est-il acceptable de remplacer uniquement l'élément chauffant sans traiter le flux d'air ?
Si une restriction du flux d'air a provoqué une surchauffe, remplacer uniquement l'élément peut entraîner une défaillance récurrente. La validation du flux d'air après réparation (peluches/conduit/évacuation) doit être traitée comme une étape obligatoire, et non comme une optimisation facultative.
Pourquoi les éléments chauffants de remplacement tombent-ils en panne prématurément dans certains appareils ?
TUTCO note que les propriétés des alliages et éléments traces peuvent différer entre les fournisseurs et affecter matériellement les performances et la durée de vie ; l'environnement du chauffage compte également. Dans les sèche-linge, « l'environnement » est souvent le chemin du flux d'air et les conditions de cyclage thermique.
Quelles informations doivent être recueillies avant de commander une pièce de remplacement ?
Enregistrez le numéro de modèle complet, prenez des photos du câblage et des connecteurs, et documentez tout code d'erreur. Cela réduit les erreurs de commande de pièces et les erreurs de câblage.
Existe-t-il un moyen fiable de comparer les spécifications des composants chauffants entre différents produits ?
Recherchez une divulgation claire des valeurs nominales et des marques de sécurité. Par exemple, la fiche de l'élément enfichable de 1000 W de Hudson Reed divulgue l'IP67 et l'approbation UL. Même lorsque les applications diffèrent, une divulgation transparente des spécifications constitue un point de repère utile lors de l'évaluation des pièces.
- TUTCO — définition de l'élément chauffant, matériaux, cadres et discussion sur le coût de la qualité : https://tutco.com/conductive/heating-elements
- Hudson Reed — exemple documenté de prix/spécifications ($209.95, 1000W, IP67, approuvé UL) : https://usa.hudsonreed.com/1000-plug-in-watt-electric-heating-element-76309
- Whirlpool — cité ici pour le principe général de sécurité selon lequel alimenter un chauffage avant qu'il ne soit correctement « dans son milieu de travail » peut provoquer un grillage immédiat (avertissement de marche à sec dans leur procédure de chauffe-eau) : élément Jinzhong — ancres internes et navigation par catégories pour les familles de chauffage et les capacités du fabricant : https://www.whirlpoolwaterheaters.com/support/help/element-was-out-of-range/24
- Divulgation : https://jinzho.com/ | https://jinzho.com/product-category/heating-element/ | https://jinzho.com/about/ | https://jinzho.com/product-category/die-casting-heating-solutions/

