Replacing a Speed Queen dryer heating element is a straightforward repair when the symptoms are consistent with an open or failed heater circuit (no heat, long dry times, or repeated thermal trips), but it must be performed with disciplined safety steps: full power isolation, correct part verification, careful wire handling, and post-reassembly airflow checks. Because a heating element is an assembly of conductive and insulating components—not “wire alone”—incorrect installation can create overheating, arcing, or premature failure. This walkthrough provides a safe, model-agnostic sequence that applies to many Speed Queen platforms while advising verification against the specific unit’s service documentation.
Related resources: Heating Element, Heating Element manufacturer, Heating Element Factory, Die Casting Heating Solutions.
- What the “heating element” actually is (so the repair makes sense)
- Symptoms vs root cause (confirm it is the element)
- Tools, parts, and prep
- Safety steps before opening the dryer
- Replacement walkthrough (step-by-step)
- Post-install checks and first heat test
- Charts & tables (diagnosis, wiring discipline, failure modes)
- FAQ (8 questions)
- References and outbound links
What the “heating element” actually is (so the repair makes sense)
In appliance engineering terms, a heating element is not just a piece of resistance wire. It is a component that combines electrically conductive material with a framework of insulating and supporting material, plus lead connections that safely interface with the circuit. That distinction matters during replacement because common failure points include terminals, insulators, and mechanical supports—not only the resistive path.
LSI keywords: resistive heating, Joule heating, insulators, terminal connections, heater assembly.
Why dryer heaters behave like “embedded” designs
Many heaters operate with the resistive conductor integrated within a supporting/insulating structure to manage safe heat transfer. Engineering classifications often distinguish suspended, supported, and embedded element frameworks because they change how heat is transferred and how failure occurs. A dryer heater relies heavily on controlled convection airflow and stable mounting to avoid hot spots.
Symptoms vs root cause (confirm it is the element)
A failed heating element is common, but it is not the only reason a dryer does not heat. Before replacing parts, the unit should be evaluated for airflow restriction (lint blockage), thermal cutoff events, and electrical supply issues. In many cases, a clogged vent causes overheating and repeated safety trips that mimic a failed heater.
Tools, parts, and prep
Typical tools
- Nut driver set / socket set (common sizes vary)
- Phillips and flat screwdrivers
- Needle-nose pliers
- Vacuum + brush (lint removal)
- Multimeter (recommended for continuity/ohms checks)
- Camera/phone for wire-reference photos
Parts and selection discipline
The replacement must match the dryer’s electrical requirements. Servicing guidance in other heater systems explicitly emphasizes verifying voltage and wattage against the unit data plate before installation; the same discipline applies here.
LSI keywords: correct replacement, voltage and wattage, data plate.
Safety steps before opening the dryer
This procedure assumes a typical electric dryer. If the unit is gas-fired, the heating system is fundamentally different and requires a different approach. For any dryer type, the correct starting point is safe isolation and cool-down.
Non-negotiable safety rules
- Disconnect power at the breaker and unplug the dryer before servicing.
- Do not rely on the control panel being “off.”
- Allow time for internal components to cool.
- Do not energize the dryer while any protective covers are removed.
- If wires are heat-damaged, stop and repair the harness/terminals before installing a new element.
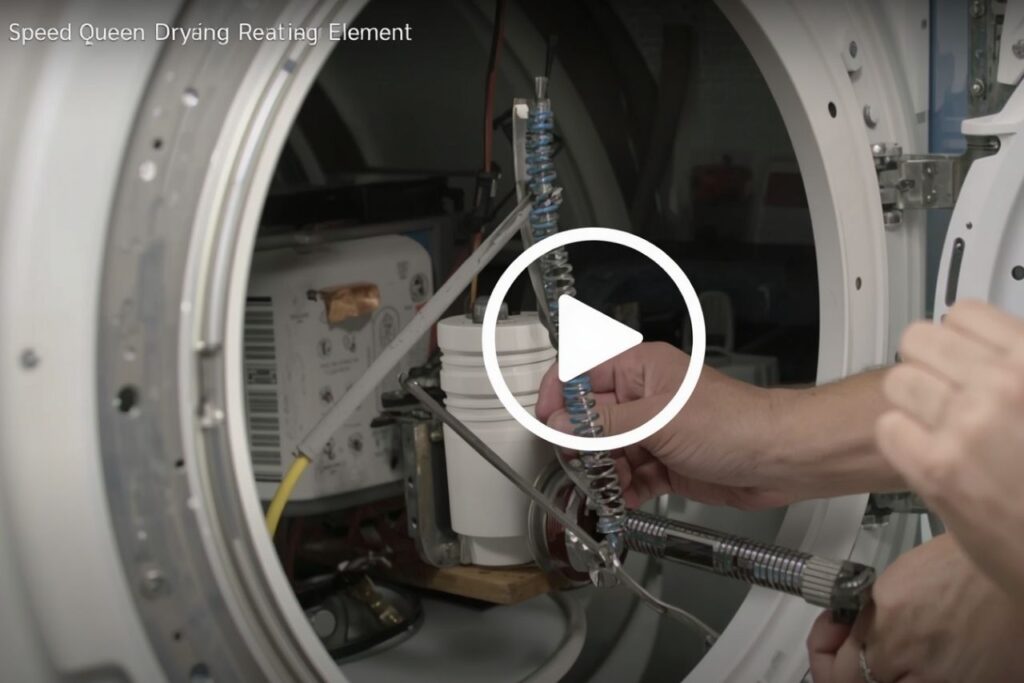
Replacement walkthrough (step-by-step)
Note: Speed Queen has multiple chassis designs. The access path (front, rear, or lower panel) varies. The sequence below is written to be broadly compatible: it focuses on controlled disassembly, correct wire handling, and heater housing replacement.
Step 1 — Confirm the complaint and document wiring
- Record the symptoms: “no heat,” “heat cuts out,” or “long dry times.”
- Photograph the rear and/or front panel fastener layout before removal.
- Once the heater area is accessible, take clear photos of every wire connection and terminal orientation.
Step 2 — Open the cabinet safely and control lint
- Remove the panel needed to access the heater assembly (rear panel on many electric designs; front/lower panel on others).
- Vacuum lint accumulation around the heater duct, blower area, and cabinet corners.
- Inspect the exhaust duct connection for heavy lint that could have caused overheating.
LSI keywords: lint blockage, airflow restriction, overheating.
Step 3 — Identify the heater housing and terminals
- Locate the heater box/duct where the element sits (typically in the heating duct path).
- Identify element terminals and any adjacent components (thermostats, thermal cutoffs, sensors).
- Inspect terminals for discoloration, looseness, or melted insulation.
Step 4 — Disconnect wires (label and preserve connector integrity)
- Label each wire with tape (e.g., A/B/C) to match your photos.
- Pull spade connectors by the connector body, not by the wire.
- If a terminal is loose, replace the connector rather than squeezing it “tighter” as a long-term fix.
Step 5 — Remove the heating element assembly
- Remove screws securing the heater housing cover or element bracket.
- Withdraw the element carefully to avoid bending supports or scraping insulation.
- Compare old vs new part for shape, terminal placement, and mounting points before installing.
Step 6 — Install the new element (mechanical stability first)
- Seat the element into the housing so it is centered and not contacting metal walls unless designed to do so.
- Reinstall all mounting screws. Do not overtighten to the point of deforming the heater frame.
- Confirm insulators/spacers are in place and intact.
This step matters because a heating element is a framework + conductor + leads assembly; deformation can create hot spots or shorts.
Step 7 — Reconnect wiring and verify connections
- Reconnect wires exactly as documented. Ensure spade connectors are fully seated.
- Confirm no wire rests on sharp edges or hot surfaces.
- Inspect any thermal devices in the heater duct for secure mounting.
Step 8 — Reassemble panels and restore airflow path integrity
- Reinstall the access panel and any internal covers removed.
- Reconnect the exhaust duct securely; avoid crushing or kinking flexible ducting.
- Verify the lint filter and filter housing are clean and properly seated.
Post-install checks and first heat test
Before the first full run, the unit should be checked for safe assembly and correct airflow. Servicing procedures for other heater systems emphasize a key safety concept: do not energize a heating element under unsafe operating conditions. In water heaters, this means not applying power until the tank is full; in dryers, this translates to ensuring the heater duct is assembled and airflow is not blocked.
First heat test (controlled)
- Restore power at the breaker, then plug the unit in.
- Run a short timed cycle with heat enabled and observe through the first few minutes.
- Check for abnormal smells (beyond minor dust burn-off), noise, or cycling that suggests overheat conditions.
- Confirm exhaust airflow at the vent outlet is strong and warm after a few minutes.
Charts & tables (diagnosis, wiring discipline, failure modes)
Table 1: “No heat” diagnostic mapping (before part replacement)
| Symptom | Likely cause | High-value check | Replace heater now? |
|---|---|---|---|
| Motor runs, no heat, no burning smell | Open heating element or open safety device | Continuity/ohms test across heater terminals; inspect thermal devices | Often yes (after confirming) |
| Heat starts then stops; cabinet very hot | Airflow restriction causing thermal trip | Vent path inspection/cleaning; blower/lint housing check | Not until airflow is corrected |
| Breaker trips when heat engages | Short, grounded element, or wiring fault | Inspect terminals, insulation damage; professional evaluation if needed | Only after fault is isolated |
| Weak drying + warm but not hot air | Vent restriction or partial heating performance | Measure exhaust flow; clean vent; verify element condition | Maybe |
Table 2: Wire-handling discipline (prevents repeat failures)
| Practice | Why it matters | Common mistake to avoid |
|---|---|---|
| Photo + label every connector | Prevents miswiring and protects safety devices | “It only fits one way” assumptions |
| Replace heat-damaged terminals | Loose connections create resistance heating and arcing | Reusing blue/browned spade connectors |
| Route wires away from heater duct | Avoids insulation breakdown over time | Letting wires rest on metal edges or hot zones |
Table 3: Heating element construction primer (why parts differ by application)
This table connects dryer-heater expectations to broader heating-element constructions referenced by engineering and component suppliers.
| Element family | Typical construction | Design intent | Where it shows up |
|---|---|---|---|
| Wire-in-framework (supported/suspended) | Resistance alloy + ceramic/mica supports + lead connectors | Max airflow exposure; controlled convection | Air heaters; some appliance heaters |
| Sheathed / tubular (“heating tube”) | Metal sheath + resistance wire + high-purity MgO insulation | Electrical insulation + robust conductive heat transfer | Kettles, ovens, water heaters; many appliance modules |
| Die-cast integrated modules | Heating element integrated with aluminum/copper die-casting | High transfer efficiency + mechanical strength + corrosion resistance | Thermal modules in appliances and industrial equipment |
| Plug-in accessory elements (spec-driven) | Packaged element with defined wattage, protection rating, approvals | Convenient installation; clear compliance attributes | Radiators/towel warmers; accessory heating |
Compliance and environment notes (context)
Some heating components are specified with environmental protection ratings (e.g., IP ratings) and approvals (e.g., UL) depending on intended installation. A plug-in heating element listing may highlight features such as IP67 and UL approval; dryer heater assemblies are typically internal components whose compliance is assessed at the appliance level, but the broader point remains: specification alignment and safe installation conditions are essential.
FAQ (8 questions)
1) How can it be confirmed that the heating element is actually bad?
The most defensible method is a continuity/ohms check across the element terminals with a multimeter after power is fully disconnected. Visual inspection alone can miss internal breaks or high-resistance failures.
2) Can a dryer heating element fail because of lint and airflow problems?
Yes. Restricted airflow increases heater temperature and stresses the element and nearby safety devices. Over time, overheating can shorten element life and trigger thermal cutoffs that mimic a bad element.
3) Should the dryer be run with panels removed to “see if it heats”?
No. Energizing a heater with protective covers removed increases shock and fire risk and can disrupt airflow paths that keep heater temperature stable.
4) Is a “heating element” just a coil of wire?
No. Heating-element engineering references define it as an assembly including conductive and insulating/support materials plus lead connections. That is why mechanical mounting and terminal integrity matter in replacement.
5) Why is part verification (voltage/wattage) emphasized?
Installing the wrong rating can cause unsafe temperatures, control issues, or inadequate heat. Servicing procedures for other heating systems explicitly call out verifying voltage and wattage against the unit data plate before installation; dryer repairs should follow the same principle.
6) If the element was replaced and there is still no heat, what is next?
The next checks are the thermal cutoff/thermostat devices in the heater duct, wiring integrity, and airflow/venting. A no-heat condition can persist when a safety device has opened due to prior overheating.
7) Should the vent system be cleaned when replacing the heater?
It is strongly recommended. Vent restriction is a primary driver of overheating and repeat failures, and cleaning is a low-cost preventive measure.
8) When should a professional be involved?
If there is evidence of arcing, melted wiring, repeated breaker trips, or uncertainty about the unit type (gas vs electric), professional service is appropriate.
Conclusion
A Speed Queen dryer heating element replacement is most successful when it is treated as a controlled service process rather than a single-part swap: isolate power, document wiring, replace the heater assembly without deforming supports, correct any heat-damaged terminals, and restore airflow integrity. Because heating elements are engineered assemblies of conductive and insulating components, careful handling and proper installation conditions reduce the risk of nuisance cycling and premature failure.
References and outbound links
Heating element engineering definitions, element frameworks (suspended/embedded/supported), materials, and design considerations:
https://tutco.com/conductive/heating-elements
Heating tube construction context (metal sheaths + MgO insulation + resistance wire; customization features):
https://jinzho.com/product-category/heating-element/heating-tubes/
Manufacturer overview and product families (tubes/plates/films; production capacity claims; certifications mentioned on site):
https://jinzho.com/
https://jinzho.com/product-category/heating-element/
https://jinzho.com/product-category/die-casting-heating-solutions/
Safety/process reference (used as a safety-sequencing analogy: verify correct replacement ratings; avoid energizing heater under unsafe conditions):
https://www.whirlpoolwaterheaters.com/support/help/element-was-out-of-range/24
Example of how component listings communicate wattage, materials, IP rating, and UL approval (context only; not dryer-specific):
https://usa.hudsonreed.com/1000-plug-in-watt-electric-heating-element-76309
Disclosure: This walkthrough is educational and model-agnostic. For exact panel access locations, fastener counts, and wiring diagrams, the correct Speed Queen service manual for the specific model should be followed.
Additional general references (user-provided list; not required for the procedure):
https://en.wikipedia.org/wiki/Heating_element
https://www.homedepot.com/b/Appliances-Appliance-Parts/Heating-Element/N-5yc1vZc35vZ1z0liod
https://www.mcmaster.com/products/heat-elements/

