
当您的Maytag烘干机停止产生热量时,您很可能面临令人沮丧的洗衣延误。Maytag设备中,故障的加热元件通常是导致此问题的原因。借助正确的工具和适当的维修步骤,您可以恢复烘干机的性能。立即采取行动解决问题,确保每次循环后衣物都能干燥。.
Maytag烘干机不加热:确认加热元件是问题所在
当您的Maytag烘干机停止加热时,您需要在开始任何维修前确认根本原因。加热元件经常失效,但其他组件也可能导致缺乏热量。通过识别正确的症状并执行快速检查,您可以避免不必要的部件更换,并高效恢复烘干机的性能。.
Maytag烘干机加热元件损坏的迹象
完整循环后衣物仍然潮湿
您可能会注意到您的 衣物仍然潮湿或湿润 即使在运行完整烘干循环后也是如此。此症状通常指向加热问题。烘干机中的加热元件负责产生烘干衣物所需的热量。当其失效时,滚筒内的空气保持凉爽,您的衣物无法按预期干燥。.
烘干机运转但不产生热量
如果您的烘干机通电、翻滚并完成循环,但不产生任何热量,则加热元件可能存在问题。根据制造商指南和维修专家的说法,损坏的加热元件会阻止烘干机加热空气,导致烘干无效。您还可能观察到电费增加,因为烘干机运行时间更长却无法正常烘干衣物。.
错误代码或警告灯
某些Maytag型号在加热系统故障时会显示错误代码或警告灯。这些警报可能指示加热元件或相关组件存在问题。请务必查阅您的用户手册以准确解读这些代码。.
Mẹo: 如果您看到错误代码,请在拔下烘干机电源前将其记录下来。此信息可帮助您或技术人员更快地诊断问题。.
更换加热元件前的快速检查
在更换加热元件之前,请执行几项基本检查。许多问题都可能导致Maytag烘干机不加热,因此彻底的诊断可以节省时间和金钱。.
检查电源和烘干机设置
首先,确认您的烘干机已牢固插入电源,并且设置正确。有时,一个简单的错误,例如选择了空气翻新或无热循环,可能会让您误以为烘干机不工作。同时,确保门正确关闭,因为某些型号在门开关未接合时不会加热。.
检查断路器和保险丝
跳闸的断路器或烧断的保险丝可能会中断加热元件的电源。检查您家中的配电板并重置任何跳闸的断路器。必要时更换烧断的保险丝。电源问题是烘干机加热故障的常见原因。.
排除热熔断器和恒温器故障
热熔断器和恒温器保护您的烘干机免于过热。如果任一组件失效,烘干机将停止加热。使用万用表 测试这些部件的导通性. 。如果它们显示不导通,请在考虑更换加热元件之前先更换它们。家电维修专业人士建议检查这些组件,因为它们与加热元件一样是常见故障点。.
- Các Maytag烘干机不加热的最常见原因 包括:
- 有缺陷的加热元件
- Cầu chì nhiệt bị lỗi
- 有缺陷的恒温器(循环和限温)
- 电源供应问题
- 通风口堵塞或设置不正确
通过遵循这些步骤,您可以准确判断是加热元件还是其他部件导致您的Maytag烘干机不加热。.
如何修复:为您的Maytag烘干机收集工具和更换零件
在开始任何维修之前,您需要收集正确的工具和零件。准备好一切将帮助您高效、安全地完成工作。本节说明您需要什么以及如何为您的Maytag烘干机选择正确的替换加热元件。.
所需基本工具
有些热水器型号在检修面板上使用六角头螺丝。使用螺母旋具或小套筒扳手拆卸它们比使用钳子要容易得多。
您将需要十字和一字螺丝刀来拆卸和安装烘干机面板上的螺丝。这些工具可帮助您接触内部组件,而不会损坏螺丝或设备。.
螺母旋具或套筒扳手
螺母起子或套筒扳手可让您拆卸固定加热元件和其他部件的螺栓。为您的特定型号选择正确的尺寸,以避免损坏硬件。.
用于测试导通性的万用表
万用表对于测试电气导通性至关重要。您可以使用它来检查加热元件、热熔断器或恒温器是否正常工作。此工具有助于您在继续操作前确认需要更换哪个部件。.
在拆卸加热元件前,需要使用花园软管排空热水器水箱。将软管连接到排水阀并将水引至安全位置。此步骤可防止溢水并降低热水烫伤风险。
佩戴工作手套和安全眼镜,以在维修过程中保护您的手和眼睛。烘干机内部的锋利边缘可能导致受伤。安全装备还能保护您免受灰尘和碎屑的侵害。.
家电维修专家推荐 多功能螺丝刀 作为更换Maytag烘干机加热元件最重要的工具。此工具可让您在拆卸和重新组装过程中处理不同类型的螺丝。在开始任何维修前,务必拔下烘干机电源或关闭断路器,以防止电气事故。.
Lựa chọn bộ phận gia nhiệt phù hợp
找到您的Maytag烘干机型号
在购买替换零件之前,您必须找到烘干机的型号。型号通常位于门框内部或后面板上的标签上。将其记下或拍照以供参考。.
购买兼容的替换加热元件
当您购买新的加热元件时,请将制造商的零件编号与您烘干机的型号相匹配。始终选择OEM(原始设备制造商)零件,以确保合适的配合和功能。例如, Maytag DE482使用OEM加热元件(240V),零件编号为WPY313538. 。此零件也适用于某些Jenn-Air和Kenmore型号。.
- 使用正确的OEM零件可防止:
- 不一致或不良的加热性能。.
- 因过载而损坏其他内部组件。.
- 安全隐患,例如暴露于带电电流。.
使用不兼容的加热元件可能导致烘干时间延长、设备损坏甚至电气风险。在购买前务必仔细核对零件编号。.
通过准备正确的工具和选择正确的替换零件,您为成功维修奠定了基础。您现在知道如何自信且安全地修复您的Maytag烘干机。.
Maytag烘干机维修:开始前的安全预防措施
在开始任何烘干机维修之前,您必须认真对待安全。遵循正确的预防措施可保护您免受电气危险、烫伤和其他常见风险。Maytag和家电安全组织建议在维修过程中采取几项基本步骤,以保护您和您的家庭安全。.
断开电源并准备工作区域
拔下烘干机电源或关闭断路器电源
Bạn phải 在开始任何维修前,断开烘干机的所有电源 。将设备从墙壁插座上拔下,或关闭为烘干机供电的断路器。此步骤可防止意外触电,并消除因带电电线导致烫伤的风险。DIY维修期间的许多安全事故都是因为人们忘记断开电源而发生的。务必再次确认在您工作时烘干机无法启动。.
Mẹo: 如果您拥有燃气烘干机,也请关闭燃气供应。此操作可防止燃气泄漏并降低爆炸风险。.
移动烘干机以便于操作
将您的烘干机从墙边移开,为维修创造足够的空间。根据您的型号,您需要能够清晰接触到后面板或前面板。将烘干机放置在平坦、稳定的表面上以防止倾倒。一个组织良好的工作空间有助于您避免事故,并使维修过程更加顺畅。.
穿戴安全装备
佩戴安全装备
个人防护装备对于安全的烘干机维修至关重要。佩戴工作手套以保护您的手免受锋利边缘和高温表面的伤害。安全眼镜可保护您的眼睛免受灰尘和碎屑的侵害。许多专业人士推荐这些物品,因为它们能降低割伤、烫伤和眼部受伤的风险。您还应穿着封闭式鞋子,以保护您的脚免受掉落工具或零件的伤害。.
清理烘干机周围区域
移除烘干机周围所有易燃材料,如待洗衣物、清洁用品或纸张。整洁的工作空间可降低火灾风险,并便于安全操作。保持工具摆放有序,确保区域照明充足。若发现烘干机散发异常气味、产生火花或异响,, 请立即停止维修 并寻求专业帮助。.
Ghi chú: 定期清洁绒毛过滤器和通风口不仅能提升烘干机性能,还可降低维修期间及之后的火灾隐患。.
遵循这些安全预防措施,能为您的烘干机维修创造更安全的环境。同时可降低受伤风险,保护您的住宅免受潜在危害。若对任何步骤存在疑虑,建议联系受过培训的专业人员协助处理。.
修复步骤:定位并测试美泰克烘干机加热元件

打开烘干机外壳
拆卸后挡板或前面板
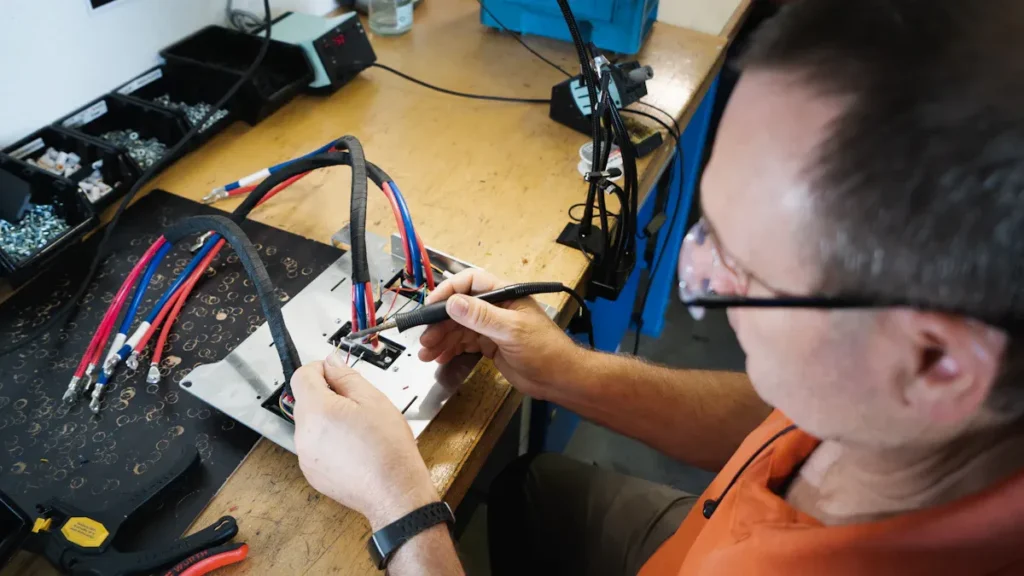
您需要打开烘干机外壳才能接触到加热元件。务必首先 拔下烘干机电源插头 。此步骤可防止触电风险。接下来取出绒毛过滤器并妥善放置。使用十字螺丝刀卸下固定顶板的螺丝(通常位于烘干机背部)。.
掀起顶板并将其倚靠在稳定表面。小心断开所有线束连接,并将控制面板与外壳分离。找到并卸下固定前面板的螺丝(通常位于顶部和底部),在抬起并移除前面板前需先断开舱门开关线束。若您的机型需要,请卸下固定滚筒与后隔板的螺丝,小心取出滚筒。.
Mẹo: 将所有螺丝和小零件存放在容器中。此做法可避免重新组装时丢失关键配件。.
定位加热元件总成
拆卸必要面板后,即可定位加热元件总成。在大多数美泰克机型中,加热元件位于烘干机后部的金属罩内。该总成通常呈线圈状或带接线端子的金属盒形态。请检查该区域是否有积尘或绒毛堆积,这些会影响元件性能。.
检测加热元件故障
使用万用表检测通断性
用万用表测试烘干机加热元件可帮助确认是否故障。将万用表调至 200欧姆电阻档位. 欧姆档。找到加热元件引线(通常是连接线圈的三根红色导线)。将万用表探针接触加热线圈的两个引线。.
若万用表显示数值,表明加热元件具有通断性且可能工作正常;若无读数显示,则元件故障需要更换。若不确定部件位置,请务必查阅制造商指南。.
Ghi chú: 检测任何电气元件前必须拔掉烘干机电源。此步骤是安全操作的基本保障。.
检查可见断裂或烧灼痕迹
目视检查可发现加热元件故障的明显迹象。检查线圈是否存在可见断裂或金属罩上的烧灼痕迹。若发现 异常气味或烧灼迹象, ,则加热元件或其连接线可能已过热或受损。间歇性加热或完全无法加热通常指向这些问题。.
- 加热元件故障的常见可视迹象包括:
- 线圈断裂或分离
- 元件或外壳上的深色烧灼痕迹
- 端子熔化或变色
如果您发现任何这些迹象,您应该更换 加热元件以恢复您的Maytag烘干机的 性能。.
Chú thích: 若对操作过程中的任何步骤存在疑问,请查阅烘干机说明书或联系专业技术人员获取指导。.
修复步骤:更换美泰克烘干机故障加热元件

更换故障加热元件是恢复烘干机加热功能与性能的关键步骤。需遵循系统化操作流程以确保安全与效率。本指南将引导您完成从拆卸旧加热元件到安装新元件的全过程。.
Tháo bộ phận làm nóng cũ
断开导线与固定螺丝
首先确保烘干机已断电。安全第一。佩戴牢固的工作手套以防被机壳内部锐边划伤。根据您的机型,将烘干机移离墙面以便操作后部或前面板。.
按以下步骤断开导线与固定螺丝:
- 打开烘干机门,卸下门两侧附近的螺丝。.
- 握住外侧边缘轻轻拉下前面板。.
- 定位滚筒下方的加热元件(通常在右侧)。.
- 卸下保护加热元件的盖板(通常由1/4英寸六角螺丝固定)。.
- 拧下将加热元件固定于机壳底板的1/4英寸六角头螺丝。.
- 卸下加热器罩顶部后侧固定于后墙的螺丝。.
- 断开导线前,请清晰拍摄接线布局照片。此步骤有助于后续正确恢复所有连接。.
- 小心断开加热元件端子上的导线。.
Mẹo: 使用小容器收纳所有螺丝和紧固件,保持维修过程井然有序。.
小心取出加热元件
断开导线并卸下所有固定螺丝后,即可取出加热元件。紧握元件将其笔直拉出外壳。若您的机型有高温恒温器附着于元件,请将其拆下并妥善放置以便移植至新部件。.
检查旧加热元件的可见损伤,如线圈断裂或烧灼痕迹。此检查可确认您已准确判断美泰克烘干机加热问题的根源。.
Lắp đặt bộ phận làm nóng mới
Cố định phần tử mới vào đúng vị trí
安装新加热元件前,如需移植高温恒温器,请将其从旧元件转移至新元件。按原始方位放置新加热元件。.
按以下步骤固定新元件:
- 将新加热元件滑入外壳,确保紧密贴合。.
- 对准安装孔,插入1/4英寸六角头螺丝将元件固定于底板和后墙。.
- 重新安装加热元件保护盖并拧紧螺丝。.
Ghi chú: 仔细检查新元件是否牢固就位,触碰时无松动。.
重新连接导线与紧固件
现在将导线重新连接至新加热元件。参考之前拍摄的照片确保每根导线接入正确端子。紧固所有连接以防止电气故障。.
继续执行以下步骤:
- 若尚未操作,请将高温温控器安装至新加热元件上。.
- 将前面板与箱体对齐并按压到位,重新安装前面板。.
- 插入并拧紧所有先前拆卸的螺丝。.
- 将干衣机移回原位并接通电源。.
Chú thích: 重新组装后,空载运行干衣机短时循环以确认新加热元件正常工作。注意倾听异常噪音并检查热量输出是否正常。确认运行正常后,, 放入少量湿衣物进行烘干测试 以确保设备功能完整。.
遵循这些步骤,您即完成了美泰克干衣机维修的核心工作。现在您已掌握如何修复故障加热元件,使设备恢复可靠制热功能。.
美泰克干衣机不制热:维修后的重组装与测试
重组装干衣机
重新安装面板与螺丝
您需要仔细重组装美泰克干衣机,以确保其安全高效运行。按以下步骤将所有部件复位:
- 将滚筒滑回箱体,借助传动带将其导向后方。操作前,, 请为支撑滚筒的后轴 涂抹新润滑脂。此步骤可减少摩擦并延长设备使用寿命。.
- 在前顶轨上重新安装塑料支撑件。.
- 拧紧面板内侧螺丝以固定前顶板。.
- 用螺丝刀压入卡扣,从前方放下干衣机顶部。.
- 安装小型后面板,确保传动带保持松弛状态。.
- 将传动带环绕电机和张紧轮,确保对位准确。.
- 再次确认所有安装螺丝和紧固件均已拧紧。.
Mẹo: 重组装过程中请妥善整理所有螺丝和小零件。此举可避免延误,并确保不遗漏任何关键部件。.
恢复供电与连接
重新安装所有面板并固定滚筒后,请恢复供电与连接:
- 将干衣机重新插入墙壁插座,或重新打开断路器。.
- 若为燃气型号,请重新打开燃气供应阀。.
- 确认所有线束和连接器均已牢固连接。.
恢复供电前务必检查干衣机周围区域是否通畅。此步骤有助于防止意外损坏或火灾隐患。.
运行测试确认正常工作
运行测试循环检查制热功能
完成干衣机组装后,必须确认维修是否成功。首先进行空载测试循环:
- 将干衣机设置为高温模式。.
- 运行5-10分钟。.
- 打开门检查滚筒是否感觉温热。.
若滚筒内部有热感,则新加热元件工作正常。若干衣机仍不制热,可能需要检查安装情况或排查其他问题。.
确认干衣机功能正常
为确保干衣机安全高效运行,请执行以下附加检查:
- 在电源线连接的接线端子处 确认干衣机获得220伏电压。.
- 即使用户近期已更换过,仍需用万用表测试所有温控器和热熔断器。.
- 检查电机连接线,特别是两根红色导线,必须确保连接牢固。.
- 检查电机内部的离心开关。故障开关会导致加热元件无法通电。.
若完成以上步骤后干衣机仍不制热,则可能需要更换电机。请查阅用户手册或咨询专业技术人员获取进一步指导。.
遵循这些步骤,您将学会如何修复美泰克干衣机并恢复可靠制热功能。细致的重组装和全面的测试可确保设备安全高效运行。.
预防美泰克干衣机加热元件故障
保持干衣机健康运行的维护建议
定期清洁绒毛过滤器和通风口
通过坚持定期清洁可延长美泰克设备的使用寿命。日常维护有助于防止干衣机过热,降低加热元件故障风险。家电专家推荐以下步骤:
- 每次烘干后清洁绒毛过滤器. 。此简单习惯可保持气流畅通,确保干衣机高效运行。.
- 每周或每两周用肥皂水清洗绒毛过滤网. 。织物柔顺剂和烘干纸残留物可能堵塞气流通道。.
- 每月用吸尘器清理绒毛收集仓。绒毛可能穿透过滤器在仓内积聚,导致过热。.
- 每年至少安排一次专业排气管道清洁。若经常进行大批量洗衣,应考虑增加清洁频率。.
Mẹo: 通风口堵塞是导致 Maytag烘干机 停止加热。保持通风口畅通可确保气流正常,并保护加热元件。.
避免过载运行
应避免使干衣机超负荷运行。大件厚重衣物会限制气流,迫使加热元件超负荷工作。这种额外压力可能导致元件过热并过早损坏。建议分批烘干较小负载,为空气循环留出空间。长期坚持将获得更佳烘干效果并减少维修需求。.
- 定期检查加热元件是否存在可见损伤或烧灼痕迹。.
- 检查与干衣机配套的洗衣机。均衡负载和正确的脱水程序有助于减少湿度,减轻烘干负担并降低加热元件工作压力。.
何时需要联系专业人员进行美泰克干衣机维修
自行维修后持续存在的制热问题
若更换加热元件并清洁通风管道后,美泰克干衣机仍存在制热问题,则可能面临更复杂的故障。持续故障通常指向 温控器缺陷、电路短路或电机开关故障。. 这些问题需要诊断测试和专用工具。.
- 若设备仍无响应,请致电专业人员 或出现电气问题迹象时也应联系专业维修。.
- 异常噪音、烧焦气味或热熔断器反复故障,都表明存在需要专家处理的深层故障。.
电气或安全隐患
除非经过专业培训,否则切勿尝试涉及电气危险或燃气连接的维修。不具备专业知识而处理线路或控制板问题可能导致受伤或火灾。燃气烘干机还存在泄漏或一氧化碳暴露等额外风险。.
Ghi chú: 自行维修可能导致保修失效. 。认证技术人员拥有安全高效修复您美泰格电器所需的知识和工具。.
| Diện mạo | Sửa chữa chuyên nghiệp | 自行维修 |
|---|---|---|
| 人工成本范围 | 每小时 100 至 190 元 | 无人工成本,仅需个人时间 |
| 总维修成本范围 | 大约 100 至 550 元 | 仅零件成本(原厂或通用件价格不同) |
| 成功率 | 因专业知识与优质零件而更高 | 若仔细遵循说明则成功率良好 |
了解何时应呼叫专业人员,可保护您的投资与安全。若对任何维修步骤不确定,请寻求专家帮助以避免进一步损坏。.
更换美泰格烘干机的加热元件可恢复可靠热量并提升烘干性能。得益于用户友好的设计,自行处理此维修可节省时间和金钱。定期维护(如清洁绒毛过滤器和通风口)可延长设备寿命。若遇到持续性问题或安全隐患,请联系专业技术人员获取专家支持。.
| 关键要点 | Lợi ích |
|---|---|
| 安装便捷性 | 流程简单,仅需基本工具,可降低维修成本 |
| 加热性能 | 热量均匀稳定,确保烘干均匀,减少冷点 |
| 使用寿命 | 耐用零件在妥善保养下 可持续使用 5–10 年 若在任何步骤感到不确定,专业服务和在线资源可提供指导并让您安心。 |
应多久更换一次美泰格烘干机的加热元件?.
Câu hỏi thường gặp
仅在加热元件故障时才需更换。大多数元件在妥善保养下可使用 5–10 年。定期维护(如清洁绒毛过滤器和通风口)有助于延长其寿命。
可以在美泰格烘干机中使用通用加热元件吗?.
应始终使用 OEM(原厂设备制造商)加热元件。通用零件可能无法正确安装或提供可靠性能。OEM 零件可确保安全并与您的特定型号兼容。
更换美泰格烘干机加热元件需要哪些工具?.
您需要十字螺丝刀、一字螺丝刀、螺母起子或套筒扳手、万用表和作业手套。这些工具可帮助您安全地接触、测试和更换加热元件。
为什么美泰格烘干机总是烧断热熔断器?.
通风口堵塞或绒毛堆积常导致热熔断器反复故障。气流受限会引起过热。定期清洁绒毛过滤器和通风口可防止此问题。
自行维修美泰格烘干机安全吗?.
若遵循所有安全预防措施,您可以安全地维修烘干机。开始前务必断开电源。穿戴防护装备。若感到不确定,请联系专业技术人员。
没有万用表如何判断加热元件是否损坏?.
您可以查看可见迹象,如加热元件线圈断裂或有烧焦痕迹。若烘干机运行但不产生热量,则元件可能已故障。然而,万用表能提供最准确的诊断。
更换加热元件后烘干机仍不加热该怎么办?.
检查热熔断器、恒温器和电源。确保所有电线连接牢固。若问题持续,请咨询专业人员。可能需要检查或更换其他组件。
通风口堵塞会导致美泰格烘干机停止加热吗?.
是的。通风口堵塞会限制气流,导致烘干机过热并关闭加热元件。定期清洁通风口以维持烘干机正常功能。
定期维护可预防大多数加热问题并延长烘干机寿命。.
Mẹo: 惠而浦烘干机加热元件购买指南.

