You can troubleshoot and replace your hot tub Heizelement by recognizing early warning signs and using simple diagnostic tools. Many spa owners discover that heater elements may need replacement within five years, often due to poor water chemistry.
Jinzhong Elektroheizung und andere Hersteller von Heizelementen Design Heizelemente für Haushaltsgeräte to withstand regular use, but even the best components require attention and care.
Signs Your Hot Tub Heating Element Needs Replacement

Common Symptoms in Spa Heater
Wasser erwärmt sich nicht
You may notice your hot tub is not heating at all or not heating enough. This issue often points to a failing spa heater element. When the water temperature stays cold despite the heater running, you should suspect a problem with the element. Inconsistent water temperature or slow heating also signals trouble.
Fehlercodes auf dem Bedienfeld
Modern spa heaters display error codes when something goes wrong. If your control panel shows heating-related errors, you should check the heater and its connections. These codes help you identify spa heater problems before they cause further damage.
Unusual Noises or Smells
Strange sounds or odors coming from the spa heater area often indicate electrical or mechanical issues. You might hear buzzing, popping, or hissing. Sometimes, a burnt smell suggests the element has failed. Address these signs quickly to prevent more serious damage.
Tipp: Industry experts recommend watching for these common signs that your spa heater needs attention:
- No heat or reduced heat output
- GFCI breaker tripping unexpectedly
- Visible damage or corrosion on the element
- Ungleichmäßige Wassertemperatur
- Unusual noises from the heater area
When to Replace the Heater Element
Ruling Out Other Hot Tub Issues
Before you replace the spa heater element, rule out other possible causes. Problems with the thermostat, pump, or control board can also affect heating. Check for proper water flow and ensure all settings are correct. If you confirm the heater is the source, move forward with replacement.
Age and Wear of the Heating Element
Heater elements do not last forever. Under normal use, you can expect a lifespan of around five years or more with regular care. Neglecting maintenance, such as poor water chemistry or infrequent cleaning, can shorten this period. If your spa is older or you see visible corrosion, replacement becomes necessary.
Here are the most common criteria for determining when to replace your hot tub heater element:
| Criteria | Beschreibung |
|---|---|
| Chemical Imbalance | High levels of calcium can cause scale formation and corrosion, leading to premature failure. |
| Improper Water Maintenance | Poor water quality from inadequate maintenance can obstruct the heater element’s operation. |
| High Water Flow and Pressure | Excessive flow or pressure can stress the heater element, causing mechanical failure. |
| Elektrische Probleme | Power surges or faulty connections can lead to overheating and failure of the heater element. |
| Age and Wear | Over time, constant heating and cooling cycles degrade the element, leading to eventual failure. |
| Inadequate Heating | Insufficient heating or slow temperature rise indicates a failing heater element. |
| Fluctuating Temperature | Inconsistent water temperature suggests a problem with the heater element. |
| No Heating | If the water remains cold despite the heater running, the element likely has failed. |
| Tripping Breakers | Frequent breaker trips may indicate a faulty heater element causing electrical issues. |
| Visible Damage | Inspect for cracks, breaks, or corrosion that can affect performance. |
- The lifespan of a hot tub heater can be around 5 years or more with diligent care.
- Neglecting maintenance can significantly shorten the lifespan of the heating element.
If you notice any of these issues, you should consider replacing the heater element to restore reliable heat to your spa.
Step-by-Step Troubleshooting for Hot Tub Heater Element
Safety Precautions Before Replacement
Power Off and Disconnect Spa Heater
Before you begin any troubleshooting or repairs, always ensure your safety. Electricity and water create a hazardous environment. You must disconnect all electrical power to the spa heater before you inspect or replace any components. Shut off the power at the service panel. As an extra precaution, disconnect the power directly at the spa as well.
Caution: Electrical repairs can be dangerous, especially around water. Repairs must be made by a qualified electrician or spa technician. Regardless of who performs the work, disconnect all electrical power to the hot tub prior to any inspection or repair.
Shut power off at the service panel, and as a secondary precaution, disconnect the power to the spa as well. Do not attempt to perform electrical repairs unless you are qualified.
Disconnect all electrical power to the spa prior to any inspection or repair, and before heater removal and testing.
Schutzausrüstung verwenden
You should always wear protective gear when working on a spa heater. Use insulated gloves and safety goggles to protect yourself from electrical shock and accidental splashes. Make sure your hands and tools are dry before touching any electrical components. Safety must remain your top priority throughout the process.
Visual Inspection of Hot Tub Heater
Checking for Corrosion or Damage
Begin your troubleshooting with a careful visual inspection of the heater element. Look for physical signs that indicate damage or corrosion. These signs often reveal the root cause of heater failure.
- Discoloration
- Cracking
- Verziehen
- Signs of corrosion such as bulging or pitting
- Pin holes in the sheath caused by corrosion
- Water intrusion into the element’s outer sheath
- Outer sheath splits open
- Heating coil wire hanging out
- Cracked or blown MGO filler
If you notice any of these issues, the element likely needs replacement. Physical damage can prevent the heater from operating efficiently and may lead to further problems if left unaddressed.
Inspecting Electrical Connections
Next, examine all electrical connections to the spa heater. Loose, corroded, or burned terminals can disrupt the flow of electricity and cause the heater to malfunction. Heater element failures in spas are frequently linked to electrical problems, particularly shorts caused by mineral buildup or aging components. These shorts can lead to significant issues, including the tripping of breakers, indicating that electrical connection issues are a common contributor to heater element failures. Tighten any loose connections and clean away any visible corrosion. If you see signs of burning or melting, replace the affected wires or terminals.
Testen des Heizelements mit einem Multimeter
Einrichten des Multimeters
After your visual inspection, you should test the heater element using a multimeter. This tool measures electrical resistance and helps you determine if the element is still functional. Set your multimeter to the ohms (Ω) setting. Make sure the spa heater remains disconnected from all power sources before you proceed.
Measuring Resistance of the Element
Locate the terminals on the heater element. Place one probe of the multimeter on each terminal. Read the resistance value displayed on the multimeter screen. For most portable spa heater elements, the acceptable resistance range falls between 9 and 12 ohms. Some elements may read slightly higher, up to 14 ohms, and still function properly.
| Resistance Range | Beschreibung |
|---|---|
| 9–12 Ohm | Indicates a good heater element |
If your reading falls within this range, the heater element is likely in good condition. A reading outside this range, especially zero (short circuit) or infinite (open circuit), means the element has failed and requires replacement.
Tipp: Testing spa heater elements with a multimeter provides a reliable diagnosis. Always compare your readings to the manufacturer’s specifications for your specific model.
Interpretieren von Multimeterergebnissen
What Readings Mean for Replacement
When you test your hot tub heater element with a multimeter, you receive a resistance reading in ohms. This number tells you if the element works or if you need to replace it. Most spa heater elements should show a resistance between 9 und 12 Ohm. If your reading falls within this range, your element likely functions well.
You may see readings outside this range. A reading of 0 Ohm means the element has shorted out. An infinite reading means the circuit is open and the element has failed. Both cases require immediate replacement. Sometimes, you may see a resistance much higher than 12 ohms. This also signals a problem and means you should replace the element.
You can use the following table to interpret your multimeter results:
| Widerstandsmessung | Zustand | Aktion |
|---|---|---|
| 9 – 12 ohms | Element ist gut | No replacement needed |
| 10 – 30 ohms | Functional element (some models) | Monitor for performance |
| 0 Ohm | Shorted element | Replace the element |
| Unendlicher Widerstand | Unterbrechung | Replace the element |
| Significantly higher | Possible scale buildup or damage | Replace the element |
Anmerkung: If you notice scale buildup or cracks in the outer casing during inspection, you should replace the element even if the resistance appears normal. Scale can reduce heat output and lead to early failure.
Deciding Whether to Replace the Heater Element
You must decide on replacement based on your test results and visual inspection. If your multimeter shows a resistance between 9 and 12 ohms and you see no physical damage, your heater element remains in good condition. You can continue using it and monitor for any changes in performance.
If you see any of the following, you should replace the heater element:
- Resistance reading of 0 ohms (short circuit)
- Infinite resistance (open circuit)
- Resistance much higher than 12 ohms
- Cracks, corrosion, or scale buildup on the element
A faulty heater element can cause your hot tub to stop heating, trip breakers, or display error codes. Replacing a damaged element restores proper function and prevents further electrical issues.
⚡ Tipp: Always compare your multimeter readings to the specifications for your spa model. If you feel unsure about your results or see signs of damage, replacing the heater element is the safest choice.
By understanding your multimeter readings and knowing what to look for, you can make informed decisions about your hot tub heater element. This approach helps you maintain a safe and comfortable spa experience.
How to Replace the Heater Element in Your Hot Tub

Tools and Materials Needed for Replacement
List of Required Tools (screwdriver, wrench, multimeter, replacement element)
You need the right tools to complete a successful spa heater replacement. Gather all necessary items before you begin. This preparation helps you avoid delays and ensures a smooth process. Here is a hot tub heater replacement list you should have on hand:
- Multimeter – Use this to test electrical continuity and resistance.
- Spanner or wrench – Loosen and tighten the heater element securely.
- Screwdrivers (flathead and Phillips) – Remove access panels and electrical terminals.
- Teflon tape – Seal threads if your heater design requires it.
- Compatible replacement heater element – Match this to your spa’s specifications.
Tipp: Always check your spa manual for any additional tools or specific instructions unique to your model.
You may also need replacement parts for a complete spa heater replacement. The table below outlines common components:
| Ersatzteil | Beschreibung/Verwendung |
|---|---|
| Heizelement | Muss zu Ihrem Whirlpool-Modell und den Wattanforderungen passen |
| Heizungsdichtung | Dichtet das Heizelement ab, um Leckagen zu verhindern; für beste Ergebnisse austauschen |
| Pullovergurt | Verbindet die Heizung mit der Steuerplatine; bei Korrosion oder Beschädigung ersetzen |
| Elektrische Steckverbinder | Drähte und Anschlüsse; prüfen und ersetzen, wenn sie abgenutzt oder korrodiert sind |
Choosing the Right Replacement Heater Element (Incoloy, Titanium, correct wattage)
Selecting the correct heater element is critical for reliable spa heater replacement. You must match the wattage and dimensions to your spa model. Two common materials for heater elements are Incoloy and Titanium. Each offers unique benefits.
| Material | Hauptvorteile | Nachteile |
|---|---|---|
| Incoloy | Excellent resistance to oxidation and corrosion; suitable for acidic/alkaline water; often paired with ceramic coatings for extra durability | Does not match titanium’s resistance to saltwater corrosion; scale buildup concerns; can develop pinholes from corrosion; requires proper installation to avoid damage. |
| Titan | Lightweight, robust, highly resistant to corrosion and erosion; ideal for saltwater and harsh environments | May encounter scale buildup with hard water; improper installation can lead to failure; higher cost than other types. |
Choose Incoloy for most standard spas, especially if you maintain balanced water chemistry. Select Titanium if you use saltwater or your spa operates in harsh conditions. Always confirm the wattage and fit before you replace the heater element.
Draining and Accessing the Spa Heater
Safely Draining the Hot Tub
Before you start any spa heater replacement, drain the hot tub to a level below the heater element. Follow your manufacturer’s instructions or consult your spa manual for the correct draining procedure. This step prevents water from spilling into the equipment area and protects you from electrical hazards.
- Turn off power at the circuit breaker.
- Attach a hose to the drain spout or use the built-in drain valve.
- Open the valve and let the water flow out until it drops below the heater level.
- Close the valve and remove the hose when finished.
Anmerkung: Some spas do not have isolation valves. In these cases, you must drain the entire hot tub before you access the heater.
Locating the Heating Element in the Spa Heater
Once you drain the spa, remove the access panels or covers to reach the heater assembly. Most spa heaters sit near the equipment compartment, close to the pump and control board. Use your screwdriver to remove the screws holding the panel in place. Set the panel aside in a safe location.
Look for a metal tube or canister with electrical wires attached. The heater element sits inside this housing. Identify the terminals and note the wire colors for easy reinstallation.
Removing the Old Hot Tub Heater Element
Disconnecting Wires from the Element
Sie müssen disconnect all electrical connections before you remove the old spa heater. Use your screwdriver to loosen the terminal screws. Carefully pull the wires away from the heater element. Take a photo or label the wires to help you reconnect them correctly during spa heater replacement.
⚡ Caution: Double-check that the power is off before you touch any wires. Use your multimeter to confirm there is no voltage present.
Unscrewing and Extracting the Heater Element
After you disconnect the wires, locate the securing nuts or bolts holding the heater element in place. Use your wrench or spanner to loosen and remove these fasteners. If your heater uses unions or clamps, unthread them to release the element.
Gently pull the element out of the heater housing. Inspect the gasket and replace it if you see any signs of wear or damage. Check the canister for corrosion or debris before you install the new element.
Tipp: Keep all hardware and gaskets organized for easy reassembly. If you find damage to the heater canister, consider a full spa heater replacement.
You have now completed the removal process. You are ready to install the new spa heater element and restore your spa’s heating performance.
Installing the New Replacement Element
Positioning and Securing the New Heater Element
You must position the new heater element carefully to ensure proper function and safety. Start by confirming that the new element matches your spa’s specifications in both size and electrical rating. This step prevents compatibility issues and ensures efficient heating.
Follow these best practices for installing a replacement spa heater:
- Align the new heater element with the mounting holes in the heater housing.
- Insert the element gently, making sure it sits flush against the housing.
- Secure the element using washers and bolts. Tighten them evenly to avoid Lecks or damage.
- Check that the union o-rings are in place and undamaged. Replace them if necessary to prevent leaks.
- Reinstall the temperature sensor if your spa uses one. Tighten the sensor bolt to ensure a solid connection.
Tipp: Always use a new gasket when installing a replacement. Old gaskets can cause leaks and improper sealing.
You should avoid overtightening, which can crack the housing or deform the gasket. A snug fit ensures a watertight seal and reliable operation.
Reconnecting Wires to the Spa Heater
Once you secure the heater element, reconnect the wires to the terminals. Attach each wire to its correct terminal, matching the labels or photo you took earlier. Tighten the terminal screws to create a solid electrical connection.
- Make sure all wire connections are tight and free from corrosion.
- Secure any loose wires to prevent them from touching other components.
- Reconnect any safety switches or sensors that were disconnected during removal.
Proper wiring prevents electrical problems and ensures your spa heater element operates safely. Double-check your work before moving on to reassembly.
⚡ Anmerkung: Incorrect wiring can cause electrical issues, such as tripped breakers or no heat. Take your time and verify each connection.
Reassembly and Refilling the Hot Tub
Reattaching Panels and Covers
After you install the new spa heater and reconnect all wires, replace the access panels and covers. Use your screwdriver to secure each panel in its original position. Make sure all screws are tight and panels fit snugly to protect the internal components from moisture and debris.
| Ausgabe | Beschreibung |
|---|---|
| Lecks | Often caused by improper sealing or a damaged gasket. Inspect and replace gaskets to prevent leaks. |
| Improper Sealing | Reusing old gaskets can lead to leaks. Always use a new gasket for a watertight seal. |
| Electrical Problems | Incorrect wiring can cause no hot water, tripped breakers, or unusual noises after replacement. |
Tipp: Inspect the area for leftover tools or debris before closing the panels. This step helps prevent future maintenance issues.
Refilling the Hot Tub with Water
You can now refill your spa with water. Attach a hose to the fill port or place it directly into the tub. Fill the spa slowly, watching for leaks around the heater housing and unions.
- Fill the hot tub until the water level reaches the recommended mark.
- Remove any air locks by loosening the pump or heater unions until air escapes, then tighten them quickly.
- Monitor the area around the heater for any signs of water leakage.
Proper refilling ensures your spa operates efficiently and safely. Secure all connections to avoid electrical hazards and water damage.
💧 Anmerkung: Air trapped in the system can cause the heater to overheat or shut down. Always bleed air from the lines before powering up the spa.
By following these steps, you complete the installation and reassembly process. You have now restored your spa’s heating capability and ensured a safe, leak-free environment.
Testing Your Hot Tub After Heater Element Replacement
Powering Up the Spa Heater
Restoring Power Safely
You must restore power to the spa heater with caution. Begin by verifying that all panels and covers are securely attached. Check that the heater element and electrical connections are dry and free from debris. Turn on the circuit breaker and reconnect the spa to its power source. Always stand clear of the equipment area when you restore power. This step reduces the risk of electrical shock.
⚡ Tipp: If you notice any sparks or unusual sounds when powering up, immediately turn off the spa and inspect the wiring.
Initial Startup Checks
After restoring power, perform a series of startup checks to confirm that the heater operates correctly. Use the following procedure to test your spa heater:
- Ensure the power to the spa heater is off before any testing.
- Use a multimeter set to Ohms to measure resistance across the heater terminals. A good heater element should show 9-12 ohms.
- Switch the spa heater on and use an amp meter to measure the amp draw. A functional heater should draw between 15-25 amps at 240 volts.
- If you detect excessive amp draw, the heater element may be faulty. If there is no amp draw, check for power reaching the terminals.
These steps help you confirm that the heater element is installed correctly and that the spa heater is ready for operation.
Checking for Leaks After Replacement
Inspecting Connections for Water Leaks
You need to inspect all connections around the heater for water leaks. Look closely at the unions, gaskets, and heater housing. Even a small drip can lead to bigger problems if left unchecked. Use a flashlight to examine hard-to-see areas. If you find moisture, tighten the connections or replace the gasket as needed.
💧 Anmerkung: Water leaks can damage electrical components and cause the spa heater to malfunction.
Monitoring Water Levels in the Hot Tub
Monitor the water level in your spa after refilling. The water should remain steady and reach the recommended fill line. If you notice the water dropping, investigate for hidden leaks near the heater or plumbing. Maintaining proper water levels ensures the heater does not run dry, which can cause the spa to stop heating at all or not heating enough.
Confirming Proper Heating in the Hot Tub
Measuring Water Temperature
You must verify that the heater is warming the spa water efficiently. Use a reliable thermometer to measure the water temperature at regular intervals. Most spas require several hours to reach optimal temperature. The time depends on the ambient temperature and starting water temperature. Review the table below for typical heating times:
| Ambient Temperature | Wassertemperatur | Time to Reach 100°F (38°C) |
|---|---|---|
| 76°F (24°C) | 76°F (24°C) | 4 to 8 hours |
| 52°F (11°C) | 52°F (11°C) | 8 to 16 hours |
If your spa is not heating at all or not heating enough after this period, recheck the heater installation and electrical connections.
Watching for Error Codes on Control Panel
Monitor the spa control panel for error codes during the heating process. Error codes can indicate issues with the heater, water flow, or sensors. If you see a code, consult your spa manual for troubleshooting steps. Addressing error codes promptly helps maintain safe and reliable operation of your spa heater.
🛠️ Tipp: Regularly check the control panel and water temperature to ensure your spa heater continues to function as expected.
Maintenance Tips for Hot Tub Heater and Element Longevity
Regular Inspection of Spa Heater
Checking for Early Signs of Wear
You should inspect your spa heater every month. Look for discoloration, corrosion, or any physical damage on the heater. Early detection of wear helps you prevent unexpected breakdowns. Examine the heater housing and terminals for cracks or loose connections. If you notice any unusual sounds or smells, investigate further. Regular inspection keeps your spa running smoothly and extends the life of the heater.
Tipp: Address water chemistry monthly to prevent corrosion. Clean filters to maintain steady water flow and reduce heater stress. Regularly inspect the heater for signs of wear or damage.
Cleaning Electrical Connections
You need to keep electrical connections clean and secure. Dust, moisture, and corrosion can interfere with the heater’s performance. Use a dry cloth or a soft brush to remove debris from terminals and connectors. Tighten any loose screws and replace damaged wires. Clean connections help the spa heater operate efficiently and safely.
Water Quality Management in Hot Tub
Balancing Chemicals to Prevent Scale
Water chemistry plays a critical role in heater longevity. Test the water in your spa regularly to maintain balanced pH and alkalinity. Unbalanced water can cause scale buildup or corrosion on the heater element. Use test strips or a digital tester to check chemical levels. Adjust chemicals as needed to keep the water within recommended ranges.
| Key Factor | Impact on Heater Longevity |
|---|---|
| Water Chemistry | Balancing pH and alkalinity prevents corrosion and scaling. |
| Regular Testing | Ensures efficient operation and extends lifespan. |
| Hard Water Scaling | Can cause lasting damage if not managed properly. |
Preventing Scale Build-Up on Heater Element
Scale buildup restricts heat transfer and stresses the heater. You should shock the spa to eliminate contaminants and replace filters if cleaning does not improve water quality. If you use hard water, consider a scale inhibitor to protect the heater element. Preventing scale ensures consistent heating and reduces the risk of costly repairs.
- Check water chemistry regularly.
- Shock the spa to eliminate contaminants.
- Replace filters if cleaning does not improve water quality.
Scheduled Professional Service for Hot Tub
Annual Check-Ups of Spa Heater
Schedule a professional inspection of your spa heater at least once a year. A technician can identify hidden issues and perform advanced diagnostics. Annual check-ups help you catch problems early and keep your spa in top condition. Professional service also includes cleaning and testing the heater for optimal performance.
When to Call a Technician for Replacement
You should call a technician if you notice persistent heating problems, frequent breaker trips, or visible damage to the heater. Complex repairs or electrical issues require expert attention. A qualified professional ensures safe replacement and protects your investment in the spa.
Note: Routine maintenance and timely professional service help you avoid unexpected heater failures and extend the life of your spa.
When to Replace the Complete Hot Tub Heater
Assessing the Condition of the Spa Heater
Signs the Entire Heater Needs Replacement
You may notice that your spa heater struggles to maintain water temperature or takes much longer to heat the spa than before. If you see visible corrosion on the heater manifold, repeated electrical failures, or frequent error codes, these signs often indicate that the entire heater needs replacement. Sometimes, the heater’s efficiency drops, and you experience higher energy bills. When the heater shows multiple symptoms or has reached the end of its service life, replacing the complete hot tub heater becomes the best solution.
Du solltest evaluate the overall condition of the heater, its efficiency, and the power requirements. Consider the specific needs of your spa environment. Upgrading the spa heater can lead to faster heating, similar to upgrading a car’s stereo for better sound. Increasing the size or power of the heater may enhance efficiency and reduce energy costs.
Tip: If you notice persistent heating issues after replacing the element, inspect the entire spa heater for wear or damage. A full replacement may save you time and money in the long run.
Comparing Costs: Element vs. Complete Heater
You need to compare the costs before deciding whether to replace just the element or the entire heater. The price difference can be significant. A heater element usually costs much less than a complete spa heater unit. Titanium spa heaters and advanced assemblies cost even more.
| Artikel | Kosten |
|---|---|
| Heizelement | $30 |
| Complete Balboa Heater Unit | $120 |
| Titanium Spa Heaters | $320 |
| EasyPak/HydroQuip Heater Assembly | $199.95 |
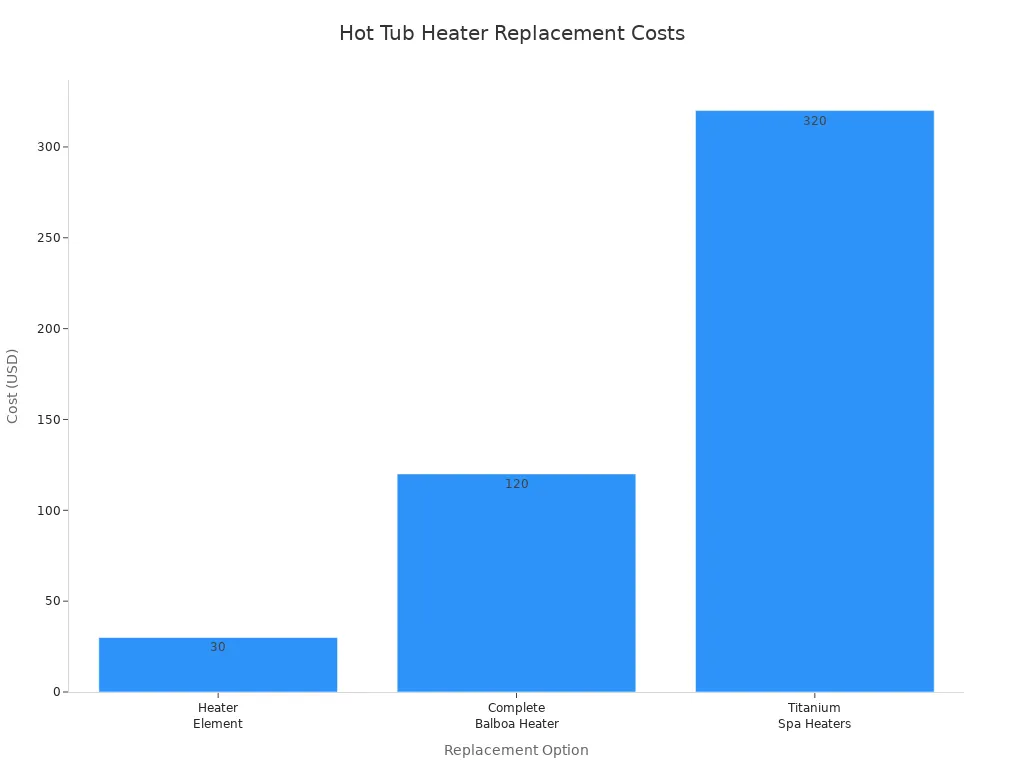
If your spa heater shows extensive damage or repeated failures, investing in a new unit may offer better long-term value. Replacing the entire heater manifold is often simpler than just changing the element. You must ensure that the new heater matches the existing one in both physical dimensions and electrical specifications.
Consulting Experts for Hot Tub Heater Replacement
Getting Professional Advice
You should consult a spa technician or a qualified electrician before you replace the complete hot tub heater. Professionals can assess the heater’s condition and recommend the best solution for your spa. They help you avoid costly mistakes and ensure safe installation. Expert advice is especially important if your spa uses advanced control systems or unique heater designs.
Note: Professional consultation helps you determine whether a full replacement is necessary or if a simple element swap will restore your spa’s performance.
Choosing the Right Replacement Heater
Ordering the correct spa heater replacement requires attention to detail. You must match the new heater to your spa’s specifications, including wattage, voltage, and physical size. Consider the water chemistry and environment when selecting materials such as Incoloy or Titanium. A properly chosen replacement heater ensures reliable heating and extends the life of your spa.
You should review the manufacturer’s guidelines and consult with experts to confirm compatibility. This step prevents installation issues and guarantees efficient operation.
Tip: Always verify the electrical specifications and physical dimensions before ordering a replacement heater for your spa.
You can troubleshoot and replace your hot tub heater element with confidence when you follow each step carefully.
- Regular inspection and water care help you prevent future issues.
- Professional service ensures safety if you feel uncertain about any part of the process.
Remember, maintaining your hot tub keeps it running efficiently and extends its lifespan.
FAQ
How often should you inspect your hot tub heater element?
You should inspect the heater element every month. Regular checks help you spot corrosion, scale, or damage early. Consistent inspection extends the lifespan of your spa equipment and ensures safe operation.
What tools do you need to replace a heater element?
You need a multimeter, screwdriver, wrench, and a compatible replacement element. Teflon tape and new gaskets also help prevent leaks. Always consult your spa manual for model-specific requirements.
Can you replace a hot tub heater element without draining the water?
You must drain the water below the heater level before replacement. This step prevents electrical hazards and water damage. Some spas require complete draining if isolation valves are not present.
Why does your spa heater trip the breaker?
A faulty heater element, damaged wiring, or water leaks can cause breaker trips. You should inspect connections and test the element with a multimeter. Persistent issues may require professional service.
How do you know if the heater element is compatible with your spa?
You must match the wattage, voltage, and physical size to your spa’s specifications. Review the manufacturer’s guidelines and consult experts if needed. Using the wrong element can cause performance issues.
What is the typical lifespan of a spa heater element?
Most heater elements last around five years with proper maintenance. Poor water chemistry or neglect can shorten this period. Regular inspection and balanced water help maximize longevity.
Can you use your hot tub immediately after replacing the heater element?
You should wait until the spa refills and reaches the desired temperature. Check for leaks and confirm proper heating before use. This process ensures safety and comfort.
Tip: Always verify all connections and monitor water temperature after any heater replacement.

