
Kenmore乾燥機が加熱しないことに気づいた場合、加熱素子に関する一般的な問題に直面している可能性があります。あなたのような多くの住宅所有者は、明確な指示に従うことでKenmore乾燥機の加熱素子交換に対処できます。基本的な加熱素子修理ガイドがあれば、この作業はアクセスしやすく、やりがいのあるものになります。.
- 加熱素子の交換は、簡単な修理に分類されます。.
- オンラインの修理ガイドやチュートリアルは、安全に作業を完了するのに役立ちます。.
- 簡単な乾燥機の加熱問題に関するDIY修理は、費用を節約し、自信を高めます。.
始める前に、必要な工具を集め、Kenmore乾燥機のすべての指示を読んでください。安全に重点を置き、修理を成功させるために各手順に従ってください。.
Kenmore乾燥機が加熱しない症状の認識
Kenmore乾燥機の加熱素子が故障している兆候
ドライヤーは作動するが加熱されない
Kenmore乾燥機は通常通り回転しているが、衣類が冷たく湿ったままであることに気づくかもしれません。これは乾燥機が加熱しない最も一般的な兆候です。ドラムは回転し、タイマーはカウントダウンしますが、内部に暖かさを感じません。このような場合、加熱素子または関連部品に問題があると疑うべきです。 ドライヤー発熱体 または関連部品。.
ヒント 乾燥機が 動作するが加熱しない, 適切な動作に必要な240ボルトが供給されているか確認してください。一部の乾燥機は120ボルトで動作する場合がありますが、完全な電圧がなければ加熱しません。.
衣類が乾くのに時間がかかりすぎる
洗濯サイクルがいつまでも続くように感じられる場合、乾燥機が十分な熱を生成していない可能性があります。衣類が濡れたままである、または複数のサイクルを要する場合は、多くの場合、加熱の問題を示しています。この症状は通常、加熱素子の故障または空気の流れの制限を意味します。.
乾燥機が早期に停止する、または過熱する
サイクルが終了する前に停止する、または過度に熱くなるKenmore乾燥機は、加熱素子または関連する安全部品の故障が原因である可能性があります。過熱は高温リミットサーモスタットまたはサーマルカットオフを作動させ、損傷を防ぐために乾燥機を停止させることがあります。.
- Kenmore乾燥機が加熱しない場合に最も頻繁に報告される症状は次のとおりです:
- 乾燥機は動作するが熱を生成しない。.
- フルサイクルの後、衣類が湿ったままである。
- 乾燥機が過熱する、または予期せず停止する。.
問題の確認
加熱素子コイルの目視検査
まず乾燥機のプラグを抜き、背面パネルを取り外します。加熱素子コイルに目に見える破損、焼け、または変色がないか確認してください。損傷したコイルは、交換の必要性を示すことがよくあります。摩耗の明らかな兆候が見られる場合、乾燥機が加熱しない原因を発見した可能性があります。.
マルチメータによる導通試験
故障した乾燥機加熱素子を確認するには 故障した乾燥機加熱素子, マルチメーターを使用して導通テストを行います。次の手順に従ってください:
- 乾燥機キャビネット内の Kenmore乾燥機の背面キャビネット内部の加熱素子.
- 加熱素子に接続されているワイヤーを外します。.
- マルチメーターを抵抗(オーム)測定に設定します。.
- プローブを加熱素子の端子に接触させます。.
- 正常な素子は、10~20オームの抵抗を示すはずです。 10~20オームの抵抗.
- 測定値がはるかに高い場合、またはメーターが開回路を示す場合、加熱素子を交換する必要があります。.
- マルチコイル素子の場合、各コイルを共通端子に対してテストします。コイルあたり約20~25オームの測定値が期待されます。.
- 両方のコイル端子間を測定します。値は単一コイルの約2倍になるはずです。.
注: 正確なテストは、不必要な部品交換を避け、問題を正しく修正するのに役立ちます。.
これらの手順に従うことで、Kenmore乾燥機の加熱素子が乾燥機の加熱不良の原因であるかどうかを迅速に特定できます。このアプローチは時間を節約し、自信を持って前進するのに役立ちます。 Kenmore乾燥機の加熱素子 乾燥機が加熱しない原因.
Kenmore電気乾燥機修理のための工具と交換部品

Kenmore製電気乾燥機の修理を準備する際には、適切な工具と交換部品が必要です。正しい機器を使用することで、作業が円滑に進み、不要な遅延を防ぐことができます。このセクションでは、作業を開始する前に準備すべき必須の工具と部品について概説します。 ドライヤー発熱体 交換について。.
ヒーター・エレメントの交換に不可欠な工具
プラスドライバーとマイナスドライバー
この修理には、プラスドライバーとマイナスドライバーの両方が必要です。これらの工具を使用して、乾燥機の背面パネルのネジを外し、内部コンポーネントにアクセスします。ほとんどのKenmoreモデルはプラスネジを使用しますが、一部のパネルやブラケットにはマイナスドライバーが必要な場合があります。.
ヒント 修理中にネジを紛失しないよう、小さな容器を近くに置いて保管してください。.
ナットドライバーまたはソケットレンチ
ナットドライバーまたはソケットレンチは、加熱素子アセンブリを固定するボルトを取り外すのに役立ちます。Kenmore乾燥機のボルトに合ったサイズを選択してください。正しい工具を使用することで、ハードウェアの損傷を防ぎ、作業を迅速に進められます。.
テスト用マルチメーター
マルチメーターは、乾燥機の電気的問題を診断するために不可欠です。これを使用して、加熱素子、サーモスタット、およびヒューズの導通をテストします。正確なテストにより、故障した部品のみを交換し、最適な修理ガイドに従うことができます。.
| 道具 | 目的 |
|---|---|
| プラスドライバー | パネルからネジを取り外す |
| マイナスドライバー | クリップをこじ開ける、またはマイナスネジを取り外す |
| ナットドライバー/レンチ | 加熱アセンブリからボルトを取り外す |
| マルチメーター | 導通をテストし、問題を診断する |
必要な交換部品
Kenmore乾燥機加熱素子キット
お使いのモデルに適合するキットを購入する必要があります。 Kenmore乾燥機の加熱素子 お使いのモデルに適合するキット。このキットには通常、加熱素子と取り付け用ハードウェアが含まれています。購入前に、特定のKenmore電気乾燥機との互換性を必ず確認してください。正しい部品を使用することで、適切な加熱と安全な動作が保証されます。.
高温リミットサーモスタットとサーマルカットオフヒューズ
多くの修理ガイドでは、加熱素子と一緒に高温リミットサーモスタットとサーマルカットオフヒューズを交換することを推奨しています。これらの安全部品は、乾燥機の過熱を防ぎます。どちらかの部品が故障すると、乾燥機が加熱しなくなったり、予期せず停止したりする可能性があります。修理中にこれらを交換することで、将来の問題を防ぎ、Kenmore製品の寿命を延ばすことができます。.
注: 取り付け前に、必ず古い部品と新しい部品を比較してください。この手順により、正しい交換部品を確認し、再組み立て時のエラーを防ぐことができます。.
これらの工具と部品を事前に準備しておくことで、Kenmore製乾燥機の ヒーターエレメント修理 を効率的に完了できます。整理整頓し、準備を整えておくことで、時間を節約し、イライラを軽減できます。.
乾燥機修理前の安全手順
Kenmore乾燥機の修理を始める前に、安全を最優先する必要があります。適切な予防措置を講じることで、電気的危険から身を守り、スムーズな作業が保証されます。また、機器や作業スペースへの偶発的な損傷を防ぐことができます。.
電源と電気的安全に関する注意事項
乾燥機のプラグを抜き、ワイヤーを隔離する
修理を始める前に、必ず乾燥機を電源から切り離してください。. 乾燥機をコンセントからプラグを抜く または電力を供給する回路ブレーカーをオフにします。この手順により、加熱素子やその他の内部コンポーネントを扱う際の感電のリスクが排除されます。.
ヒント プラグを抜いた後、乾燥機を壁から引き離します。これにより、背面パネルと内部部品に安全にアクセスできます。.
乾燥機のプラグを抜いたら、接地線がある場合はそれを外します。偶発的な接触を防ぐために、露出したワイヤーを隔離してください。乾燥機が完全に電源から切断されたことを確認した後にのみ、マルチメーターを使用して加熱素子、サーマルカットオフ、またはその他の電気部品の導通をテストしてください。.
ガス供給の確認(該当する場合)
Kenmoreの乾燥機がガス式の場合、修理を開始する前にガス供給バルブを必ず閉めてください。乾燥機の背面にある遮断バルブを見つけ、閉位置に回してください。この手順はガス漏れを防ぎ、修理中の安全を確保します。.
注: ガス供給を遮断せずにガス乾燥機を修理しようとしないでください。ガス漏れは重大な危険を引き起こす可能性があります。.
作業エリアの準備
乾燥機周辺のスペース確保
作業を始める前に、安全で整理された作業スペースを作成してください。乾燥機を壁から離し、背面と側面に完全にアクセスできるようにします。そのエリアから洗濯かご、掃除用品、または散らかったものを取り除いてください。明確なスペースがあることで、自由に動き回れ、つまずいたり工具を倒したりするリスクを減らせます。.
- 火災リスクを減らし、適切な空気の流れを確保するために、糸くずフィルターを取り外して掃除してください。.
- 過熱を防ぐために、通気ホースを外し、通気システムを掃除してください。.
工具と部品の整理
修理を始める前に、必要な工具と交換部品をすべて集めてください。ドライバー、ナットドライバー、マルチメーターを手の届くところに置いてください。ネジやブラケットなどの小さな部品は、作業中に紛失しないように容器に入れて保管してください。.
場合によっては、 背面パネルを固定しているボルトやネジを外して取り外す必要があります。 モデルによっては、パテナイフを使用するか、スプリングファスナーを解除して、下部前面パネルまたは上部パネルを取り外します。各パネルは安全な場所に置いてください。.
プロのアドバイス 工具と部品を清潔なタオルまたはトレイの上に並べてください。これにより、すべてが整理され、乾燥機の仕上げに傷がつくのを防げます。.
これらの安全手順に従うことで、Kenmore乾燥機の加熱修理のための安全な環境を作り出せます。慎重な準備は事故を防ぎ、作業を効率的に完了するのに役立ちます。.
Kenmore乾燥機の加熱エレメント交換のステップバイステップガイド

乾燥機内の加熱エレメントへのアクセス
乾燥機の背面パネルの取り外し
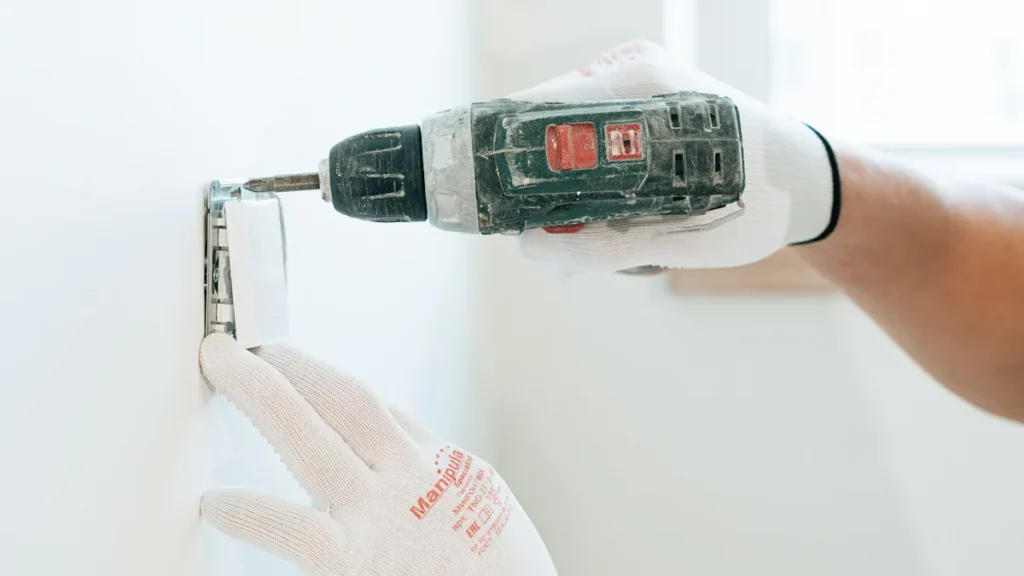
まず、Kenmore電気乾燥機のプラグが抜かれ、安全に配置されていることを確認してください。乾燥機を壁から離し、背面にアクセスします。プラスドライバーまたはナットドライバーを使用して、背面パネルを固定しているすべてのネジを外してください。ネジは小さな容器に入れて紛失を防ぎます。背面パネルをそっと持ち上げて脇に置きます。この手順で内部コンポーネントが露出し、加熱アセンブリがはっきりと見えるようになります。.
ヒント 作業を進める前に、配線とコンポーネントのレイアウトの写真を撮ってください。この参考資料は再組み立て時に役立ちます。.
加熱エレメントアセンブリの位置確認
背面パネルを取り外したら、加熱エレメントアセンブリの位置を確認します。ほとんどのKenmoreモデルでは、乾燥機の加熱エレメントは右下または左側付近の金属製キャニスター内に収められています。アセンブリには通常、端子に接続された2本以上のワイヤーがあり、ハイリミットサーモスタットまたはサーマルヒューズが取り付けられている場合があります。アセンブリを固定している取り付けネジまたはブラケットを特定してください。.
加熱エレメントと関連コンポーネントのテスト
マルチメーターを使用した導通と電圧の確認
問題を診断するには、加熱エレメントと関連コンポーネントをテストする必要があります。マルチメーターを 200オーム設定. に設定してください。加熱コイルの各端子に1つのプローブを当てます。 正常な乾燥機加熱エレメント は数値表示を示し、通常は10~20オームの間です。表示が変わらない場合、または「OL」(開回路)と表示される場合、エレメントは故障しており交換が必要です。.
ハイリミットサーモスタットとサーマルヒューズもテストする必要があります。各コンポーネントをアセンブリから取り外してください。マルチメーターを最低のオーム設定に設定します。プローブをサーモスタットまたはヒューズの端子に当てます。サーモスタットでゼロの読み取り値が出た場合、交換が必要です。サーマルヒューズの場合、ゼロ以外の読み取り値は正常に機能していることを示します。.
注: 交換を進める前に、必ず加熱エレメント、サーモスタット、ヒューズをテストしてください。この手順により、加熱不良のすべての可能性のある原因に対処できます。.
検査結果の解釈
マルチメーターが加熱エレメントに導通を示した場合、問題は別の場所にある可能性があります。ただし、導通がない場合は、新しい乾燥機加熱エレメントが必要であることが確認されます。サーモスタットの場合、ゼロの読み取り値は部品の故障を示します。サーマルヒューズの場合、ゼロ以外の読み取り値は正常であることを意味します。これらのテストに不合格となったコンポーネントはすべて交換し、適切な加熱を回復してください。.
故障した加熱エレメントの取り外しと交換
ワイヤーとマウントの取り外し
故障したコンポーネントを確認した後、加熱エレメント端子からワイヤーを外してください。必要に応じてラジオペンチを使用しますが、ワイヤー自体を引っ張らないでください。加熱エレメントアセンブリを固定しているネジまたはボルトを取り外します。古いエレメントを慎重に引き出してください。モデルにアセンブリに取り付けられたハイリミットサーモスタットまたはサーマルヒューズが含まれている場合は、これらも外してください。.
注意: 加熱エレメントは慎重に扱ってください。コイルは壊れやすく、曲げたりねじったりすると破損する可能性があります。.
新しい加熱エレメントとサーモスタットの取り付け
新しい加熱エレメントとサーモスタットを古い部品と比較して、互換性を確認してください。新しいエレメントをアセンブリにスライドさせ、取り付け穴に合わせます。元のネジまたはボルトで固定します。交換する場合は、新しいサーモスタットとサーマルヒューズを取り付けてください。参考写真をガイドとして使用し、すべてのワイヤーを正しい端子に再接続します。.
乾燥機を再組み立てする前に、すべての接続を再確認してください。 加熱エレメント修理ガイド の指示がお使いのKenmoreモデルと一致していることを確認してください。すべてがしっかりと固定されていることを確認したら、背面パネルを再取り付けできます。.
プロのアドバイス 交換が完了したら、電源を復旧し、短いテストサイクルを実行してください。乾燥機が適切に加熱されているか監視し、異常な音がないか聞いてください。.
これらの詳細な指示に従うことで、 Kenmore乾燥機の加熱エレメント交換 を安全かつ効率的に完了できます。このプロセスにより、乾燥機の加熱性能が回復し、使用寿命が延びます。.
Kenmore電気乾燥機の再組み立てとテスト
背面パネルの再取り付け
新しい加熱エレメントを取り付け、すべての接続を確認しました。次に、Kenmore乾燥機に背面パネルを再取り付けする必要があります。パネルを乾燥機背面のネジ穴に合わせます。パネルを安定させ、クロスねじを防ぐために各ネジを手で挿入してください。ドライバーまたはナットドライバーを使用してネジをしっかりと締めます。締めすぎるとねじ山を傷めたり、パネルを損傷する可能性があるため、注意してください。.
ヒント まず角のネジから始めてパネルを固定し、その後残りのネジを追加してぴったりとフィットさせてください。.
背面パネルの端に隙間がないか確認してください。密着したフィットにより、適切な空気の流れが確保され、Kenmore電気乾燥機内部での糸くずの蓄積を防げます。通気ホースを排気ポートに再接続してください。乾燥機をそっと元の位置に戻し、換気のために十分なスペースを残します。.
接続の再確認とテストサイクルの実行
電源を復旧する前に、乾燥機内部のすべての接続を再確認してください。加熱エレメント、サーモスタット、サーマルヒューズに取り付けられたワイヤーを点検します。各ワイヤーが端子にしっかりと固定されていることを確認してください。緩んだ接続は断続的な加熱を引き起こしたり、新しい部品を損傷する可能性があります。.
配線レイアウトに不安がある場合は、参考写真を見直してください。乾燥機キャビネット内に工具や緩んだネジが残っていないことを確認します。修理中に開けたアクセスパネルをすべて閉じてください。.
次に、乾燥機を電源コンセントに再び差し込んでください。ガスモデルの場合、ガス供給を遮断していた場合はバルブを再び開けてください。タイムドライサイクルを選択し、乾燥機を起動します。5~10分間運転させてください。ドアを開け、ドラム内部に温かい空気があるか確認してください。安定した熱を感じるはずで、これは新しいKenmore 乾燥機加熱エレメント が正しく動作していることを意味します。.
注: 熱を感じない場合や異常な音に気づいた場合は、すぐに乾燥機のプラグを抜いてください。作業内容を再確認し、すべての接続を検証してください。.
修理後の最初の完全な乾燥サイクルを監視してください。適切な加熱と正常な動作を確認します。乾燥機が早期に停止したり、加熱しない場合は、取り付けを再確認するか、関連コンポーネントを再度テストする必要があるかもしれません。.
テストサイクルが成功すれば、Kenmore乾燥機の性能が回復したことが確認されます。これで、修理スキルに自信を持って通常の洗濯ルーチンに戻ることができます。.
その他のKenmore乾燥機の加熱不良問題のトラブルシューティング
サーマルヒューズとカットオフスイッチの確認
ヒューズまたはスイッチの切れの症状
乾燥機が加熱しない場合、サーマルヒューズとカットオフスイッチを原因として考慮する必要があります。切れたサーマルヒューズは、乾燥機が熱を生成しなくなったり、まったく電源が入らなくなったりすることがよくあります。ドラムは回転するが、衣類に熱が届かないことに気づくかもしれません。場合によっては、乾燥機がまったく起動しないこともあります。.
乾燥機が動作するが加熱しない場合、または起動しない場合、切れたヒューズまたはカットオフスイッチが原因である可能性があります。.
これらの部品のテストと交換方法
以下の手順に従って、サーマルヒューズとカットオフスイッチをテストおよび交換できます:
- 乾燥機のモデル番号と図を参照して、サーマルヒューズの位置を特定してください。通常、排気ダクトまたはブロワーハウジングにあります。.
- ドライヤーのパネルを固定している4本のネジを外して取り外します。.
- サーモスタット(温度ヒューズ)から慎重に配線を外します。.
- ヒューズをテストします。:
- 導通モードに設定したマルチメーターを使用します。プローブをヒューズの端子に接触させます。導通がない場合、ヒューズは切れており、交換が必要です。.
- 別の方法として、ジャンパー線でヒューズを一時的にバイパスすることもできます。ドライヤーが加熱する場合、ヒューズが故障しています。.
- ヒューズのテストや交換を行う前には、安全のため必ずドライヤーのプラグを抜いてください。.
切れたヒューズやスイッチを交換することで、適切な加熱が回復し、Kenmore製品へのさらなる損傷を防ぐことができます。.
電源供給とドライヤー設定の点検
コンセントの電圧と回路ブレーカーの確認
電源供給の不良も、ドライヤーが加熱しなくなる原因となります。以下の手順を実施してください:
- ドライヤーのプラグを抜き、再度差し込んで接続が確実であることを確認します。.
- 自宅の回路ブレーカーまたはヒューズボックスを確認します。. ドライヤー用のブレーカーが落ちていないか、ヒューズが無傷であるかを確認してください。どちらかの問題があると、ドライヤーが加熱しなくなる可能性があります。.
- ガス式ドライヤーの場合は、安全上の理由から専門の技術者に連絡してください。.
正しいドライヤーサイクルの選択の確認
ドライヤーの設定は加熱性能に影響を与えます。以下の点を確認してください:
- 洗濯物の量を点検します。過剰に詰め込むと加熱効率が低下する可能性があります。.
- 非常に満杯の状態でオートドライ設定を使用しないでください。ドライヤーが軽い衣類を乾いたと感知し、加熱を停止して、重い衣類が湿ったままになることがあります。.
- 同様の種類の衣類を一緒に乾かすことで、加熱結果が向上します。.
適切な設定と洗濯物の量により、ドライヤーが効率的に動作し、不必要な修理の必要性を防ぐことができます。.
ドライヤーベントと空気の流れの点検
糸くずトラップとドライヤーベントの清掃
空気の流れが制限されると、加熱の問題が発生する可能性があります。毎回の使用後に糸くずトラップを清掃してください。定期的にドライヤーのベントホースとベント自体を取り外して清掃します。糸くずの蓄積が空気の流れを制限し、ドライヤーの過熱や加熱停止を引き起こします。.
過熱と将来の故障の防止
定期的なメンテナンスは過熱を防ぎ、ドライヤーの寿命を延ばします。徹底的な清掃と点検を計画してください。乾燥時間の延長やドライヤー外装の過熱など、空気の流れが悪い兆候に注意してください。これらの問題に迅速に対処し、将来の加熱不良を回避してください。.
一貫した清掃とメンテナンスにより、ドライヤーは安全かつ効率的に動作し続けます。🛠️
将来のKenmoreドライヤー加熱素子の故障防止
ドライヤーの定期的なメンテナンス
毎回の使用後に糸くずフィルターを清掃する
毎回のサイクル後に糸くずフィルターを清掃することで、ドライヤーを保護し、効率を向上させます。糸くずの蓄積は空気の流れを制限し、加熱素子の過熱や故障を引き起こす可能性があります。新しい洗濯物を始める前に、糸くずスクリーンを取り外し、すべてのゴミを取り除いてください。毎月、糸くずスクリーンを水と柔らかいブラシで洗い、柔軟剤の残留物を取り除いてください。この手順により、空気の流れが強く保たれ、過熱のリスクが軽減されます。.
ヒント 清潔な糸くずフィルターは、ドライヤーが衣類をより速く乾かし、加熱システムへの不必要な負担を防ぐのに役立ちます。.
徹底的な清掃と点検の計画
定期的な徹底清掃と点検は、Kenmore製品の寿命を延ばします。以下の手順を実施してください:
- 排気ベントシステムを定期的に清掃します。. 外部のダンパーベントを確認し、柔軟な排気ダクトを掃除機で吸引し、ドライヤーの排気口から糸くずを取り除きます。.
- 必要に応じてドライヤードラムを清掃します。染料、ガム、インクなどの汚れは、適切な清掃方法を使用して除去してください。.
- 6ヶ月ごとに、湿度センサーバーを rubbing alcohol で拭いてください。これにより、ドライヤーシートの残留物が不正確な乾燥を引き起こすのを防ぎます。.
- 年に一度、専門のメンテナンスサービスを予約してください。技術者がドライヤーキャビネット内部を点検・清掃し、排気システムと加熱システムを確認し、電気接続と制御装置をテストします。.
これらの手順は、火災の防止、効率の向上、予期しない故障の可能性の低減に役立ちます。.
注意すべき警告サイン
異常な騒音、異臭、または不均一な加熱
将来の加熱素子の故障を示す可能性のある早期警告サインに注意を払ってください。以下の問題に注意してください:
- 衣類の乾燥に通常よりはるかに時間がかかる.
- ドライヤーは動作するが熱を発生せず、衣類が湿ったままになる。.
- 機器が過熱する、または触ると異常に熱く感じる。.
- ドライヤーが時々加熱したりしなかったりと、熱出力が不安定になることに気づく。.
- 動作中に回路ブレーカーが頻繁に落ちる。.
これらの問題のいずれかを検出した場合は、迅速に対処してください。早期の対応により、ドライヤーへのより深刻な損傷を防ぎ、洗濯ルーチンを円滑に保つことができます。.
定期的なメンテナンスと警告サインへの注意は、高額な修理を回避し、Kenmoreドライヤーを安全かつ効率的に動作させ続けるのに役立ちます。.
Kenmoreドライヤー修理の専門家に依頼するタイミング
修理が複雑すぎる、または危険である兆候
ヒーター以外の電気的問題
修理が単純な加熱素子の交換を超える状況に直面する場合があります。配線、端子台、または制御基板を含む電気的な問題には、高度な知識と専門的な工具が必要です。適切な訓練なしにこれらの修理を試みると、感電の危険にさらされたり、機器にさらなる損傷を与えたりする可能性があります。持続的なエラーコード、焦げる臭い、または煙に気づいた場合は、直ちに作業を中止し、専門家に連絡してください。これらの兆候は、認定技術者のみが対処すべき、より深刻な電気的故障を示していることがよくあります。.
⚠️ 警告だ: 専門知識なしで電気修理を行うと、保証が無効になり、火災の危険が生じる可能性があります。.
持続的なドライヤー加熱不良の問題
乾燥機のヒーターエレメント 電熱線 またはサーモヒューズを交換した後も、加熱の問題が続く場合、より複雑な問題に直面している可能性があります。駆動ベルトの破損、ドラムローラーの摩耗、モーターの故障などの機械的な不具合は、多くの場合、大がかりな分解と技術的なスキルを必要とします。また、異音が大きい、振動が増加した、モーターは作動しているのにドラムが回転しないなどの症状が見られる場合も、専門家の支援を求めるべきです。. ガス式ドライヤーの修理は、常に専門家の対応が必要です。 ガス漏れや一酸化炭素中毒のリスクがあるためです。.
専門技術者が必要となる一般的な状況:
- 配線、端子台、または制御基板に関する電気的問題
- ガス式ドライヤーの問題またはガスラインに関わる修理
- 持続的なエラーコードまたは焦げる臭い
- モーターや電子制御装置などの内部コンポーネントの交換
- 複雑な分解を必要とする修理
資格のある家電技術者の選択
修理サービスに求めるべき点
適切な技術者を選ぶことで、修理が安全かつ効果的に行われます。以下の資格を持つ専門家を探してください: 高校卒業資格またはGED(一般教育修了資格)および職業訓練 電子機器、家電製品修理、またはHVACシステムに関するもの。冷媒取扱いに関するEPAセクション608などの認定資格は、技術的能力を示す。見習い期間や指導を通じて得た経験は、実践的なスキルを高める。優れた技術者は、専門性、優れた問題解決能力、明確なコミュニケーション能力を示す。多くの信頼できるサービス業者は、訪問修理のために有効な運転免許証と無事故運転記録を技術者に要求する。.
| 資格 | なぜ重要なのか |
|---|---|
| 職業訓練 | 技術的知識を保証する |
| 認証 | 専門性と法令遵守を確認する |
| 経験 | 実践的な修理スキルを構築する |
| 専門性(プロフェッショナリズム) | 信頼性と信用性を反映する |
| コミュニケーション能力 | 修理内容と費用の説明に役立つ |
採用前に質問すべきこと
修理サービスを依頼する前に、, 適切な質問をして、質の高い作業と公正な価格設定を確保する。:
- 過去のお客様からの推薦状や評価を提供していただけますか?
- 家電修理の事業許可証および保証金はお持ちですか?
- 同様の修理の標準的な費用はいくらですか?また、サービス出張費には何が含まれますか?
- 書面での見積もりや比較のための複数の見積もりを提供していますか?
- どのようなお支払い方法に対応していますか?また、すべての取引に対して領収書を発行しますか?
- 特にケンモア製乾燥機に関して、どの程度の修理経験がありますか?
- 家電の使用年数と状態に基づき、修理と交換のどちらが最適か判断していただけますか?
💡 ヒント 最終決定の前に、必ず資格を確認し、見積もりを比較してください。.
修理が複雑すぎる、またはリスクが高いと判断した場合、適格な技術者を選ぶことで、ご自宅、家電製品、そして安心を守ることができます。.
ケンモア乾燥機のヒーター素子を交換することで、大幅な修理コストを節約できます。なぜなら、 費用の大部分は人件費によるものだからです。. 作業開始前には必ず乾燥機の電源プラグを抜き、, マルチメーターを使用してヒーター素子を検査し、 すべての接続を再確認して、 よくあるミスを避けてください。. 糸くずフィルターと排気システムの定期的な清掃は、 火災リスクを低減し、加熱システムの効率を維持します。不安がある場合や、乾燥機がまだ加熱しない場合は、安全で信頼できるサービスを提供する専門家に相談してください。.
さらなるガイダンスについては、 修理ガイド、コミュニティフォーラム、メーカーリソースを参照してください。.
よくあるご質問
ケンモア乾燥機のヒーター素子が故障しているかどうかは、どのように判断しますか?
乾燥機は作動するが加熱しない場合や、フルサイクル後も衣類が湿っている場合です。マルチメーターを使用して素子の導通をテストしてください。導通がなければ、ヒーター素子を交換する必要があります。.
ケンモア乾燥機の加熱要素を自分で交換できますか?
はい、ご自身で交換可能です。適切な工具を揃え、安全手順に従い、互換性のある交換部品を使用してください。多くの住宅所有者は、基本的なDIYスキルと説明書への注意深い対応でこの修理を完了しています。.
乾燥機の加熱要素を交換するにはどのくらい時間がかかりますか?
ほとんどの修理は30分から60分かかります。手順には、乾燥機の電源プラグを抜く、パネルを外す、素子を交換する、再組み立てが含まれます。開始前に工具と部品を準備することで時間を節約できます。.
ケンモア乾燥機の加熱部分が故障する原因は何ですか?
一般的な原因には、糸くずの蓄積、気流の制限、過負荷、通常の摩耗が含まれます。メンテナンス不良による過熱も素子の寿命を縮めます。定期的な清掃と点検は早期故障の防止に役立ちます。.
ヒーター素子を交換する際にサーモスタットも交換する必要がありますか?
多くの専門家は、ヒーター素子とともに高限界サーモスタットとサーモヒューズの交換を推奨しています。これにより、すべての安全部品が適切に機能し、将来の加熱問題を防ぎます。.
ヒーター素子を交換した後も乾燥機が加熱しないのはなぜですか?
サーモヒューズの断線、サーモスタットの故障、または電源の問題が考えられます。すべての接続を再確認し、関連部品をテストしてください。問題が解決しない場合は、専門技術者にさらなる診断を依頼してください。.
ヒーター素子が故障している状態でケンモア乾燥機を使用しても安全ですか?
いいえ、故障したヒーター素子で乾燥機を運転すべきではありません。過熱や他の部品の損傷を引き起こす可能性があります。乾燥機を再使用する前には、必ず素子を修理または交換してください。.

