


È possibile prevenire guasti imprevisti e riparazioni costose controllando regolarmente la resistenza di riscaldamento dell'asciugatrice Maytag. I problemi alla resistenza di riscaldamento rappresentano il 38% di tutti i guasti delle asciugatrici Maytag, rendendo questo il problema più comune che potresti dover affrontare. 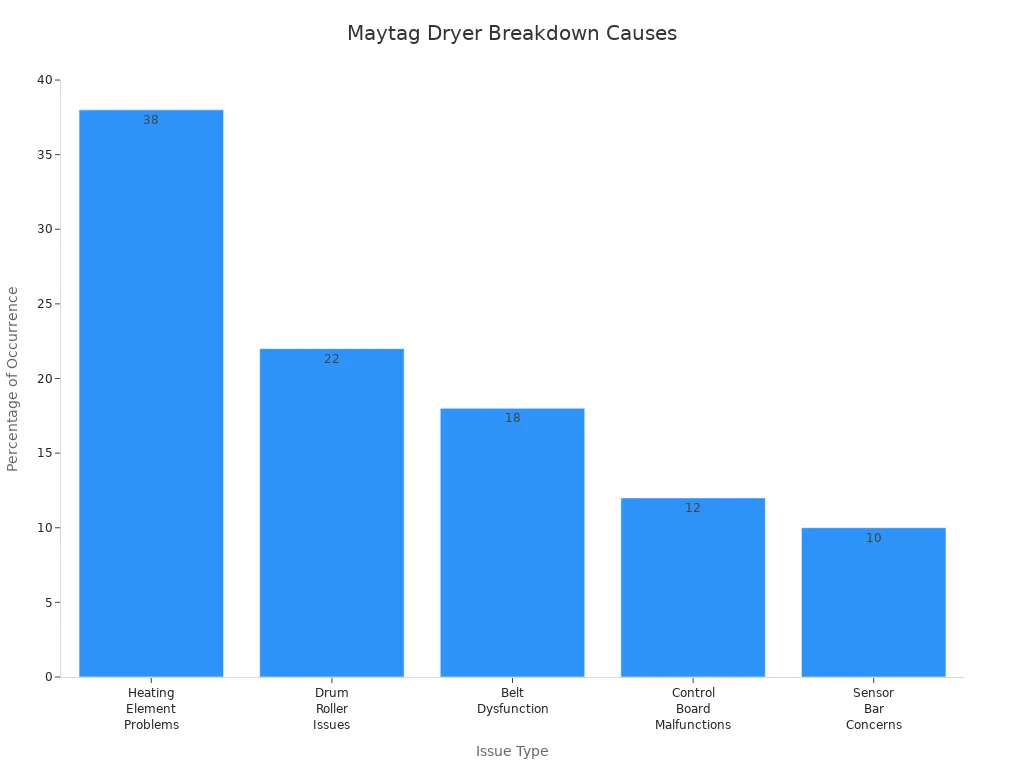
Se si notano anche piccoli cambiamenti nelle prestazioni di asciugatura o si sospetta una resistenza di riscaldamento rotta, agire rapidamente. Affrontare tempestivamente questi segnali mantiene l'asciugatrice efficiente e sicura.

Come funziona la resistenza di riscaldamento dell'asciugatrice Maytag
Il ruolo della resistenza di riscaldamento nell'asciugatrice Maytag
Come genera calore per asciugare i vestiti
Lei fa affidamento elemento riscaldante per alimentare il processo di asciugatura nell'asciugatrice Maytag. Questo componente è costituito da un filo avvolto a spirale realizzato in materiale ad alta resistenza. Quando si avvia un ciclo, l'elettricità scorre attraverso la bobina, causandone il riscaldamento. L'asciugatrice convoglia quindi l'aria attraverso la bobina calda, riscaldando l'aria prima che entri nel tamburo. Mentre l'aria riscaldata circola attraverso il bucato, evapora l'umidità dai tessuti. Questo processo garantisce che i vestiti si asciughino in modo efficiente e uniforme.
- La elemento riscaldante nell'asciugatrice:
- Contiene una bobina avvolta che si riscalda con la corrente elettrica.
- Genera il calore necessario per asciugare i vestiti riscaldando l'aria.
- Fa circolare quest'aria riscaldata attraverso il tamburo per evaporare l'umidità.
- Se la resistenza si guasta, l' asciugatrice può funzionare ma non produrrà calore sufficiente, lasciando i vestiti umidi.
- Una resistenza difettosa è un motivo comune per cui l'asciugatrice potrebbe non asciugare i vestiti in un solo ciclo.
Importanza del corretto funzionamento per sicurezza ed efficienza
Una resistenza di riscaldamento funzionante correttamente è essenziale sia per la sicurezza che per le prestazioni. Quando la resistenza opera come previsto, l'asciugatrice Maytag asciuga i vestiti rapidamente e utilizza l'energia in modo efficiente. Se la resistenza malfunziona, si rischiano tempi di asciugatura più lunghi, bollette più alte e potenziali pericoli per la sicurezza. È sempre necessario affrontare immediatamente qualsiasi segno di problema per evitare ulteriori complicazioni.
Caratteristiche di sicurezza e precauzioni per il proprietario
Meccanismi di sicurezza integrati nelle asciugatrici Maytag
Le asciugatrici Maytag includono diverse caratteristiche di sicurezza per proteggere sia l'utente che la resistenza di riscaldamento. I fusibili termici agiscono come dispositivi di sicurezza monouso. Se l'asciugatrice si surriscalda, il fusibile termico interrompe il circuito elettrico, prevenendo rischi di incendio. I termostati a limite massimo fungono da interruttori di sicurezza. Interrompono il circuito di riscaldamento se la temperatura supera i limiti di sicurezza, proteggendo la resistenza e prevenendo danni.
- I fusibili termici interrompono l'alimentazione alla resistenza di riscaldamento in caso di surriscaldamento.
- I termostati a limite massimo interrompono il circuito di riscaldamento a temperature non sicure.
- Testare questi componenti per la continuità garantisce che funzionino correttamente.
- Un flusso d'aria e una ventilazione adeguati prevengono il surriscaldamento e proteggono la resistenza.
- La pulizia regolare delle prese d'aria e dei filtri per lanugine riduce il rischio di flusso d'aria limitato, una causa comune di guasto della resistenza di riscaldamento.
Suggerimenti di sicurezza essenziali per i proprietari
Suggerimento: scollegare sempre l'asciugatrice prima di ispezionare o riparare qualsiasi parte interna.
Pulire regolarmente il filtro per lanugine e le prese d'aria dell'asciugatrice per mantenere il flusso d'aria e prevenire il surriscaldamento.
Programmare ispezioni periodiche per individuare i primi segni di problemi.
Non sovraccaricare mai l'asciugatrice pesante Maytag, poiché ciò sollecita la resistenza di riscaldamento e può portare a un guasto prematuro.
Segnali che la resistenza di riscaldamento dell'asciugatrice Maytag si sta guastando
Chiari segnali di allarme di una resistenza di riscaldamento rotta
L'asciugatrice funziona ma non produce calore
Potresti notare che l'asciugatrice Maytag gira come al solito, ma i vestiti rimangono freddi e umidi. Questo è uno dei segnali più comuni che la resistenza di riscaldamento è rotta. Quando l'asciugatrice non si riscalda, di solito significa che la resistenza si è guastata a causa di una rottura o bruciatura nella bobina del filo. Puoi confermarlo testando la resistenza con un multimetro. Scollega i fili dai terminali e imposta il multimetro sulla modalità di continuità o resistenza. Una resistenza funzionante mostrerà una lettura di resistenza tra 7 e 15 ohm. Se si vede una resistenza infinita o nessuna continuità, la resistenza di riscaldamento è rotta e deve essere sostituita.
- La il motore dell'asciugatrice funziona, ma non si riceve calore.
- La resistenza deve essere testata per la continuità utilizzando un multimetro.
- L'asciugatrice gira normalmente ma non genera calore.
- Componenti correlati come fusibili termici bruciati e termostati difettosi possono anche causare un guasto al riscaldamento, ma il segno principale di una resistenza di riscaldamento rotta è l'assenza di calore nonostante l'asciugatrice sia in funzione.
I vestiti rimangono umidi dopo un ciclo completo
Se i vestiti rimangono umidi dopo un ciclo di asciugatura completo, si dovrebbe sospettare un problema con la resistenza di riscaldamento. L'asciugatrice può sembrare funzionante, ma senza calore adeguato, l'umidità non evapora dal bucato. Questo problema spesso indica direttamente una resistenza guasta, soprattutto se si è già verificato l'accumulo di lanugine e una corretta ventilazione.
Odori o rumori insoliti durante il funzionamento
Un elemento riscaldante guasto può talvolta produrre un odore di bruciato o persino un lieve odore metallico. Potresti anche udire rumori insoliti, come ronzii o scoppiettii, durante il funzionamento. Questi sintomi possono indicare che l'elemento si sta surriscaldando o ha sviluppato un cortocircuito. Se noti uno di questi segnali di avvertimento, interrompi immediatamente l'uso dell'asciugatrice e ispeziona l'elemento per individuare danni visibili, come crepe, fusione o corrosione.
Suggerimento: Scollegare sempre l'asciugatrice dalla presa di corrente prima di eseguire qualsiasi ispezione o riparazione per evitare rischi elettrici.
Sintomi sottili da osservare
Tempi di asciugatura più lunghi del normale
A volte, i segni di un elemento riscaldante guasto sono meno evidenti. Potresti notare che l'asciugatrice impiega molto più tempo del solito per asciugare un carico standard. Questo sintomo spesso si sviluppa gradualmente. L'elemento può ancora produrre un po' di calore, ma non abbastanza per asciugare i capi in modo efficiente. Un riscaldamento incoerente o parziale può prolungare i tempi di asciugatura e aumentare le bollette energetiche.
Emissione di calore incoerente o fluttuante
Un altro indicatore sottile è un'emissione di calore incoerente o fluttuante. Potresti notare che l'asciugatrice si riscalda all'inizio del ciclo ma poi si raffredda inaspettatamente. Ciò può derivare da problemi di cablaggio o da un guasto parziale della bobina all'interno dell'elemento riscaldante. Per distinguere tra il guasto dell'elemento riscaldante e altri problemi comuni dell'asciugatrice , utilizzare la seguente tabella:
| Aspetto | Dettagli |
|---|---|
| Sintomi | Nessun calore o asciugatura incoerente; odore di bruciato o lanugine carbonizzata; interruttore automatico scattato. |
| Ispezione visiva | Cercare crepe, fusione o corrosione sull'elemento riscaldante. |
| Test elettrico | Utilizzare un multimetro per la continuità (deve emettere un segnale acustico) e la resistenza (valore atteso ~11,5 ohm per un elemento da 240V, 5000W). |
| Guasti comuni | Circuito aperto (bruciato, resistenza infinita); cortocircuito (resistenza inferiore a 5 ohm). |
Problemi di cablaggio dell'elemento riscaldante possono causare assenza di calore, riscaldamento intermittente o odori di bruciato. Termostati difettosi possono anche causare un riscaldamento improprio, surriscaldamento o tempi di asciugatura più lunghi. Tuttavia, se l'asciugatrice Maytag non si riscalda e si osservano i sintomi sopra descritti, è probabile che l'elemento riscaldante sia la fonte del problema.
Cause comuni di guasto dell'elemento riscaldante dell'asciugatrice Maytag
Abitudini quotidiane che danneggiano l'elemento riscaldante
Sovraccarico dell'asciugatrice
Potresti pensare che riempire l'asciugatrice con quanti più capi possibile faccia risparmiare tempo, ma questa abitudine può ridurre la durata dell'elemento riscaldante. Il sovraccarico mette ulteriore stress sul motore e su ogni componente critico all'interno dell'apparecchio. L'elemento riscaldante lavora di più per asciugare carichi più grandi e pesanti, il che porta a surriscaldamento e danni fisici. Quando superi la capacità raccomandata, costringi il motore a lavorare oltre i suoi limiti. Questo accelera l'usura, causando il guasto dell'elemento riscaldante prima del previsto. Seguire le linee guida sulla capacità del produttore aiuta a mantenere la longevità di questo componente essenziale.
Suggerimento: caricare sempre l'asciugatrice secondo il manuale utente. Carichi moderati e distribuiti uniformemente si asciugano più velocemente e proteggono il sistema di riscaldamento.
Ignorare l'accumulo di lanugine e una scarsa ventilazione
L'accumulo di lanugine e il flusso d'aria limitato sono cause principali del guasto dell'elemento riscaldante. Quando la lanugine ostruisce il filtro o il condotto di ventilazione, l'aria calda non può fuoriuscire in modo efficiente. Questa ostruzione causa il surriscaldamento dell'elemento riscaldante, che può attivare il fusibile termico e danneggiare l'elemento stesso. Dovresti pulire il filtro della lanugine dopo ogni ciclo e controllare regolarmente il tubo di ventilazione per pieghe o ostruzioni. Se noti tempi di asciugatura più lunghi o ripetuti interventi del fusibile termico, ispeziona prima il sistema di ventilazione. Un flusso d'aria adeguato mantiene l'elemento riscaldante fresco e operativo in modo efficiente.
- Le cause più frequenti di guasto del fusibile termico e dell'elemento riscaldante includono:
- Flusso d'aria di scarico ostruito o limitato.
- Accumulo di lanugine nel filtro o nel condotto di ventilazione.
- Sovraccarico dell'asciugatrice con carichi eccessivamente grandi o bagnati.
- Termostati difettosi o elementi riscaldanti in cortocircuito.
- Cortocircuiti nel cablaggio o negli interruttori del motore.
Fattori tecnici e ambientali
Problemi elettrici che influenzano l'elemento riscaldante
Problemi elettrici possono danneggiare silenziosamente l'elemento riscaldante dell'asciugatrice. Fili di collegamento difettosi, terminali allentati o isolamento usurato possono causare riscaldamento intermittente o guasto completo. Potresti notare che l'asciugatrice funziona ma non riscalda, oppure potresti sentire odori di bruciato durante il funzionamento. Questi sintomi spesso indicano guasti elettrici che riducono le prestazioni e attivano dispositivi di sicurezza come il kit di interruzione termica. Il surriscaldamento dovuto a problemi elettrici può anche causare danni visibili o la bruciatura dell'elemento riscaldante, riducendone l'efficienza e la durata. Ispezioni regolari aiutano a individuare questi problemi in anticipo.
- I problemi elettrici comuni includono:
- Fili dell'elemento riscaldante danneggiati o allentati.
- Riscaldamento intermittente dovuto a collegamenti scadenti.
- Surriscaldamento che attiva i dispositivi di interruzione di sicurezza.
Età, usura e componenti fuori produzione
Anche con una cura adeguata, ogni elemento riscaldante ha una durata di vita limitata. Dopo anni di utilizzo, la bobina dell’elemento può usurarsi, soprattutto se si eseguono cicli frequenti o prolungati. L’accumulo di minerali dovuto all’acqua dura o ai residui può anche ostacolare il trasferimento di calore, costringendo l’elemento a lavorare di più. Alla fine, il componente può guastarsi per semplice usura. Secondo i dati di settore, un elemento riscaldante Maytag dura in genere da 12 a 15 anni in condizioni normali, con la maggior parte dei proprietari che necessita di zero o una sostituzione in 15 anni.
| Marca | Durata Media (Anni) | Sostituzioni Tipiche in 15 Anni |
|---|---|---|
| Maytag | da 12 a 15 | da 0 a 1 |
Se l’asciugatrice è più vecchia o utilizza componenti fuori produzione, reperire un ricambio può richiedere uno sforzo aggiuntivo. Una manutenzione regolare e riparazioni tempestive aiutano a massimizzare la durata dell’elemento riscaldante ed evitare guasti imprevisti.
Segreti di diagnostica e test fai-da-te per la tua asciugatrice Maytag
Guida passo-passo alla risoluzione dei problemi
Sicurezza prima di tutto: scollega e prepara l’asciugatrice
Prima di iniziare qualsiasi operazione di diagnostica, dai sempre priorità alla sicurezza. Scollega l’asciugatrice Maytag o spegni l’interruttore automatico. Questo passaggio ti protegge da scosse elettriche e previene l’attivazione accidentale durante l’ispezione. Prepara gli strumenti in anticipo. Avrai bisogno di un cacciavite per rimuovere il pannello posteriore e di un multimetro per testare la continuità elettrica.
Suggerimento: Non saltare mai il passaggio di scollegamento. Anche una breve dimenticanza può causare lesioni gravi.
Ispezione visiva dell’elemento riscaldante
Una volta scollegata l’alimentazione, allontana l’asciugatrice dalla parete per un facile accesso. Usa il cacciavite per rimuovere il pannello posteriore. Individua l’elemento riscaldante, che appare come una custodia metallica contenente fili avvolti a spirale. Scollega con attenzione i fili e le viti di montaggio per rimuovere l’elemento dal suo alloggiamento.
Ispeziona attentamente le bobine. Cerca rotture visibili, bruciature o altri danni. Se noti sezioni rotte o bruciate, dovrai sostituire il componente. Un controllo visivo spesso rivela la causa dei problemi di riscaldamento senza ulteriori test.
Come usare un multimetro per testare l’elemento riscaldante
Un multimetro è lo strumento più affidabile per diagnosticare guasti elettrici. Imposta il multimetro per misurare la resistenza (ohm) o la continuità. Tocca le sonde sui terminali dell’elemento riscaldante. Un elemento funzionante mostrerà una lettura intorno ai 10 ohm o produrrà un segnale acustico, indicando continuità. Se non vedi alcuna lettura o il multimetro rimane silenzioso, l’elemento è guasto e richiede sostituzione.
Procedura di test passo-passo:
- Scollega l’asciugatrice o spegni l’interruttore automatico.
- Rimuovi il pannello posteriore con un cacciavite.
- Individua e rimuovi l’elemento riscaldante.
- Imposta il multimetro sulla modalità corretta (ohm o continuità).
- Posiziona le sonde sui terminali dell’elemento.
- Controlla una lettura vicina a 10 ohm o ascolta un segnale acustico.
- Se la lettura è errata o non c’è segnale acustico, sostituisci l’elemento.
Nota: Puoi anche usare il multimetro per testare i termostati rimuovendo i loro fili e misurando la resistenza.
Quando chiamare un professionista per un problema di elemento riscaldante rotto
Segnali di avvertimento da non ignorare
Alcuni problemi richiedono l’attenzione di un esperto. Se noti odori persistenti di bruciato, fili fusi o lo scatto ripetuto dell’interruttore automatico, interrompi la diagnostica e contatta un professionista. Questi sintomi possono indicare guasti elettrici più profondi o rischi di incendio. Tentare riparazioni senza conoscenze adeguate aumenta il rischio di scosse elettriche o incendi.
- Segnali che richiedono assistenza professionale:
- Fili allentati o fusi vicino all’elemento riscaldante.
- Suoni di arco elettrico o scintille durante il funzionamento.
- Difficoltà nel ricollegare saldamente i fili.
- Incertezza su qualsiasi fase della riparazione.
Cosa può diagnosticare e riparare un tecnico
Un tecnico qualificato dispone di strumenti specializzati ed esperienza. Può diagnosticare problemi elettrici complessi, sostituire cablaggi danneggiati e garantire che tutte le connessioni rispettino gli standard di sicurezza. I tecnici controllano anche problemi nascosti, come termostati o schede di controllo difettosi, che potrebbero non essere evidenti durante un’ispezione di base. Le riparazioni professionali eliminano i rischi di incendio e ripristinano le prestazioni dell’asciugatrice.
Avviso: A un filo allentato o montato in modo improprio può surriscaldarsi e fondersi, creando un serio rischio di incendio. Assicurati sempre che le connessioni siano strette e sicure. Se non ti senti sicuro, chiama un professionista.
Segreti per la sostituzione dell’elemento riscaldante della tua asciugatrice Maytag

Scelta del ricambio giusto per l’elemento riscaldante
Identificazione del numero di modello della tua asciugatrice Maytag
Devi identificare il numero di modello esatto della tua asciugatrice Maytag prima di acquistare un ricambio. I numeri di modello compaiono su un’etichetta o una targhetta metallica, spesso all’interno del telaio della porta, sul pannello posteriore o vicino al filtro lanugine. Questi numeri possono essere numerici o alfanumerici, come 1005400 o LAT1000AAE. Registrare accuratamente questo numero garantisce di selezionare un elemento riscaldante compatibile con la tua specifica asciugatrice Maytag heavy duty. Molte risorse e guide online possono aiutarti a individuare e verificare il numero di modello, essenziale per trovare un ricambio OEM originale.
- I numeri di modello sono fondamentali per la compatibilità.
- Utilizzare il numero esatto per cercare online il ricambio corretto.
- I ricambi OEM garantiscono una perfetta aderenza per il tuo elettrodomestico Maytag heavy duty.
Ricambi OEM vs. resistenze riscaldanti aftermarket
Quando si sceglie una resistenza riscaldante di ricambio, ci si trova di fronte a una decisione tra ricambi OEM e aftermarket. I professionisti della riparazione di elettrodomestici raccomandano i ricambi OEM per riparazioni critiche perché offrono affidabilità, durata e una garanzia di qualità. Le resistenze OEM presentano spesso bobine più spesse e materiali superiori, che contribuiscono a una maggiore durata del servizio. I ricambi aftermarket possono costare meno inizialmente, ma possono guastarsi prima e non offrono la stessa garanzia di qualità. Molti utenti scoprono che investire in un ricambio OEM fa risparmiare denaro nel tempo, evitando sostituzioni ripetute e problemi di prestazioni.
Consigli per la sostituzione fai-da-te della resistenza riscaldante
Strumenti necessari per la sostituzione
Sono sufficienti solo attrezzi manuali di base per installare un nuovo componente nel tuo asciugatrice Maytag. Un cacciavite multiplo, pinze e un avvitatore a bussola gestiranno la maggior parte delle operazioni. Scollegare sempre l'asciugatrice o spegnere l'interruttore automatico prima di iniziare. Per i modelli a gas, chiudere l'alimentazione del gas alla valvola di isolamento.
- Cacciavite multiplo
- Pinze
- Chiave a bussola
- Guanti da lavoro
Guida all'installazione passo dopo passo
Seguire questi passaggi per sostituire la resistenza riscaldante in modo sicuro ed efficiente:
- Scollega l’asciugatrice o spegni l’interruttore automatico.
- Rimuovere le viti nella parte inferiore del pannello frontale.
- Ruotare il pannello verso l'esterno per rilasciare le clip superiori.
- Scollegare i cavi dall'interruttore della porta e mettere da parte il pannello.
- Rimuovere le viti che fissano lo schermo protettivo della resistenza riscaldante.
- Scollegare il cavo di alimentazione e i cavi del termostato di massima temperatura.
- Rimuovere le viti di montaggio ed estrarre il gruppo resistenza riscaldante.
- Separare l'alloggiamento e rimuovere la vecchia bobina.
- Inserire la nuova bobina attraverso gli anelli isolanti, assicurando una spaziatura uniforme.
- Fissare le estremità della bobina con rondelle e dadi.
- Riassemblare l'alloggiamento e reinstallare tutti i componenti.
- Ricollegare i cavi e fissare il pannello frontale.
- Collegare l'asciugatrice e testare il corretto funzionamento.
Suggerimento: controllare sempre il fusibile termico prima di sostituire la resistenza riscaldante per evitare lavori inutili.
Consigli per risparmiare sui costi di sostituzione della resistenza riscaldante
Dove acquistare ricambi Maytag per asciugatrice di qualità
È possibile trovare resistenze OEM affidabili presso rivenditori di fiducia come ReliableParts.com. Questo sito offre ricambi certificati in fabbrica progettati per asciugatrici Maytag, inclusi resistenze riscaldanti, kit di riparazione e fusibili termici. Si beneficia di garanzia di qualità, compatibilità e accesso alle istruzioni di installazione. L'acquisto di un ricambio online da una fonte affidabile garantisce di ricevere un componente collaudato che soddisfa specifiche rigorose.
Evitare errori comuni di sostituzione
Molti proprietari trascurano passaggi chiave durante la sostituzione. Scollegare sempre l'asciugatrice e verificare il numero di modello prima di ordinare. Non saltare il controllo del fusibile termico, poiché un fusibile bruciato può simulare un guasto della resistenza. Installare il nuovo componente con attenzione, assicurandosi che la bobina non tocchi se stessa o l'alloggiamento. Un'installazione corretta previene i cortocircuiti e prolunga la vita della resistenza riscaldante.
| Componente di costo | Intervallo di costo (USD) |
|---|---|
| Elemento riscaldante (pezzo) | $70 – $150 |
| Manodopera (all'ora) | $50 – $100 |
| Tariffa per chiamata di servizio | $100 – $150 |
| Costo totale della riparazione | $100 – $550 |
Nota: è possibile risparmiare notevolmente eseguendo la sostituzione da soli, poiché i costi di manodopera spesso superano il prezzo del ricambio.
Consigli professionali per prolungare la vita della resistenza riscaldante dell'asciugatrice Maytag
Routine di manutenzione per la resistenza riscaldante
Pulizia del filtro per lanugine e delle prese d'aria dell'asciugatrice
È possibile prolungare la vita della resistenza riscaldante rendendo la rimozione della lanugine una parte regolare della routine di lavanderia. Dopo ogni carico, rimuovere la lanugine dal filtro a mano. Questo semplice passaggio mantiene il flusso d'aria e riduce il rischio di surriscaldamento. Per una pulizia più profonda, lavare il filtro per lanugine con acqua e sapone ogni settimana o due. Questo rimuove i residui che possono trattenere la lanugine e causare ostruzioni. Una volta al mese, utilizzare un aspirapolvere per pulire l'alloggiamento del filtro per lanugine. Questo impedisce ai detriti di fuoriuscire nel sistema di ventilazione.
La pulizia professionale delle prese d'aria dell'asciugatrice una volta all'anno è essenziale, soprattutto se si utilizza frequentemente il modello Maytag heavy duty. L'accumulo di lanugine nella presa d'aria limita il flusso d'aria, il che può causare il surriscaldamento e il guasto della resistenza. Una pulizia regolare mantiene l'asciugatrice efficiente e protegge il tuo investimento.
| Componente | Frequenza di pulizia | Scopo/Effetto sui problemi della resistenza riscaldante |
|---|---|---|
| Filtro per lanugine | Dopo ogni utilizzo | Previene l'accumulo di lanugine, riduce il rischio di surriscaldamento |
| Settimanale o bisettimanale (lavaggio) | Rimuove i residui, previene gli intasamenti | |
| Alloggiamento del filtro per lanugine | Mensile (aspirazione) | Rimuove i detriti, riduce gli intasamenti dello sfiato |
| Condotti di sfiato dell'asciugatrice | Annuale (pulizia professionale) | Previene l'accumulo di lanugine, riduce il rischio di guasto dell'elemento riscaldante |
Ispezioni regolari per la rilevazione precoce dei problemi
È necessario ispezionare visivamente l'elemento riscaldante su base regolare. Cercare segni di bruciature, crepe o altri danni. La rilevazione precoce consente di sostituire un componente difettoso prima che causi un guasto completo. Controllare lo sfiato di scarico ogni pochi mesi per assicurarsi che non vi siano ostruzioni. Se si notano tempi di asciugatura più lunghi o odori insoliti, indagare immediatamente. Le ispezioni di routine aiutano a evitare costose riparazioni e a mantenere l'asciugatrice Maytag funzionante in modo sicuro.
| Routine di manutenzione | Scopo/Beneficio | Frequenza raccomandata/Note |
|---|---|---|
| Pulire il filtro per lanugine dopo ogni carico | Mantiene il flusso d'aria, riduce il rischio di surriscaldamento | Renderlo un'abitudine |
| Ispezionare e pulire lo sfiato di scarico | Previene le ostruzioni, riduce il surriscaldamento | Ogni pochi mesi |
| Ispezionare visivamente l'elemento riscaldante | Rileva i danni precocemente, previene i guasti | Regolarmente |
Abitudini di utilizzo intelligenti per prevenire problemi all'elemento riscaldante
Tecniche di carico corrette per l'asciugatrice Maytag
Si protegge la elemento riscaldante caricando correttamente l'asciugatrice. Seguire sempre le linee guida del produttore ed evitare di riempire il tamburo oltre i tre quarti della capacità. Il sovraccarico limita la circolazione dell'aria e costringe l'elemento riscaldante a lavorare di più, il che può portare a un guasto prematuro. I capi devono muoversi liberamente per un'asciugatura uniforme. Se la lavatrice lascia i capi troppo bagnati, controllare lo scarico e i cicli di centrifuga. L'umidità eccessiva fa lavorare di più l'asciugatrice e aumenta l'usura dell'elemento riscaldante Evitare l'uso eccessivo e il surriscaldamento.
Le abitudini di utilizzo intelligenti vanno oltre il carico corretto. Concedere all'asciugatrice il tempo di raffreddarsi tra un carico e l'altro, soprattutto se la si utilizza intensamente. Evitare di eseguire più cicli consecutivi, poiché ciò può causare surriscaldamento. Pianificare una manutenzione di routine per ispezionare componenti critici come termostato, elemento riscaldante e condotti di sfiato. Affrontare tempestivamente i problemi minori previene guasti maggiori. Assicurarsi che l'asciugatrice sia installata con uno sfiato correttamente allineato e senza ostruzioni. Ciò consente a calore e umidità di fuoriuscire in modo efficiente, riducendo lo sforzo sull'elemento riscaldante.
Suggerimento: pulire e sostituire regolarmente i filtri per lanugine,.
controllare i termostati per eventuali guasti, e sostituire le guarnizioni dello sportello secondo necessità per mantenere un'efficiente ritenzione del calore., conoscere i segreti essenziali per mantenere l'elemento riscaldante dell'asciugatrice Maytag.
Ora in condizioni ottimali. offre benefici concreti:. Manutenzione regolare Pulire i filtri per lanugine e i condotti riduce lo stress sull'elemento riscaldante.
- Un flusso d'aria adeguato previene il surriscaldamento e prolunga la durata.
- I controlli di routine rilevano guasti precoci, evitando riparazioni costose.
- Un controllo costante della temperatura migliora l'efficienza energetica.
- Iniziare oggi la propria routine di manutenzione. Si proteggerà il proprio investimento, si risparmierà sulle bollette energetiche e si godrà di prestazioni affidabili dell'asciugatrice per anni a venire.
Con quale frequenza si deve sostituire l'elemento riscaldante dell'asciugatrice Maytag?.
FAQ
La maggior parte degli elementi riscaldanti dura dai 12 ai 15 anni con una cura adeguata. Sostituire l'elemento solo se si notano segni evidenti di guasto, come assenza di calore o danni visibili alla bobina. Una manutenzione regolare aiuta a prolungarne la durata.
Si può far funzionare l'asciugatrice Maytag con un elemento riscaldante rotto?.
Si può far funzionare l'asciugatrice, ma non asciugherà i capi. Il tamburo girerà, ma non verrà prodotto calore. Far funzionare l'asciugatrice in questo modo spreca energia e può causare ulteriori danni. Sostituire tempestivamente l'elemento riscaldante.
Servono un cacciavite multiplo, pinze e un avvitatore a bussola. I guanti da lavoro proteggono le mani. Scollegare sempre l'asciugatrice prima di iniziare. Per i modelli a gas, chiudere l'alimentazione del gas alla valvola.
Quali strumenti ti servono per sostituire la resistenza di riscaldamento di un'asciugatrice Maytag?
Come si fa a sapere se il problema è l'elemento riscaldante o il fusibile termico?.
Testare entrambe le parti con un multimetro. Un elemento riscaldante funzionante mostra continuità (circa 10 ohm). Un fusibile termico bruciato non mostra continuità. Sostituire il componente difettoso in base ai risultati del test.
Test both parts with a multimeter. A working heating element shows continuity (around 10 ohms). A blown thermal fuse shows no continuity. Replace the faulty part based on your test results.
Dove puoi trovare il numero di modello del tuo asciugatrice Maytag?
Cerca il numero di modello all'interno del telaio della porta, sul pannello posteriore o vicino al filtro per i pelucchi. Utilizza questo numero per ordinare i ricambi corretti.
È meglio utilizzare elementi riscaldanti OEM o aftermarket?
I componenti OEM offrono maggiore affidabilità e una migliore vestibilità. I ricambi aftermarket possono costare meno ma spesso hanno una durata inferiore. Per prestazioni ottimali, scegli elementi riscaldanti OEM per la tua asciugatrice Maytag. Elementi riscaldanti per la tua asciugatrice Maytag.
Quali interventi di manutenzione aiutano a prevenire il guasto dell'elemento riscaldante?
- Pulisci il filtro per i pelucchi dopo ogni carico.
- Aspira l'alloggiamento del filtro per i pelucchi mensilmente.
- Pianifica una pulizia professionale dello sfiato annuale.
- Ispeziona regolarmente l'elemento riscaldante per verificare eventuali danni.
Perché la tua asciugatrice impiega più tempo ad asciugare i capi anche dopo aver sostituito l'elemento riscaldante?
Sfiati ostruiti, accumulo di pelucchi o termostati difettosi possono causare tempi di asciugatura prolungati. Controlla e pulisci tutti i percorsi del flusso d'aria. Se il problema persiste, ispeziona altri componenti per individuare eventuali guasti.

