When you consider the cost to replace a Élément chauffant in your oven, you face a wide price range. If you choose a DIY approach, you typically pay $10 to $50 for parts depuis Fabricants d'éléments chauffants such as Chauffage électrique Jinzhong. Professional oven repair services often charge $150 to $400, with labor fees between $50 and $200 per hour.
| Composante de coût | Coût de remplacement | Coût de remplacement professionnel |
|---|---|---|
| Pièces (élément chauffant) | $10 à $50 | $10 à $50 |
| Travail | $0 | $50 à $200 par heure |
| Coût total estimé | $10 à $50 | $150 à $400 |
Understanding oven repair cost helps you make informed decisions about éléments chauffants pour appareils ménagers. Several factors influence the final repair bill:
- Oven type and model affect installation complexity.
- Brand and availability of parts matter, especially for luxury or discontinued models.
You see that most homeowners prefer hiring professionals for oven repair, but knowing these cost drivers lets you plan ahead.
Cost to Replace a Heating Element in an Oven

Typical Oven Repair Cost Range
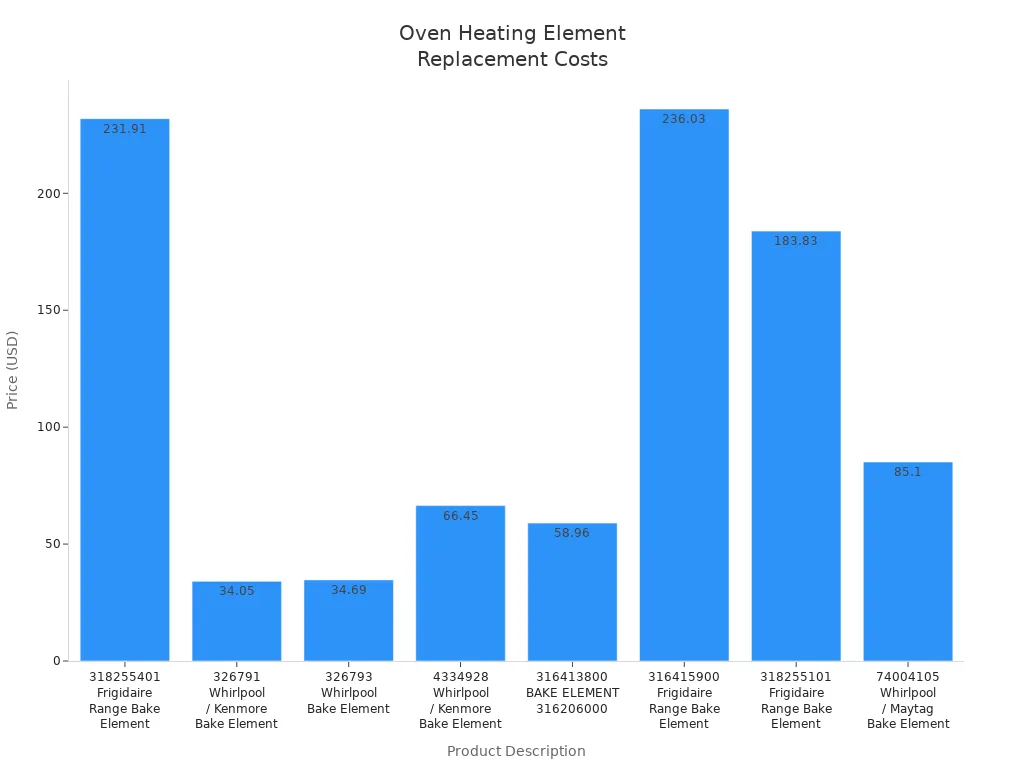
You will notice a wide range in the cost to replace a heating element in an oven. Prices depend on the brand, model, and where you live. For example, a basic heating element for common oven brands usually costs between $25 and $85. Some specialty or high-end models, such as certain Frigidaire or Whirlpool elements, can reach over $200. The following table shows the price range for several popular models:
| Product Description | Prix |
|---|---|
| 318255401 Frigidaire Range Bake Element | $231.91 |
| 326791 Whirlpool / Kenmore Bake Element | $34.05 |
| 326793 Whirlpool Bake Element | $34.69 |
| 4334928 Whirlpool / Kenmore Bake Element | $66.45 |
| 316413800 BAKE ELEMENT 316206000 | $58.96 |
| 316415900 Frigidaire Range Bake Element | $236.03 |
| 318255101 Frigidaire Range Bake Element | $183.83 |
| 74004105 Whirlpool / Maytag Bake Element | $85.10 |
Your location also affects the oven repair cost. In urban areas, you often pay more due to higher demand and living expenses. In rural areas, you might see lower fees, but companies may charge extra for travel—sometimes $2 for every mile outside their service area.
Parts vs. Labor: Breaking Down the Cost to Replace
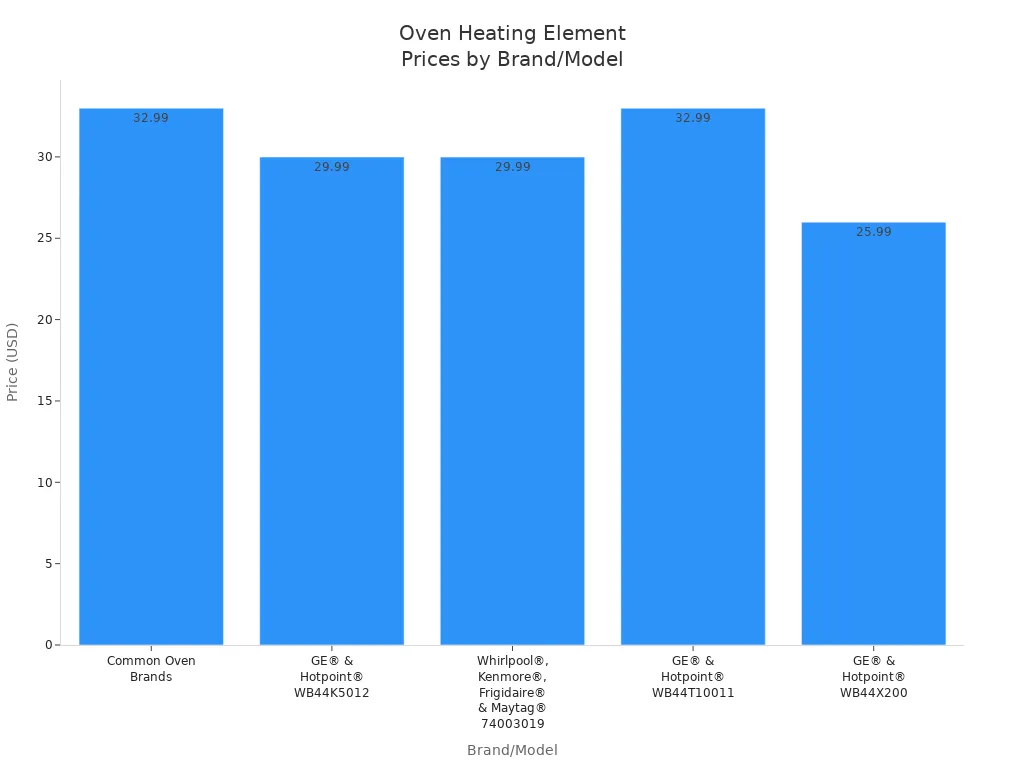
When you look at the total cost to replace a heating element, you need to consider both parts and labor. The price of the replacement part varies by brand and model. For example, a GE® & Hotpoint® WB44K5012 heating element costs about $29.99, while a Whirlpool®, Kenmore®, or Frigidaire® element can range from $25.99 to $32.99.
| Marque/Modèle | Prix |
|---|---|
| Common Oven Brands | $32.99 |
| GE® & Hotpoint® WB44K5012 | $29.99 |
| Whirlpool®, Kenmore®, Frigidaire® & Maytag® 74003019 | $29.99 |
| GE® & Hotpoint® WB44T10011 | $32.99 |
| GE® & Hotpoint® WB44X200 | $25.99 |
Labor charges make up a significant part of the total oven repair cost. Most professionals charge between $50 and $100 for labor. In some cases, labor fees can reach $200 per hour, especially for complex repairs or high-end ovens. If you live far from a service provider, you may also pay additional mileage fees.
DIY Oven Repair Cost vs. Professional Service
You can save money by replacing the heating element yourself. The DIY cost to replace a heating element usually falls between $10 and $85, depending on the part you need. Professional oven repair services typically charge between $125 and $350, which includes both parts and labor.
| Type de réparation | Fourchette de coûts |
|---|---|
| DIY (Parts Only) | $10 – $75 |
| DIY Heating Element | $25 – $85 |
| Réparation professionnelle | $125 – $350 |
Conseil : You can save a significant amount by choosing the DIY route, but you must weigh the risks and hidden costs.
Common hidden costs with DIY oven repair include:
- Risk of electric shock or fire if you handle high-voltage appliances incorrectly.
- Misdiagnosis, which can lead to unnecessary or incorrect repairs.
- Voiding the manufacturer’s warranty, making you responsible for future repairs.
- Physical injury from handling heavy or complex oven parts.
- Increased costs if you cause more damage during the repair.
You should consider your skill level, safety, and warranty status before deciding between DIY and professional service. If you feel unsure, hiring a professional can help you avoid costly mistakes and ensure a safe, reliable repair.
What Influences Oven Repair Cost?
Type of Oven and Heating Element
When you plan an oven heating element replacement, you must consider the type of oven you own. The design and technology behind each oven model directly affect the complexity and price of repairs.
Electric vs. Gas Oven Repair Cost
You will find that electric ovens usually offer a more straightforward repair process. The components inside an electric oven are less complex, which means you pay less for labor and parts.
- Electric oven repairs typically range from $100 to $250.
- Replacing a heating element in an electric oven usually costs between $150 and $400, often on the lower end compared to gas ovens.
- Gas ovens have more intricate systems and safety requirements. You may face higher repair costs because technicians must handle gas lines and additional safety checks.
Note: The cost of replacing a heating element in electric ovens tends to be lower than in gas ovens, especially for advanced models.
Wall Oven vs. Range Cost to Replace
The style of your oven also plays a role in the overall expense. Wall ovens and range ovens differ in installation and accessibility.
- For electric ovens, repair costs typically range from $100 to $250.
- Gas ovens can have repair costs that may reach up to $600, especially if the repair involves more than just the heating element.
- The cost of replacing heating elements varies by brand and model, with standard parts costing between $25 and $77, while premium parts can exceed $200.
If you own a wall oven, you may pay more for labor because technicians need extra time to access and remove the unit. Range ovens, which combine a cooktop and oven, often allow easier access for repairs.
Brand and Model Impact on Oven Repair
The brand and model of your oven can significantly influence the repair process.
- Luxury appliance brands like Sub-Zero, Viking, Thermador, Miele, and Wolf have higher repair costs due to proprietary parts.
- These brands use unique components that are not interchangeable with generic parts.
- Specialized repair services are required for these brands because their parts are custom-engineered for specific functions.
If you own a premium oven, you should expect higher prices for both parts and labor. Standard brands often use universal heating elements, which lowers the replacement cost.
Heating Element Price Differences
Heating element prices vary widely across oven models.
- The average cost of a heating element for a residential oven ranges from $20 to $100 or more.
- Basic replacement elements for standard ovens are generally on the lower end of the price range.
- High-end or specialized oven elements tend to be more expensive.
- The type of heating element (bake, broil, convection, etc.) also influences the price.
You should check the specifications of your oven before purchasing a replacement part. If you need a specialty element, you may pay a premium.
Tip: Always verify the compatibility of the heating element with your oven model to avoid unnecessary expenses.
Labor Fees and Service Charges for Oven Repair
When you schedule an oven repair, labor fees and service charges make up a significant part of your total bill. Most repair companies charge a flat service fee just to diagnose the problem. This fee usually ranges from $50 to $100. If you decide to move forward with the repair, the company often applies this fee toward your final invoice.
You will notice that labor fees depend on the complexity of the job and the technician’s experience. Simple oven repairs, such as a heating element replacement, usually take less than an hour. For these jobs, you might pay between $50 and $100 for labor. More complicated repairs, especially those involving high-end ovens or hard-to-reach parts, can push labor costs up to $200 per hour.
Your location also plays a big role in how much you pay for labor. In urban areas, you often see higher labor rates because of increased demand and higher living expenses. In rural regions, labor fees may be lower, but you could face extra charges if the technician needs to travel a long distance to reach your home.
Conseil : Always ask for a detailed breakdown of labor and service charges before you agree to any oven repair. This helps you avoid unexpected expenses and gives you a clear picture of what you are paying for.
Location and Part Availability
Where you live affects both the speed and the price of your oven repair. In cities, you have access to more repair services and parts suppliers. This competition can help keep prices reasonable and reduce wait times for parts.
If you live in a remote or rural area, you may face higher costs for oven repair. Technicians often charge travel fees when they must drive long distances to reach your home. These fees can add up quickly, especially if your location is far from the nearest service provider. Sometimes, companies charge by the mile, which increases your total bill.
Part availability also impacts your repair experience. In remote areas, local suppliers may not stock the specific oven parts you need. When this happens, technicians must order parts from distant warehouses. This process can increase both the cost and the time required for your repair. You might wait several days for the right part to arrive, which can be frustrating if you rely on your oven for daily cooking.
Note: Limited access to parts and repair services in rural locations often leads to higher overall costs and longer repair times for homeowners.
If you want to keep your oven running smoothly, consider these factors when planning for a replacement or repair. Understanding how location and part availability influence your repair cost helps you make better decisions and avoid surprises.
DIY Oven Repair vs. Hiring a Professional
Avantages et inconvénients de la réparation de fours à domicile
Cost Savings and Risks
When you consider replacing a heating element in your oven yourself, you gain several advantages. You save money on labor fees, and you control the timing of your repair. You may also feel a sense of accomplishment when you complete the task on your own.
- Économies de coûts on labor
- Flexibility to schedule the repair at your convenience
- Satisfaction from completing the oven replacement yourself
However, you must weigh these benefits against the risks. Working with electrical appliances exposes you to safety hazards, such as electric shock or burns. If you install the wrong part or make a mistake, you could damage your oven or void its warranty. You may also face additional costs if you need to correct errors later.
- Safety risks, including electric shock and burns
- Potential for mistakes, such as installing the wrong heating element or damaging the oven
- Warranty concerns, since DIY repairs may void manufacturer coverage
Tip: If you can identify wires, own basic tools, and follow schematics, you may feel comfortable attempting a DIY oven repair. For integrated smart ovens, gas hybrids, or hardwired units, you should call a professional.
Safety and Skill Requirements
You must assess your skill level before starting a DIY oven replacement. Basic repairs require you to disconnect power, handle tools safely, and follow instructions closely. If you lack experience with electrical systems, you risk injury or further damage to your oven. Safety should always be your top priority.
Pros and Cons of Professional Oven Repair
Expertise, Warranty, and Convenience
Hiring a professional for oven repair offers several advantages. Technicians have the training and experience to handle electrical appliances safely. They ensure correct installation and can diagnose underlying issues that you might overlook. Many professional repairs include warranties or guarantees, which protect you from unexpected costs.
Home oven warranty coverage often goes beyond what your stove manufacturer’s warranty is willing to cover. The latter generally has a much shorter duration and doesn’t apply to wear and tear damage.
| Warranty Type | Détails de la couverture |
|---|---|
| Appliance Warranties | Cover unexpected repairs, accidental damage, and malfunctions. |
| ShieldGold | Covers up to $2,000 for each covered appliance. |
| ShieldPlatinum | Covers up to $4,000 for each covered appliance and includes replacement if needed. |
- Home warranties can cover ovens, ranges, and cooktops, providing protection against unexpected repair costs.
- Manufacturer warranties typically have limited duration and may not cover wear and tear.
You gain peace of mind knowing your oven is in expert hands, and you avoid the risks associated with DIY repairs.
Higher Oven Repair Cost
Professional oven repair usually costs more than a DIY approach. You pay for the technician’s expertise, travel, and service fees. While you invest more upfront, you reduce the risk of mistakes and benefit from warranty coverage.
Note: You should weigh the higher cost against the convenience, safety, and long-term protection offered by professional oven repair.
Step-by-Step Guide: How to Replace an Oven Heating Element
Safety Precautions for Oven Repair
Disconnecting Power and Using Protective Gear
You must prioritize safety before starting any oven repair. Always turn off the electrical breaker that powers your oven. Unplug the appliance from the outlet to eliminate the risk of electric shock. Wait until the oven has cooled down completely. This step prevents burns and ensures a safe working environment. Inspect the oven’s interior and remove any obstacles that could interfere with your work. Gather all necessary tools and wear protective gloves and safety goggles. Clear the area around the oven so you have enough space to move and work efficiently.
Conseil : Never attempt heating element replacement while the oven is plugged in or hot. Safety gear protects you from accidental injuries.
Tools and Materials Needed for Oven Repair
You need the right tools and materials to complete an oven heating element replacement. Prepare the following items before you begin:
- Tournevis cruciforme
- Flathead screwdriver (if required)
- Pince à bec effilé
- Tourne-écrou
- Multimeter (optional, for continuity testing)
- Replacement oven heating element (available from suppliers such as PRS Parts Inc.)
- Gants de travail
A multimeter helps you test the old heating element for continuity. This step confirms whether the part needs replacement. Work gloves protect your hands from sharp edges and electrical components.
Retrait de l'ancien élément chauffant
Follow these steps to remove the old heating element from your oven:
- Disconnect power by unplugging the oven or turning off the circuit breaker.
- Remove the metal cover plate inside the oven to expose the heating element terminals.
- Carefully disconnect the wires by pulling off the terminal connectors. Note their positions for reinstallation.
- Unscrew any mounting screws holding the heating element in place.
- Lift out the old heating element and set it aside.
You must match the new heating element with the old one to ensure compatibility. Align the prongs and secure the new part in place. Reconnect the wires firmly and replace the cover plate. Restore power to the oven and test its performance. If the oven heats up properly, you have completed the heating element replacement successfully.
Remarque : Always check the manufacturer’s instructions for your specific oven model. Some ovens may have unique steps or require additional tools.
Installation du nouvel élément chauffant
You have removed the old heating element and prepared your tools. Now, you can install the new part in your oven. Follow these best practices to ensure a safe and effective installation:
- Take the new heating element out of its packaging. Inspect it for any visible damage before proceeding.
- Place the element inside your oven, aligning it with the mounting holes.
- Attach the wires to the new heating element. Wiggle the spade connectors onto the terminals until they fit snugly.
- Move the element into the correct position within the oven cavity.
- Secure the element using the original screws or clips. Tighten them to prevent movement during operation.
- Double-check all connections. Make sure the wires are firmly attached and the element sits flush against the oven wall.
Conseil : Always match the new heating element to the old one before installation. This step helps you avoid compatibility issues and ensures proper function.
You should avoid touching the element with bare hands. Oils from your skin can cause hot spots and reduce the lifespan of the part. Use gloves for this step. Once you finish, you can move on to restoring power and testing the oven.
Testing the Oven After Repair
After you install the new heating element, you need to verify that your oven works correctly. Proper testing ensures safety and confirms that the repair succeeded. Here is a step-by-step process to test new oven heating element:
- Restore power to the oven by plugging it in or switching the circuit breaker back on.
- Set the oven to bake at a high temperature, such as 350°F.
- Observe the new heating element. It should glow red within a few minutes, indicating it heats up properly.
- Check the oven’s interior for even heat distribution. You can use an oven thermometer for more accurate results.
- If the element does not glow or the oven fails to heat, turn off the power immediately. Recheck the wiring connections. If problems persist, consult a professional technician.
Remarque : For an extra layer of assurance, you can use a multimeter to test the heating element’s continuity. Place the probes on the terminals. A reading between 0 and 50 ohms means the element functions as expected.
You have now completed the installation and testing process. Your oven should operate efficiently with the new heating element in place.
Signs You Need Oven Repair or Replacement
Common Symptoms of a Failing Heating Element
You rely on your oven for daily cooking, so recognizing early signs of trouble helps you avoid bigger issues. A failing heating element often shows clear symptoms. If you notice any of these problems, you should inspect your oven before the situation worsens.
- Chauffage inégal: Food may come out undercooked in some spots and burned in others.
- Complete failure to heat: The oven stays cold even after you set the temperature.
- Strange noises: Buzzing or popping sounds can signal electrical faults.
- Burning smells: Overheated elements sometimes produce a strong odor.
- Visible damage: Cracks, breaks, or discoloration on the element indicate wear.
If you see visible damage or smell burning, turn off your oven immediately. Continuing to use a damaged heating element can lead to further complications or safety hazards.
You might also notice longer preheat times or inconsistent baking results. These issues often point to heating element failure. Regularly checking your oven for these symptoms ensures you catch problems early and avoid costly repairs.
When Oven Repair Isn’t Enough
Sometimes, repairing your oven does not make financial sense. You should weigh the cost of repair against the price of a new appliance. For example, if you own a low-end range and face a repair bill of $212, replacing the oven may be more practical, especially if a new model costs around $800. On the other hand, if you have a premium oven that originally cost $1,250 or more, investing in a $212 repair often extends its life for many years.
Consider these factors when deciding between repair and replacement:
- Age of the oven: Older ovens may develop frequent issues, making replacement a better long-term solution.
- Repair costs: If the cost to fix your oven approaches half the price of a new one, replacement usually offers better value.
- Model quality: Expensive or high-end ovens often justify repair costs, while budget models may not.
- Frequency of breakdowns: Repeated repairs signal that your oven is nearing the end of its useful life.
Tip: Always compare the total repair cost, including labor and parts, with the price of a new oven. This approach helps you make a smart, cost-effective decision.
If you find yourself scheduling frequent repairs or dealing with persistent heating element failure, replacing the oven may save you money and frustration in the long run.
Tips to Lower Your Oven Repair Cost
Finding Affordable Heating Elements
You can reduce expenses by shopping smart when you need a new oven heating element. Start by checking online appliance parts retailers, which often offer competitive prices compared to local stores. Compare prices across several websites before making a purchase. Many manufacturers and third-party suppliers provide genuine parts at lower rates if you search for deals or clearance items.
You should also consider generic or universal heating elements if your oven model supports them. These alternatives usually cost less than brand-specific parts and still deliver reliable performance. Always verify compatibility with your oven before buying. If you have an older oven, look for refurbished or surplus parts from reputable sellers. This approach can help you find a quality replacement at a fraction of the original price.
Tip: Keep your oven’s model number handy. This information ensures you select the correct part and avoid unnecessary returns.
Using Discounts and Coupons for Oven Repair
You can take advantage of discounts and coupons to lower your oven repair expenses. Many service providers offer special deals for new customers, seniors, or those installing multiple appliances. Mentioning these offers when booking your appointment can lead to significant savings.
Here is a summary of common discounts available:
| Type de remise | Montant | Conditions |
|---|---|---|
| New Customer Discount | $30 OFF | Mention this coupon when booking. |
| Senior Citizens Discount | $40 OFF | Mention this coupon when booking. |
| Installation of 2 or More Appliances | $50 OFF | Mention this coupon when booking. |
You should always ask about current promotions before scheduling your oven repair. Some companies exclude service call fees from discounts, so clarify the terms in advance. Saving even a small amount on each repair helps you manage your household budget more effectively.
Knowing When to Call a Professional
You may want to handle minor oven issues yourself, but certain situations require expert attention. Calling a professional ensures your safety and protects your investment. Consider these factors when deciding to seek help:
- Safety first: Ovens can present risks like gas leaks or electrical shocks. Professionals have the training to manage these hazards.
- Knowledge of specialized parts: Technicians understand complex oven systems and can diagnose problems accurately.
- Gas and electrical safety: Professionals possess the expertise to work with both gas and electric ovens safely.
- Maintaining manufacturer warranties: Professional repairs help keep your warranty valid, which safeguards your oven’s value.
- Long-term reliability: Technicians can implement preventive measures to reduce future breakdowns.
Note: If you feel uncertain about any aspect of oven repair, prioritize your safety and call a qualified technician.
Oven Repair Cost Summary and Key Takeaways
Recap of Main Cost Points
You have seen that the cost to replace a heating element in your oven can vary widely. The price depends on several factors, such as the type of oven, the brand, and your location. If you choose a do-it-yourself approach, you often pay only for the part, which usually ranges from $10 to $85. When you hire a professional, you pay for both parts and labor, which can bring your total to $150 or more. Some high-end models or hard-to-find parts may push the cost to replace even higher.
Here is a quick summary of what affects your oven repair cost:
- Type of oven (electric or gas)
- Brand and model (standard or luxury)
- Labor fees and service charges
- Location and part availability
Remember: Labor often makes up the largest part of your bill. You should always ask for a detailed estimate before you agree to any repair.
You also need to consider the age and condition of your oven. If your appliance is old or has frequent problems, investing in a new oven may save you money in the long run.
Final Advice for Homeowners
You should always weigh your options before deciding how to handle an oven heating element replacement. If you have basic skills and feel comfortable working with electrical appliances, you can save money by doing the job yourself. Make sure you follow all safety precautions and use the correct replacement part for your oven.
If you feel unsure or if your oven has a complex design, hiring a professional makes sense. You gain peace of mind and protect your investment. Professionals can also spot other issues that you might miss.
To keep your costs down, shop around for parts and ask about discounts or coupons when booking service. Keep your oven’s model number handy to ensure you buy the right part. Regular maintenance and prompt attention to problems help you avoid bigger repair bills in the future.
Tip: Always prioritize safety. If you ever feel uncertain, call a qualified technician for your oven repair.
By understanding the real cost to replace a heating element and knowing when to seek help, you make smart decisions that keep your oven running efficiently and your household budget on track.
You now understand the real cost to replace a heating element in your oven. Take time to compare DIY and professional repair options before you decide. Always put safety first and consider your skills, the complexity of the job, and the long-term value of your appliance. Careful planning helps you make the best choice for your home.
FAQ
Comment savoir si l’élément chauffant de votre four doit être remplacé ?
You may notice uneven cooking, longer preheat times, or visible damage on the element. If your oven does not heat up or you see sparks, you likely need a new heating element.
Can you replace an oven heating element yourself?
Yes, you can replace it yourself if you feel comfortable working with electrical appliances. Always disconnect power before starting. If you feel unsure, hire a professional for safety.
Combien de temps faut-il pour remplacer un élément chauffant ?
Most replacements take 30 to 60 minutes. The process involves removing the old element, installing the new one, and testing the oven. Complex models may require more time.
Are all oven heating elements universal?
No, heating elements are not universal. You must match the replacement part to your oven’s brand and model. Always check compatibility before purchasing.
What tools do you need for oven heating element replacement?
You need a screwdriver, needle-nose pliers, and work gloves. A multimeter helps test the old element. Always follow the manufacturer’s instructions for your specific oven.
Will replacing the heating element void your oven warranty?
DIY repairs may void your manufacturer’s warranty. Review your warranty terms before starting. Professional repairs often keep your warranty valid.
How much does a professional charge to replace an oven heating element?
You can expect to pay between $150 and $400 for professional replacement. The price includes parts, labor, and service fees. High-end ovens may cost more.
What should you do if your oven still does not heat after replacing the element?
Check all connections and ensure correct installation. If the oven still fails, another component may have failed. Contact a qualified technician for further diagnosis.

