You can often fix your appliance issues when you choose to replace heating element parts yourself. A heating element powers many home devices, and it wears out over time. You need only basic tools and a careful approach for a successful heating element replacement. This process helps you restore function and avoid unnecessary expenses.
Understanding the Heating Element in Home Appliances
What Is a Heating Element and How Does It Work?
You encounter heating elements in many home appliances. These components convert electrical energy into heat using the principle of Joule heating. When electricity passes through a resistive wire, the wire heats up and transfers warmth to its surroundings. Manufacturers design heating elements to meet strict safety standards, including insulation strength and resistance to oxidation. The typical lifespan of a heating element in domestic appliances ranges from 500 to 5000 hours. Factors such as wire thickness and operating temperature influence how long the element lasts.
| Specification / Property | Descripción |
|---|---|
| Principio | Joule heating: electrical energy converted to heat via resistance (P = IV or P = I²R) |
| Resistivity | Electrical resistance of material; key for heat generation efficiency and element length/size |
| Resistencia a la oxidación | Ability to resist degradation at high temperatures; alloying elements form protective oxide layers |
| Temperature Coefficient of Resistance (TCR) | Stability of resistance with temperature; low TCR preferred for stable heating output |
| Propiedades mecánicas | Creep resistance, ductility, tensile strength to maintain shape and strength at high temperatures |
| Punto de fusión | Limits maximum operating temperature; materials chosen for high-temp stability (e.g., nichrome, kanthal) |
| Densidad de vatios | Heat output per unit area; affects element temperature and lifespan |
| Power Supply | Voltage and frequency compatibility; typical ratings 120V or 240V |
| Control de temperatura | Use of sensors and controllers; sensor placement critical for accurate temperature regulation |
| Resistencia a la corrosión | Sheath materials protect element from chemical attack; materials include stainless steel, brass, alloys |
You will find that the design of each heating element must balance efficiency, safety, and durability.
Common Appliances That Use a Heating Element
You rely on heating elements in a wide range of household appliances. These components play a crucial role in your daily routines. Here are some of the most common appliances that use a heating element:
- Ovens: The oven heating element provides direct heat for cooking and baking.
- Electric stoves and ranges: These use heating elements to warm pots and pans.
- Water heaters: Heating elements raise water temperature for showers and cleaning.
- Washing machines: The heating element heats water during wash cycles.
- Dishwashers: The dishwasher heating element heats water for cleaning and dries dishes at the end of the cycle.
- Dryers: Heating elements generate hot air to dry clothes.
- Space heaters: These use heating elements to warm rooms.
A study of 1511 appliances showed that washing machines, dishwashers, and electric ovens all rely on heating elements for their core functions. For example, about 6% of people use electricity to heat water during peak evening hours, and 6% use dishwashers at these times. The dishwasher heating element is essential for both washing and drying cycles.
| Appliance Type | Mean Energy Consumption (kWh) | Notes on Heating Element Use |
|---|---|---|
| Washing Machines | Varies by class (e.g., 75.23 for Samsung A) | Heating element for water heating |
| Dishwashers | Similar to washing machines | Dishwasher heating element for water heating and drying |
| Electric Ovens | Alta | Direct heating element for cooking |
| Refrigerators | Bajo | Typically no heating element |
Signs Your Heating Element Needs Replacement
You can spot a failing heating element by watching for several clear signs. These indicators help you decide when to replace the part and restore your appliance’s performance.
- The heating element does not glow bright orange when active.
- You see burns, cracks, or blistering on the element’s surface.
- Food or items do not heat or cook properly, showing uneven or incomplete results.
- Excessive dirt or buildup appears on the element, which can cause damage.
- Your electricity bill rises unexpectedly, as a faulty element may draw more power.
For example, if your oven heating element fails to glow or your dishwasher heating element leaves dishes wet and dirty, you likely need a replacement. The dishwasher heating element often shows visible damage or buildup, which you should check during routine maintenance. If you notice any of these issues, consider inspecting the dishwasher heating element closely.
Tip: Regularly inspect your dishwasher heating element for buildup or damage. Early detection can prevent more serious appliance problems.
Safety Steps Before You Replace Heating Element
Essential Safety Precautions for Heating Element Replacement
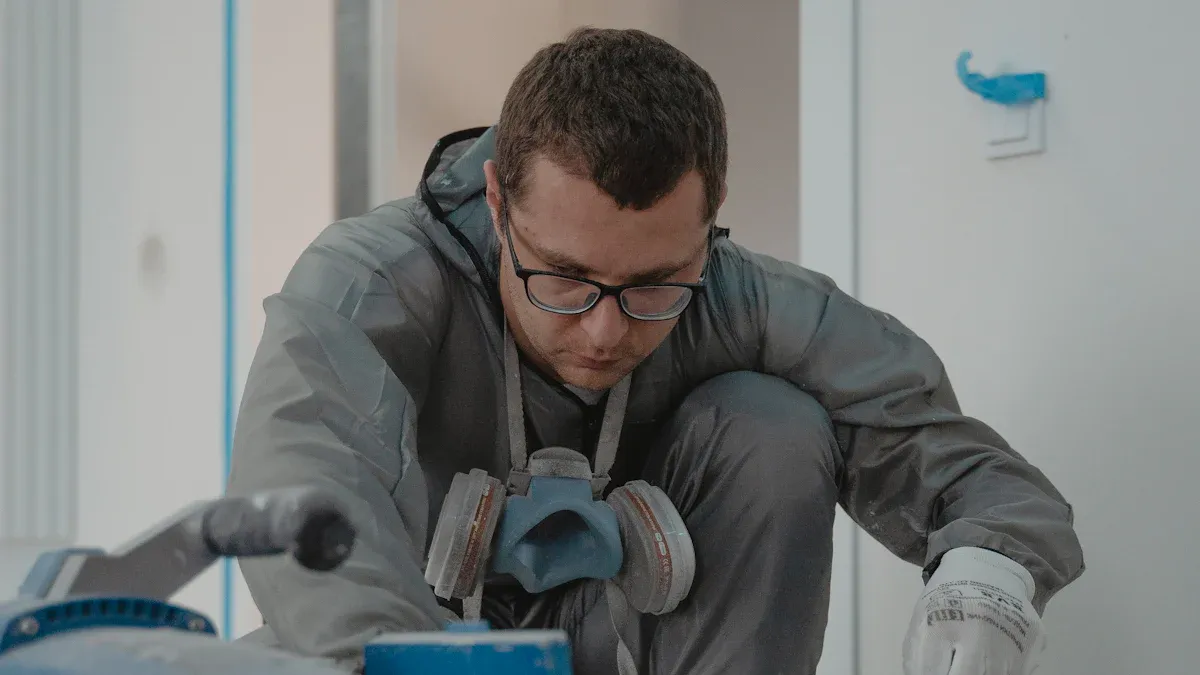
You must always prioritize safety when working with any appliance. Start by disconnecting the appliance from its power source. Unplug the unit or switch off the circuit breaker to prevent electrical shock. If you work with a water heater or dishwasher, turn off the water supply as well. Allow the appliance to cool completely before you touch any internal parts. Hot surfaces can cause burns. Wear safety gloves and protective eyewear to shield yourself from sharp edges and debris. Keep your workspace dry and free of clutter. Water and electricity create a dangerous combination. Always double-check that you have removed all sources of power before you begin.
⚠️ Consejo: Never attempt to replace a heating element if you feel unsure about the process. Consult a professional if you encounter any uncertainty.
Tools and Materials Needed for the Job
You need the right tools and materials to ensure a smooth and safe replacement process. Gather these items before you start:
- Replacement heating element specific to your appliance model
- Screwdrivers (Phillips and flathead)
- Adjustable wrench or socket wrench set
- Pipe wrench (for water heaters)
- Plumber’s Teflon tape (for threaded connections)
- Bucket or hose (for draining water from water heaters or dishwashers)
- Work gloves and safety goggles
- Multimeter (for electrical testing)
- Towels or rags (to clean up spills)
Having these tools ready helps you avoid interruptions and reduces the risk of accidents. You should also keep the appliance manual nearby for reference. Manufacturers often include diagrams and instructions that make the process easier.
How to Locate the Heating Element in Your Appliance
You can find the heating element by consulting your appliance’s manual or looking for online diagrams. In ovens and electric ranges, the heating element usually sits at the bottom or top of the cooking chamber. For dishwashers, the element appears as a thick metal loop at the base of the tub. Water heaters often have the heating element installed behind an access panel on the side of the tank. Unplug the appliance and remove any necessary panels or covers. Use a flashlight to inspect the area. Look for wires connected to a metal rod or coil. If you have trouble identifying the part, take a photo and compare it to images in the manual or on the manufacturer’s website.
🔍 Nota: Locating the heating element correctly ensures you replace the right component and avoid unnecessary disassembly.
Diagnosing a Faulty Heating Element
Inspección visual del elemento calefactor
You can often spot problems with a heating element by looking closely at its surface. Start by unplugging the appliance and letting it cool. Use a flashlight to check for visible damage. Look for signs such as cracks, blisters, or burn marks. These marks usually indicate that the element has overheated or failed. In ovens and dryers, a working heating element often glows red or orange when in use. If you see dark spots or areas that do not heat, you may have a faulty heating element. Sometimes, you will notice broken or separated coils. Dirt or mineral buildup can also cause the element to work less efficiently. Cleaning the surface may help, but if you see physical damage, you should plan to replace the part.
🔎 Consejo: Take a clear photo of the heating element before removing it. This helps you compare the old and new parts and ensures correct installation.
How to Test a Heating Element with a Multimeter
You can confirm if a heating element works by testing it with a multimeter. Set your multimeter to the lowest resistance (ohms) setting. Disconnect the appliance from power. Remove the wires from the heating element terminals. Touch one probe to each terminal. A good heating element will show a low resistance reading, usually between 10 and 100 ohms, depending on the appliance. If the display shows “OL” (open line) or infinite resistance, the circuit is broken. This means the heating element no longer conducts electricity and needs replacement. If you get a reading of zero, the element may have shorted out. Always check your appliance manual for the correct resistance range.
| Lectura del multímetro | Qué significa |
|---|---|
| 10-100 ohms | Element is working |
| “OL” or infinite | Element is broken |
| 0 ohmios | Element is shorted |
⚡ Nota: Always disconnect power before testing. This prevents electric shock and protects your multimeter.
Other Causes of Heating Problems
You may find that your appliance still does not heat after replacing the heating element. Several other issues can cause heating problems. Check the following possibilities:
- Faulty temperature sensors can prevent proper heating in ovens.
- Tripped circuit breakers may cut power to the appliance.
- Improper installation or loose wiring can interrupt the electrical flow.
- Control panel locks or settings may block the heating cycle.
- Oven doors that do not close properly allow heat to escape.
- In gas appliances, cracked heat exchangers or leaking gas lines can cause safety hazards.
- Blockages in venting systems or incomplete combustion can reduce heating efficiency.
Proper installation and regular maintenance help prevent these issues. Building codes require automatic outdoor venting for water heaters and furnaces to reduce indoor air pollution. Even with these standards, problems can occur if you do not install or maintain appliances correctly. Scientific studies show that well-installed devices with proper flues rarely cause harmful indoor pollution.
🛠️ Consejo: If you cannot find the cause of the problem, consult a professional technician. Safety should always come first.
Step-by-Step Guide to Oven Heating Element Replacement
Cómo retirar el elemento calefactor del horno antiguo
You can remove the old oven heating element by following a systematic approach. Begin by turning off the power supply at the circuit breaker or unplugging the electric oven. Always wear protective gloves and safety goggles before starting. Remove all oven racks to create space for your work. Some users find it helpful to remove the oven door for better access, though this step is optional.
Locate the oven heating element inside the cooking chamber. You will usually see it attached with two screws at the back wall or floor of the oven. Use a screwdriver to remove these screws. Gently pull the mounting bracket and the heating element toward you. The element will remain connected to the oven by two spade wire connectors. Use pliers to disconnect these wires, taking care not to let them slip back into the oven wall.
⚡ Consejo: Always double-check that the oven is completely disconnected from power before you touch any internal components.
Most users report that removing an old oven heating element is straightforward and safe when you follow these steps. Some people choose to pull the stove out and remove the back cover for easier wire access, but this is not always necessary. Replacement parts can be expensive, so handle the old element carefully in case you need to compare it with the new one.
Installing the New Oven Heating Element
You can install the new oven heating element by reversing the removal process. First, match the new part to your appliance model to ensure compatibility. Insert the new heating element into the mounting holes. Reconnect the spade wire connectors securely using pliers. Make sure the connections are tight to prevent electrical faults.
Push the mounting bracket into place and use a screwdriver to fasten the screws tightly. Reinstall the oven racks and, if removed, the oven door. Confirm that no wires are exposed and that the heating element sits evenly in its position.
🛠️ Nota: Always follow the manufacturer’s instructions for your specific oven model. This ensures a safe and effective heating element replacement.
Testing the Oven After Heating Element Replacement
You must test the new oven heating element before regular use. Restore power by plugging in the oven or turning on the circuit breaker. Set the oven to bake and observe the new element. It should glow orange within a few minutes, indicating proper function.
To verify temperature accuracy, place an oven thermometer inside and preheat the oven. Compare the thermometer reading to the set temperature. If the readings match, you have completed the replacement successfully. If you notice any issues, such as the element not heating or uneven temperatures, double-check the wire connections and mounting screws.
🔍 Consejo: Always test new oven heating element performance with an oven thermometer. This step ensures your appliance heats accurately and safely.
A step-by-step approach helps you replace heating element parts efficiently. You can avoid unnecessary costs and extend the life of your electric oven by following these guidelines.
How to Replace Heating Element in Electric Ranges and Dryers
Removing the Old Heating Element in Electric Ranges
You can remove the old range heating element by following a systematic approach. Always begin by turning off the power. Unplug the appliance and switch off the circuit breaker to eliminate the risk of electric shock. Safety must come first when you work with any electrical component.
Next, remove the bottom broiler pan to access the heating element. Locate the screws that secure the range heating element in place. Use a screwdriver to remove these screws. Gently pull the heating element out from its position. Take care not to damage the wires connected to the terminals. Disconnect the metal spade connectors from the old element. If you encounter resistance, wiggle the connectors gently rather than forcing them.
⚠️ Consejo: Always match the replacement part number or model number to your appliance. This step ensures you use the correct range heating element and avoid compatibility issues.
Installing the New Heating Element in Electric Ranges
You can install the new heating element by reversing the removal steps. Use only UL or ETL/Intertek listed parts to meet industry safety standards. Identify the correct replacement by checking the part number or model number on your appliance.
Follow these steps for a safe and effective installation:
- Attach the spade connectors securely to the new heating element terminals.
- Push the new element back into the oven cavity.
- Reinstall the screws to secure the element in place.
- Restore power by plugging in the appliance and switching on the circuit breaker.
- Test the new element by setting the oven to 350°F. Observe the element to ensure it glows red and heats evenly.
- Use an oven thermometer to verify the temperature accuracy.
If you notice heavy or continuous smoke, unplug the appliance and turn off the circuit breaker immediately. Certified Appliance Accessories recommends professional installation for oven baking elements due to potential risks. However, many homeowners complete heating element replacement successfully by following these steps.
🛡️ Nota: Never skip the power-off step. This precaution protects you from electrical hazards during range heating element installation.
Dryer Heating Element Replacement Steps
You can replace a dryer heating element with careful preparation and attention to detail. This repair ranks among the most common DIY appliance fixes. Many users report high success rates when they follow clear instructions.
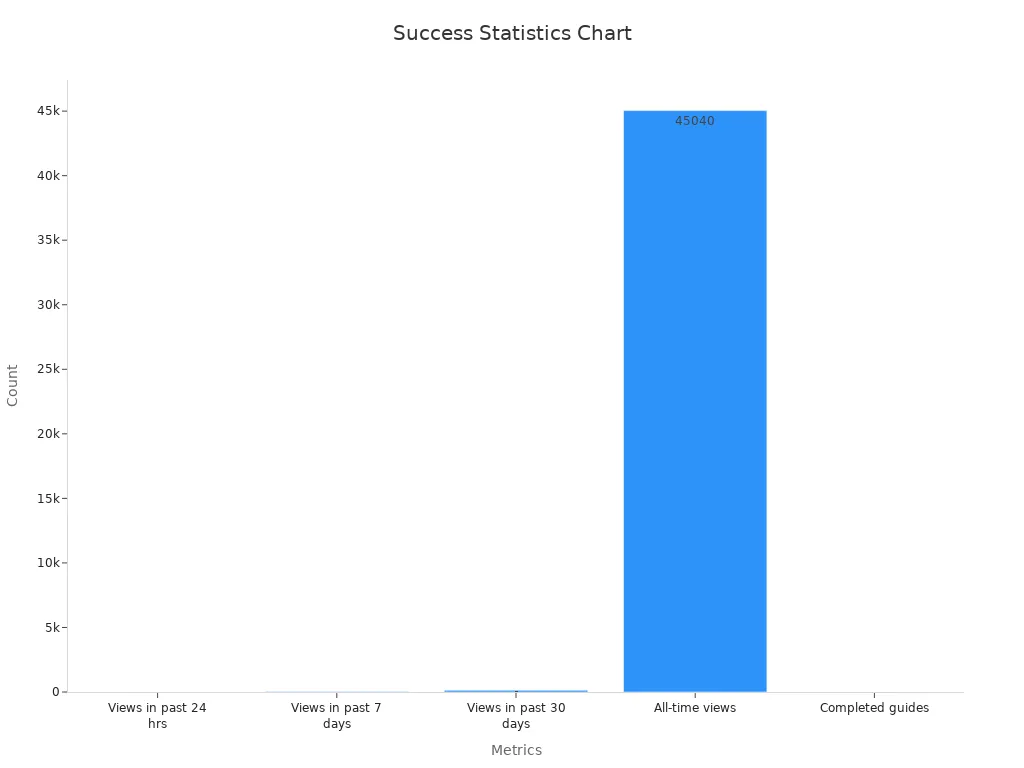
| Métrica | Count |
|---|---|
| Views in past 24 hrs | 9 |
| Views in past 7 days | 35 |
| Views in past 30 days | 136 |
| All-time views | 45,040 |
| Completed guides | 9 |
- The article on dryer heating element replacement has been viewed 335,760 times.
- It holds a 100% helpfulness rating based on user feedback.
- Readers praise the instructions as accurate and complete.
Begin by unplugging the dryer and turning off the circuit breaker. Remove the back panel or access panel, depending on your dryer model. Locate the heating element, which often appears as a metal coil or housing near the blower. Disconnect the wires from the terminals. Remove any screws or fasteners holding the element in place. Slide out the old heating element and insert the new one. Reattach the wires and secure the element with screws. Replace the panel and restore power. Run a test cycle to confirm the dryer heats properly.
🔧 Consejo: Always consult your dryer’s manual for model-specific instructions. Proper installation ensures safe and efficient operation after heating element replacement.
Dishwasher Heating Element Replacement Process
How to Access the Dishwasher Heating Element
You can access the dishwasher heating element by following a systematic approach. Start by disconnecting the dishwasher from its power source. Unplug the appliance or switch off the circuit breaker. Wait for the dishwasher to cool before you begin. Open the dishwasher door and remove the lower dish rack. You will see the dishwasher heating element as a thick metal loop at the bottom of the tub.
To ensure you address the correct issue, test the continuity from the control board to the dishwasher heating element. This step confirms electrical connectivity. Many dishwashers store technical instruction sheets behind the lower kick plate. Use these sheets to enter service diagnostic modes. Press the correct button sequence to run a self-test. The dishwasher will check the heating element and related components. If you suspect a control issue, perform a power cycle by shutting off the circuit breaker for several minutes. Restore power and observe if the dishwasher heating element operates during a wash or dry cycle. Look for steam or feel for heat inside the tub.
🔎 Consejo: Always check the high temperature thermostat. Unplug its wires to isolate and test its effect on the dishwasher heating element operation.
Removing and Replacing the Dishwasher Heating Element
You can replace heating element in dishwasher models by following these steps:
- Verify that the dishwasher heating element is the source of the problem. Confirm the complaint and rule out external factors.
- Disconnect the electricity by unplugging the dishwasher or turning off the circuit breaker.
- Use an ohmmeter to test the dishwasher heating element terminals for shorts or continuity. A reading outside the normal range indicates a faulty part.
- Remove the wire terminals from the dishwasher heating element. Pull gently to avoid damaging the connectors.
- Access the underside of the dishwasher. Loosen the locknuts that secure the dishwasher heating element to the tub.
- Carefully lift the old dishwasher heating element out from inside the tub.
- Insert the new dishwasher heating element through the mounting holes. Secure it with the locknuts from below.
- Reconnect the wire terminals to the new dishwasher heating element.
⚠️ Nota: Always avoid contact between wiring and metal surfaces during testing. This precaution reduces the risk of electrical hazards.
Testing the Dishwasher After Heating Element Replacement
After you replace heating element in dishwasher units, you must test the appliance to confirm proper operation. Restore power to the dishwasher. Run a normal wash and dry cycle. Observe the dishwasher heating element during the cycle. You should see steam or feel heat inside the tub. Some dishwashers allow you to enter a diagnostic mode using the instruction sheet. This mode checks the dishwasher heating element and other components.
If the dishwasher heating element does not produce heat, double-check all connections. Make sure the high temperature thermostat functions correctly. Perform another continuity test if needed. Reset the control system by cycling the power. These steps help you confirm a successful heating element replacement and restore your dishwasher’s performance.
✅ Consejo: Always monitor the first cycle after installing a new dishwasher heating element. Early detection of issues prevents further damage.
Troubleshooting and Maintenance After Heating Element Replacement
What to Do If the Appliance Still Doesn’t Heat
You may finish a dishwasher heating element replacement and still find your appliance does not heat. Start with basic heating element troubleshooting. Confirm that you restored power to the appliance. Check the circuit breaker and ensure the outlet works. Inspect the control settings to verify you selected the correct cycle. Sometimes, a dishwasher heating element will not activate if the door latch fails or the high-limit thermostat malfunctions. Examine the wiring for loose or disconnected terminals. If you see no visible issues, use a multimeter to test the dishwasher heating element for continuity. A reading outside the normal range signals a faulty part. If the element tests fine, review the control board and sensors. These components can prevent the dishwasher heating element from operating. If you feel uncertain about how to fix heating element problems, consult a qualified technician.
💡 Tip: Always allow the appliance to cool before you begin any inspection or testing.
Double-Checking Connections and Installation
Careful installation of a dishwasher heating element ensures reliable performance. Double-checking your work helps prevent common failures. Use two wrenches when tightening or loosening electrical terminals. This method prevents twisting or fracturing the epoxy seal, which protects the dishwasher heating element from water intrusion. Avoid bending, pushing, or twisting the electrical terminal during installation. These actions can damage the epoxy potting and lead to premature failure. Improper installation may cause shorts, resulting in GFCI tripping and rapid heater failure. Always disconnect all electrical power before you inspect, repair, or test the dishwasher heating element. After installation, test the heater element with an ohm meter. Disconnect the power leads first, then verify the reading matches the manufacturer’s specifications. If a replacement heater fails quickly, review your installation steps. Rapid failure often points to overlooked issues during the process.
⚠️ Note: Double-checking every connection and installation step increases the lifespan of your dishwasher heating element and reduces the risk of repeat repairs.
Maintenance Tips for Longer Heating Element Life
You can extend the life of your dishwasher heating element with regular maintenance. Clean the element and surrounding area to remove mineral deposits and debris. Hard water can cause buildup on the dishwasher heating element, reducing efficiency and increasing the risk of overheating. Run a cleaning cycle with a dishwasher-safe descaler every few months. Inspect the element for signs of wear, such as discoloration or pitting. Address any leaks in the tub or door seal promptly. Water intrusion can damage the electrical terminals and the epoxy seal of the dishwasher heating element. Check the wiring and connections during routine maintenance. Tighten any loose terminals and replace damaged wires. Use only manufacturer-approved replacement parts for any heating element replacement. This practice ensures compatibility and safety. Schedule professional inspections if you notice repeated heating issues or rapid element failure.
🛠️ Tip: Preventative care and routine checks help you avoid costly repairs and keep your dishwasher heating element working efficiently.
Is Heating Element Replacement Worth Doing Yourself?
Cost Comparison: DIY vs. Professional Heating Element Replacement
You may wonder if handling a heating element replacement on your own will save money. The answer depends on the type of appliance, your skill level, and the complexity of the job. Many homeowners choose the DIY route to avoid labor charges and reduce overall repair costs. However, you should consider all expenses before making a decision.
Here is a breakdown of typical costs for heating element replacement and related repairs:
| Componente de costo | Cost Range (USD) |
|---|---|
| Electric Dryer Heating Element | $90 to $250 |
| Gas Dryer Burner Assembly | $100 to $350 |
| Professional Labor | $60 to $150 per hour |
| Dryer Vent Cleaning (Pro) | Up to $200 |
| Additional Parts | |
| – Timer | Alrededor de $100 |
| – Sensor(s) | Around $20 |
| – Thermal Fuse | Around $15 |
| – Igniter (gas) | Alrededor de $30 |
| – Flame Sensor (gas) | Around $20 |
| – Valve Coils | Alrededor de $10 |
If you complete the repair yourself, you pay only for the parts. You avoid the hourly labor fees charged by an appliance repair technician. However, you risk misdiagnosing the problem or damaging other components, which can increase your total expenses. Some newer appliances have higher parts costs, but they may also include warranties that cover heating element replacement. The complexity of your dryer or oven model can also affect the final price.
💡 Consejo: Always check your appliance warranty before starting a DIY repair. Some manufacturers require a certified appliance repair technician for warranty coverage.
When to Call a Professional for Heating Element Issues
You should recognize when a repair is best left to a professional. Certain situations require advanced skills, tools, or knowledge. Attempting a complex heating element replacement without proper training can lead to safety hazards and costly mistakes.
- Installing a water heater involves plumbing, gas lines, and electrical work. These tasks demand specialized expertise.
- Professionals ensure your installation meets current codes and safety standards.
- Hiring an appliance repair technician helps you avoid errors that could result in water leaks, electrical hazards, or the need for additional repairs.
- Professionals handle permits and inspections, ensuring your project complies with local laws.
- An experienced technician can recommend the best replacement options and provide warranties for their work.
In many cases, hiring a professional proves safer and more cost-effective than a DIY approach. For example, water heater installation requires extensive labor and knowledge. A certified appliance repair technician ensures the job meets building codes and avoids hazards related to gas or electrical work.
⚠️ Nota: If you feel unsure about any step or face a complex repair, contact a qualified appliance repair technician. Your safety and the long-term reliability of your appliance should always come first.
You can tackle heating element replacement as a practical DIY project. With the right tools, clear instructions, and a focus on safety, you save money and extend your appliance’s lifespan.
- Always disconnect power before starting.
- Double-check each connection.
- Use manufacturer-approved parts.
🛠️ If you feel uncertain at any step, consult a professional. Your safety and the reliability of your appliance come first.
PREGUNTAS FRECUENTES
How often should you replace a heating element in home appliances?
You should replace a heating element when you notice signs of failure, such as uneven heating or visible damage. Most elements last several years with normal use. Regular inspection helps you catch problems early.
¿Puede utilizar cualquier elemento calefactor para su aparato?
No. You must use a heating element designed for your specific appliance model. Check the part number in your manual or on the manufacturer’s website to ensure compatibility.
What safety gear do you need for heating element replacement?
You need insulated gloves and safety goggles. These protect you from electrical shock and sharp edges. Always disconnect power before you start any repair.
How do you know if the new heating element works?
After installation, restore power and run a test cycle. The element should heat up as expected. Use a thermometer or observe for proper operation. If it does not heat, double-check your connections.
¿Es seguro sustituir una resistencia uno mismo?
You can safely replace a heating element if you follow all safety steps and use the correct tools. If you feel unsure at any point, contact a professional technician.
What tools do you need for most heating element replacements?
You usually need a screwdriver, adjustable wrench, multimeter, and sometimes pliers. Your appliance manual lists any special tools required for your specific model.
Will replacing the heating element fix all heating problems?
No. Other issues, such as faulty thermostats, wiring problems, or control board failures, can also cause heating problems. If the new element does not solve the issue, investigate these other components.

