
Achieving high hatch rates starts with mastering temperature control. The right incubator Heizelement delivers stable warmth, ensuring optimal heat distribution throughout your incubator. Leading Hersteller von Heizelementen, like Jinzhong Elektroheizung, create components far more precise than generic Heizelemente für Haushaltsgeräte. You must maintain a very specific temperature range for embryonic development.
| Incubation Period/Condition | Temperaturbereich (°C) | Outcome/Observation |
|---|---|---|
| Overall Optimum | 37.5–37.7 | Optimum for development; variance reduces hatchability |
| Days 1 to 18 | 37.5–37.8 | Fixed incubator temperature |
| Hatching Period | 36.1–37.2 | Fixed incubator temperature |
This level of precision makes your Heating Element the true heart of the entire system.
The Role of the Incubator Heating Element in Successful Hatches
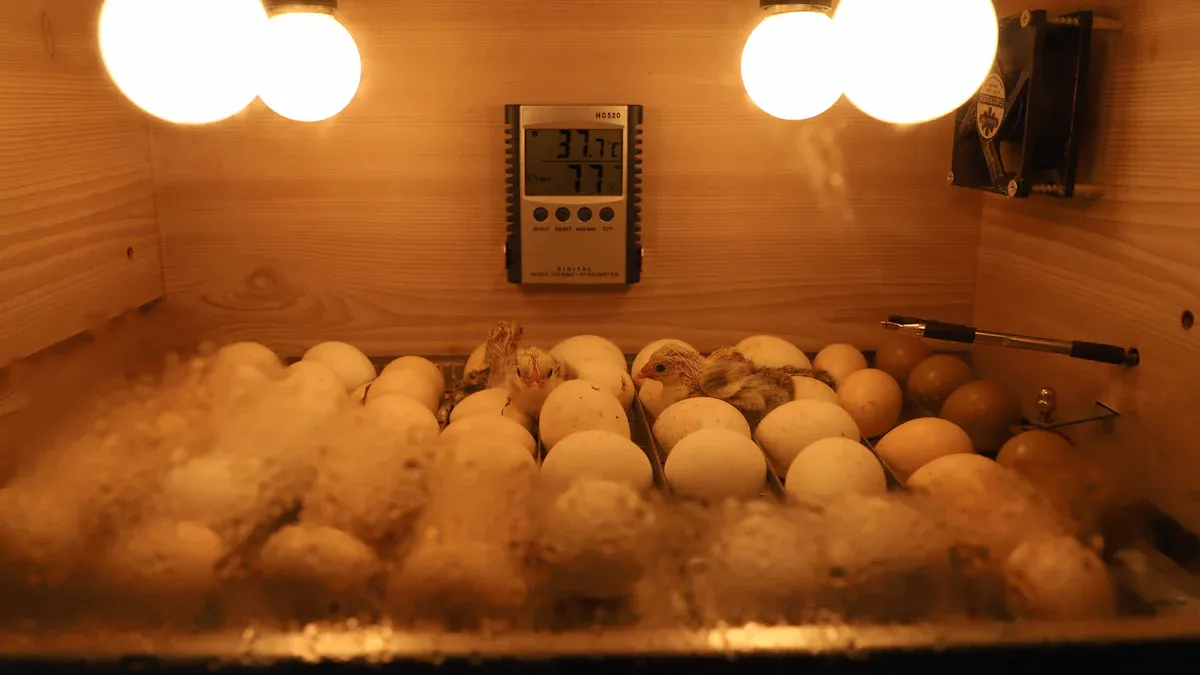
An excellent incubator heating element is the cornerstone of successful egg incubation. It does more than just produce warmth; it creates the stable, life-sustaining environment embryos need to thrive. Understanding its role is the first step toward mastering your hatch rates.
Why Consistent Heat is Non-Negotiable
Temperature stability is the single most critical factor in incubation. Even minor fluctuations can have devastating consequences. You must provide a consistent thermal environment for the entire incubation period.
Impact on Embryo Development
Embryos are incredibly sensitive to temperature shifts. Consistent heat ensures that all developmental stages proceed on schedule.
- Cell Division: Proper temperatures drive the rapid cell division that forms organs and body systems.
- Metabolic Rate: Heat regulates the embryo’s metabolism, controlling how efficiently it uses the yolk’s nutrients.
- Hatching Timeline: Stable warmth keeps all embryos developing at a similar pace, leading to a more synchronized and successful hatch.
Anmerkung: Temperatures that are too high can cause deformities or death, while temperatures that are too low can slow or completely halt development, leading to weak chicks or failed hatches.
Preventing Hatch Failures
Many common hatch failures trace back to poor temperature control. The right heating elements, paired with a quality thermostat, prevent these issues. They work to eliminate hot and cold spots, ensuring every egg receives the same ideal temperature. This consistency directly translates to higher hatchability and healthier chicks.
Understanding Heat Transfer in an Incubator
How your incubator moves warmth from the heating elements to the eggs is fundamental. The two primary methods are radiant and convected heat, and their effectiveness is tied directly to air circulation.
Radiant vs. Convected Heat
You will encounter two main types of heat transfer in an incubator.
| Heat Type | Beschreibung |
|---|---|
| Radiant Heat | Heat travels in straight lines from a hot surface (like a ceramic emitter) to a cooler object (the egg). |
| Convected Heat | Heat is transferred through the movement of air. A fan blows air across a heating element and circulates it. |
While both can work, convected heat generally provides more uniform heat distribution throughout the entire machine.
The Importance of Air Circulation
Effective air circulation is crucial for creating a uniform environment. Without it, heat naturally rises, and different gas molecules settle, creating inconsistent microenvironments. Fan-assisted systems actively counteract this. A fan ensures a homogeneous distribution of temperature and humidity. This active circulation prevents temperature gradients, ensuring every egg—whether at the top, bottom, or in a corner—experiences the same conditions. This uniformity is essential for sensitive embryonic development and achieving consistent, successful results.
A Deep Dive into the Main Types of Heating Elements
Selecting the right component is critical for your incubator’s performance. The market offers several types of heating elements, each with distinct characteristics. You must understand how each one works to match it to your specific needs and achieve consistent, successful hatches.
Silicone Wire and Cable Heaters
Silicone wire heaters are one of the most versatile options available, especially for custom or do-it-yourself (diy) projects. Their unique construction gives you significant design freedom.
How Silicone Heaters Work
These heaters consist of a flexible resistance wire encased in a durable, waterproof silicone sheath. You apply an electrical current to the wire. The wire resists the flow of electricity, which generates predictable and controllable heat. The silicone coating insulates the wire electrically while efficiently transferring thermal energy to the surrounding air.
Pros: Flexibility and Even Heat
The primary advantage of silicone heaters is their incredible flexibility. You can bend and shape the wire to fit the exact layout of your incubator. This allows you to distribute the heat source evenly across a wide area, which is excellent for minimizing hot and cold spots when paired with a fan.
- Customizable Layouts: Easily route the wire around fans, water trays, and other internal components.
- Uniform Heating: Spreading the heat source prevents intense hot spots that can form under more concentrated elements.
- Water-Resistant: The silicone sheath offers good protection against the high humidity inside an incubator.
Cons: Slower Heat-Up Time
Silicone heaters generally have lower power density compared to metal or ceramic options. This means they take longer to bring your incubator up to the target temperature from a cold start. They also have more thermal inertia, so they cool down more slowly. This requires a well-tuned thermostat to prevent temperature overshoots.
Best For: DIY and Forced-Air Setups
The flexibility and even heating profile make silicone wire ideal for a homemade incubator. You can create a custom heating array perfectly suited to your design. They perform best in forced-air incubators, where a fan circulates air across the widely distributed wires, ensuring a perfectly uniform internal temperature.
Ceramic Heating Emitters
Ceramic heating emitters are a popular choice for their durability and unique heating method. They are robust, long-lasting, and operate without producing any light.
How Ceramic Emitters Function
These devices, often shaped like a light bulb with a flat or concave surface, contain a resistance coil embedded within a ceramic body. When energized, the coil heats the ceramic, which then emits long-wave infrared radiation. This infrared energy travels through the air and warms any objects it strikes, including the eggs and internal surfaces of the incubator.
Pros: Durability and No-Light Heat
Ceramic infrared heaters are extremely durable and can last for thousands of hours. Their key benefit is that they produce heat without any visible light, a feature known as “no-light” heat.
Why No-Light Heat Matters Constant light can disrupt the natural day-night cycles of developing embryos, potentially causing stress and affecting hatch rates. Ceramic emitters provide pure heat, creating a more natural and stable environment.
Cons: Potential for Hot Spots
Because ceramic infrared heaters emit radiant heat in a directional manner, they can create intense hot spots on eggs positioned directly beneath them. Without proper placement and air circulation, this can lead to uneven development. You must carefully position the emitter to ensure it provides broad, indirect warmth rather than focused, direct heat.
Best For: Still-Air and Longevity
These heaters are a good option for still-air incubators, where their radiant heat can create a natural temperature gradient. They are also excellent for anyone prioritizing a long-lasting, low-maintenance heating solution. For advanced setups, you can explore different types of ceramic heaters.
| Heizgerät Typ | Energie-Effizienz | Anmerkungen |
|---|---|---|
| MCH Ceramic Heater | Saves 20-30% energy over PTC for the same effect | High-efficiency and environmentally friendly. A modern choice for energy-conscious users. |
| PTC Ceramic Heater | Less energy-saving | Power output can decrease as the element ages. However, it offers excellent safety features. |
Metal Sheathed and Cartridge Heaters
When you need serious heating power for large-capacity incubators, metal sheathed elements are the professional standard. These are robust, high-wattage components built for performance.
How Metal Sheathed Heaters Operate
These heating elements feature a nickel-chromium resistance coil housed inside a protective metal tube, often made of stainless steel. The space between the coil and the sheath is filled with a compacted powder like magnesium oxide, which provides excellent electrical insulation and thermal conductivity. The entire assembly is sealed to protect it from moisture and damage.
Pros: Rapid Heating and High Power
The main advantage of metal sheathed heaters is their ability to generate a large amount of heat very quickly. Their high power density makes them perfect for bringing large air volumes up to temperature and recovering that temperature rapidly after you open the incubator door.
Cons: Requires a Fan for Distribution
This high power is also their biggest challenge. A metal sheathed heater is extremely concentrated and will create dangerous hot spots if you do not use it with a powerful fan. The fan is not optional; it is an essential safety and performance component needed to distribute the intense heat and create a uniform environment.
Best For: Large Commercial Incubators
You will typically find these powerful heating elements in large cabinet-style or commercial incubators that hold hundreds or thousands of eggs. Their raw power and fast response time are necessary to maintain stable temperatures in such a large space, making them unsuitable for smaller, hobbyist-level machines.
PTC (Positive Temperature Coefficient) Heaters
Temperature stability is the single most critical factor in incubation. Even minor fluctuations can have devastating consequences. You must provide a consistent thermal environment for the entire incubation period.
Impact on Embryo Development
Embryos are incredibly sensitive to temperature shifts. Consistent heat ensures that all developmental stages proceed on schedule.
- Cell Division: Proper temperatures drive the rapid cell division that forms organs and body systems.
- Metabolic Rate: Heat regulates the embryo’s metabolism, controlling how efficiently it uses the yolk’s nutrients.
- Hatching Timeline: Stable warmth keeps all embryos developing at a similar pace, leading to a more synchronized and successful hatch.
Anmerkung: Temperatures that are too high can cause deformities or death, while temperatures that are too low can slow or completely halt development, leading to weak chicks or failed hatches.
Preventing Hatch Failures
Many common hatch failures trace back to poor temperature control. The right heating elements, paired with a quality thermostat, prevent these issues. They work to eliminate hot and cold spots, ensuring every egg receives the same ideal temperature. This consistency directly translates to higher hatchability and healthier chicks.
Understanding Heat Transfer in an Incubator
How your incubator moves warmth from the heating elements to the eggs is fundamental. The two primary methods are radiant and convected heat, and their effectiveness is tied directly to air circulation.
Radiant vs. Convected Heat
You will encounter two main types of heat transfer in an incubator.
| Heat Type | Beschreibung |
|---|---|
| Radiant Heat | Heat travels in straight lines from a hot surface (like a ceramic emitter) to a cooler object (the egg). |
| Convected Heat | Heat is transferred through the movement of air. A fan blows air across a heating element and circulates it. |
While both can work, convected heat generally provides more uniform heat distribution throughout the entire machine.
The Importance of Air Circulation
Effective air circulation is crucial for creating a uniform environment. Without it, heat naturally rises, and different gas molecules settle, creating inconsistent microenvironments. Fan-assisted systems actively counteract this. A fan ensures a homogeneous distribution of temperature and humidity. This active circulation prevents temperature gradients, ensuring every egg—whether at the top, bottom, or in a corner—experiences the same conditions. This uniformity is essential for sensitive embryonic development and achieving consistent, successful results.
A Deep Dive into the Main Types of Heating Elements
Selecting the right component is critical for your incubator’s performance. The market offers several types of heating elements, each with distinct characteristics. You must understand how each one works to match it to your specific needs and achieve consistent, successful hatches.
Silicone Wire and Cable Heaters
Silicone wire heaters are one of the most versatile options available, especially for custom or do-it-yourself (diy) projects. Their unique construction gives you significant design freedom.
How Silicone Heaters Work
These heaters consist of a flexible resistance wire encased in a durable, waterproof silicone sheath. You apply an electrical current to the wire. The wire resists the flow of electricity, which generates predictable and controllable heat. The silicone coating insulates the wire electrically while efficiently transferring thermal energy to the surrounding air.
Pros: Flexibility and Even Heat
The primary advantage of silicone heaters is their incredible flexibility. You can bend and shape the wire to fit the exact layout of your incubator. This allows you to distribute the heat source evenly across a wide area, which is excellent for minimizing hot and cold spots when paired with a fan.
- Customizable Layouts: Easily route the wire around fans, water trays, and other internal components.
- Uniform Heating: Spreading the heat source prevents intense hot spots that can form under more concentrated elements.
- Water-Resistant: The silicone sheath offers good protection against the high humidity inside an incubator.
Cons: Slower Heat-Up Time
Silicone heaters generally have lower power density compared to metal or ceramic options. This means they take longer to bring your incubator up to the target temperature from a cold start. They also have more thermal inertia, so they cool down more slowly. This requires a well-tuned thermostat to prevent temperature overshoots.
Best For: DIY and Forced-Air Setups
The flexibility and even heating profile make silicone wire ideal for a homemade incubator. You can create a custom heating array perfectly suited to your design. They perform best in forced-air incubators, where a fan circulates air across the widely distributed wires, ensuring a perfectly uniform internal temperature.
Ceramic Heating Emitters
Ceramic heating emitters are a popular choice for their durability and unique heating method. They are robust, long-lasting, and operate without producing any light.
How Ceramic Emitters Function
These devices, often shaped like a light bulb with a flat or concave surface, contain a resistance coil embedded within a ceramic body. When energized, the coil heats the ceramic, which then emits long-wave infrared radiation. This infrared energy travels through the air and warms any objects it strikes, including the eggs and internal surfaces of the incubator.
Pros: Durability and No-Light Heat
Ceramic infrared heaters are extremely durable and can last for thousands of hours. Their key benefit is that they produce heat without any visible light, a feature known as “no-light” heat.
Why No-Light Heat Matters Constant light can disrupt the natural day-night cycles of developing embryos, potentially causing stress and affecting hatch rates. Ceramic emitters provide pure heat, creating a more natural and stable environment.
Cons: Potential for Hot Spots
Because ceramic infrared heaters emit radiant heat in a directional manner, they can create intense hot spots on eggs positioned directly beneath them. Without proper placement and air circulation, this can lead to uneven development. You must carefully position the emitter to ensure it provides broad, indirect warmth rather than focused, direct heat.
Best For: Still-Air and Longevity
These heaters are a good option for still-air incubators, where their radiant heat can create a natural temperature gradient. They are also excellent for anyone prioritizing a long-lasting, low-maintenance heating solution. For advanced setups, you can explore different types of ceramic heaters.
| Heizgerät Typ | Energie-Effizienz | Anmerkungen |
|---|---|---|
| MCH Ceramic Heater | Saves 20-30% energy over PTC for the same effect | High-efficiency and environmentally friendly. A modern choice for energy-conscious users. |
| PTC Ceramic Heater | Less energy-saving | Power output can decrease as the element ages. However, it offers excellent safety features. |
Metal Sheathed and Cartridge Heaters
When you need serious heating power for large-capacity incubators, metal sheathed elements are the professional standard. These are robust, high-wattage components built for performance.
How Metal Sheathed Heaters Operate
These heating elements feature a nickel-chromium resistance coil housed inside a protective metal tube, often made of stainless steel. The space between the coil and the sheath is filled with a compacted powder like magnesium oxide, which provides excellent electrical insulation and thermal conductivity. The entire assembly is sealed to protect it from moisture and damage.
Pros: Rapid Heating and High Power
The main advantage of metal sheathed heaters is their ability to generate a large amount of heat very quickly. Their high power density makes them perfect for bringing large air volumes up to temperature and recovering that temperature rapidly after you open the incubator door.
Cons: Requires a Fan for Distribution
This high power is also their biggest challenge. A metal sheathed heater is extremely concentrated and will create dangerous hot spots if you do not use it with a powerful fan. The fan is not optional; it is an essential safety and performance component needed to distribute the intense heat and create a uniform environment.
Best For: Large Commercial Incubators
You will typically find these powerful heating elements in large cabinet-style or commercial incubators that hold hundreds or thousands of eggs. Their raw power and fast response time are necessary to maintain stable temperatures in such a large space, making them unsuitable for smaller, hobbyist-level machines.
Thinking: I will write the section on PTC heaters as requested.
-
Deconstruct the Task:
- Topic: PTC (Positive Temperature Coefficient) Heaters.
- Structure: Follow the
h3undh4outline provided. - Formatting: Use Markdown, including lists, blockquotes, or tables. No dividing lines.
- Word Count: This is a core section, so it needs to be detailed.
- Tone & Style: Professional, second-person (“you”), active voice, simple sentences for high school readability, but with varied sentence structure.
- Evidence Integration: I need to naturally weave in the provided details about how PTC heaters self-regulate and their operating temperatures. I will use an ordered list for the self-regulation process as suggested.
- Keyword Integration: I must use “egg incubators” (2 times) and “ptc heaters” (3 times).
- Final Output: The content must be followed by a “Keyword Usage” summary.
-
Mental Sandbox & Planning:
### PTC (Positive Temperature Coefficient) Heaters: I’ll start with a brief introduction to PTC technology, highlighting its “smart” nature.#### The Science of Self-Regulating PTC Heaters: This is where I’ll integrate the first piece of evidence. The suggested ordered list is perfect for explaining the step-by-step process of self-regulation. I will explain that the material’s resistance increases with temperature, which inherently limits current and heat output. This makes the technology unique.#### Pros: Unmatched Safety and Efficiency: I’ll expand on the self-regulation concept. The primary “pro” is safety—it’s nearly impossible for these to overheat. This is a huge benefit for something as delicate as incubation. I’ll also touch on efficiency. Because they only draw the power needed to maintain temperature, they can be very energy-efficient. I’ll use a blockquote to emphasize the safety aspect.#### Cons: Limited Power Output: This is the trade-off for safety. I’ll explain that PTC heaters are not high-wattage powerhouses like metal sheathed elements. Their self-limiting nature means they have a ceiling on their heat output. I will also incorporate the second piece of evidence here. I’ll mention that while the surface can get hot (around 220-230°C), the overall power is limited, making them unsuitable for very large spaces. This is a good place to use the “ptc heaters” keyword.#### Best For: Small to Medium Egg Incubators: This section logically follows from the “Cons”. I’ll state clearly that their safety and moderate power make them the perfect choice for hobbyist-level or small-to-medium egg incubators. I will use the keywords “egg incubators” and “ptc heaters” here to meet the count. I’ll summarize by saying you get peace of mind and stable temperatures without the risk of overheating associated with more powerful elements.
-
Drafting and Keyword/Evidence Placement:
- Intro: Introduce PTC heaters.
- Science: Use the ordered list from Evidence 1 to explain the self-regulation process.
- Vorteile: Talk about safety and efficiency. Use a blockquote.
- Nachteile: Discuss limited power. Mention the surface temperature from Evidence 2 (220-230°C) to illustrate that while the surface is hot, the overall wattage is low. Use “ptc heaters” here.
- Best For: Connect the pros and cons. State they are ideal for “small to medium egg incubators”. Use “ptc heaters” and “egg incubators” again to finalize the keyword count.
-
Review and Refine:
- Read through the entire section.
- Check for active voice and second-person perspective (“you”).
- Ensure sentence structure is varied but still easy to understand.
- Verify all subheadings are present.
- Confirm evidence is integrated naturally.
- Count the keywords: “egg incubators” (2/2), “ptc heaters” (3/3). Perfect.
- Create the final “Keyword Usage” summary.
This plan covers all instructions and ensures a well-structured, informative, and compliant output.
PTC (Positive Temperature Coefficient) Heaters
PTC heaters represent a modern and intelligent approach to incubator heating. These components are not just simple resistors; they are “smart” devices that actively manage their own temperature, offering a unique combination of safety and reliability.
The Science of Self-Regulating PTC Heaters
A PTC heating element is a special type of thermistor. Its electrical resistance dramatically increases as its temperature rises. This intrinsic property allows it to self-regulate without complex external controls. You get a heating system that is inherently stable. The process works in a continuous feedback loop:
- At room temperature, the PTC element has very low resistance, which allows electrical current to flow freely when you apply voltage.
- This flow of current generates heat, causing the element’s temperature to rise.
- As the temperature climbs, the material’s resistance increases significantly.
- This higher resistance restricts the flow of current, which automatically reduces heat generation.
- The element settles at a stable operating temperature, preventing overheating by design.
This self-limiting behavior is the key differentiator that sets PTC technology apart from other heating methods.
Pros: Unmatched Safety and Efficiency
The greatest advantage of PTC heaters is their built-in safety. Because they physically cannot overheat past their designed temperature, they eliminate a major risk factor in incubation.
Peace of Mind by Design 🛡️ The self-regulating nature of a PTC heater means it will not become dangerously hot, even if your thermostat fails. This provides an unparalleled level of protection for your developing embryos.
This technology is also highly efficient. The heater automatically reduces its power consumption as it reaches the target temperature, drawing only the minimal energy required to maintain that heat. This results in lower energy bills and consistent performance.
Cons: Limited Power Output
The same feature that makes PTC heaters safe also limits their raw power. Their self-regulating nature means they have a maximum heat output they cannot exceed. While the surface of a PTC element can get quite hot—some models designed for incubators have a dry heating temperature around 220-230°C—their overall wattage is modest. This makes them unsuitable for heating very large, poorly insulated spaces or for applications requiring extremely rapid temperature recovery.
Best For: Small to Medium Egg Incubators
The balance of safety, efficiency, and moderate power makes PTC heaters the perfect choice for most hobbyist and small-to-medium egg incubators. Their gentle and stable heat output is ideal for enclosures holding up to around 200 eggs. When you choose one of these components, you are prioritizing safety and stability over raw heating power. For smaller setups, this is an excellent trade-off that ensures a secure and consistent environment for a successful hatch.
How to Choose the Perfect Incubator Heating Element
Selecting the right heating component is not a one-size-fits-all decision. You must carefully match the element’s characteristics to your incubator’s size, airflow design, and the environment where you operate it. This section guides you through the critical factors to consider, ensuring you build a safe, efficient, and successful incubation system.
Matching the Element to Your Incubator Size
The volume of your incubator is the first and most important factor in choosing a heater. An underpowered element will struggle to maintain temperature, while an overpowered one can create dangerous temperature spikes.
Heating Elements for Small Incubators (Under 50 Eggs)
For smaller desktop or DIY egg incubators, safety and gentle heat are your top priorities. You do not need immense power.
- PTC Heaters: These are an excellent choice due to their self-regulating nature. They provide safe, stable heat without the risk of overheating.
- Low-Wattage Silicone Wire: A short length of silicone heating wire (e.g., 15-40 watts) allows you to distribute heat evenly in a compact space, especially when paired with a small fan.
Options for Medium Incubators (50-200 Eggs)
Medium-sized incubators offer more flexibility. You need enough power to heat a larger volume but still require precise control.
- Higher-Wattage Silicone Wire: You can use longer or more powerful silicone wires (e.g., 50-100 watts) to create a custom heating array that covers a larger area.
- Ceramic Emitters: A 60-100 watt ceramic heater can work well, but you must use it with a fan to prevent hot spots and distribute the radiant heat effectively.
- PTC Heater Arrays: Multiple PTC elements can be combined to provide sufficient power for these incubators.
Powering Large or Commercial Incubators (200+ Eggs)
Large cabinet-style incubators demand high-power heating solutions to manage the large air volume and recover temperature quickly after the door is opened.
- Metal Sheathed Heaters: These are the industry standard for large incubators. Their high wattage (often 200 watts or more) and rapid heating capabilities are essential for maintaining stability in a big space.
Crucial Note for Large Setups ⚠️ You must always pair a metal sheathed heater with a powerful fan. Using one without forced air circulation will create extreme hot spots and guarantee hatch failure.
Forced-Air vs. Still-Air: A Critical Choice
Your incubator’s air circulation system dictates which heating elements will perform best. The goal is always to deliver uniform warmth to every egg.
Best Heating Elements for Forced-Air Incubators
In a forced-air design, a fan actively circulates air. This makes heat distribution much easier and opens up your options.
- Silicone Wire: The fan blows air across the widely spaced wires, picking up heat and distributing it evenly.
- PTC Heaters: A fan placed near a PTC element ensures its gentle, consistent heat reaches every corner of the machine.
- Metal Sheathed Heaters: These powerful heating elements are designed exclusively for forced-air systems.
Optimizing Heat in Still-Air Incubators
Still-air incubators rely on natural convection—the principle that hot air rises. This creates a natural temperature gradient, with the top of the incubator being warmer than the bottom.
- Ceramic Emitters: These are often preferred for still-air models. Their radiant heat warms the eggs and internal surfaces directly, mimicking a more natural heating process.
- Silicone Wire: You can lay a low-wattage silicone wire on the floor of the incubator, often in a spiral pattern, to provide gentle, rising heat from below.
Calculating the Right Wattage for Your Setup
Choosing the right wattage ensures your heater can do its job without being overworked or dangerously overpowered. While a precise calculation can be complex, understanding the principles will help you make an informed choice.
A Simple Wattage Estimation Formula
Professionals use specific formulas to determine heating requirements. A common formula for calculating wattage in kilowatts (kW) for forced-air systems is:
kW = ((SCFM x Delta T) / 3000) x 1.2
- SCFM: This stands for Standard Cubic Feet per Minute, which is the airflow rate of your fan.
- Delta T: This is the temperature difference (in °F) you need to achieve between the room air and the incubator’s target temperature.
While you may not need to perform this exact calculation for a small DIY project, it shows the key relationship between airflow, temperature lift, and power.
Factoring in Ambient Room Temperature
The temperature of the room where you place your incubator has a huge impact on the heater’s workload.
Pro Tip: Create a Stable Environment 🌡️ Keep your incubator in a room with a stable temperature and no drafts. A heater in a 60°F (15.5°C) basement has to work much harder than one in a 72°F (22°C) room. A stable ambient temperature reduces stress on your heating system and prevents wide temperature swings.
If your incubator is in a cold location, you will need a higher-wattage element to maintain the target temperature of approximately 99.5°F (37.5°C).
Ensuring Thermostat and Power Supply Compatibility
Your heating system is only as strong as its weakest link. You must ensure all components can work together safely. The chosen incubator heating element must be compatible with both your thermostat and your power supply. A 100-watt heater requires a thermostat and power source rated for at least 100 watts, with a safety margin of 20-25% being ideal.
To ensure the quality and safety of your components, you should look for heating elements that meet recognized industry standards. Certifications provide assurance that the product has been tested for safety and performance. Key standards include:
- UL/ETL: Certifications for product safety, primarily for the North American market.
- CE: Indicates conformity with health, safety, and environmental protection standards for products sold within the European Economic Area.
- RoHS: Restricts the use of specific hazardous materials found in electrical and electronic products.
Choosing certified components for your egg incubators gives you peace of mind that you are building a reliable and safe system.
Step-by-Step Guide to Installing Your Heating Element
Proper installation is just as crucial as selecting the right component. A poorly installed heating element can lead to inconsistent temperatures, fire hazards, and failed hatches. You can ensure a safe and effective heating system by following a methodical process.
Safety First: Essential Precautions
Before you begin any work, you must prioritize safety. Working with electrical components requires your full attention and adherence to standard safety protocols.
Always Disconnect Power
Always unplug the incubator from its power source before you touch any internal components. You should never work on wiring or heating elements while they are connected to electricity. This simple step prevents electrical shock and is the most important rule of any electrical project.
Ensure Proper Insulation and Clearance
Your heating element will get very hot. You must provide adequate clearance between the element and any other surface, especially plastic walls or egg turners. A minimum of one inch of open space around the element is a good rule of thumb. This prevents melting and reduces fire risk.
Use High-Temperature Rated Wiring
Standard electrical wire cannot handle the heat generated by an incubator element. You must use wiring specifically designed for high-temperature applications. Professionals use what is known as incubation nursery heater wire, or silica electrical heating cables. This special wire uses an alloy heating cloth and a silicone rubber insulator that can sustain long-term use at 150°C and has a maximum operating temperature between 250°C and 300°C. Using the correct wire is a non-negotiable safety measure for any diy build.
The Installation Process
With safety checks complete, you can move on to the installation. The goal is to position and connect the element for optimal and even heat distribution.
Strategic Placement for Optimal Heat Flow
Your element’s location directly impacts temperature uniformity. In a forced-air unit, you should place the heating element directly in the fan’s airflow path. This allows the fan to distribute the heat throughout the entire chamber. For still-air designs, a central location near the top often works best, allowing heat to radiate downwards naturally.
How to Securely Mount the Element
You must never let the heating element rest directly against the incubator’s floor or walls. You should use ceramic or metal standoffs to securely mount the element. These non-flammable insulators hold the element in place, ensuring it has proper clearance for both safety and airflow. This is a critical step for a successful diy setup.
Basic Wiring: Connecting to the Thermostat
Connecting the element to the thermostat creates the control system. For a common 12V DC system, the circuit functions as a simple loop controlled by a relay.
How the Circuit Works ⚙️
- A temperature sensor (like an LM35) measures the internal temperature.
- An op-amp on the thermostat board compares this reading to your set temperature.
- If the temperature is too low, the thermostat sends a signal to a relay.
- The relay acts as a switch, closing the circuit and sending power to the heating element.
- Once the set temperature is reached, the thermostat signals the relay to open, cutting power to the element.
You will connect the heating element’s wires to the designated output terminals on the relay or thermostat board, which then switches the power from your 12V DC supply.
Maintaining Your Heating System for Peak Performance
A high-quality heating system is built to last, but regular maintenance ensures its long-term reliability and performance. You can prevent most hatch failures and extend the life of your equipment by adopting a routine of checks, cleaning, and proactive troubleshooting.
The Pre-Hatch System Check
Before you set a single egg, you must verify that your entire system is functioning perfectly. This pre-hatch check is your best defense against unexpected equipment failure.
Performing a 24-48 Hour Test Run
You should always run your empty incubator for at least 24 to 48 hours before introducing eggs. This test period allows you to monitor the temperature stability closely. Watch for any unusual fluctuations or listen for inconsistent fan operation. This simple step gives you confidence that your system can hold a steady temperature for the entire incubation period.
Calibrating Your Thermostat and Thermometers
Your incubator’s built-in thermostat can drift over time. You must calibrate it to ensure its readings are accurate. You can achieve this using a certified secondary thermometer, like a medical-grade mercury thermometer.
- Place the sensor of your digital thermostat next to the certified thermometer inside the empty incubator, ensuring they are at the same height.
- Allow the incubator to run until the certified thermometer reads your target temperature, such as 99.5°F (37.5°C).
- Adjust your incubator’s digital display to match the reading on the certified thermometer. This synchronizes your system to a known, accurate standard.
Routine Maintenance Between Hatches
After each hatch, you should thoroughly clean and inspect your heating system. This prevents the buildup of dust and down, which can create fire hazards and impede performance.
How to Safely Clean the Heating Element
First, always disconnect the incubator from its power source. Once cool, you can use a soft, dry brush or a can of compressed air to gently remove any dust or debris from the element and its mounting points. Avoid using water or chemical cleaners directly on electrical components.
Inspecting for Wear, Damage, and Loose Connections
You should perform a careful visual inspection of the incubator heating element. Look for any signs of corrosion, cracks, or discoloration. Gently check all wire connections to the thermostat and power supply to ensure they are secure. Loose connections can cause intermittent power and temperature swings. This is also a good time to inspect other heating elements in your setup.
Fehlerbehebung bei häufigen Problemen mit Heizelementen
Even with great maintenance, problems can arise. Knowing how to diagnose them can save a hatch.
Identifying a Failing Element
If your incubator fails to heat up, the element itself may have failed. You can confirm this with a multimeter. After unplugging the unit, test for continuity.
- Set your multimeter to the continuity setting, which often has a sound wave symbol.
- Touch the probes together to confirm the meter beeps.
- Place one probe on each terminal of the heating element.
- A continuous beep indicates the internal circuit is complete and the element is likely good. No beep means there is a break in the circuit, and you need to replace the part.
This simple test quickly tells you if your heating elements are the source of the problem.
Diagnosing Temperature Fluctuations
If the temperature is unstable but the element tests fine, the issue may lie elsewhere. Common culprits include a faulty thermostat, a failing circulation fan, or drastic changes in the ambient room temperature. You should investigate each of these components to isolate the source of the instability.
Your key to perfect hatches is selecting an incubator heating element that precisely matches your incubator’s size, type, and airflow. You can choose silicone for flexibility, ceramic for durability, PTC for safety, or metal sheathed for raw power in large incubators. Remember that correct installation, diligent safety checks, and regular maintenance for all incubators are just as crucial as the element itself for consistent, successful results. Your attention to these details will lead to healthier chicks and higher hatch rates.
FAQ
How many watts do I need for my incubator?
Wattage depends on incubator size and room temperature. Small incubators (under 50 eggs) often need 25-60 watts. Larger units may require 100 watts or more. You should always check the manufacturer’s recommendation for your specific model.
Can I leave my heating element on all the time?
No, you must connect your heating element to a thermostat. The thermostat cycles the power on and off to maintain a precise temperature. Continuous operation would cause lethal overheating and poses a significant fire risk.
Is a ceramic heater the same as an infrared heater?
Yes, ceramic heating emitters are a type of infrared heater. They produce long-wave infrared radiation to warm objects directly. This method provides heat without producing any visible light, which is beneficial for embryonic development.
What is the best heater for a homemade incubator?
For a homemade incubator, flexible silicone wire and self-regulating PTC heaters are excellent choices. Silicone wire allows for custom layouts, while PTC heaters offer superior safety by preventing overheating. Both work well in DIY designs.
How long does an incubator heating element last?
Lifespan varies by type. Ceramic emitters are very durable, often lasting for thousands of hours. Silicone and PTC elements also have long service lives. You should inspect any element for wear or damage between each hatch.
Can I use two heating elements in my incubator?
Yes, using multiple lower-wattage elements can improve heat distribution in larger egg incubators. You must wire them correctly to your thermostat. This strategy helps eliminate hot spots more effectively than a single, powerful element in some egg incubators.

