You rely on your hot tub for comfort and relaxation. The bộ phận làm nóng inside your spa works by converting electricity into heat as water passes over it. This process keeps your water warm and inviting. Reliable heating elements from trusted nhà sản xuất bộ phận làm nóng giống Hệ thống sưởi điện Jinzhong ensure optimal performance. Many bộ phận làm nóng thiết bị gia dụng share similar technology, making replacement straightforward when you notice issues.
A well-maintained heating element can extend the life of your hot tub and enhance your experience.
Hot Tub Heater Element Function and Importance
What the Heater Element Does
You depend on the heater element to keep your spa water at the perfect temperature. The heater element performs several critical functions during operation:
- It converts electrical current into heat through electrical resistance, much like the filament in a light bulb.
- The element sits inside a stainless steel housing, allowing water to flow over it and absorb the generated heat.
- Sensors, including a high limit switch and thermostat, monitor and control the water temperature for safety and comfort.
- Proper water flow across the element prevents overheating and damage, such as dry firing, which can destroy the heating coil.
- The heater element maintains your desired water temperature by heating the circulating water in your hot tub.
The science behind this process relies on Nhiệt lượng Joule. When electricity passes through the element, resistance causes electrons to collide with atoms, transferring kinetic energy and producing heat. The amount of heat generated depends on the resistance and the square of the current, as described by Joule’s first law. Materials like nichrome are chosen for their high melting point and stability, ensuring safe and efficient heat transfer. The heat moves from the element to the water mainly through conduction, which means the hot element directly warms the cooler water as it flows by.
Mẹo: Always ensure your hot tub has proper water flow before turning on the heater. This prevents dry firing and extends the life of the heating element.
Why the Heater Element Is Essential for Your Hot Tub
The heater element stands at the core of your hot tub’s performance. Without it, you cannot maintain a comfortable water temperature, and your spa experience suffers. The heater element’s efficiency directly impacts how much energy you use to keep the water warm. Efficient elements heat water quickly and maintain temperature with less electricity, reducing your energy bills. Inefficient or failing elements force your system to work harder, increasing costs and wear.
MỘT high-quality heater element also ensures safety and durability. Manufacturers use materials like titanium, Incoloy, or stainless steel to resist corrosion and extend lifespan. The design, including thickness and surface area, affects how evenly and quickly the element heats the water. Integrated safety features, such as overheat protection, prevent dangerous situations and unexpected shutdowns.
You must also consider the risks of a malfunctioning heater element. Overheating, corrosion, and electrical hazards can occur if the element fails or if water chemistry is not maintained. Frequent cycling or improper installation can shorten the element’s life. Regular inspection and balanced water chemistry help prevent these issues, ensuring your hot tub remains a safe and enjoyable retreat.
Ghi chú: Choosing a hot tub with an efficient, well-designed heater element is crucial for reliable performance and long-term savings.
How Hot Tub Heater Elements Work

Basic Operation of the Heater Element
You rely on the heater element to transform electrical energy into heat for your hot tub. The process begins when electrical current flows through a resistance coil housed in stainless steel. This coil heats up as electricity passes through it. Water circulates through the heater housing, absorbing the heat from the coil. The heated water then returns to the tub through jets, creating a comfortable soaking environment. A thermostat and safety switches regulate the temperature, ensuring efficient and safe heating. The closed-loop water circulation system maintains consistent warmth and prevents overheating.
Tip: Always check that your hot tub pump provides adequate water flow before activating the heater. Proper circulation prevents overheating and protects the element.
Key Components and Materials
Heating Coil and Element Materials
The heating coil sits at the heart of the heater element. Manufacturers use corrosion-resistant alloys such as Incoloy or stainless steel to encase the coil. These materials protect the filament from moisture and extend the lifespan of the element. The coil’s resistivity and temperature coefficient of resistance ensure stable heat production. Watt density must match your hot tub’s requirements to avoid premature failure and optimize heat delivery. Mechanical properties like tensile strength and creep resistance help the element withstand high temperatures. Proper insulation and hermetic sealing safeguard internal components, supporting reliable heating performance.
| Thành phần | Material Used | Mục đích |
|---|---|---|
| Heating Coil | Incoloy/Stainless | Heat generation, corrosion resistance |
| Sheath | Thép không gỉ | Protects coil, maintains efficiency |
| Cách nhiệt | Ceramic/Mica | Electrical isolation |
| Gasket | Rubber/Silicone | Seals assembly, prevents leaks |
Terminals, Connections, and Housing
You connect the heater element to your hot tub’s electrical system using sturdy terminals. Avoid bending or twisting these terminals during installation, as this can fracture epoxy seals and allow water intrusion. Gaskets seal the heater assembly, preventing leaks and withstanding heat and pressure. High-quality gaskets improve durability. Pressure and flow switches monitor water movement, stopping the heater if flow drops too low. Thermowells shield sensitive sensors from high temperatures and pressure, ensuring accurate monitoring. Thermostat sensors regulate temperature, while high limit switches cut power if temperatures exceed safe limits.
Note: After servicing, purge air from the plumbing to prevent dry firing and rapid overheating.
How the Element Heats Hot Tub Water
The heater element raises water temperature by transferring heat from the coil to the circulating water. Heat transfer efficiency depends on water temperature and flow rate. For example, increasing water flow from 8 to 18 liters per minute can more than double the heat transfer coefficient, allowing faster heating and preventing element overheating. Adequate water flow cools the element and prevents dangerous temperature spikes. Pressure and flow switches protect both equipment and users by stopping heater operation during low flow conditions. Consistent water circulation promotes mixing, reduces temperature fluctuations, and helps the thermostat maintain uniform warmth.
Callout: Balanced water chemistry and proper sanitizer levels prevent corrosion and bacteria buildup, preserving the heater sheath and extending the element’s life.
Types of Hot Tub Heater Elements
Common Designs: Flo-Thru vs. Bolt-On
You will encounter two main designs when selecting a hot tub heater element: flo-thru and bolt-on. Flo-thru elements allow water to pass directly over the heating coil inside a stainless steel tube. This design maximizes heat transfer and efficiency. Most modern residential hot tubs use flo-thru elements because they offer reliable performance and easy replacement. Stainless steel tubular heater elements, especially single-ended types, dominate the residential market. You benefit from their balance of cost, availability, and performance. Bolt-on elements, on the other hand, attach directly to the heater housing and are less common in newer spas. You may find bolt-on designs in older or specialized models, but flo-thru remains the standard for most home hot tubs.
Tip: When replacing your heater element, check your spa’s manual to confirm the design type. This ensures a smooth installation and optimal heating.
Material Options: Incoloy, Titanium, and Coated Metals
Choosing the right material for your heater element impacts both longevity and performance. Incoloy, titanium, and coated metals each offer unique benefits. Incoloy elements provide solid corrosion resistance and suit most residential water conditions. Titanium elements deliver superior durability, especially in saltwater or chemically aggressive environments. Some titanium elements feature epoxy coatings, which further extend their lifespan and warranty coverage.
| Material Type | Coating | Thời hạn bảo hành |
|---|---|---|
| Incoloy | Không có | Standard (not specified) |
| Titanium | Không có | 2 Years |
| Titanium | Epoxycast | 4 Years |
You will notice that titanium elements often come with longer warranties than Incoloy. This reflects their enhanced corrosion resistance. If you own a high-end or saltwater spa, you should consider titanium or epoxycast titanium for maximum protection. For most standard residential hot tubs, Incoloy offers a cost-effective and reliable solution.
Note: Always match the element material to your water chemistry and spa usage for the best results.
Power Ratings and Compatibility
Selecting a heater element with the correct power rating is essential for safe and efficient operation. You must verify the wattage, voltage, and physical size before making a replacement. Using an incorrect power rating can cause poor heating or even damage your spa’s electrical system. For example, a 5.5kW heater element supports dual voltage (115V/230V) and works with major spa control systems like Balboa, Gecko, ACC, and Hydro Quip. The power rating determines how quickly your spa heats up and how well it maintains temperature, especially in larger tubs.
Heater elements come in a range of power ratings and voltages:
- Power ratings typically range from 1.5kW to 27kW.
- Voltage options include 120V and 240V.
- You must match the element’s power rating and voltage to your spa’s electrical system for optimal performance.
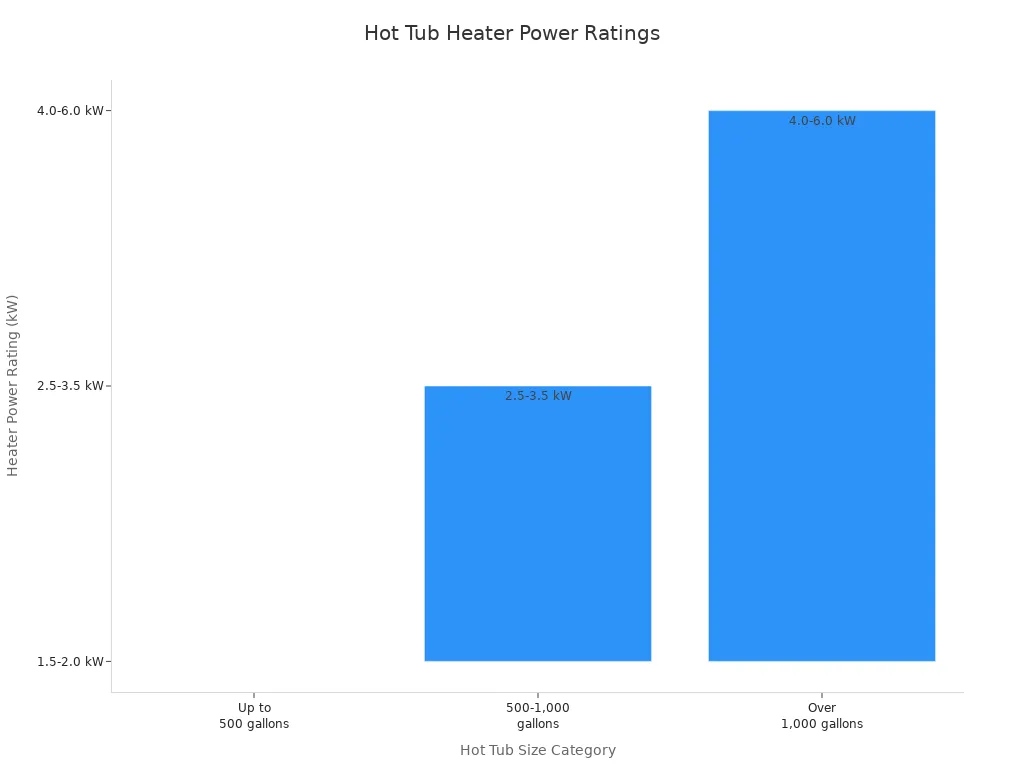
The following table summarizes the most common power ratings by hot tub size:
| Power Rating | Tub Size Served | Điện áp |
|---|---|---|
| 1.5-2.0 kW | Up to 500 gallons | 120V |
| 2.5-3.5 kW | 500-1,000 gallons | 120V/240V |
| 4.0-6.0 kW | Over 1,000 gallons | 240V |
Callout: Always consult your spa’s documentation or a professional before selecting a replacement heater element. Proper matching ensures safe operation and extends the life of your hot tub system.
Signs of Hot Tub Heater Element Failure
No Heat or Reduced Heating
You may first notice a problem when your hot tub water fails to reach the desired temperature or cools down faster than usual. A heater element that has burned out or broken will stop producing heat entirely. Often, this happens because the element operated without enough water flow, a situation known as dry firing. When this occurs, the coil or sheath can melt or show visible damage. Reduced heating can also result from scale buildup on the element. Minerals from hard water or salt systems form a layer on the heater, which insulates it and lowers its efficiency. You might see the water temperature drop or take much longer to heat up. Testing the heater element with an ohm meter helps confirm the issue. A healthy element typically shows a resistance between 9 and 12 ohms. Readings outside this range, such as infinite or zero resistance, indicate a failed element.
Tip: If your hot tub struggles to maintain temperature, check for proper water flow and inspect the heater element for visible damage or scale.
Tripping Breakers and Error Codes
Frequent tripping of the GFCI breaker or the appearance of error codes on your control panel often signals electrical problems with the heater element. Moisture intrusion through pinholes or cracks in the element sheath can cause electrical shorts. When this happens, the GFCI breaker trips to protect you from potential hazards. Without this protection, you risk arcs, sparks, or even fire. Error codes related to heating, high limit switches, or flow sensors may also appear. These codes alert you to overheating, low water flow, or sensor malfunctions. High limit switches and pressure switches serve as safety devices. They shut down the heater if temperatures rise too high or if water flow drops below safe levels. If these switches trip repeatedly, you should investigate the heater element and related components.
- Common electrical symptoms include:
- GFCI breaker trips when the heater activates
- Error codes for “no heat,” “overheat,” or “flow”
- High limit switch or pressure switch tripping
Physical Signs: Corrosion, Scale, and Rust
Physical inspection of the heater element can reveal clear signs of failure. Corrosion often appears as pitting, discoloration, or rust on the element sheath. Low pH or chemical imbalances in the water accelerate corrosion, which weakens the element and increases the risk of electrical shorts. Scale buildup forms a white or chalky layer on the element, especially in areas with hard water. This buildup reduces heat transfer and can cause the element to overheat and burn out. Cracks or pinholes in the outer casing allow water to enter, leading to shorts and further damage. If you see any of these signs, you should replace the heater element promptly to avoid further issues.
- Look for these physical warning signs:
- Rust or discoloration on the heater sheath
- White, chalky scale deposits
- Cracks, pinholes, or melted areas on the element
Regular inspection and maintenance help you catch these problems early, ensuring safe and efficient hot tub operation.
How to Test a Hot Tub Heater Element
Testing your hot tub heater element helps you diagnose heating problems before replacing any parts. You can follow a systematic approach to ensure accurate results and maintain safety throughout the process.
Safety Precautions Before Testing
Working with electricity and water requires strict safety measures. You must protect yourself and your equipment by following these precautions:
- Always disconnect all electrical power to the hot tub before any inspection, repair, or testing.
- Shut off power at the service panel and also at the spa disconnect for extra safety.
- Only perform electrical repairs if you have proper training; otherwise, contact a qualified electrician or spa technician.
- Avoid bending, pushing, or twisting the heater element terminals during installation or removal to prevent damage.
- Use two wrenches when tightening or loosening terminal nuts to avoid turning the terminal itself.
- Purge all air from the plumbing after servicing or refilling the spa to prevent dry firing.
- Check the plumbing system for leaks before reconnecting power.
- Maintain balanced water chemistry to prevent corrosion and scale buildup.
- Wear rubber-soled shoes and remove all jewelry to reduce the risk of electrical shock.
- Keep one hand behind your back when measuring voltages to minimize the chance of current passing through your body.
⚠️ Mẹo: Never work on electrical components near water unless you have fully disconnected all power sources.
Tools Needed for Testing
You need the right tools to test your heater element accurately. Gather the following items before you begin:
- Multimeter or Ohm meter set to measure resistance (ohms).
- Amp meter (optional, for measuring current draw at 240 volts).
- Two wrenches for loosening and tightening terminal nuts.
- Insulated gloves and rubber-soled shoes for personal protection.
- Screwdriver or nut driver to access the heater housing.
Having these tools ready ensures you can complete the test safely and efficiently.
Step-by-Step Testing Process
Power Off and Drain the Hot Tub
- Turn off all power to the hot tub at the main breaker and spa disconnect.
- Confirm that no power reaches the spa by checking with a voltage tester.
- Drain the hot tub water below the heater level to prevent leaks and accidental contact with water during testing.
Accessing the Heater Element
- Remove the access panel on your hot tub to reach the heater assembly.
- Locate the heater element, usually inside a stainless steel tube near the control box.
- Disconnect both power leads from the heater element terminals to isolate the element.
Using a Multimeter to Check Continuity
- Set your multimeter to the ohms (Ω) setting, preferably at the 1000-ohm range.
- Place one test lead on each terminal of the heater element.
- Observe the resistance reading:
- A good heater element typically measures between 9 and 14 ohms, depending on the model.
- A very low reading (close to 0) indicates a short circuit.
- A very high or infinite reading means the element is open or broken.
- To check for a short to ground, place one probe on a terminal and the other on the metal sheath of the element. An infinite reading means no short; any measurable resistance indicates a faulty element.
Interpreting the Test Results
- If the resistance measures between 9 and 14 ohms, your heater element is likely in good condition.
- An open circuit or no reading means the element has failed and needs replacement.
- A very low resistance reading signals a short circuit, which also requires replacement.
- If you detect continuity between a terminal and the element sheath, the element has a short to ground and is faulty.
- If your hot tub breaker trips, disconnect the heater element and restore power. If the breaker stays on, the heater element is the likely cause.
- If voltage is present at the element terminals but the water does not heat, the element is faulty.
- Always inspect the element visually for signs of damage, such as holes, cracks, or burn marks.
🛠️ Ghi chú: If your heater element passes all tests but your hot tub still does not heat, check related components like the thermostat, high limit switch, or control board.
How to Replace a Hot Tub Heater Element

Replacing a heater element in your hot tub requires careful preparation and attention to detail. You can complete this task at home if you follow each step methodically and prioritize safety.
Preparation and Safety Steps
Before you begin, you must prepare your workspace and ensure your safety. Follow these steps to set up for a successful replacement:
- Turn off the power at the circuit breaker. This step prevents electrical shock and keeps you safe.
- Gather all necessary tools and materials. You will need a compatible replacement heater element, wrenches, screwdrivers, a multimeter, and Teflon tape if your model requires it.
- Drain the hot tub completely to a level below the heater element. Always follow the manufacturer’s instructions for draining.
- Remove access panels or covers to reach the heater assembly.
- Carefully disconnect all electrical connections. Note the wire colors and terminal positions so you can reconnect them correctly later.
- Remove any mounting hardware, such as brackets, clamps, or screws, that hold the heater element in place.
- Gently extract the old heater element. Take care not to damage surrounding components.
⚠️ Mẹo: Always double-check that the power is off using a multimeter before touching any electrical parts.
Removing the Old Heater Element
Disconnecting Power and Water
You must ensure complete safety before removing the heater element. Start by turning off all power to the hot tub at the circuit breaker. Use a multimeter to confirm that no voltage is present at the heater terminals. Next, drain the water below the level of the heater element. Close any shut-off valves to prevent water from entering the area during removal.
Detaching Wires and Mounts
Once you have confirmed the power is off and the water is drained, disconnect all electrical wires from the heater element. Take a photo or label the wires to remember their positions. Remove any mounting hardware, such as screws or clamps, that secure the element to the housing.
Removing the Element from the Housing
After detaching the wires and mounts, gently pull the heater element out of its housing. If the element feels stuck, wiggle it slightly to loosen it, but avoid using excessive force. Inspect the housing for corrosion or debris. Clean the area thoroughly to prepare for the new element.
Note: If your heater assembly is more than eight years old or shows significant corrosion, consider replacing the entire assembly for improved reliability.
Installing the New Heater Element
Choosing the Correct Replacement
Select a replacement heater element that matches the original specifications. Check the voltage, wattage, and physical size to ensure compatibility. Using the wrong element can cause electrical issues or poor heating performance.
Installation Techniques and Sealing
Prepare the new heater element by wrapping the threads with Teflon tape if recommended by the manufacturer. Insert the element into the housing, making sure it aligns properly. Secure it with the mounting hardware, tightening evenly but not excessively. Over-tightening can damage the element or cause leaks. Install new O-rings or gaskets, lubricating them with silicone grease if advised. Ensure the seals sit correctly to prevent pinching or leaks.
🛠️ Mẹo: Always clean sealing surfaces and remove old O-rings or gaskets before installing the new element.
Reconnecting Wires and Testing
Reconnect the electrical wires and sensors exactly as they were before removal. Tighten the connections securely to prevent arcing or overheating. Close and secure the access panel. Refill the hot tub slowly to the recommended water level. As you fill, check for leaks around the heater assembly. Purge air from the plumbing by loosening a union fitting near the heater to avoid air locks.
Before restoring power, double-check that all connections are tight and the area is dry. Turn the power back on at the circuit breaker. Set the hot tub to heat and observe the control panel for heater activation. Monitor the water temperature for 15–30 minutes to confirm the heater works properly. Watch for error codes or tripped breakers. If you notice any issues, check the high limit switch and thermostat.
Callout: Always perform a leak check after installation and address any leaks immediately to prevent water damage.
Testing the Hot Tub After Replacement
After you install a new heater element in your hot tub, you must test the system to confirm safe and effective operation. Careful testing protects your investment and ensures a comfortable spa experience. You should follow a systematic approach to verify that the heater element functions correctly and that the installation meets safety standards.
Follow these steps to test your hot tub after replacing the heater element:
-
Isolate the Heater Element:
Disconnect the heater leads from the heater terminals. This step allows you to safely isolate the heating element for accurate testing. -
Measure Resistance:
Set your ohm meter to the appropriate range. Place the probes on the heater terminals. A healthy heater element should show a resistance between 9 and 12 ohms. If the reading falls outside this range, the element may be faulty. -
Check for Shorts to Ground:
Place one probe on a terminal and the other on the metal sheath of the element. An infinite reading means there is no short to ground. Any measurable resistance indicates a problem that requires attention. -
Verify Amp Draw:
Use an amp meter to measure the current draw when the heater operates. For a 110V system, expect around 15 amps. For a 220V system, the draw should be close to 25 amps. These values confirm that the element receives the correct voltage and functions as intended. -
Inspect Installation:
Examine the terminals and connections. Avoid bending or twisting the terminals, as this can damage seals and allow water to enter the element. Secure all connections and ensure the housing is dry. -
Purge Air from Plumbing:
Remove any air trapped in the plumbing. Airlocks can cause overheating or dry firing, which damages the heater element. Open a union fitting near the heater or use the spa’s purge function to release trapped air. -
Restore Water Chemistry:
Test and adjust the chemical balance of your hot tub water. Proper pH and sanitizer levels prevent corrosion and extend the life of the heater element. -
Monitor Initial Heat Cycle:
Turn on the hot tub and set the desired temperature. Observe the control panel for heater activation. Watch for error codes or tripped breakers. Allow the system to run for at least 30 minutes. Check that the water heats evenly and that the heater cycles on and off as expected. -
Limit Heat Cycles (Optional):
Use your control system settings to limit the number of heat cycles. This practice can prolong the life of your heater element and improve energy efficiency.
🛠️ Mẹo: Always check for leaks around the heater assembly during the first heating cycle. Address any leaks immediately to prevent water damage.
| Test Step | Expected Result | Action if Failed |
|---|---|---|
| Resistance (Ohms) | 9–12 Ohms | Thay thế phần tử |
| Short to Ground | Sức cản vô hạn | Inspect for damage |
| Amp Draw | 15–25 Amps (per voltage) | Check wiring/element |
| Water Chemistry | Balanced pH and sanitizer | Adjust chemicals |
| Air Purge | No airlocks | Repeat purge |
| Leak Check | No leaks | Tighten seals/replace |
You must complete each step carefully to ensure your hot tub operates safely and efficiently. Proper testing after replacement not only protects your heater element but also guarantees years of reliable spa enjoyment.
Hot Tub Heater Element Maintenance Tips
Preventing Scale and Mineral Buildup
You can prevent scale and mineral buildup by managing your water hardness and temperature. Minerals like calcium and magnesium tend to deposit on heater elements when water is too hard or too hot. These deposits act as insulation, reducing heat transfer and causing the element to overheat. To avoid this, test your water hardness regularly. If you find high levels, use a water softener or a scale control product designed for spas. Keep your water temperature within the manufacturer’s recommended range. High temperatures accelerate scale formation. You should also drain and refill your spa every three to four months, especially if you use it frequently.
Tip: Use a spa pre-filter when filling your hot tub. This simple step removes minerals before they enter your system.
Kiểm tra định kỳ và vệ sinh
Routine inspection helps you catch problems before they damage your heater element. Every month, open the access panel and visually inspect the heater assembly. Look for signs of scale, corrosion, or discoloration. If you see white or chalky deposits, clean the element using a non-abrasive cloth and a spa-safe descaler. Avoid using metal tools or harsh chemicals, as these can damage the protective sheath. Tighten any loose connections and check for leaks around the heater housing. If you notice rust or pitting, consider replacing the element to maintain safe operation.
A simple inspection checklist can help:
- Check for visible scale or mineral buildup.
- Inspect for rust, corrosion, or discoloration.
- Ensure all electrical connections are tight.
- Look for leaks around the heater assembly.
Regular cleaning and inspection extend the life of your heater element and keep your hot tub running efficiently.
Maintaining Proper Water Chemistry
Maintaining balanced water chemistry protects your heater element from corrosion and scale. Test your water at least once a week using reliable test strips or a digital meter. Focus on these key parameters:
| Tham số | Ideal Range | Effect on Heater Element |
|---|---|---|
| pH | 7.2 – 7.8 | Low pH causes corrosion; high pH leads to scale |
| Alkalinity | 80 – 120 ppm | Stabilizes pH, prevents swings |
| Calcium Hardness | 150 – 250 ppm | Too high causes scale; too low causes corrosion |
Adjust your chemicals as needed to keep these values in range. Use a spa shock treatment after heavy use or when water appears cloudy. Always add chemicals with the pump running to ensure even distribution. If you struggle to maintain balance, consult your spa manual or a water care professional.
Note: Proper water chemistry not only protects your heater element but also improves your overall spa experience.
Khi nào nên gọi cho chuyên gia
You can handle many hot tub heater element tasks on your own. However, some situations require the expertise of a licensed professional. Recognizing these moments protects your safety and ensures your hot tub operates correctly.
Consider calling a professional if you encounter any of the following:
-
Electrical Uncertainty:
If you feel unsure about working with electrical systems, do not attempt repairs. Electricity and water create a dangerous combination. A certified electrician or spa technician has the training to work safely. -
Persistent Error Codes:
When your control panel displays error codes that do not clear after basic troubleshooting, you need expert diagnostics. Some codes indicate deeper issues with the control board, sensors, or wiring. -
Frequent Breaker Trips:
If your GFCI breaker trips repeatedly, you may have a hidden electrical fault. Professionals use specialized tools to locate shorts or ground faults that are not obvious during visual inspection. -
Complex Heater Assembly:
Some hot tubs use integrated heater assemblies or proprietary components. If you cannot identify or access the heater element easily, a technician can disassemble and reassemble the system without causing damage. -
Warranty Concerns:
If your hot tub is under warranty, unauthorized repairs may void coverage. Always check your warranty terms. Many manufacturers require service by authorized professionals for warranty claims. -
Water Leaks After Repair:
If you notice leaks after replacing a heater element, stop and call a technician. Persistent leaks can damage electrical parts and lead to costly repairs.
⚠️ Cảnh báo an toàn:
Never attempt repairs if you smell burning, see smoke, or notice melted wires. Shut off power immediately and contact a professional.
Professional technicians provide several advantages:
| Lợi ích | Sự miêu tả |
|---|---|
| An toàn | Experts follow strict safety protocols |
| Accurate Diagnosis | Technicians use advanced diagnostic equipment |
| Warranty Protection | Professional service maintains your warranty |
| Time Savings | Experts complete repairs quickly and efficiently |
You protect your investment and your safety when you know your limits. If you ever feel uncertain, trust a qualified professional to restore your hot tub’s performance.
Mẹo: Keep the contact information for a trusted spa technician handy. Quick access to expert help can prevent small issues from becoming major problems.
Troubleshooting Other Hot Tub Heating Issues
Problems Not Related to the Heater Element
You may encounter heating problems in your hot tub that do not involve the heater element. Many issues can prevent your spa from reaching the desired temperature. For example, a faulty circulation pump can stop water from moving through the heater. If water does not flow, the heater cannot transfer heat, and your hot tub stays cold. You should listen for unusual noises or check for weak water flow from the jets. A clogged filter can also restrict water movement. Dirty or blocked filters reduce circulation and trigger safety switches that shut off the heater.
You might also face problems with sensors. Temperature sensors and flow switches monitor your system. If these sensors fail, your control system may prevent the heater from turning on. You should inspect sensor wiring and look for error codes on your control panel. Sometimes, airlocks in the plumbing can stop water flow. After draining and refilling your spa, you should purge air from the lines to restore normal operation.
Mẹo: Always check your hot tub’s filter and circulation pump before replacing the heater element. Many heating issues start with simple maintenance problems.
Checking the Thermostat and Control Board
Your hot tub’s thermostat and control board play a critical role in heating performance. The thermostat measures water temperature and signals the heater to turn on or off. If the thermostat malfunctions, your hot tub may not heat at all or may overheat. You should verify the set temperature on your control panel. If the display shows the correct setting but the water remains cold, the thermostat may need calibration or replacement.
The control board acts as the brain of your hot tub. It processes signals from sensors, switches, and the thermostat. If the control board fails, you may see error codes, flashing lights, or no response from the heater. You should inspect the board for signs of damage, such as burnt components or loose wires. Many modern hot tubs display diagnostic codes that help you identify control board problems.
| Triệu chứng | Possible Cause | Recommended Action |
|---|---|---|
| No heat, no error code | Faulty thermostat | Test or replace thermostat |
| Error code on display | Control board issue | Inspect or replace board |
| Sưởi ấm không đồng đều | Sensor/control fault | Check wiring and sensors |
Ghi chú: If you suspect a control board failure, consult your spa’s manual or contact a professional technician. Control board repairs often require specialized tools and expertise.
Electrical Supply and GFCI Troubleshooting
You must ensure your hot tub receives a stable electrical supply. Many heating problems trace back to power issues. A tripped GFCI (Ground Fault Circuit Interrupter) breaker will cut power to the heater and other components. You should check your breaker panel and reset the GFCI if needed. If the breaker trips again, you may have a short circuit, ground fault, or moisture intrusion.
Loose or corroded electrical connections can also cause intermittent heating. You should inspect all wiring at the heater, control board, and breaker panel. Tighten any loose terminals and replace damaged wires. Always turn off power before working on electrical parts.
You can follow this checklist to troubleshoot electrical supply issues:
- Verify the GFCI breaker is not tripped.
- Inspect wiring for signs of wear or corrosion.
- Confirm voltage at the heater terminals with a multimeter.
- Check for moisture around electrical components.
⚡ Báo động: Never attempt electrical repairs unless you feel confident and have the proper training. Electricity and water create serious hazards. When in doubt, call a licensed electrician or spa technician.
You restore comfort and efficiency to your hot tub when you replace a faulty heater element. Regular maintenance and proper water care extend the life of your equipment. Always follow safety procedures during repairs. If you feel unsure about any step, consult a professional. With the right approach, you ensure years of reliable, relaxing soaks in your hot tub.
Câu hỏi thường gặp
How often should you replace a hot tub heater element?
You should inspect your heater element every year. Replace it if you see corrosion, scale, or if it fails a continuity test. Most elements last three to five years with proper maintenance.
Can you replace a hot tub heater element yourself?
You can replace the heater element if you follow safety steps and use the correct tools. Always disconnect power before starting. If you feel unsure, contact a professional technician.
What causes a hot tub heater element to fail?
Common causes include scale buildup, corrosion, dry firing, and poor water chemistry. Electrical shorts or improper installation also damage the element. Regular maintenance helps prevent these issues.
How do you know which heater element fits your hot tub?
Check your hot tub’s manual for voltage, wattage, and design type. Match these specifications when buying a replacement. If you cannot find the manual, contact the manufacturer for guidance.
Is it safe to use your hot tub if the heater element is faulty?
You should not use your hot tub if the heater element is damaged. Electrical faults or leaks pose safety risks. Repair or replace the element before using your spa.
What maintenance helps extend heater element life?
Test water chemistry weekly. Clean the element and inspect for scale or corrosion monthly. Use a spa pre-filter when filling. Replace worn gaskets and O-rings. Schedule professional inspections if you notice persistent issues.
Do all hot tubs use the same heater element?
Hot tubs use different heater elements based on size, voltage, and design. Flo-thru and bolt-on types are common. Always verify compatibility before purchasing a replacement.
Mẹo: Keep your spa manual and warranty documents in a safe place. Quick access helps you find the right parts and service information.

