
若您的三星烘干机突然停止加热,请保持冷静并立即采取以下步骤。首先,拔下烘干机电源插头以防止电气危险。许多三星型号的烘干机存在加热元件问题,这常导致无法加热。请检查烘干机是否有加热元件损坏的明显迹象,例如烧焦气味或可见的线圈损坏。快速行动有助于恢复加热功能,并保护您的三星电器免受进一步损坏。.
识别三星烘干机加热元件损坏

三星烘干机不加热的常见原因
加热元件损坏的迹象
当您的烘干机加热元件故障时,您可能会注意到以下几种警示信号。 三星干衣机加热元件 最明显的迹象是烘干机可以运转,但衣物取出时仍是冷的或潮湿的。如果检查加热元件,您可能会看到线圈上有烧焦痕迹、裂纹甚至起泡。有时,加热元件在工作时不会发出明亮的橙色或红色光芒,这意味着它没有产生热量。这些物理症状直接指向加热元件损坏,通常需要立即更换。.
其他导致不加热的常见原因
虽然故障的加热元件是三星烘干机不加热的主要原因, 但其他问题也可能引发不加热故障。您应 使用万用表检查热熔断器的通断性。 熔断的保险丝会切断加热元件的电源,从而停止产热。故障的温控器(例如高温限制器或循环温控器)可能中断加热循环。控制板问题、电线损坏或连接松动也可能中断电力供应。最后,务必确认您的烘干机获得正确的电压——三星电烘干机需要240伏电压才能运行加热系统。 更换加热元件组件(通常包括热熔断器和温控器)是一种常见且经济高效的维修方式。大多数用户可以花费约.
Mẹo: 130元 完成此项维修。.
加热元件损坏的症状
干衣机运转但不产生热量
如果您的三星烘干机运转但不加热,很可能存在加热元件问题。滚筒会旋转,计时器会倒计时,但内部空气仍然是凉的。此症状是三星烘干机不加热的最常见原因之一。.
烘干周期后衣物仍潮湿
当加热元件故障时,即使经过完整的烘干周期,您的衣物仍会保持潮湿。您可能会注意到,随着加热元件接近失效,烘干时间逐渐增加,这表明在元件完全停止工作之前就已出现热量损失。.
加热元件线圈可见损坏
目视检查可以揭示加热元件损坏的明显迹象。检查线圈上是否有烧焦痕迹、裂纹或灼伤痕迹。如果加热元件在启动周期十分钟内不能均匀发光或完全不发光,您应考虑更换。.
| 诊断迹象或症状 | 描述与维修数据 |
|---|---|
| 元件不发出橙/红色光芒 | 表明加热元件损坏或故障;应在加热10分钟内发光。. |
| 可见物理损伤 | 元件上的烧焦痕迹、裂纹、起泡或灼伤痕迹是损坏的明确迹象。. |
| 加热性能不均匀 | 由元件故障导致的热量分布不均引起。. |
| 数字显示屏上的错误代码 | 诸如F1、F2、F3或E2等代码表示加热元件或传感器故障。. |
三星烘干机不加热的快速家用检测方法
检查错误代码
现代三星烘干机会显示错误代码,帮助您诊断加热问题。例如,F1、F2或F3等代码通常指向加热元件故障,而E2表示传感器问题。您还可能看到诸如“HC”(表示温度异常)或“9C1”(表示电压问题)等代码。请务必查阅用户手册以获取完整的错误代码列表及其含义。.
使用万用表进行通断性测试
使用万用表进行通断性测试是确认加热元件损坏最可靠的方法之一。首先,拔下烘干机电源并找到加热元件端子。将万用表调至通断测试档,将表笔接触端子。如果万用表不发出蜂鸣声或无读数,则表明元件已失效,需要更换。您还应测试热熔断器和温控器的通断性,因为这些部件也可能导致三星烘干机不加热。.
- 将烘干机设置为“定时烘干”模式,并关闭“节能烘干”功能。. 启动烘干周期,30秒后检查滚筒内是否有热量。.
- 检查安装因素,包括正确电压(电型号为240V)和适当的通风。.
- 将断路器关闭再打开,以确保两个电路都处于激活状态。.
- 通过按下相应的组合按钮运行通风口堵塞测试。解读显示的代码以识别通风或温度问题。.
- 定期清洁排气口,以防止堵塞导致热量输出降低。.
- 如果所有测试均通过,但您的三星烘干机不加热问题仍然存在,请联系专业技术人员。.
Ghi chú: 在进行任何诊断测试或维修之前,务必拔下烘干机电源插头,以避免电气危险。.
更换加热元件前的安全步骤
基本安全预防措施
断开烘干机电源
在对三星烘干机进行任何维修之前,务必断开电源。从墙壁插座拔下电器插头。如果您的烘干机采用硬接线连接,请关闭断路器。此步骤可防止触电并保护您免受伤害。. 将烘干机移离墙壁,并在需要时断开通风软管。 切勿在烘干机接通电源或连接电源的情况下尝试维修。.
Mẹo: 开始任何维修前务必拔下烘干机电源插头。. 在任何故障排除或更换任务中,安全应放在首位。.
佩戴防护手套和护目镜
在处理任何内部部件之前,您应佩戴防护手套和安全眼镜。烘干机内部的金属边缘可能很锋利。手套可保护您的手免受割伤和擦伤。安全眼镜可保护您的眼睛免受灰尘和碎屑的伤害。这些预防措施有助于您在狭窄空间工作时避免受伤。除非已采取适当的安全措施,否则切勿用湿手操作烘干机或触摸内部部件。.
更换加热元件所需的工具和材料
螺丝刀和螺母起子
您将需要一套螺丝刀和螺母起子来拆卸面板并接触到加热元件。大多数三星烘干机使用十字头螺丝和六角螺母。请将工具摆放整齐,并对拆下的螺丝做好标记。这种做法可使重新组装更容易,并防止硬件丢失。.
Máy đo đa năng để kiểm tra
万用表是测试加热元件及其他电气元件的必备工具。请使用它检查电路通断,并确认加热元件是否需要更换。务必在安装新零件前测试 干衣机的电源端子及加热元件。 此步骤可确保您正确诊断问题,避免不必要的维修。.
替换加热元件
为您的三星烘干机型号购买兼容的 替换加热元件。 购买前请核对型号和规格。使用正确的部件可确保安装合适且运行安全。将新的加热元件存放在清洁干燥的地方,直到准备安装。.
安全指南建议 每次使用后清洁绒毛过滤器, 并每年检查一次通风口。避免将烘干机紧贴墙壁放置以保持空气流通。为增加安全性,请将塑料通风管更换为金属通风管。.
| 工具/材料 | Mục đích |
|---|---|
| 螺丝刀/螺母起子 | 拆卸面板并接触内部部件 |
| Đồng hồ vạn năng | 测试通断性并诊断故障 |
| 替换元件 | 恢复加热功能并确保安全运行 |
遵循这些安全步骤并使用正确的工具,您可以保护自己并延长烘干机的使用寿命。务必优先考虑安全,并查阅用户手册以获取针对特定型号的说明。.
三星烘干机加热元件诊断分步指南
接触加热元件组件
拆卸后板或前面板
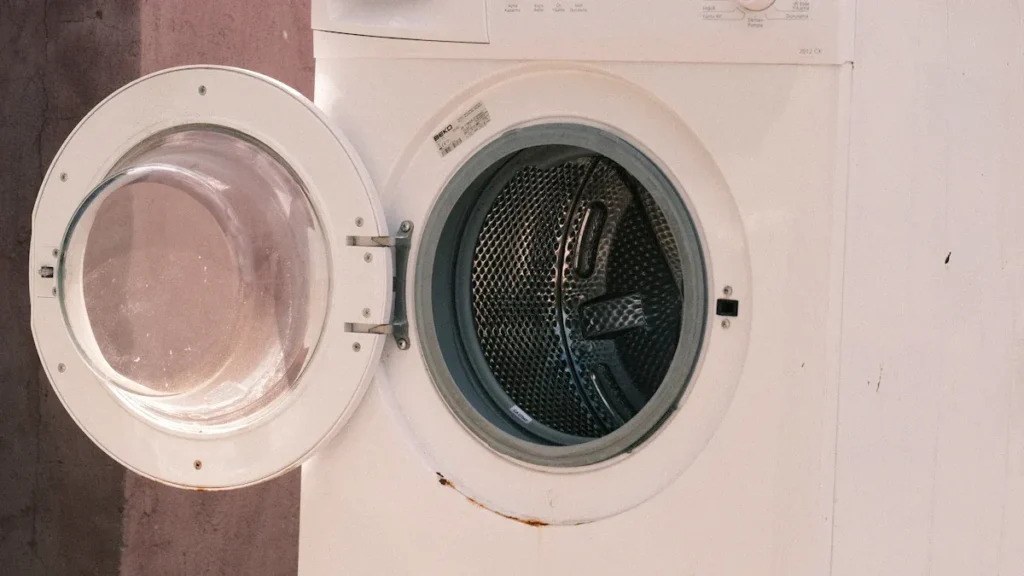
开始诊断三星烘干机前,您需要接触内部部件。首先拔掉烘干机电源并将其移离墙面。大多数三星型号需要拆卸后板或前面板才能接触到加热元件组件。使用螺丝刀或套筒扳手卸下固定面板的螺丝。将螺丝放入小容器中以免丢失。轻轻抬起或滑出面板。如果您的型号带有前面板,可能需要打开烘干机门并卸下开口处的额外螺丝。.
Mẹo: 拆卸前拍摄面板和螺丝位置的照片。此步骤有助于您正确重新组装烘干机。.
定位烘干机内部加热元件
卸下面板后,定位加热元件。在大多数三星烘干机中,加热元件组件位于设备底部靠近风机外壳处。该组件通常呈金属罐状或带连接线的矩形盒状。您可能看到外壳内的线圈。识别连接至加热元件的导线,并记录其位置以便重新组装。.
测试加热元件通断性
使用万用表检测元件
您需要万用表来测试 三星烘干机电加热元件 通断性。将万用表调至最低电阻档位(欧姆,Ω)。断开加热元件接线端上的导线。将两个探针分别接触两个接线端。正常的加热元件应显示10-50欧姆的读数。若显示屏显示无穷大电阻或无变化,则元件已损坏。.
通断性测试步骤:
- 拔下烘干机电源并接触加热元件。.
- 使用元件扳手旋出并取下旧加热元件。.
- Set your multimeter to the ohms setting.
- 将探针置于每个接线端。.
- 读取显示屏上的电阻值。.
Ghi chú: 务必小心操作加热元件和导线,避免损坏其他部件。.
解读通断性测试结果
您必须解读万用表读数以判断加热元件是否正常工作。读数在10-50欧姆范围内表示元件具有通断性且应正常发热。零电阻或无穷大电阻读数表示元件已损坏需更换。若出现异常读数,请重新检查连接并再次测试。.
| 万用表读数 | 诊断结论 | Hành động cần thiết |
|---|---|---|
| 10–50欧姆 | 通断性正常 | 无需更换 |
| 0或无限大 | 无通断性(元件故障) | Thay thế phần tử |
| 读数不稳定/异常 | 可能连接松动或存在故障 | 需重新测试或检查 |
遵循这些步骤,您可以准确诊断加热元件的状态。此流程确保您仅在必要时更换部件,从而节省时间和成本。.
三星烘干机加热元件更换流程

拆卸损坏的加热元件
断开导线与固定螺丝
必须首先确保烘干机已断电。安全是所有维修的第一原则。将烘干机移离墙面以便操作。. 使用油灰刀撬起或卸下后部螺丝以拆卸顶板. 。滑动并抬起卸下顶板。接着打开烘干机门,卸下门后及顶部边缘的螺丝。. 断开门开关接线. 。将前面板向前拉出并放置一旁。.
在内部右前角的金属外壳中定位加热元件。卸下固定加热元件支架的螺丝。取出将加热元件固定在支架上的螺丝。将支架移开。在导线允许范围内尽量拉出加热元件。断开连接至加热元件、热熔断器或恒温器的所有导线。使用尖嘴钳扳直固定加热元件外壳两半的锁紧卡扣。.
Mẹo: 断开每根导线时做好标记。此步骤将帮助您在重新组装时正确连接所有线路。.
安全取出旧元件
断开导线并卸下安装螺丝后,即可从外壳中取出加热元件。用钳子扳直所有接线端锁紧卡扣。通过弯曲卡扣并卸下剩余螺丝,小心分离加热元件外壳的两部分。轻轻滑出旧加热元件。避免损坏金属外壳或附近部件。将损坏的元件放置一旁以待妥善处理。.
Lắp đặt bộ phận làm nóng mới
固定新元件到位
取新加热元件滑入金属外壳。确保其贴合紧密并与安装孔对齐。将锁紧卡扣扳回原位以固定外壳。重新安装支架并拧紧所有螺丝。再次检查元件是否稳固且在外壳内无松动。.
重新连接导线与面板
将所有导线重新连接至加热元件、热熔断器和恒温器。参照您的标记或照片确保正确安装。轻轻拉动每个连接点以确认紧固。对准前面板位置并拧紧螺丝进行重装。重新连接门开关接线。将顶板滑回原位并固定螺丝。将烘干机移回原位置并重新连接排风管。.
Ghi chú: 重新接通烘干机电源前,务必检查所有导线无挤压或裸露。.
更换加热元件后的烘干机测试
运行加热测试周期
将烘干机重新插入电源插座。选择标准烘干周期并启动机器。让其运行数分钟。打开门检查滚筒内是否有热空气。若感受到热量,则新元件工作正常。.
检查运行状态
为确保烘干机达到行业标准性能,可参考既定的测试流程。美国能源部(DOE)及行业组织建议使用标准化测试负载来验证更换加热元件后的性能。下表汇总关键要点:
| Diện mạo | Sự miêu tả | 支持详情 |
|---|---|---|
| 测试流程 | DOE衣物烘干机测试流程包括测试负载构成、尺寸及周期选择 | 参照DOE附录D1和D2;包含测试布料的特定织物类型与重量 |
| 测试负载构成 | 标准化测试负载采用50%棉质/50%聚酯漂白布料,具有精确尺寸与重量 | DOE规定能源测试布与能源填充布的尺寸与重量 |
| 确保产品质量与安全 | ANSI/AHAM HLD-1-2010与IEC标准61121规定性能测量的测试负载与尺寸 | ANSI采用100%棉质床单、毛巾、枕套;IEC包含棉质与合成/混纺测试负载 |
| 重复性与再现性 | 三星及其他制造商支持DOE测试负载以确保结果一致可重复;实际负载缺乏再现性 | 三星声明实际负载无法产生可重复结果;支持采用DOE测试负载以降低不确定性 |
| 测试负载尺寸 | DOE规定标准烘干机负载为8.45磅±0.085磅, ,紧凑型烘干机为3磅±0.03磅 | 行业及公用事业团体建议增加负载尺寸以更好反映消费者使用习惯 |
| 维修应用 | 通用DOE测试流程与行业标准可作为烘干机更换部件后的性能验证框架 | 虽无专门针对加热元件更换后的独立测试流程,但通用流程同样适用 |
若您的烘干机能够正常加热并高效烘干标准负载,则表明维修已成功完成。若发现任何问题(如无热量或错误代码),请重新检查连接与安装步骤。.
🛠️ 专业建议: 更换加热元件后,务必全程监控首次完整烘干周期。此操作可确保烘干机安全高效运行。.
三星烘干机不加热的其他常见故障排查
检查热熔断器和温控器
热熔断器熔断的症状
若热熔断器失效,您可能会遇到几种常见的三星烘干机加热故障。当热熔断器熔断时,烘干机将停止产生热量,尽管滚筒仍在旋转。您可能会发现衣物在完整周期后仍保持潮湿。某些情况下,控制面板会显示错误代码或烘干机在运行中途关闭。这些症状通常表明需要检查热熔断器。若发现熔断器已熔断,必须更换热熔断器以恢复正常运行。.
温控器的检测与更换
故障温控器也可能导致加热问题。若烘干机过热或无法达到正确温度,可能是温控器未能正常调节热量。应使用万用表检测温控器的导通性。断开电源,拆下温控器,检查是否存在连续电路通路。若读数不在预期范围内,请更换温控器。某些情况下,, 即使温控器通过初步测试,在实际运行条件下仍可能出现故障. 。正确的重新组装与气流循环对于准确诊断和维修至关重要。.
故障排查提示: 检测或更换内部组件前务必断开电源。此步骤可防止电气危险并确保人身安全。.
检查电源与断路器
确保烘干机供电电压正常
许多常见的三星烘干机加热问题源于供电故障。三星电热式烘干机需要 配备双联30安培断路器的240伏专用插座. 。燃气机型需要15安培电路和标准三孔插座。重新通电前,请检查电源线、插头和插座是否有烧灼痕迹或损坏。若发现任何损坏或安装不当迹象,请联系持证电工处理。.
必要时重置断路器
断路器有时可能处于“半跳闸”状态(尤见于电热式烘干机)。重置时,将断路器的双联开关完全关闭至少30秒,然后重新开启。此操作可恢复烘干机的完整供电。若加热问题持续存在,请重复重置流程。若断路器再次跳闸,应寻求专业帮助。对于轻微故障,也可通过拔掉电源插头等待一至两分钟后重新插上来重置烘干机。此简单步骤常可解决临时性故障。.
故障排查提示: 操作烘干机电源连接前必须关闭断路器,以防触电危险。.
清洁烘干机通风管与绒毛过滤器
预防过热及未来故障
通风管或过滤器中的绒毛堆积是导致常见三星烘干机加热问题的主要原因。定期清洁可防止过热并降低火灾风险。. 每次烘干前后清洁绒毛过滤器. 。检查并清洁通风系统以维持正常气流。仅使用经认证的金属通风材料,以最大限度减少绒毛积聚并确保安全运行。.
分步清洁指南
遵循以下故障排查步骤以保持烘干机高效运行:
- 取出绒毛过滤器,用手或软刷进行清洁。.
- 使用吸尘器或通风管清洁刷清除过滤器槽内的绒毛。.
- 从烘干机背部断开通风软管。.
- 用长柄刷或吸尘器清洁通风软管及墙体管道。.
- 牢固地重新连接通风软管,确保无弯折。.
- 用软布蘸取酒精擦拭湿度传感器以清除残留物。.
- 保持烘干机周围区域远离易燃物品。.
故障排查提示: 若发现烘干时间延长、过热或焦糊味,请立即清洁通风管并执行重置。这些迹象通常表明气流受限。.
清洁或维修后,您也可通过拔掉电源插头一分钟再重新通电来重置三星烘干机。此过程可清除轻微故障,帮助烘干机恢复正常加热。.
| Nhiệm vụ bảo trì | Tính thường xuyên | Lợi ích |
|---|---|---|
| 清洁绒毛过滤器 | 每次装载衣物前/后 | 防止绒毛堆积,提升效率 |
| 检查并清洁通风系统 | 每6-12个月 | 减少过热,预防故障 |
| 擦拭湿度传感器 | Hàng tháng | 确保烘干周期精准 |
遵循这些故障排查提示与定期维护规程,可解决最常见的三星烘干机加热问题,并延长设备使用寿命。.
加热元件损坏时何时需联系专业人员
Dấu hiệu cho thấy bạn cần sự trợ giúp của chuyên gia
更换后持续存在加热问题
更换加热元件后,您可能发现烘干机仍无法加热。这种情况通常指向需要专业处理的深层问题。持续故障可能源于 热熔断器熔断、温控器故障或控制板失灵. 。若您已检查并更换基础组件,但烘干机仍性能不佳,则不应继续自行维修。.
若烘干机显示错误代码、不产生热量或重置后无法启动,这些明确表明您需要专家协助。经过培训的技术人员使用 专业诊断工具 来识别控制板、传感器及连接模块的故障。他们还能解读三星特定错误代码(如LE、DE或3E),以精确定位问题根源。.
电气或线路问题
电气故障存在严重安全隐患。若检测到 焦糊味、发现烧灼痕迹或听到异常噪音(如摩擦声或尖鸣声), ,请立即停止使用烘干机。这些症状通常表明线路故障或控制板失灵。未经专业培训擅自维修电气故障可能导致人身伤害或火灾风险。.
- 若出现以下情况应联系专业人员:
- 控制面板无响应或持续显示错误代码
- 运行期间过热或出现焦糊味
- 重置后烘干机仍无法启动
- 线路或连接处存在任何可见损坏
控制板故障或线路损坏等复杂问题,需要经认证的烘干机维修服务专家处理。专业人员可确保安全精准的维修,并提供正式记录文件。.
选择合格的家电维修技师
选择维修服务的注意事项
选择合适的技师可保障您的投资,并确保三星烘干机获得专业维护。选择雇佣持证且经验丰富技师的维修服务。信誉良好的公司使用原厂三星备件,并为所有维修提供书面保修文件。.
| Tiêu chí | Tại sao nó quan trọng |
|---|---|
| 认证 | 确保技师符合行业标准 |
| Kinh nghiệm | 提高故障诊断准确性 |
| 保修范围 | 防范未来故障发生 |
| 使用原厂配件 | 保持烘干机性能与安全 |
| 透明定价 | 避免意外费用 |
您还应在其报告中核查积极的服务记录和官方技术人员备注。可靠的服务机构在诊断后会出具详细的技术报告,列明故障根源、受影响的部件以及维修建议。.
雇佣前应询问的问题
在聘请技术人员前,请询问以下问题以确保获得优质服务:
- 您的技术人员是否具备维修三星干衣机的认证资质?
- 您是否为零件和人工提供书面保修?
- 您会使用原装三星替换零件吗?
- 维修后您能否提供详细的服务报告?
- 如果干衣机在初次上门服务后需要额外维修,您的政策是什么?
询问这些问题有助于您选择值得信赖的维修服务,并确保您的干衣机得到最佳护理。.
如果您遇到持续加热问题、电气故障或怀疑线路有问题,请立即联系专业人士。经认证的干衣机维修服务拥有专业工具和知识,能够安全高效地修复您的电器。.
预防未来三星干衣机加热元件故障
定期维护要点
每次使用后清洁绒毛过滤器
每次烘干循环后清洁绒毛过滤器,可显著延长三星干衣机的使用寿命。绒毛堆积会限制气流,导致加热元件工作负荷加重,增加过热风险。定期清除绒毛有助于干衣机高效运行并降低火灾隐患。多项长期维护研究表明,坚持清洁绒毛过滤网的用户设备故障更少,干衣机性能更佳。这一简单习惯印证了制造商关于 三星干衣机可使用十年以上 。.
Mẹo: 的声明。养成习惯,在每次烘干前后检查并清洁绒毛过滤器。这一小步骤可以避免昂贵的维修,并保持干衣机平稳运行。.
安排年度通风管道清洁
年度通风管道清洁是另一项重要的维护任务。随着时间的推移,绒毛和碎屑会在通风系统中积聚,导致堵塞,从而延长烘干时间并给加热元件带来额外压力。您应至少每年安排一次专业的通风管道清洁,以确保最佳气流并防止过热。维护记录和专家检查清单均推荐此步骤,以降低火灾风险并保持干衣机效率。适当的通风管道清洁也有助于避免加热元件过早失效。.
- 每次使用后清洁绒毛过滤器。.
- 每年安排专业通风管道清洁。.
- 定期检查滚筒、密封件和排气口。.
- 资深水暖技师建议为热水器建立详细维护日志。记录每次检查、维修及更换情况,注明日期、维护部件及相关观察结果。此习惯有助于追踪部件使用寿命并发现重复性问题规律。若后续需要专业协助,日志也能提供重要参考信息。 以跟踪服务和维修记录。.
烘干机使用最佳实践
避免干衣机超载
通过正确装载衣物可有效保护您的 三星烘干机加热元件 避免过载循环。当衣物装载量超过建议容量时,设备将被迫超负荷运转,可能导致烘干不均匀及内部组件过度磨损。采用正确的使用方式(如按标准容量装载衣物)有助于维持设备最佳性能,延长机器使用寿命。.
针对不同面料使用正确设置
为每种面料类型选择正确的设置,可确保温和有效的烘干效果。三星干衣机提供一系列针对不同材料设计的循环和温度选项。例如,对坚固的棉质衣物使用高温,对合成纤维或精致面料使用较低温度。始终遵循衣物护理标签,对于羊毛或羊绒等物品使用洗衣网袋。. 避免使用漂白剂和液体织物柔顺剂, ,特别是对于特殊面料。这些最佳实践可以节约能源,减少干衣机磨损,并有助于防止加热元件故障。.
| 面料类型 | 推荐设置 | 额外提示 |
|---|---|---|
| 棉质 | 高温 | 使用"感应烘干"以获得最佳效果 |
| 合成纤维 | 中温或低温 | 避免过度烘干以防止静电 |
| 精致面料 | 超低温或风干 | 使用洗衣网袋,避免使用烘干纸 |
| 羊毛/羊绒 | 轻柔循环,低温 | 平铺晾干,使用羊毛专用洗涤剂 |
| 抓绒/人造毛皮 | 冷风/无热风,风干 | 单独洗涤,避免漂白剂 |
遵循这些指导原则可帮助您充分发挥 三星烘干机的效能,同时最大限度降低未来加热元件 故障风险。.
通过遵循清晰的诊断和维修步骤,您可以恢复三星干衣机的性能。始终将安全放在首位并使用正确的故障排除方法。如果您遇到持续性问题,请寻求认证技术人员的帮助。定期清洁和检查绒毛过滤器可延长干衣机的使用寿命,在正常使用情况下平均寿命为 8 至 14 年 。下表重点说明了维护和使用如何影响使用寿命和维修需求。.
| Diện mạo | 三星干衣机加热元件 |
|---|---|
| 平均使用寿命 | 8 至 14 年 |
| 更换频率 | 15 年内更换 1 至 2 次 |
| 维护影响 | 定期清洁可延长使用寿命 |
Câu hỏi thường gặp
三星烘干机的加热元件应多久更换一次?
大多数三星干衣机加热元件在定期维护下可使用 8 至 14 年。仅当您注意到加热问题或可见损坏时才应更换该元件。定期清洁可延长其使用寿命并减少频繁更换的需要。.
加热元件损坏后还能使用干衣机吗?
您不应在加热元件损坏的情况下使用干衣机。干衣机将无法正常烘干衣物,并可能造成进一步损坏。在恢复使用前,务必修理或更换故障部件。.
哪些错误代码表示加热元件问题?
三星干衣机会显示如 HC, HE, F1, 或 E2 等代码,表示加热元件或温度传感器故障。您可以查阅用户手册以获取完整的错误代码列表及其含义。.
更换加热元件是否需要特殊工具?
您需要螺丝刀、螺母起子和万用表等基本工具。务必使用防护手套和安全眼镜。大多数家庭维修不需要高级设备。.
更换加热元件后,如果烘干机仍然不加热,您应该怎么做?
检查热熔断器、恒温器和电源。确保所有电线连接牢固。如果问题持续存在,您应联系认证的家电技术人员进行进一步诊断。.
如何防止三星烘干机过热?
每次使用后清洁绒毛过滤器。安排每年一次的通风管道清理。避免超负荷运行烘干机。根据每种织物类型选择正确的设置。这些步骤有助于维持安全温度并防止过热。.
Có an toàn khi tự thay thế bộ phận gia nhiệt không?
如果您遵循所有安全预防措施,可以安全地更换加热元件。务必断开电源、穿戴防护装备并遵循制造商的说明。如果您不确定,请聘请专业技术人员。.
哪些维护任务有助于延长烘干机的使用寿命?
| Nhiệm vụ | Tính thường xuyên |
|---|---|
| 清洁绒毛过滤器 | 每次使用后 |
| 检查并清洁通风口 | 每6-12个月 |
| 擦拭湿度传感器 | Hàng tháng |
定期维护可保持烘干机高效运行并防止故障。.

