Is your water heater not performing as it should? It might be time to replace water heater element to restore its efficiency. Common warning signs include a complete lack of hot water, inconsistent temperatures, strange noises from the tank, discolored water, or a tripped circuit breaker. If you notice any of these issues with your electric water heater, act quickly. Timely replacement helps you maintain safe, reliable hot water for your home and prevents costly damage.
Signs You Need to Replace Water Heater Element

Key Symptoms of a Failing Water Heater Element
No Hot Water or Inconsistent Temperature
You may notice your water heater delivers only cold or lukewarm water. This often points to a failed heating element. In an electric water heater, if the upper heating element fails, you get no hot water at all. If the lower element fails, you run out of hot water quickly. Fluctuating temperatures or water that never gets as hot as before also signal trouble. These symptoms usually mean the heating element cannot maintain the set temperature, causing discomfort and inconvenience.
Water Takes Too Long to Heat
When your water heater takes much longer than usual to provide hot water, a faulty heating element is a likely cause. The unit may run for extended periods, trying to reach the desired temperature. This not only increases your wait time but also raises your energy bills. Minor dips in temperature and longer heating cycles often appear before the element fails completely. You might notice hot water running out faster or the tank struggling to keep up with demand.
Unusual Noises from the Water Heater
Popping, rumbling, or knocking sounds coming from your water heater often indicate sediment buildup on the heating element. As sediment accumulates, it causes the element to overheat and make noise. These sounds suggest the element is working harder than it should, which can lead to premature failure. Regular maintenance helps prevent this issue, but persistent noises mean you should inspect the element soon.
Обесцвеченная или ржавая вода
If you see rusty or discolored water coming from your hot taps, the heating element may have corroded. Corrosion or mineral buildup on the element can contaminate your water supply. This not only affects water quality but also signals that the element is deteriorating. You should address this issue promptly to avoid further damage to your water heater.
Tripped Circuit Breaker or Blown Fuse
A tripped circuit breaker or blown fuse often points to electrical problems within your water heater. Faulty heating elements can draw excessive current, causing breakers to trip. If you reset the breaker and it trips again when the heater turns on, the element may have shorted out. Electrical issues like these require immediate attention to prevent safety hazards.
Совет: If you experience any of these symptoms, consider testing the heating element with a multimeter to confirm the problem before you replace water heater element.
Here is a quick reference table summarizing the most common symptoms and their explanations:
| Симптом | Объяснение |
|---|---|
| Insufficient Hot Water | Reduced hot water supply or unexpected temperature fluctuations caused by worn-out heating elements or sediment buildup. |
| Inconsistent Temperature | Fluctuations in water temperature due to faulty heating elements or thermostat issues. |
| Странные шумы | Popping or rumbling sounds caused by sediment buildup leading to overheating of the heating element. |
| Breaker Trips | Electrical breakers tripping due to faulty or failing heating elements causing electrical issues. |
Quick Self-Diagnosis Checklist
Simple Questions to Identify a Bad Element
You can quickly assess your water heater by asking yourself these questions:
- Does your hot water run out faster than before?
- Do you hear unusual noises like popping or rumbling from the tank?
- Have you noticed any rusty or discolored water from your hot taps?
- Has the circuit breaker for your water heater tripped recently?
- Is your water heater older than six years?
- Do you see any visible leaks or corrosion around the tank or element?
If you answer “yes” to one or more of these questions, your heating element may be failing.
For a more technical check, follow these steps:
- Turn off the power to the water heater at the circuit breaker.
- Use a multimeter to confirm no electricity is present.
- Remove the thermostat cover and insulation to access the heating element.
- Disconnect the wires from the element.
- Set your multimeter to measure resistance (ohms).
- Measure resistance between the two terminals of the heating element.
- A reading between 5 and 25 ohms means the element is good.
- A reading below 5 ohms or no reading at all means the element is faulty.
- Inspect the element for corrosion, mineral buildup, or visible damage.
Distinguishing Element Issues from Other Water Heater Problems
Not all water heater problems stem from a bad heating element. Here are some ways to tell the difference:
- If you have no hot water in a single-element heater, the upper element likely failed.
- Lukewarm water often points to a bad upper heating element.
- Hot water that runs out quickly usually means the lower element is malfunctioning.
- Circuit breakers that trip when the heater turns on suggest an electrical issue with the element.
- Popping sounds indicate mineral buildup on the element.
Other issues, such as gas burner malfunctions or thermostat problems, can cause similar symptoms but require different solutions. Testing the heating element with a multimeter helps confirm if the element is the source of the problem. If your water heater uses gas, heating element failure will not apply.
Примечание: Annual professional inspections can help catch failing elements early and prevent unexpected breakdowns.
Should You Replace Water Heater Element Yourself?
DIY vs. Professional Replacement
Плюсы и минусы самостоятельной замены
Many homeowners consider replacing a heating element as a do-it-yourself job. You might save money and gain a sense of accomplishment. However, you should weigh the risks and benefits before starting.
Benefits of DIY:
- You can save on labor costs.
- You control the timing and pace of the repair.
- You gain hands-on experience with your water heater.
Risks of DIY:
- Electric water heaters operate at high voltage. Improper handling can cause severe electrical shock.
- Incorrect wiring or installation may lead to overheating or fire hazards.
- DIY repairs often void manufacturer warranties, leaving you without coverage for future issues.
- If you misdiagnose the problem, you might cause further damage or face costly repairs.
- Water leaks from improper connections can damage your property.
⚠️ Совет: Replacing a heating element is more complex than basic maintenance tasks like flushing the tank or adjusting the thermostat. Most manufacturers recommend professional service for this repair.
When to Call a Professional for Your Water Heater
You should contact a licensed technician if you feel unsure about any step in the process. Professionals bring specialized tools and years of experience. They can diagnose issues accurately and ensure repairs meet safety codes. Hiring a professional also preserves your warranty and provides guaranteed workmanship. If your water heater uses gas, always call a professional. Gas leaks and improper handling can lead to explosions or carbon monoxide poisoning.
Safety Precautions for Replacing Water Heater Element
Electrical Safety Steps
You must follow strict safety procedures when working with an electric water heater. Always turn off the electrical power at the circuit breaker before starting. Use a voltage tester or multimeter to confirm the power is off. Remove access covers and disconnect all wires from the heating element. Never restore power until you have refilled the tank completely and checked for leaks. Failing to follow these steps can result in electric shock or damage to the new heating element.
Water and Pressure Safety Tips
Before removing the heating element, close the cold water supply valve and drain the tank fully. This step prevents hot water or steam from causing burns. Open a hot water faucet to release pressure and allow air into the system. After installing the new heating element, refill the tank and let water run from a hot tap for several minutes. This process removes trapped air and prevents dry firing, which can damage the new part. Always check for leaks around the gasket and connections before restoring power.
🛠️ Примечание: Use only replacement parts that match the voltage and wattage listed on your water heater’s data plate. Proper fit and installation help prevent future problems.
Tools and Materials Needed to Replace Water Heater Element
When you prepare to replace a heating element, you need the right tools and materials to ensure a safe and efficient job. Using the correct equipment not only makes the process smoother but also helps you avoid common mistakes that could damage your water heater.
Необходимые инструменты для работы
Гаечные ключи и отвертки
You will need a sturdy wrench to loosen and remove the old heating element from your water heater. Most elements require a specific element wrench, which fits snugly around the base. A standard adjustable wrench may work for some models, but a dedicated element wrench provides better grip and leverage. You also need a screwdriver to remove the access panel and thermostat covers. Choose a screwdriver that matches the screws on your unit to prevent stripping.
Multimeter for Testing the Element
A multimeter is a crucial tool for diagnosing problems with your heating element. Before you begin any work, use a voltage test pen or a multimeter to confirm that the power is off. This step protects you from electrical shock. After disconnecting the wires, set your multimeter to the Ohms setting to test the heating element’s resistance. Professional plumbers recommend this test to determine if the element needs replacement. A reading outside the normal range signals a faulty component.
Выбор правильного сменного элемента
Selecting the correct replacement heating element is essential. Check your water heater’s data plate for the voltage and wattage specifications. Using an element with the wrong rating can cause poor performance or even damage your unit. Bring the old element to the store if you are unsure, or consult your owner’s manual for guidance. Always choose a high-quality replacement to ensure long-lasting results.
Additional Supplies for Water Heater Maintenance
Gasket and Sealant
When you install a new heating element, you should also replace the gasket. The gasket creates a watertight seal between the element and the tank. A worn or damaged gasket can lead to leaks. Use a manufacturer-approved sealant if your model requires it. This step helps prevent water from escaping and protects your home from potential water damage.
Cleaning Supplies
Proper maintenance extends the life of your water heater. You will need cleaning brushes to remove sediment and debris from the tank and element area. A bucket and drain valve help you flush out accumulated sediment, which can reduce efficiency and cause noise. For ongoing care, keep a supply of anode rods, insulation wraps, and approved cleaning solutions on hand. These items support regular inspection and help you address issues before they become serious.
Совет: Regularly testing the thermostat and pressure relief valve with a multimeter and manual operation ensures your water heater operates safely and efficiently.
Step-by-Step Guide to Replace Water Heater Element
Preparation and Safety Measures
Отключение электро- и водоснабжения
You must always prioritize safety before you replace water heater element. Begin by shutting off the electricity to your electric water heater at the main breaker panel. This step prevents electrical shock and ensures a safe work environment. Use a multimeter or voltage tester to confirm that the power is completely off at the terminals. Never skip this verification.
Next, close the cold water supply valve. This action stops water from entering the tank and helps prevent accidental flooding. Allow the water inside the tank to cool for at least one hour. Hot water can cause severe burns if released suddenly.
Совет: Wear safety goggles and gloves to protect yourself from splashes, sharp edges, and hot surfaces.
Слив воды из бака водонагревателя
Properly draining the tank is essential before you access the heating element. Attach a garden hose to the drain valve at the bottom of the tank. Place the other end of the hose in a safe drainage area or a large bucket. Open a hot water faucet in your home to relieve pressure and allow air into the system.
Slowly open the drain valve and let the water flow out. You may need to open the pressure relief valve to speed up the process. Make sure the tank is completely empty before you proceed. Keep towels and a bucket nearby to catch any remaining water.
Напоминание о безопасности: Maintain a clean, dry, and well-lit workspace. Remove clutter to reduce the risk of accidents.
Testing the Water Heater Element
Using a Multimeter to Check the Element
Testing the heating element with a multimeter helps you confirm whether it needs replacement. Follow these steps:
- Отключите питание с помощью автоматического выключателя. and verify with a voltage tester.
- Снимите панель доступа и изоляцию, чтобы получить доступ к нагревательному элементу.
- Disconnect the wires from the heating element terminals. Label or photograph the wires for easy reconnection.
- Set your multimeter to the lowest resistance (ohms) setting.
- Подсоедините один датчик к каждой клемме нагревательного элемента.
- Read the resistance value on the display.
A functional heating element typically shows a resistance between 10 and 30 ohms. If you see a reading of zero or infinite resistance, the element is faulty and requires replacement.
Понимание результатов теста
You need to interpret the multimeter readings accurately. Whirlpool’s official documentation states that a functioning water heater element should have a resistance value between 5 and 25 ohms. If your reading falls outside this range, the heating element is likely defective.
- 10–30 ohms: The element is usually in good condition.
- 0 ohms: The element is shorted and must be replaced.
- Infinite resistance: The element has an open circuit and is no longer functional.
If the element passes the test, reconnect the wires and reassemble the access panel. If it fails, continue with the replacement process.
Снятие старого нагревательного элемента водонагревателя
Доступ к панели элементов
Locate the access panel on your water heater. Use a screwdriver to remove the screws securing the panel. Take off the insulation to reveal the heating element and thermostat. Keep all screws and parts organized for reassembly.
Примечание: Some models have two panels—one for the upper heating element and one for the lower. Identify which element you need to replace.
Loosening and Removing the Element
Use a heating element wrench or a suitable socket wrench to loosen the old heating element. Turn the wrench counterclockwise until the element is free. Carefully pull the element out of the tank. Be prepared for some residual water to escape.
Inspect the removed element for signs of corrosion, mineral buildup, or damage. These issues often cause poor performance in your water heater. Clean the area around the opening before installing the new part.
Совет от профессионала: Always check the gasket and replace it if it appears worn or damaged. A new gasket helps prevent leaks after installation.
Установка нового элемента водонагревателя
Positioning and Securing the New Element
You need to ensure a precise fit when you install a new heating element. Start by confirming that the replacement matches your water heater’s voltage and wattage specifications. This step prevents performance issues and protects your electric water heater from damage.
Before you insert the new element, clean the threads in the tank opening thoroughly with a rag. Any debris or old gasket material can compromise the seal and lead to leaks. Place the new gasket onto the heating element. Lightly lubricate the gasket with a drop of hand dishwashing liquid. This simple step helps the gasket seat properly and prevents damage during tightening.
Follow these steps to secure the new element:
- Hand-tighten the heating element into the tank opening.
- Use an element wrench or a 1 1/2″ deep well socket to tighten the element securely. Avoid over-tightening, which can damage the threads or the gasket.
- Reconnect the power wires to the terminals. Make sure each connection is tight and matches your earlier notes or photos.
🛠️ Совет: Always double-check the gasket’s position before tightening. A misaligned gasket is a common cause of leaks after you replace water heater element.
Reassembling the Water Heater
Once you have installed the new water heater element, you need to restore the protective layers. Replace the insulation over the element and thermostat. Secure the access panel with the original screws. This step reduces the risk of electric shock and helps maintain energy efficiency.
If your water heater has a plastic protector, snap it back into place. Make sure all covers fit snugly and no wires are exposed. Proper reassembly ensures your water heater operates safely and efficiently.
Примечание: Never restore power to the water heater until you have completely refilled the tank with water. Dry firing the element can cause immediate failure.
Наполнение и перезапуск водонагревателя
Refilling the Tank with Water
After you finish installing the new element, you must refill the tank before restoring power. Begin by closing the drain valve tightly. Turn the cold water supply valve counterclockwise to allow water to flow into the tank.
Open a hot water faucet in your home. Let the water run until it flows in a steady stream without sputtering. This process removes trapped air from the tank and prevents air pockets from forming. Keep the faucet open for at least three minutes to ensure all air escapes.
While the tank fills, listen for air bubbles and check for leaks around the new element. If you notice any leaks, tighten the element gently. Persistent leaks may indicate a damaged gasket, which you should replace before proceeding.
🚰 Вызов: Always check the area around the drain valve and the new element for leaks during and after refilling. Address any leaks immediately to prevent water damage.
Restoring Power and Testing Operation
Once the tank is full and all air has been purged, you can restore power to your water heater. Switch the circuit breaker back on for electric models. If you use a gas water heater, set the thermostat to your desired temperature.
Monitor the system as it heats up. Check for proper operation and confirm that no leaks develop around the new element. If you encounter issues such as tripped breakers, faulty thermostats, or persistent leaks, consult a licensed professional. Common problems after replacing a water heater element include loose wiring, corroded components, or a malfunctioning high-limit switch. These issues require expert diagnosis to ensure safe operation.
Совет: Never turn on the power before the tank is completely full. Dry firing the heating element can cause permanent damage and void your warranty.
A successful installation restores reliable hot water to your home and extends the life of your water heater. Regular maintenance and careful attention during installation help you avoid future problems.
Troubleshooting After You Replace Water Heater Element
After you install a new water heater element, you expect your water heater to work smoothly. Sometimes, issues still occur. You can solve most problems with a careful approach and a few targeted checks.
If the Water Heater Still Doesn’t Work
Double-Check Electrical Connections
If your water heater does not heat water after replacement, start by reviewing the electrical setup. Use this checklist to guide your troubleshooting:
- Перед восстановлением питания убедитесь, что бак полон воды.. Running the element dry can cause immediate failure.
- Allow enough time for the tank to heat up. The upper element heats first, then the lower element activates.
- Turn off the power and inspect all wiring connections. Tighten any loose wires and check for signs of damage.
- Use a multimeter to verify that the heating elements receive the correct voltage, usually 240 volts.
- Press the red reset button inside the control panel. This button restores power if the unit overheated or lost power.
- Check the circuit breaker. Reset it if necessary, or replace it if it has failed.
- If the water heater still does not function, consider the possibility of a defective new element.
⚡ Совет: Always verify that your water heater is installed with the correct wiring and breaker size. Incorrect installation can prevent the unit from operating safely.
Inspect the Thermostat
A faulty thermostat can prevent your water heater from working, even after you replace the element. Take these steps:
- Set both the upper and lower thermostats to around 120°F.
- Use a multimeter to test the thermostat for proper voltage and function.
- Replace the thermostat if it does not respond or shows incorrect readings.
If you follow these steps and your water heater still does not heat, consult a licensed technician for further diagnosis.
Addressing Leaks or Drips
Checking the Gasket Seal
Leaks often appear after you replace a water heater element. The most common cause is a faulty or misaligned gasket. To prevent leaks:
- Inspect the gasket seal for signs of wear, rust, or damage.
- Replace any worn or deformed gaskets immediately.
- Use high-quality, heat-resistant gaskets that match your water heater model.
- Always disconnect power and let the system cool before performing maintenance.
🛑 Тревога: Timely gasket replacement helps you avoid water leaks and electrical hazards, extending the life of your water heater.
Tightening Connections
Loose connections around the heating element or at the inlet and outlet pipes can also cause leaks. Address these issues by:
- Checking all fittings and connections for corrosion or looseness.
- Tightening loose fittings carefully with the appropriate tool.
- Replacing rusty or damaged parts to ensure a proper seal.
- Inspecting the pressure relief valve for leaks or malfunction.
If leaks persist after these steps, seek help from a qualified technician. Proper maintenance and attention to detail will keep your water heater running efficiently and safely.
When Replacing Water Heater Element Isn’t Worth It
Assessing the Age and Condition of Your Water Heater
When you consider whether to repair or replace, the age and condition of your unit play a critical role. Most traditional tank water heaters last between 8 and 12 years. Tankless models can serve you for 15 to 20 years with proper care. If your unit is over 10 years old, you should start thinking about replacement rather than another water heater repair.
Look for these signs that indicate it is time for a new unit:
- Rusty or discolored water coming from your taps
- Insufficient hot water or frequent temperature fluctuations
- Visible leaks around the tank or connections
- Persistent strange noises, such as rumbling or popping
- The unit requires frequent or multiple repairs
- Сайт age of the water heater exceeds 10 years
Units under 8 years old may still benefit from a heating element replacement, especially if the repair cost is reasonable and the rest of the system is in good shape. Regular maintenance, such as flushing the tank and checking the anode rod, can help extend the lifespan of your equipment.
Signs It’s Time for a New Water Heater
You should consider full replacement if you notice:
- The tank leaks or shows signs of corrosion
- Repairs cost more than 50% of a new installation
- The unit is out of warranty and breaks down often
- Energy bills increase due to declining efficiency
💡 Совет: If you find yourself calling for water heater repair more than once a year, investing in a new unit may save you money and hassle in the long run.
Cost Comparison: Repair vs. Replace Water Heater
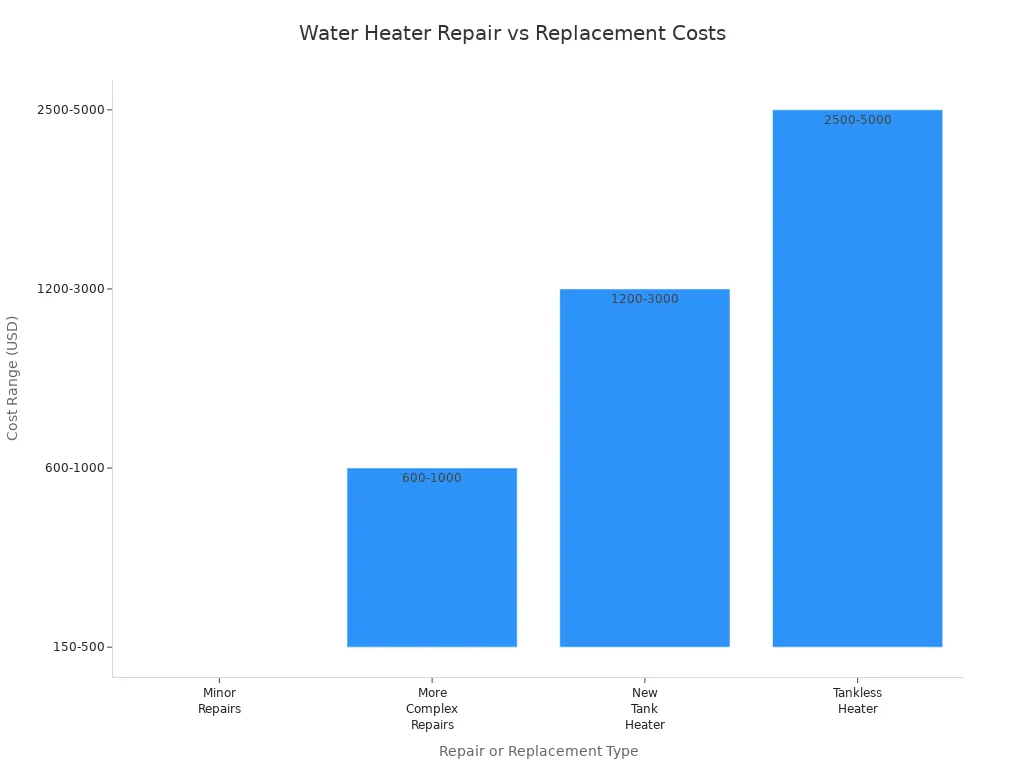
When you weigh the costs, you need to look at both immediate expenses and long-term value. Replacing a heating element usually costs between $200 and $300, including labor. More complex repairs can reach $1,000. In contrast, a new tank water heater typically costs $1,200 to $3,000 installed, while tankless models range from $2,500 to $5,000.
| Тип услуги | Typical Cost Range (including labor) |
|---|---|
| Замена нагревательного элемента | $200 – $300 |
| Full Water Heater Replacement | $1,600 – $5,500 |
Minor repairs make sense for newer units in good condition. However, if your water heater is older, has multiple issues, or repair costs approach half the price of a new unit, replacement is the smarter investment. Newer models also offer improved energy efficiency, which can lower your utility bills over time.
Evaluating Long-Term Value
You should factor in more than just the upfront cost. Older units often need frequent repairs, which add up quickly. New water heaters come with warranties and advanced features that improve performance and reliability. If your current unit is near the end of its expected lifespan, investing in a replacement can prevent unexpected breakdowns and reduce ongoing expenses.
🛑 Тревога: If your water heater is leaking, over 10 years old, or has required several repairs recently, replacement is usually the best choice for safety and peace of mind.
Tips for Maintaining Your Water Heater
Regular Maintenance Checklist
Keeping your water heater in top condition requires regular attention. You can extend its lifespan and improve efficiency by following a simple maintenance routine.
Промывка бака
Sediment buildup inside the tank can cause your water heater to work harder and overheat. You should flush the tank at least once a year. This process removes minerals and debris that settle at the bottom. To flush the tank:
- Turn off the power or gas supply for safety.
- Attach a hose to the drain valve and direct it to a safe drainage area.
- Open the valve and let the water flow until it runs clear.
- Close the valve, remove the hose, and refill the tank.
Совет: Annual flushing helps prevent noise, improves heating efficiency, and protects the heating element from damage.
Inspecting Elements and Thermostats
You should inspect the heating elements and thermostats regularly. Look for signs of corrosion, mineral buildup, or wear. Test the elements with a multimeter to ensure they function properly. Set the thermostat to around 120°F. This temperature prevents overheating and reduces energy use. Check the anode rod every year and replace it if it is less than half an inch thick or heavily corroded. Inspect all valves and pipes for leaks and address any issues immediately.
Preventing Future Water Heater Problems
Proactive steps can help you avoid costly repairs and unexpected breakdowns.
Water Quality Considerations
Hard water contains minerals that can accumulate inside your tank and on the heating elements. If you live in a hard water area, consider installing a water softener. This device reduces mineral buildup and extends the life of your water heater. Insulate the tank and exposed pipes to maintain temperature and reduce the workload on the heating element. Test the pressure relief valve annually by lifting its lever. Replace the valve if it does not release water or leaks after testing.
| Задача по обслуживанию | Recommended Frequency | Выгода |
|---|---|---|
| Промыть бак | Ежегодно | Removes sediment, prevents damage |
| Inspect anode rod | Ежегодно | Prevents corrosion |
| Test pressure relief valve | Ежегодно | Ensures safety |
| Adjust thermostat | As needed | Prevents overheating |
| Insulate tank and pipes | Once | Improves efficiency |
Scheduling Professional Inspections
Some maintenance tasks require a professional’s expertise. Schedule a professional inspection at least once a year. A licensed plumber can detect hidden issues, test electrical components, and ensure all safety features work correctly. If you notice leaks, electrical problems, or persistent heating issues, call a professional immediately. Regular inspections help you catch minor problems before they become major repairs.
🛠️ Примечание: Keeping the area around your water heater clear of clutter and flammable materials also improves safety and makes maintenance easier.
You can spot the need to replace water heater element by watching for no hot water, inconsistent temperatures, or strange noises. To complete the job safely, turn off power, drain the tank, test the element, and install the new part. If you feel unsure or see leaks, contact a licensed professional. Regular inspections and maintenance help you avoid costly repairs and keep your water heater running efficiently.
ЧАСТО ЗАДАВАЕМЫЕ ВОПРОСЫ
Как часто следует менять нагревательный элемент водонагревателя?
Most elements last 6–10 years. Replace the element if you notice reduced hot water, strange noises, or visible corrosion. Regular maintenance can extend its lifespan.
Можно ли заменить нагревательный элемент водонагревателя, не сливая воду из бака?
You should always drain the tank before replacing the element. This step prevents water spills and protects you from burns or electrical hazards.
What size heating element does your water heater need?
Check your water heater’s data plate for voltage and wattage specifications. Bring the old element to the store or consult your manual to ensure a proper match.
Безопасно ли самостоятельно заменять элемент водонагревателя?
You can replace it yourself if you follow all safety steps. Always turn off power and water. If you feel unsure, hire a licensed professional.
Почему ваш новый нагревательный элемент все еще не нагревает воду?
Double-check wiring connections and thermostat settings. Make sure the tank is full before restoring power. If problems persist, the thermostat or another component may need attention.
Какие инструменты вам понадобятся для замены элемента водонагревателя?
You need an element wrench, screwdriver, multimeter, and a new gasket. Keep towels and a bucket nearby for draining and cleanup.
How do you know if the element or thermostat is bad?
Test both with a multimeter. A faulty element shows no resistance or infinite resistance. A bad thermostat will not send power to the element even when set correctly.

