
You can prevent unexpected breakdowns and expensive repairs by regularly checking your Maytag dryer’s heating element. Heating element problems account for 38% of all Maytag dryer breakdowns, making this the most common issue you might face. 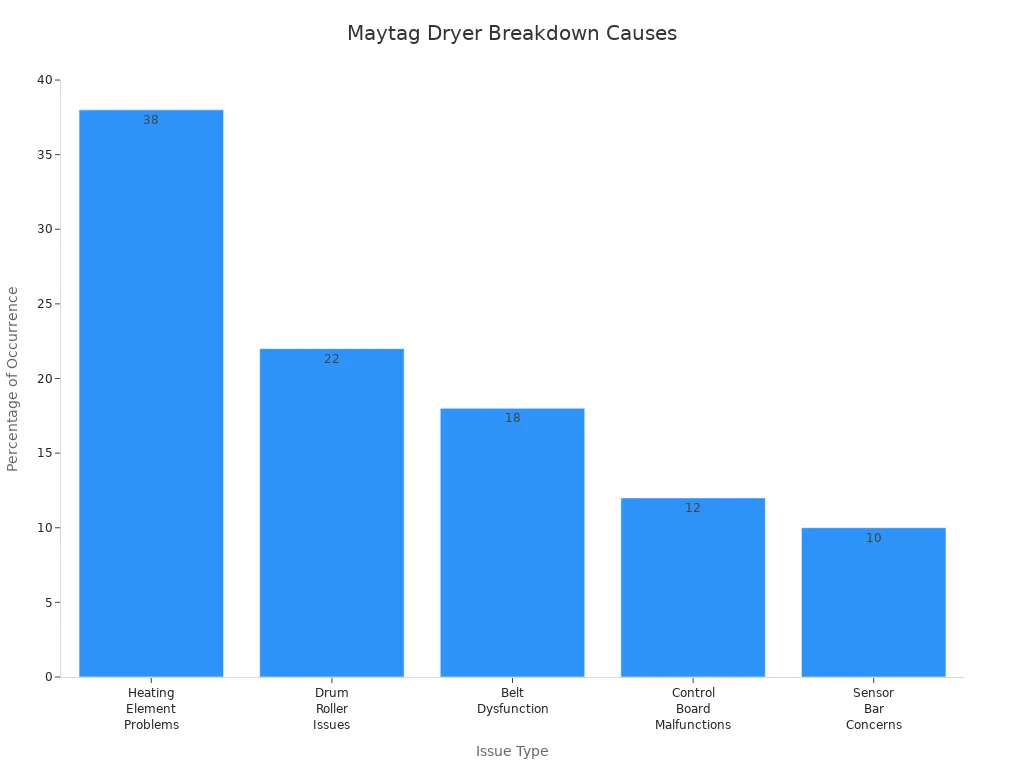
If you notice even small changes in drying performance or suspect a heating element broken, act quickly. Addressing these signs early keeps your dryer running efficiently and safely.

How the Maytag dryer heating element works
The role of the heating element in your Maytag dryer
How it generates heat for drying clothes
You rely on the heating element to power the drying process in your Maytag dryer. This component consists of a coiled wire made from high-resistance material. When you start a cycle, electricity flows through the coil, causing it to heat up. The dryer then draws air across the hot coil, warming the air before it enters the drum. As the heated air circulates through your laundry, it evaporates moisture from the fabric. This process ensures your clothes dry efficiently and evenly.
- The heating element in your dryer:
- Contains a coiled wire that heats up with electrical current.
- Generates the heat needed to dry your clothes by warming the air.
- Circulates this heated air through the drum to evaporate moisture.
- If the element fails, the dryer may run but will not produce enough heat, leaving clothes damp.
- A faulty element is a common reason your dryer might not dry clothes in one cycle.
Importance of proper function for safety and efficiency
A properly working heating element is essential for both safety and performance. When the element operates as designed, your Maytag dryer dries clothes quickly and uses energy efficiently. If the element malfunctions, you risk longer drying times, higher utility bills, and potential safety hazards. You should always address any signs of trouble immediately to avoid further complications.
Safety features and owner precautions
Built-in safety mechanisms in Maytag dryers
Maytag dryers include several safety features to protect both you and the heating element. Thermal fuses act as one-time safety devices. If your dryer overheats, the thermal fuse interrupts the electrical circuit, preventing fire risks. High-limit thermostats serve as safety switches. They cut off the heating circuit if the temperature exceeds safe limits, protecting the element and preventing damage.
- Thermal fuses cut power to the heating element when overheating occurs.
- High-limit thermostats interrupt the heating circuit at unsafe temperatures.
- Testing these components for continuity ensures they work correctly.
- Proper airflow and ventilation prevent overheating and protect the element.
- Regular cleaning of vents and lint traps reduces the risk of restricted airflow, a common cause of heating element failure.
Essential safety tips for owners
Tip: Always unplug your dryer before inspecting or servicing any internal parts.
Regularly clean the lint trap and dryer vents to maintain airflow and prevent overheating.
Schedule routine inspections to catch early signs of trouble.
Never overload your Maytag heavy duty dryer, as this strains the heating element and can lead to premature failure.
Signs your Maytag dryer heating element is failing
Clear warning signs of a heating element broken
Dryer runs but produces no heat
You may notice your Maytag dryer tumbles as usual, but your clothes stay cold and damp. This is one of the most common signs that the heating element is broken. When the dryer does not get hot, it usually means the element has failed due to a break or burnout in the wire coil. You can confirm this by testing the element with a multimeter. Disconnect the wires from the terminals and set the multimeter to continuity or resistance mode. A working element will show a resistance reading between 7 and 15 ohms. If you see infinite resistance or no continuity, the heating element is broken and needs replacement.
- Сайт dryer motor runs, but you are not getting any heat.
- The element should be tested for continuity using a multimeter.
- The dryer tumbles normally but fails to generate heat.
- Related components like blown thermal fuses and faulty thermostats may also cause heating failure, but the primary sign of a heating element broken is the absence of heat despite the dryer running.
Clothes remain damp after a full cycle
If your clothes remain damp after a full drying cycle, you should suspect a problem with the heating element. The dryer may appear to function, but without proper heat, moisture does not evaporate from your laundry. This issue often points directly to a failed element, especially if you have already checked for lint buildup and proper ventilation.
Unusual smells or noises during operation
A failing heating element can sometimes produce a burning smell or even a faint metallic odor. You might also hear unusual noises, such as buzzing or popping, during operation. These symptoms can indicate that the element is overheating or has developed a short circuit. If you notice any of these warning signs, stop using the dryer immediately and inspect the element for visible damage, such as cracks, melting, or corrosion.
Совет: Always unplug your dryer before performing any inspection or repair to avoid electrical hazards.
Subtle symptoms to watch for
Longer than normal drying times
Sometimes, the signs of a failing heating element are less obvious. You may find that your dryer takes much longer than usual to dry a standard load. This symptom often develops gradually. The element may still produce some heat, but not enough to dry clothes efficiently. Inconsistent or partial heating can extend drying times and increase your energy bills.
Inconsistent or fluctuating heat output
Another subtle indicator is inconsistent or fluctuating heat output. You may notice that the dryer heats up at the start of the cycle but then cools down unexpectedly. This can result from wiring issues or partial coil failure within the heating element. To distinguish between heating element failure and other common dryer problems, use the following table:
| Аспект | Подробности |
|---|---|
| Symptoms | No heat or inconsistent drying; burning smell or charred lint; tripped circuit breaker. |
| Визуальный осмотр | Look for cracks, melting, or corrosion on the heating element. |
| Electrical Testing | Use a multimeter for continuity (should beep) and resistance (expected ~11.5 ohms for 240V, 5000W element). |
| Common Failures | Open circuit (burned out, infinite resistance); short circuit (resistance below 5 ohms). |
Heating element wiring issues can cause no heat, intermittent heating, or burning smells. Faulty thermostats may also lead to improper heating, overheating, or longer drying times. However, if your Maytag dryer does not get hot and you observe the above symptoms, the heating element is likely the source of the problem.
Common causes of Maytag dryer heating element failure
Everyday habits that damage the heating element
Перегрузка сушилки
You might think that stuffing your dryer with as many clothes as possible saves time, but this habit can shorten the lifespan of the heating element. Overloading puts extra strain on the motor and every critical part inside the appliance. The heating element works harder to dry larger, heavier loads, which leads to overheating and physical damage. When you exceed the recommended capacity, you force the motor to work beyond its limits. This accelerates wear and tear, causing the heating element to fail sooner than expected. Following the manufacturer’s capacity guidelines helps you maintain the longevity of this essential part.
Tip: Always load your dryer according to the user manual. Evenly distributed, moderate loads dry faster and protect the heating system.
Ignoring lint buildup and poor ventilation
Lint buildup and restricted airflow are leading causes of heating element failure. When lint clogs the lint screen or vent duct, hot air cannot escape efficiently. This blockage causes the heating element to overheat, which can trigger the thermal fuse and damage the element itself. You should clean the lint screen after every cycle and check the vent hose for kinks or clogs regularly. If you notice longer drying times or repeated thermal fuse blowouts, inspect your venting system first. Proper airflow keeps the heating element cool and operating efficiently.
- The most frequent causes of thermal fuse and heating element failure include:
- Clogged or restricted exhaust vent airflow.
- Lint buildup in the lint screen or vent duct.
- Overloading the dryer with excessively large or wet loads.
- Faulty thermostats or shorted heating elements.
- Wiring or motor switches shorting out.
Technical and environmental factors
Electrical issues affecting the heating element
Electrical problems can silently damage your dryer’s heating element. Faulty connecting wires, loose terminals, or worn insulation can cause intermittent heating or complete failure. You may notice the dryer runs but does not heat, or you might smell burning odors during operation. These symptoms often point to electrical faults that reduce performance and trigger safety devices like the thermal cut-off kit. Overheating from electrical issues can also cause visible damage or burnout of the heating element, decreasing its efficiency and lifespan. Regular inspections help you catch these problems early.
- Common electrical issues include:
- Damaged or loose heating element wires.
- Intermittent heating due to poor connections.
- Overheating that activates safety cut-offs.
Age, wear, and discontinued parts
Even with proper care, every heating element has a limited lifespan. Over years of use, the element’s coil can wear out, especially if you run frequent or extended cycles. Mineral buildup from hard water or residue can also inhibit heat transfer, making the element work harder. Eventually, the part may fail due to simple wear and tear. According to industry data, a Maytag heating element typically lasts 12 to 15 years under normal conditions, with most owners needing zero or one replacement in 15 years.
| Бренд | Средняя продолжительность жизни (лет) | Typical Replacements in 15 Years |
|---|---|---|
| Maytag | 12 to 15 | 0 to 1 |
If your dryer is older or uses discontinued parts, sourcing a replacement may take extra effort. Regular maintenance and prompt repairs help you maximize the lifespan of your heating element and avoid unexpected breakdowns.
DIY troubleshooting and testing secrets for your Maytag dryer
Step-by-step troubleshooting guide
Safety first: Unplug and prepare your dryer
Before you begin any troubleshooting, always prioritize safety. Unplug your Maytag dryer or switch off the circuit breaker. This step protects you from electrical shock and prevents accidental activation during inspection. Gather your tools in advance. You will need a screwdriver to remove the back panel and a multimeter to test electrical continuity.
Совет: Never skip the unplugging step. Even a brief lapse can result in serious injury.
Визуальный осмотр нагревательного элемента
Once you have disconnected power, move the dryer away from the wall for easy access. Use your screwdriver to remove the back panel. Locate the heating element, which appears as a metal case containing coiled wires. Carefully disconnect the wires and mounting screws to remove the element from its housing.
Inspect the coils closely. Look for visible breaks, burns, or other damage. If you see any broken or burnt sections, you will need to replace the part. A visual check often reveals the cause of heating issues without further testing.
How to use a multimeter to test the heating element
A multimeter is your most reliable tool for diagnosing electrical faults. Set your multimeter to measure resistance (ohms) or continuity. Touch the probes to the terminals of the heating element. A functional element will show a reading around 10 ohms or produce a beep, indicating continuity. If you see no reading or the multimeter remains silent, the element has failed and requires replacement.
Step-by-step testing process:
- Unplug the dryer or turn off the circuit breaker.
- Remove the back panel using a screwdriver.
- Locate and remove the heating element.
- Set your multimeter to the correct mode (ohms or continuity).
- Place the probes on the element’s terminals.
- Check for a reading near 10 ohms or listen for a beep.
- If the reading is incorrect or there is no beep, replace the element.
Примечание: You can also use the multimeter to test thermostats by removing their wires and measuring resistance.
When to call a professional for a heating element broken issue
Warning signs you shouldn’t ignore
Some problems require expert attention. If you notice persistent burning smells, melted wires, or repeated tripping of the circuit breaker, stop troubleshooting and contact a professional. These symptoms may indicate deeper electrical faults or fire hazards. Attempting repairs without proper knowledge increases the risk of electrical shock or fire.
- Signs that require professional help:
- Loose or melted wires near the heating element.
- Arcing or sparking sounds during operation.
- Difficulty reattaching wires securely.
- Uncertainty about any repair step.
What a technician can diagnose and repair
A qualified technician brings specialized tools and experience. They can diagnose complex electrical issues, replace damaged wiring, and ensure all connections meet safety standards. Technicians also check for hidden problems, such as faulty thermostats or control boards, that may not be obvious during a basic inspection. Professional repairs eliminate fire hazards and restore your dryer’s performance.
Тревога: A loose or improperly attached wire can overheat and melt, creating a serious fire risk. Always ensure connections are tight and secure. If you feel unsure, call a professional.
Replacement secrets for your Maytag dryer heating element

Choosing the right heating element replacement
Identifying your Maytag dryer model number
You must identify your exact Maytag dryer model number before purchasing a replacement part. Model numbers appear on a sticker or metal plate, often found inside the door frame, on the back panel, or near the lint trap. These numbers can be numeric or alphanumeric, such as 1005400 or LAT1000AAE. Accurately recording this number ensures you select a heating element that fits your specific maytag heavy duty dryer. Many online resources and guides can help you locate and verify your model number, which is essential for finding a genuine OEM part.
- Model numbers are critical for compatibility.
- Use the exact number to search for the correct replacement part online.
- OEM parts guarantee a proper fit for your maytag heavy duty appliance.
OEM vs. aftermarket heating element parts
When you choose a replacement heating element, you face a decision between OEM and aftermarket parts. Appliance repair professionals recommend OEM parts for critical repairs because they offer reliability, durability, and a quality guarantee. OEM heating elements often feature thicker coils and superior materials, which contribute to longer service life. Aftermarket parts may cost less upfront, but they can fail sooner and lack the same quality assurance. Many users find that investing in an OEM part saves money over time, as you avoid repeated replacements and performance issues.
DIY replacement tips for the heating element
Tools needed for replacement
You need only basic hand tools to install a new part in your Maytag dryer. A multi screwdriver, pliers, and a nut driver will handle most tasks. Always unplug the dryer or shut off the circuit breaker before starting. For gas models, turn off the gas supply at the isolation valve.
- Multi screwdriver
- Плоскогубцы
- Nut driver
- Рабочие перчатки
Step-by-step installation guide
Follow these steps to replace the heating element safely and efficiently:
- Unplug the dryer or turn off the circuit breaker.
- Remove screws at the bottom of the front panel.
- Rotate the panel out to release top clips.
- Disconnect wires from the door switch and set the panel aside.
- Remove screws securing the heating element shield.
- Disconnect the power supply wire and high-limit thermostat wires.
- Remove mounting screws and pull out the heating element assembly.
- Separate the housing and remove the old coil.
- Feed the new coil through insulator rings, ensuring even spacing.
- Secure coil ends with washers and nuts.
- Reassemble the housing and reinstall all components.
- Reconnect wires and secure the front panel.
- Plug in the dryer and test for proper operation.
Tip: Always check the thermal fuse before replacing the heating element to avoid unnecessary work.
Cost-saving advice for heating element replacement
Where to buy quality Maytag dryer parts
You can find reliable OEM heating element replacements at trusted retailers like ReliableParts.com. This site offers factory-certified parts designed for Maytag dryers, including heating elements, repair kits, and thermal fuses. You benefit from quality assurance, compatibility, and access to installation instructions. Purchasing a replacement part online from a reputable source ensures you receive a time-tested component that meets strict specifications.
Avoiding common replacement mistakes
Many owners overlook key steps during replacement. Always unplug the dryer and verify the model number before ordering. Do not skip checking the thermal fuse, as a blown fuse can mimic heating element failure. Install the new part carefully, ensuring the coil does not touch itself or the housing. Proper installation prevents short circuits and extends the life of your heating element.
| Cost Component | Cost Range (USD) |
|---|---|
| Деталь нагревательного элемента | $70 – $150 |
| Labor (per hour) | $50 – $100 |
| Service Call Fee | $100 – $150 |
| Total Repair Cost | $100 – $550 |
Note: You can save significantly by performing the replacement yourself, as labor costs often exceed the price of the part.
Pro tips for extending Maytag dryer heating element life
Maintenance routines for your heating element
Cleaning the lint trap and dryer vents
You can extend the life of your heating element by making lint removal a regular part of your laundry routine. After every load, remove lint from the lint trap by hand. This simple step maintains airflow and reduces the risk of overheating. For deeper cleaning, wash the lint trap with soap and water every week or two. This removes residue that can trap lint and cause clogs. Once a month, use a vacuum to clean the lint trap housing. This prevents debris from escaping into the vent system.
Professional cleaning of your dryer vents once a year is essential, especially if you use your maytag heavy duty model frequently. Lint buildup in the vent restricts airflow, which can cause the heating element to overheat and fail. Regular cleaning keeps your dryer running efficiently and protects your investment.
| Компонент | Частота уборки | Purpose/Effect on Heating Element Issues |
|---|---|---|
| Ловушка для ворса | After every use | Prevents lint buildup, reduces overheating risk |
| Weekly or biweekly (wash) | Removes residue, prevents clogs | |
| Lint Trap Housing | Monthly (vacuum) | Clears debris, reduces vent clogs |
| Dryer Vents | Annually (professional cleaning) | Prevents lint accumulation, reduces risk of heating element failure |
Regular inspections for early problem detection
You should inspect your heating element visually on a regular basis. Look for signs of burns, cracks, or other damage. Early detection allows you to replace a failing part before it causes a complete breakdown. Check the exhaust vent every few months to ensure there are no blockages. If you notice longer drying times or unusual smells, investigate immediately. Routine inspections help you avoid costly repairs and keep your maytag dryer operating safely.
| Maintenance Routine | Purpose/Benefit | Recommended Frequency/Notes |
|---|---|---|
| Clean lint screen after every load | Maintains airflow, reduces overheating risk | Make it a habit |
| Inspect and clean exhaust vent | Prevents blockages, reduces overheating | Every few months |
| Inspect heating element visually | Detects damage early, prevents failure | Регулярно |
Smart usage habits to prevent heating element broken issues
Proper loading techniques for your Maytag dryer
You protect your heating element by loading your dryer correctly. Always follow the manufacturer’s guidelines and avoid filling the drum more than three-quarters full. Overloading restricts air circulation and forces the heating element to work harder, which can lead to premature failure. Clothes should tumble freely for even drying. If your washer leaves clothes too wet, check its drain and spin cycles. Excess moisture makes the dryer work harder and increases wear on the heating element.
Avoiding overuse and overheating
Smart usage habits go beyond proper loading. Give your dryer time to cool between loads, especially if you use it heavily. Avoid running multiple cycles back-to-back, as this can cause overheating. Schedule routine maintenance to inspect critical components such as the thermostat, heating element, and vents. Addressing minor issues early prevents major failures. Ensure your dryer is installed with properly aligned, unobstructed venting. This allows heat and moisture to escape efficiently, reducing strain on the heating element.
Tip: Clean and replace lint filters regularly, check thermostats for faults, and replace door seals as needed to maintain efficient heat retention.
You now know the essential secrets to keep your Maytag dryer heating element in top condition. Регулярное техническое обслуживание delivers real benefits:
- Cleaning lint filters and vents reduces stress on the heating element.
- Proper airflow prevents overheating and extends lifespan.
- Routine checks catch early faults, avoiding costly repairs.
- Consistent temperature control improves energy efficiency.
Start your maintenance routine today. You will protect your investment, save on energy bills, and enjoy reliable dryer performance for years to come.
ЧАСТО ЗАДАВАЕМЫЕ ВОПРОСЫ
How often should you replace your Maytag dryer heating element?
Most heating elements last 12 to 15 years with proper care. Replace the element only if you notice clear signs of failure, such as no heat or visible coil damage. Regular maintenance helps extend its lifespan.
Can you run your Maytag dryer with a broken heating element?
You can run the dryer, but it will not dry clothes. The drum will tumble, but no heat will be produced. Running the dryer this way wastes energy and may cause further damage. Replace the heating element promptly.
What tools do you need to replace a Maytag dryer heating element?
You need a multi screwdriver, pliers, and a nut driver. Work gloves protect your hands. Always unplug the dryer before starting. For gas models, turn off the gas supply at the valve.
How do you know if the heating element or thermal fuse is the problem?
Test both parts with a multimeter. A working heating element shows continuity (around 10 ohms). A blown thermal fuse shows no continuity. Replace the faulty part based on your test results.
Where can you find your Maytag dryer model number?
Look for the model number inside the door frame, on the back panel, or near the lint trap. Use this number to order the correct replacement parts.
Is it better to use OEM or aftermarket heating elements?
OEM parts offer better reliability and fit. Aftermarket parts may cost less but often have shorter lifespans. For best performance, choose OEM heating elements for your Maytag dryer.
What maintenance steps help prevent heating element failure?
- Clean the lint trap after every load.
- Vacuum the lint trap housing monthly.
- Schedule annual professional vent cleaning.
- Inspect the heating element regularly for damage.
Why does your dryer take longer to dry clothes even after replacing the heating element?
Clogged vents, lint buildup, or faulty thermostats can cause long drying times. Check and clean all airflow paths. If the problem persists, inspect other components for faults.

