When you need to replace dryer heating element, you can expect the cost to range from $20 to $150 for a do-it-yourself fix, or between $70 and $250 if you hire a professional. Most homeowners see a dryer repair cost between $70 and $350, depending on the part and labor involved. Understanding the cost to replace dryer heating element helps you plan for repairs and avoid unexpected expenses. Knowing the typical dryer repair cost also gives you confidence when comparing service quotes.
The right knowledge can save you time and money when your dryer stops heating.
Cost to Replace a Dryer Heating Element
Understanding the costs involved in dryer repair helps you make informed decisions and avoid surprises. The price you pay depends on whether you choose a DIY approach or hire a professional, the type of dryer you own, and any additional fees that may apply.
Average Dryer Repair Cost
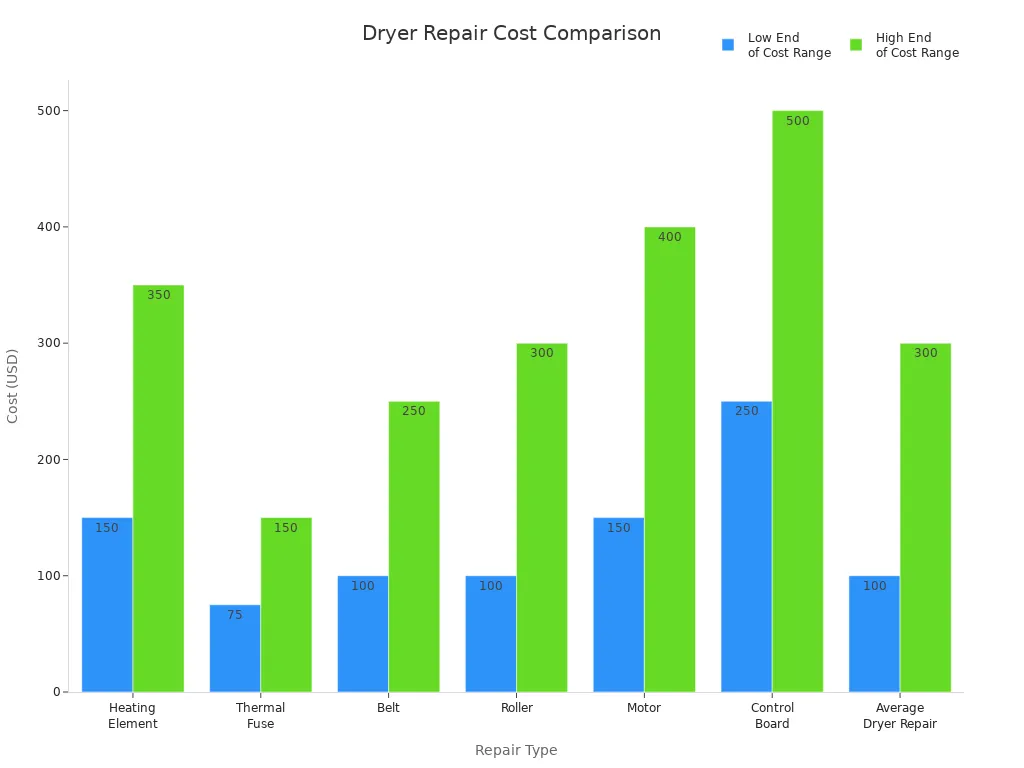
The average dryer repair cost varies based on the part that needs replacement. You will find that the cost to repair a dryer heating element typically falls in the mid to upper range compared to other common repairs.
| Repair Type | Average Cost Range (USD) | Notes on Comparison |
|---|---|---|
| Heating Element | $150 – $350 | Mid to upper range of typical dryer repair costs |
| Thermal Fuse | $75 – $150 | Lower cost than heating element replacement |
| Belt | $100 – $250 | Generally less expensive than heating element repair |
| Roller | $100 – $300 | Comparable but often slightly less than heating element |
| Motor | $150 – $400 | Comparable or slightly higher than heating element |
| Control Board | $250 – $500 | Higher cost than heating element replacement |
| Average Dryer Repair | $100 – $300 | Heating element replacement fits within this range |
DIY Replacement Cost
If you decide to replace the dryer heating element yourself, you can expect the cost of a dryer heating element to range from $35 to $100 for electric dryers. You may also need to purchase basic tools, but most homeowners already have these on hand. The total estimated cost for a DIY repair usually stays between $35 and $150, making this option more affordable if you feel comfortable with appliance repairs.
Professional Replacement Cost
Hiring a professional for dryer repair increases the cost, but you gain peace of mind and expertise. The average dryer repair cost for a heating element replacement ranges from $150 to $350. This price includes both the part and labor. Service providers may charge a diagnostic fee, which often gets credited toward the final bill if you proceed with the repair.
Cost Breakdown by Dryer Type
The type of dryer you own affects the cost to repair a dryer. Electric and gas dryers have different components and labor requirements, which impact the overall price.
| Dryer Type | Component Replaced | Parts Cost Range | Labor Cost Range | Total Cost Range | Additional Notes |
|---|---|---|---|---|---|
| Electric Dryer | Heating Element | $35 to $100 (DIY) | $100 to $350 (pro) | $150 to $350 | Heating element is coil-based; DIY possible but risky |
| Gas Dryer | Igniter | Included in total | Included in total | $100 to $250 | Igniter lights gas burner; replacement requires experience |
Electric Dryer Heating Element Cost
Electric dryers use a coil-based heating element. The cost of a dryer heating element for electric models ranges from $35 to $150, depending on the brand and quality. Labor costs for professional installation typically add $100 to $200, bringing the total cost to repair a dryer to $150 to $350.
Gas Dryer Heating Element Cost
Gas dryers do not use a traditional heating element. Instead, they rely on an igniter to light the gas burner. The cost to repair a dryer igniter usually falls between $100 and $250. This price includes both parts and labor. Gas dryer repairs often require more expertise due to safety concerns, which can increase the average dryer repair cost.
Additional Costs to Consider
When you plan for dryer repair, you need to account for more than just the heating element cost. Several additional costs can affect your final bill.
| Cost Component | Typical Cost Range (USD) | Description and Impact on Total Expense |
|---|---|---|
| Dryer Heating Element Repair | $150 – $250 | Base cost for parts and labor to replace the heating element. |
| Diagnostic / Service Call Fee | $55 – $100 | Covers technician travel and initial diagnosis; often credited if repair proceeds. Adds to upfront cost. |
| Additional Service Charges | $50 – $100+ | Includes evening, weekend, holiday, or emergency fees, increasing total cost. |
| Labor Rates | $50 – $150 per hour | Varies by technician expertise and company; affects final labor cost. |
| Required Tools | Implicitly covered | Not separately charged but included within diagnostic and labor fees. |
You may also encounter these common additional expenses:
- Initial service fee
- Labor time, which depends on how long the repair takes
- Cost of parts, which varies by brand and model
- Complexity of the repair
- Type of dryer you own
- Average cost of living in your area
Tip: Always ask your technician for a detailed breakdown of all costs before agreeing to the repair. This helps you avoid unexpected charges and compare the cost of dryer repair by part.
By understanding the average dryer repair cost, the cost of a dryer heating element, and all related expenses, you can make the best decision for your home and budget.
Factors Affecting Dryer Heating Element Replacement Cost
When you plan for a dryer repair, several factors influence the final cost. Understanding these variables helps you make informed decisions and avoid unexpected expenses.
Brand and Model Impact on Cost
Popular Dryer Brands
You might expect the brand of your dryer to play a major role in the cost of heating element replacement. In reality, most major brands—such as Maytag, Whirlpool, LG, Samsung, and Speed Queen—have similar repair costs for comparable models. The cost of a dryer heating element for these brands remains consistent, so you do not need to worry about paying a premium just because of the brand name.
Specialty or High-End Models
The specific model of your dryer can have a bigger impact on the cost. Complex or high-end models often require more time for diagnosis and repair, which increases labor costs. Simpler models usually have fewer components, so the repair process is faster and less expensive. If you own a specialty or advanced dryer, you should expect higher costs due to the extra time and expertise needed.
Part Quality and Sourcing
OEM vs. Aftermarket Dryer Heating Elements
When you shop for a replacement part, you will find both OEM (Original Equipment Manufacturer) and aftermarket options. The cost difference between these choices can be significant:
- OEM dryer heating elements often cost three to four times more than aftermarket parts. For example, you might pay $80 for an OEM part but only $25 for an aftermarket version.
- OEM parts usually feature thicker coils and higher-quality materials, which can lead to longer-lasting repairs.
- Aftermarket parts offer a lower upfront cost but may fail sooner, leading to additional repair costs down the road.
- Many professionals recommend OEM parts for reliability, even though the initial cost is higher.
Where to Buy Dryer Heating Elements
You can purchase dryer heating elements from appliance parts stores, online retailers, or directly from the manufacturer. Prices vary by source, so compare options to find the best deal. Always check that the part matches your dryer model to avoid extra costs from returns or incorrect installations.
Labor and Service Fees
Local vs. National Dryer Repair Services
Labor and service fees can vary widely depending on your location and the provider you choose. Local repair shops may offer lower costs, while national chains sometimes charge more for convenience and brand recognition. In metropolitan areas, you may see higher hourly rates due to increased business expenses, such as parking, insurance, and local taxes. Rural areas might add travel charges, which increase the total cost of your dryer repair.
Emergency or Same-Day Service Costs
If you need urgent dryer repair, expect to pay a premium. Emergency or same-day service calls often come with higher fees to cover overtime and rapid response. Some companies offer 24/7 service at competitive rates, but others charge extra for off-hour visits. Always ask about these costs before scheduling your repair to avoid surprises.
Tip: Comparing service providers and understanding all potential costs helps you control your total dryer repair expenses.
DIY vs. Professional Dryer Heating Element Replacement
Choosing between DIY and professional dryer heating element replacement requires careful consideration of cost, skill, safety, and long-term value. Each approach offers unique benefits and drawbacks that impact your total dryer repair cost and the reliability of your appliance.
Pros and Cons of DIY Replacement
Cost Savings and Expenses
DIY replacement appeals to many homeowners because it can significantly reduce the cost to repair a dryer. You avoid labor fees, paying only for the heating element and any necessary tools. However, hidden costs may arise if you misdiagnose the issue or make mistakes during the repair. These errors can lead to additional expenses, such as replacing other damaged parts or even needing professional help later.
Required Skills and Tools
You need basic mechanical skills and the correct tools to complete a DIY dryer repair. Many dryers require you to remove panels, disconnect wires, and handle delicate components. Without experience, you risk damaging the dryer or installing the replacement incorrectly. Some models have complex assemblies that challenge even skilled DIYers.
Safety Concerns and Risks
Safety should always come first. High-voltage appliances like dryers pose real risks, including electric shock and injury from sharp metal edges. Common mistakes include forgetting to unplug the dryer, misdiagnosing the problem, or using unsafe repair methods. Attempting to splice or wrap broken heating element wires can cause short circuits and further damage. Experts recommend replacing the heating element rather than repairing it, as improper fixes can energize the chassis and increase the risk of electric shock.
⚠️ Always disconnect power before starting any dryer repair to avoid injury.
- Misdiagnosing the heating element as the problem.
- Incorrectly reassembling the dryer after replacement.
- Overlooking critical safety steps, such as turning off power.
Pros and Cons of Hiring a Professional
Expertise and Warranty
Professional dryer repair services provide accurate diagnosis and proper replacement using specialized tools. Technicians have the training to handle complex models and ensure safe, reliable repairs. Most professional installation services include warranties, protecting you from future costs if issues arise.
Time and Convenience
Hiring a professional saves you time and effort. Technicians complete the replacement quickly, often offering same-day or emergency service. You avoid the trial-and-error process common with DIY repairs, and you gain peace of mind knowing the job meets industry standards.
Potential Drawbacks
The main drawback of professional repair is the higher cost. Labor and service fees increase the total dryer repair cost compared to DIY. You may also face delays if local technicians have limited availability. However, many companies offer transparent pricing and may waive service call fees, reducing unexpected costs.
Comparing Total Dryer Repair Cost
The following table summarizes the key differences between DIY and professional dryer heating element replacement:
| Aspect | DIY Repair | Professional Service |
|---|---|---|
| Cost | Lower upfront cost (parts only) | Higher cost (parts + labor + possible service fees) |
| Skill Required | Requires experience and correct tools | Expert technicians handle all aspects |
| Time | Can be time-consuming and challenging | Faster completion, saves you time |
| Risk | Higher risk of errors and safety hazards | Lower risk, proper diagnosis and installation |
| Satisfaction | Personal satisfaction from successful repair | Peace of mind from guaranteed work |
| Warranty | May void warranty if mistakes occur | Often includes warranty and work guarantees |
| Safety | Must follow strict safety precautions | Professionals trained to manage all safety risks |
When you compare the cost to repair vs replace, DIY may seem less expensive at first. However, professional installation often prevents recurring issues and provides long-term value. Consider your comfort level, available time, and the complexity of your dryer before deciding which option best fits your needs and budget.
Step-by-Step Guide to Replace Dryer Heating Element
Replacing a dryer heating element requires careful preparation, the right tools, and attention to safety. You can follow this detailed guide to complete the replacement process efficiently and safely.
Preparation and Safety Steps
Unplugging and Disconnecting the Dryer
Before you begin any replacement, you must ensure your safety. Start by turning off the circuit breaker that supplies electricity to your dryer. This step guarantees that no power flows during the repair. Next, unplug the dryer from the wall outlet. Never attempt to replace dryer heating element while the appliance remains connected to power.
Wear protective gear such as gloves to protect your hands from sharp edges and safety glasses to shield your eyes from dust and debris. Open a window or door to ventilate the area and disperse any dust or fumes. A clean, organized workspace helps prevent accidents and makes the replacement smoother.
Gathering Necessary Tools and Parts
You need the correct tools and parts to replace dryer heating element successfully. Appliance repair experts recommend the following:
- Phillips and flat-head screwdrivers
- Nut drivers or socket wrenches
- Adjustable wrenches
- Needle-nose pliers
- Multimeter for testing electrical continuity
- Flashlight for illuminating dark areas
- Electrical tape for insulating wire connections
Gather the new dryer heating element that matches your model. Check the part number in your user manual or on the manufacturer’s website. Inspect and clean the exhaust vent system by disconnecting the vent hose and removing lint buildup. This step prevents overheating and ensures safe operation after replacement.
Tip: Keep all screws and small parts in a container to avoid losing them during the process.
Accessing the Dryer Heating Element
Removing the Dryer Panel
To access the dryer heating element, you must remove the appropriate panel. Most dryers require you to take off the back panel, but some models use a front or lower panel. Use a Phillips screwdriver or nut driver to remove the screws securing the panel. Place the screws in a safe spot for reassembly.
Gently pull the panel away from the dryer. If you encounter resistance, check for hidden screws or clips. Use a flashlight to inspect dark corners and ensure you do not miss any fasteners.
Locating the Heating Element
Once you remove the panel, locate the dryer heating element. In most electric dryers, you will find the heating element inside a metal housing near the bottom or back of the appliance. The heating element resembles a coiled wire or a metal frame with terminals for electrical connections.
Use your multimeter to test the heating element for continuity. Place the probes on the terminals. If the reading shows no continuity, you have confirmed the need for replacement.
Removing and Installing the Heating Element
Detaching the Old Dryer Heating Element
Begin by disconnecting the wires attached to the heating element terminals. Use needle-nose pliers to gently pull the connectors free. Take a photo or make a note of the wire positions to ensure correct reassembly.
Remove any mounting screws or clips holding the heating element in place. Carefully slide the old heating element out of its housing. Avoid damaging nearby components or wiring during this step.
Installing the New Dryer Heating Element
Insert the new dryer heating element into the housing, aligning it with the mounting holes. Secure it with the screws or clips you removed earlier. Reconnect the wires to the correct terminals, matching your notes or reference photo.
Use your multimeter to verify proper electrical connections. Insulate any temporarily bypassed wires with electrical tape, and ensure no bare wires touch the dryer cabinet. Restore all safety components, such as the thermal fuse, to their original state.
Note: If you feel unsure at any point or if the dryer shows persistent issues after replacement, contact a professional technician to avoid safety hazards.
You have now completed the core steps to replace dryer heating element. The next phase involves reassembling the dryer and testing its operation, which ensures your replacement delivers reliable performance.
Reassembly and Testing
Reattaching Panels
After you complete the replacement of the heating element, you need to reassemble your dryer. Begin by carefully aligning the panel you removed earlier. Secure it with the original screws, making sure each one fits snugly. If your dryer uses clips, press them into place until you hear a click. Double-check that no wires or parts get pinched between the panel and the frame. A loose panel can cause rattling noises or even damage the appliance during operation.
You should also reconnect the exhaust vent if you disconnected it during the replacement. Push the vent hose back onto the outlet and tighten the clamp. This step ensures proper airflow and prevents lint buildup, which can lead to overheating. Once you finish reattaching all panels and connections, inspect the area for any leftover tools or parts. A clean workspace helps you avoid future issues.
Tip: Take a moment to review your work before moving on. A quick inspection now can save you from having to reopen the dryer later.
Testing the Dryer After Replacement
Now you need to test the dryer to confirm the success of your replacement. Plug the dryer back into the wall outlet or switch the circuit breaker back on. Set the dryer to a standard drying cycle and start the machine. Listen for any unusual sounds, such as rattling or grinding, which could indicate a panel is not secure.
Check that the drum spins smoothly and that warm air flows from the exhaust vent. If the dryer heats up and completes a cycle without error, your replacement succeeded. If you notice any issues, such as no heat or a tripped breaker, turn off the dryer immediately. Recheck your installation steps to ensure all wires connect properly and the heating element sits in the correct position.
Note: Always stay nearby during the first test cycle. If you smell burning or see smoke, stop the dryer and unplug it right away.
Safety Tips and Common Mistakes
When you replace dryer heating element, safety must remain your top priority. Many homeowners overlook basic precautions, which can lead to injury or damage. Follow these essential safety tips every time you perform a replacement:
- Disconnect the dryer from power by unplugging it or switching off the circuit breaker before starting any replacement work. This step prevents electric shock.
- Allow the dryer to cool completely if you have used it recently. Hot surfaces can cause burns.
- Work slowly and carefully. Rushing increases the risk of accidents.
- Ensure your workspace is well-lit so you can see all parts clearly.
- Keep the area clean and free of clutter. Children and pets should stay away from the work zone.
- Never handle internal parts with wet hands. Keep the work area dry to avoid electrical hazards.
- Consult your user manual for specific safety or installation instructions related to your dryer model.
- Handle all parts gently. Rough handling can damage the appliance or cause personal injury.
- Wear insulated gloves to protect your hands from sharp edges and electrical hazards.
- Avoid touching exposed wires or terminals. If you must handle them, use non-conductive tools or insulating gloves.
- Document wiring connections before disconnecting anything. This step ensures correct reassembly during replacement.
⚠️ Always prioritize safety over speed. If you feel unsure at any point, stop and consult a professional.
Common Mistakes to Avoid:
- Forgetting to disconnect power before starting the replacement.
- Failing to document wire connections, leading to incorrect reassembly.
- Using the wrong replacement part for your dryer model.
- Over-tightening screws, which can strip threads or crack panels.
- Skipping the final test cycle after reassembly.
You can prevent most problems by following these safety tips and staying organized throughout the replacement process. Careful attention to detail ensures your dryer operates safely and efficiently after you replace dryer heating element.
When to Call a Professional for Dryer Heating Element Replacement
Knowing when to call a professional for dryer heating element replacement can save you time, money, and stress. Some situations require expert attention to ensure your safety and the long-term performance of your appliance.
Signs You Need Expert Dryer Repair
You may handle basic maintenance, but certain warning signs mean you should contact a professional for dryer repair. Watch for these issues:
Complex Dryer Models
Modern dryers often feature advanced electronics, digital displays, and specialized components. If your dryer shows error codes or has a complicated assembly, you should not attempt the repair yourself. Complex models require specialized tools and knowledge. Attempting to fix these dryers without proper training can lead to further damage or void your warranty.
Electrical or Gas Safety Concerns
Safety must always come first. If you notice any of the following, stop using your dryer and call a professional:
- Excessive drying times beyond 30-45 minutes, even after cleaning the lint filter.
- Burning smells or signs of overheating during operation.
- The dryer stops mid-cycle or fails to start.
- Unusual noises such as squeaking, rattling, or grinding.
- Clothes remain damp after a full cycle, despite normal settings.
- Error codes appear on the digital display.
⚠️ Burning smells and overheating pose a serious fire hazard. Persistent issues after cleaning the vent or filter require immediate professional repair.
You should also seek expert help if you own a gas dryer. Gas appliances involve additional risks, including gas leaks and carbon monoxide exposure. Only trained technicians should handle gas dryer repairs.
What to Expect from a Dryer Repair Service Call
When you schedule a professional dryer repair, you can expect a clear and efficient process from start to finish.
Typical Service Process
A standard service call for heating element replacement usually follows these steps:
- You contact the repair service by phone or online.
- A technician arrives to diagnose the dryer problem.
- The technician provides a detailed estimate for parts and labor.
- With your approval, the technician begins the repair.
- The technician turns off power, removes the necessary panels, and locates the faulty heating element.
- The technician disconnects wiring, tests the element, and replaces it with a new part.
- The technician reassembles the dryer and tests it to confirm proper operation.
This process ensures your dryer receives a thorough inspection and a reliable repair. Most professionals focus on quality workmanship and customer satisfaction.
Questions to Ask Your Technician
Before the repair begins, you should ask your technician a few important questions:
- What caused the heating element to fail?
- Is the replacement part OEM or aftermarket?
- Will the repair come with a warranty?
- How long will the repair take?
- Are there any additional costs not included in the estimate?
- What maintenance steps can help prevent future dryer problems?
Tip: Clear communication with your technician helps you understand the repair process and avoid unexpected expenses.
By recognizing the signs that require professional help and knowing what to expect during a service call, you protect your home and ensure your dryer operates safely and efficiently.
Preventing Future Dryer Heating Element Issues
Regular maintenance plays a critical role in extending the life of your dryer and preventing costly repairs. By following a few simple steps, you can keep your appliance running efficiently and reduce the risk of a dryer not heating when you need it most.
Regular Dryer Maintenance Tips
Cleaning the Lint Trap and Dryer Vents
You should always clean the lint trap after every load. This simple habit prevents lint from entering the vent system, which can cause overheating and increase fire risk. Lint buildup restricts airflow, forcing your dryer to work harder and putting extra strain on the heating element.
Professional dryer vent cleaning is recommended at least once a year. However, if you have a large household, use your dryer frequently, or have pets, you may need to clean the vent more often. Signs that indicate immediate cleaning include longer drying times, overheating, burning smells, or visible lint around the vent. Regular cleaning not only keeps your dryer safe but also improves efficiency and extends its lifespan.
Tip: The National Fire Protection Association advises annual dryer vent cleaning, but you should adjust the frequency based on your usage and household needs.
Avoiding Overloading the Dryer
Overloading your dryer can lead to mechanical strain and excessive wear on the heating element. Always follow the manufacturer’s load capacity guidelines. When you overload the drum, you reduce airflow and force the dryer to run longer cycles, which increases the risk of overheating and premature heating element failure. By loading the dryer properly, you help maintain optimal performance and protect all internal components.
Recognizing Early Warning Signs of Heating Element Failure
You can often spot early signs of trouble before your dryer stops working completely. Watch for these common indicators:
- The dryer heats up at first but then stops producing heat while the drum continues to spin.
- You notice the dryer only reaches low temperatures, even on high heat settings.
- Drying cycles take much longer than usual, or clothes remain damp after a full cycle.
- You see visible damage to the heating element, such as breaks, burns, or discoloration.
- No error codes or warning lights appear, but the dryer still fails to heat properly.
Restricted airflow from clogged vents or lint filters can also cause the heating element to overheat and shut down prematurely. Faulty thermostats or sensors may contribute to inconsistent heating. If you observe any of these symptoms, you should inspect the heating element and related components. Using a multimeter to test for continuity can help you confirm if the heating element needs replacement.
Note: Addressing these warning signs early helps you avoid unexpected breakdowns and extends the life of your dryer.
By maintaining your dryer with regular cleaning and proper use, you reduce the risk of heating element failure and ensure safe, efficient operation for years to come.
Making the Right Choice for Your Dryer Repair Cost and Needs
Weighing Cost vs. Convenience
When you face a dryer heating element replacement, you must weigh the cost against the convenience of professional service. The cost of professional repair typically ranges from $150 to $350, which includes technician fees and labor. If you choose a DIY approach, you may spend only $35 to $100 on parts. However, you must consider more than just the upfront cost.
- DIY repair can save you money, but it requires time, effort, and a willingness to learn.
- Professional service offers expertise, safety, and peace of mind, especially for complex dryer models.
- The type of dryer—electric or gas—affects both the cost and the complexity of the replacement.
- DIY repair carries risks, such as personal injury or causing further damage, which could increase your total cost.
- Professional repair ensures the job is done right the first time, reducing the chance of repeat issues.
Tip: Balance the lower cost of DIY with the value of your time and the assurance that comes with professional repair.
Assessing Your Comfort Level with DIY Dryer Repair
Before you attempt a dryer repair, you should honestly assess your skills and resources. Consider these factors:
- Your technical understanding and ability to follow detailed instructions for replacement.
- Experience with diagnosing electrical circuits and using specialized tools.
- Comfort with safety precautions, such as working with electricity or gas, and using proper safety gear.
- Past success with appliance repairs and familiarity with your specific dryer model.
- Access to necessary tools, genuine replacement parts, and reliable repair guides.
- The time and cost involved in learning and completing the repair, including the risk of mistakes.
- The age and value of your dryer, since newer or high-end models may justify the cost of professional service.
- Your ability to recognize when a repair exceeds your capabilities, especially for electrical or gas-related issues.
Always disconnect your dryer from power before starting any repair. Wear gloves and safety glasses, and consult your user manual or trusted online resources.
If you feel uncertain about any step, or if the repair involves complex wiring or gas connections, you should consider professional replacement. Safety and proper function should always come first.
Final Decision Checklist for Homeowners
Use this checklist to guide your decision between DIY and professional dryer repair:
- Identify symptoms of a faulty heating element, such as no heat, burnt smells, or visible damage.
- Check the circuit breaker to ensure it has not tripped.
- Use a multimeter to test the heating element and related components for continuity.
- Remove the dryer’s back panel to visually inspect the heating element for breaks or discoloration.
- Confirm the replacement part matches your dryer model.
- Gather all necessary tools: screwdrivers, nut driver, multimeter, pliers, and a vacuum cleaner.
- Use proper safety gear: rubber gloves, safety glasses, and non-conductive shoes. Always disconnect power before starting.
- Avoid common mistakes, such as skipping thermal fuse tests or ignoring safety protocols.
- Compare the total cost: DIY parts and tools may cost $50-$120, while professional repair ranges from $150-$300.
- Know when to call a professional: if you lack tools, feel unsure about electrical testing, have failed previous repairs, or notice smoke or sparks.
- Consider the benefits of professional service, including warranties, thorough diagnostics, and peace of mind.
By following this checklist, you can make a confident choice that fits your budget, skills, and safety needs.
When you consider dryer heating element replacement, you must weigh the total cost, which often includes diagnostic fees, labor, and parts. The cost depends on your dryer’s brand, model, and the complexity of the repair. Labor fees and your location also impact the final cost. Always disconnect power before starting any repair to ensure safety. If you lack experience, professional repair offers peace of mind and may reduce future costs. Regular maintenance, such as cleaning lint traps and vents, helps prevent costly repair needs. Evaluate your dryer’s age and compare repair cost to replacement for the best decision.
FAQ
How do you know if your dryer heating element is bad?
You may notice your dryer runs but does not heat. Clothes stay damp after a full cycle. You might see visible breaks or burns on the heating element. Use a multimeter to test for continuity and confirm the issue.
Can you replace a dryer heating element yourself?
You can replace a dryer heating element if you have basic mechanical skills and the right tools. Always disconnect power before starting. If you feel unsure or own a complex model, consider hiring a professional for safety.
How long does it take to replace a dryer heating element?
Most DIY replacements take 30 to 90 minutes. Professionals usually finish the job in less than an hour. The time depends on your dryer’s model and your experience with appliance repairs.
What tools do you need to replace a dryer heating element?
You need a screwdriver, nut driver, needle-nose pliers, and a multimeter. Some models require a socket wrench. Always check your dryer’s manual for specific tool requirements.
Is it worth repairing an old dryer?
If your dryer is over 10 years old or needs frequent repairs, replacement may offer better value. Compare the repair cost to the price of a new dryer. Consider energy efficiency and warranty benefits.
What causes a dryer heating element to fail?
Overloading, poor airflow from clogged vents, and normal wear can cause failure. Lint buildup and faulty thermostats also contribute. Regular maintenance helps extend the life of your heating element.
Can a faulty heating element cause a fire?
Yes. A damaged or shorted heating element can overheat and ignite lint. Always address heating issues promptly and clean your lint trap and vents regularly to reduce fire risk.

