Selecting the correct socket for your water heater element ensures a smooth and damage-free replacement. Most residential units use a standard 1-1/2 inch (38mm) water heater element socket size. However, you should always verify the actual size before you begin. Using the proper socket prevents rounding off the element or causing leaks. The table below highlights the most common socket sizes found in water heaters:
| Socket Size (inches) | Typical Application |
|---|---|
| 1-1/2 | Standard residential water heater elements |
| 1-7/8 | Commercial or specialty water heater elements |
| 1-1/4 | Older or compact water heater models |
Checking the correct socket size for your element saves time and avoids unnecessary frustration.
How to Confirm Your Water Heater Element Socket Size
Check the Element’s Shape and Size
Look for Hex or Flat Sides
When you inspect your water heater element, pay close attention to its base. Most screw-in elements feature a hexagonal or flat-sided base designed for socket or wrench gripping. You may also encounter bolt-in elements with a flange and multiple bolts, or clamp-in elements that use a bracket system. Recognizing these attachment styles helps you select the right tool and avoid damaging the element.
- Straight, fold-back (U-shaped), or spiral shapes are common for water heater elements.
- The base of a screw-in element usually has a hexagonal or flat surface.
- Bolt-in elements have a rectangular or square plate with bolts.
- Clamp-in elements use a bracket or clamp assembly.
Tip: Always note the attachment style and shape before purchasing a replacement. This ensures compatibility and prevents leaks.
Measure Across the Flats
To confirm the correct socket size, measure the distance across the flats of the hex base. This measurement determines which socket will fit snugly and allow you to remove or install the element without slipping.
- Use a tape measure or caliper to measure the width of the hex base.
- Most standard water heater elements measure close to 1-1/2 inches across the flats.
- If you do not have a measuring tool, take the old element or a clear photo to the hardware store for comparison.
Use a Tape Measure or Caliper
Measuring in Inches vs. Millimeters
You can use either inches or millimeters to measure the hex head of your water heater element. Most socket sizes are listed in inches, but some manufacturers use millimeters. For example, the standard water heater element socket size is 1-1/2 inches, which equals 38.1 millimeters.
- Place the tape measure or caliper across the widest part of the hex head.
- Record the measurement in both units if possible.
- Common socket sizes include 1-1/2 inches (38.1 mm) and 1-7/8 inches (47.6 mm).
Tips for Accurate Measurement
Accurate measurement prevents frustration and ensures a proper fit. Follow these steps for best results:
- Clean the element’s base before measuring to remove debris.
- Hold the tape measure or caliper firmly against the flats.
- Double-check your measurement before purchasing a socket.
- Try a 1-1/2 inch socket first, as it fits most standard elements.
- Specialized socket tools designed for water heater elements can provide a precise fit.
Note: Taking time to measure the element before starting the job saves you from unnecessary trips to the store and prevents damage during installation.
Check the Manufacturer’s Label or Manual
Where to Find Size Information
Manufacturers often include essential details on the water heater’s label or in the manual. You can usually find the recommended socket size for the element, which is typically 1-1/2 inches. The manual may also suggest using a socket about 5 inches in length to reach the element comfortably.
What to Do if the Label is Missing
If you cannot locate the label or manual, rely on direct measurement. Use a tape measure or caliper to check the hex head size. You can also bring the old element to a hardware store for comparison. Many stores carry specialized water heater element socket tools that match standard sizes.
Tip: If you are unsure, consult the manufacturer’s website for specifications or ask a professional for advice.
Compare with Common Socket Sizes
1-1/2 Inch (38mm) as the Standard
When you work on a water heater, you will notice that most residential units use a 1-1/2 inch socket. This size is the industry standard for water heater element replacement. You can find this socket size in replacement kits from many leading brands. These brands include Rheem, AO Smith, Bradford White, EcoSmart, GE, Whirlpool, Bosch, and even most RV water heaters.
- The 1-1/2 inch socket fits the majority of screw-in elements.
- Most hardware stores stock this size as the default option for water heater repairs.
- Using the standard socket ensures a snug fit and reduces the risk of damaging the element.
Note: Always double-check the water heater element socket size before starting your project. Even though the 1-1/2 inch socket is standard, some models may require a different size.
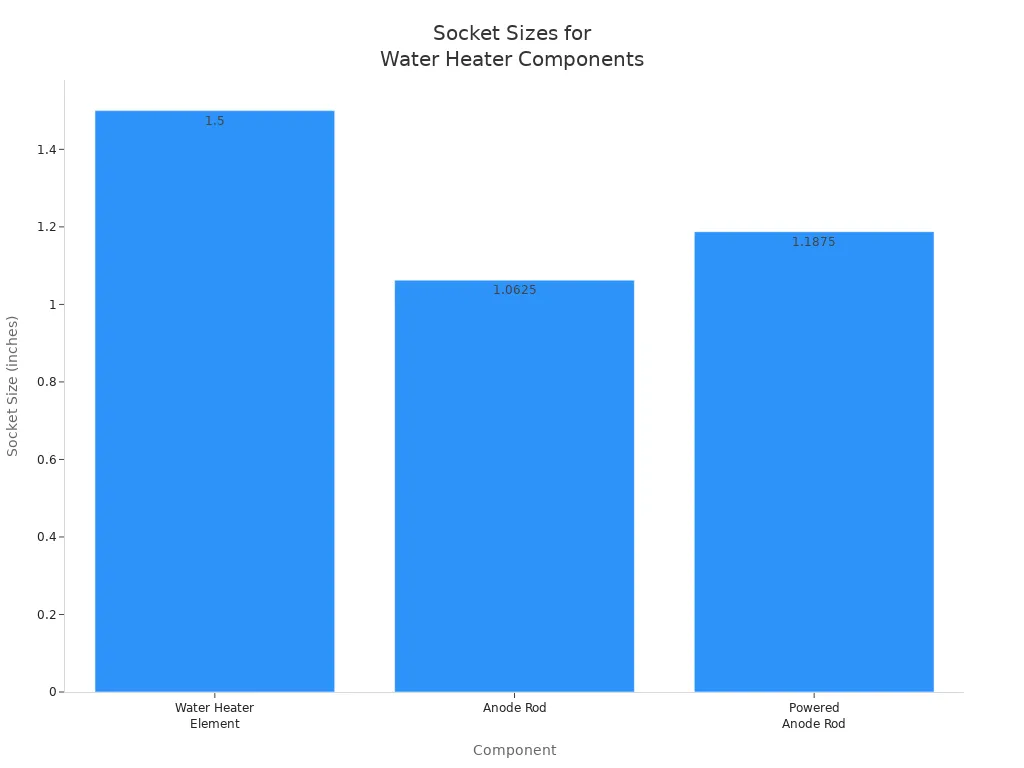
You should also remember that the anode rod in your water heater uses a different socket size. The anode rod typically requires a 1-1/16 inch socket, which is not interchangeable with the standard element socket.
Other Possible Sizes
While the 1-1/2 inch socket is the most common, you might encounter other sizes, especially if you work with older or commercial water heaters. Some elements use a 1-1/4 inch or a 1-7/8 inch socket. These sizes are less frequent but still appear in certain models.
- Older water heaters sometimes use a 1-1/4 inch socket for their elements.
- Commercial or specialty units may require a 1-7/8 inch socket.
- Always measure the flats of the element base if you suspect a non-standard size.
If you cannot identify the socket size by measurement, consult the manufacturer’s manual or label. Manufacturers often list the correct socket size for each element. If the label is missing, bring the old element to a hardware store for comparison. Most stores carry a range of sockets to match different water heater models.
Tip: Test fit your socket before applying force. A loose socket can round off the element, while a tight fit ensures safe and easy removal.
By comparing your element with these common socket sizes, you can confidently select the right tool for the job. This step saves you time and helps you avoid unnecessary damage to your water heater.
Tools You Need for Water Heater Element Replacement

When you prepare for removing a water heater element, having the right tools ensures a smooth and safe process. Using the correct equipment helps you avoid damage and makes the job much easier.
Types of Sockets for Water Heater Element
Standard Socket
You may already have standard sockets in your toolbox. These sockets fit many bolts and nuts around the house. However, standard sockets sometimes lack the depth or strength needed for water heater elements. They may not grip the element tightly, especially if it is stuck or corroded.
Deep Well Socket
Deep well sockets provide extra length. You need this extra depth to reach recessed elements or to clear the protruding threads on some water heater elements. Deep well sockets also help you apply even pressure, which reduces the risk of stripping the element.
Water Heater Element Socket
Water heater element sockets are heavy-duty tools designed specifically for this task. Most of these sockets measure 1-1/2インチ, which fits the majority of residential water heater elements from brands like Rheem, AO Smith, and Bradford White. These sockets fit snugly over the element and allow you to apply steady force, even when the element is stuck or corroded. Using the correct size socket prevents damage to the threads and ensures a secure grip. Standard sockets may not offer the same durability or precise fit, so always choose a water heater element socket for best results.
Socket Wrenches and Extensions
Ratchet Wrench
A socket wrench, especially a ratchet wrench, gives you the leverage and control needed for loosening or tightening the element. The ratcheting action lets you work in tight spaces without removing the tool after each turn. This tool saves time and reduces effort.
Breaker Bar
Sometimes, elements become stuck due to corrosion. A breaker bar provides extra leverage, making it easier to break tight seals. You can use a breaker bar with your socket to apply more force without straining your hands. Extensions also help you reach elements located deep inside the tank.
Using a socket wrench and breaker bar allows you to remove or install tightly fitted elements efficiently. Extensions help you access hard-to-reach areas, and the correct size socket reduces the risk of damage. These tools save time and help maintain the integrity of your water heater.
Optional Tools for Easier Removal
Penetrating Oil
Penetrating oil can loosen rusted or corroded threads. Apply it to the base of the element and let it sit for several minutes before attempting removal. This step makes the process smoother and reduces the chance of damaging the tank.
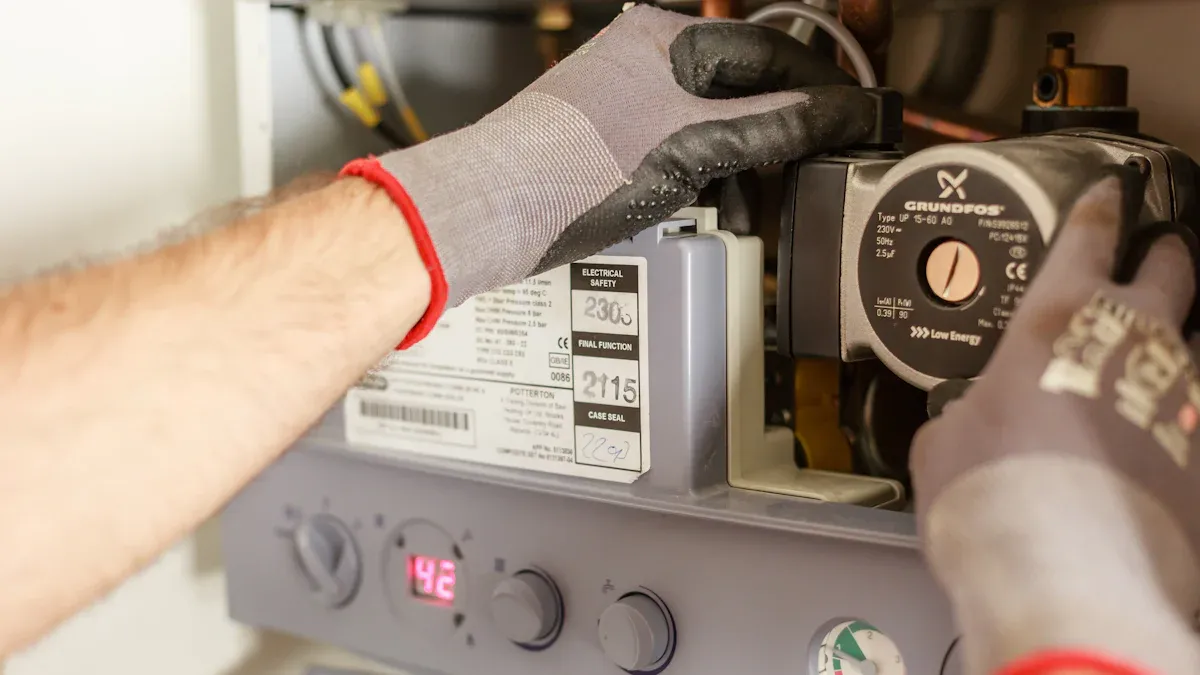
Gloves and Safety Gear
Always wear gloves and safety glasses when working on your water heater. Protective gear shields your hands from sharp edges and hot surfaces. Safety glasses protect your eyes from debris or splashes. You should also keep a towel or bucket nearby to catch any water that escapes during the process.
| Tool Category | Tools Included | Purpose and Safety Benefit |
|---|---|---|
| Plumbing Tools | Water heater element wrench, adjustable socket wrench, 18-inch breaker bar, pipe wrench, channel lock pliers | Loosen and remove stuck or corroded elements and fittings safely without damaging the tank or fittings. |
| Electrical Safety Tools | Multimeter, non-contact voltage tester, circuit tester, insulated screwdrivers | Confirm power is off, prevent electrical hazards, and safely handle electrical connections during removal. |
| Drainage Tools | Garden hose, bucket or drain pan, towels, rags | Safely drain the tank and catch residual water to prevent spills and maintain a dry, safe workspace. |
| Protective Equipment | Work gloves, safety glasses, protective clothing | Protect hands, eyes, and body from sharp edges, hot surfaces, splashes, and debris during the removal process. |
| Cleanup Tools (Optional) | Shop vacuum | Efficiently remove water and debris from the work area, reducing cleanup time and risk of mold or mildew. |
| Additional Suggestions | Having a helper | Improves safety and efficiency during the removal process. |
Tip: Organize your tools before you begin. This preparation helps you work efficiently and safely.
Easy Ways to Identify the Correct Water Heater Element Socket Size
Visual Inspection of Water Heater Element
Spotting the Hex Size
Begin by examining the base of your water heater element. Most elements feature a hexagonal head, which allows you to use a socket for removal or installation. You can usually spot the hex size by looking for six flat sides on the element’s base. This design helps you grip the element securely and prevents slippage during removal. If you see a hex head, you know you will need a socket that matches the flat-to-flat distance.
Tip: A clean, well-lit workspace makes it easier to spot the hex shape and check for any wear or rounding on the element head.
Noting Any Unusual Shapes
While most water heater elements use a standard hex head, some models may have unique shapes. You might encounter elements with square, rectangular, or even flanged bases. These unusual shapes often require a different tool or socket. Always note the shape before choosing the correct socket. If you see a flange or a bracket, you may need a different removal method.
Using a Tape Measure for Water Heater Element
Measuring Across the Flats
To confirm the correct water heater element socket size, measure the distance across the flats of the hex head. Place your tape measure or caliper directly on the two opposite flat sides. Record the measurement in inches or millimeters. Most residential elements measure 1-1/2 inches (38 mm) across the flats. This measurement ensures you select the correct socket and avoid damaging the element.
Double-Checking Your Measurement
Always double-check your measurement before purchasing or using a socket. Clean the element’s base to remove any debris that could affect accuracy. Hold the tape measure firmly and read the value at eye level. If you have doubts, compare your measurement with a socket size chart or bring the element to a hardware store for confirmation. Double-checking helps you avoid mistakes and ensures you use the correct tool.
Checking the Manufacturer’s Label for Water Heater Element
Reading the Model Number
You can often find important details on the manufacturer’s label or directly on the element head. Look for the model number, voltage, and wattage. These details help you identify the exact type of element installed in your water heater. The label may also list the recommended socket size, which simplifies choosing the correct socket.
Looking Up Specifications Online
If the label does not provide the socket size, use the model number to search the manufacturer’s website or manual. Manufacturers often publish detailed specifications, including the correct socket size for each water heater element. Some older or specialty models may require a different size, so always verify with official documentation. Following these steps helps you avoid damage and ensures a secure fit.
Note: Always use a deep well socket for full engagement and to prevent slippage, as recommended by most manufacturers.
Quick Reference Table: Steps to Confirm the Correct Socket Size
| ステップ | アクション |
|---|---|
| 1 | Remove access panels and insulation to expose the element |
| 2 | Identify the element head type (hex, flange, or other) |
| 3 | Check for printed specs (voltage, wattage, part number, socket size) |
| 4 | Consult the manual or manufacturer’s website for socket size |
| 5 | Measure across the flats if specs are missing |
| 6 | Compare your measurement to a socket size chart |
| 7 | Use a deep well socket for best results |
By following these steps, you ensure you are choosing the correct socket for your water heater element. This process saves time, prevents damage, and guarantees a secure fit during replacement.
Comparing with Your Socket Set
Test Fitting Sockets
When you have your socket set ready, you can quickly identify the correct size by physically matching each socket to the water heater element. Start by removing the access panel and exposing the element’s hexagonal base. Take your socket set and select a socket that looks close in size to the element’s hex head. Place the socket over the hex head and check for a snug fit. The socket should slide on smoothly without any wobble or extra space. If the socket feels loose or does not fit over the hex, try the next size up or down.
You want a socket that grips the flat sides of the hex head firmly. This flat contact area gives you better leverage and reduces the risk of slipping or rounding off the element. Specialized water heater element sockets are designed for this purpose. They fit tightly around the element, making removal and installation much easier. By test fitting, you avoid guessing and ensure you use the correct socket every time.
Tip: The water heater element is usually larger than the anode rod. Always compare both before selecting a socket to avoid confusion. The element typically requires a 1-1/2 inch socket, while the anode rod uses a 1-1/16 inch socket.
Test fitting also helps you confirm that you are not using a socket meant for another part of the water heater. This step is essential for choosing the correct socket and preventing damage during removal.
Marking the Correct Size for Future Use
Once you have identified the correct socket size, you can make future replacements much easier by marking it. Use a permanent marker or a piece of tape to label the socket with “Water Heater Element” and the size, such as “1-1/2 inch.” Store this socket in a dedicated spot in your toolbox or with your water heater maintenance supplies.
You can also create a simple reference chart for your home maintenance records. List the correct socket sizes for both the water heater element and the anode rod. This chart saves time and prevents mistakes the next time you need to perform maintenance.
| Part | Socket Size | Label Example |
|---|---|---|
| 給湯器エレメント | 1-1/2インチ | 給湯器エレメント |
| 陽極棒 | 1-1/16 inch | 陽極棒 |
Note: Marking the correct socket size ensures you never have to repeat the measuring process. It also helps anyone else who may need to service the water heater in the future.
By test fitting sockets and marking the correct size, you streamline your maintenance routine and reduce the risk of using the wrong tool. This approach guarantees a secure fit and makes choosing the correct socket a simple, repeatable process.
What to Do If You Don’t Have the Right Water Heater Element Socket Size
Alternative Tools and Solutions
Adjustable Wrench (Pros and Cons)
If you do not have the correct socket on hand, you might consider using an adjustable wrench. This tool can grip a variety of nut sizes, making it a flexible option for removing a water heater element. However, adjustable wrenches often lack the deep reach and secure fit of a dedicated socket. You may find it difficult to apply even pressure, especially if the element sits recessed or has corroded threads. Slipping or rounding off the hex head becomes more likely with an adjustable wrench. For best results, use this tool only as a temporary solution and avoid excessive force during removal.
Borrowing or Renting Tools
You can borrow or rent the correct socket from a neighbor, friend, or local hardware store. Many hardware stores offer tool rental programs, allowing you to access professional-grade tools without a large investment. Borrowing ensures you have the right fit for the job and reduces the risk of damaging your water heater. Always inspect borrowed tools for wear and ensure they match the size you measured.
Where to Buy the Correct Water Heater Element Socket
Hardware Stores
Most hardware stores carry water heater element sockets in the plumbing section. Staff can help you find the correct size based on your measurement or the model of your water heater. You may also find professional-grade options, such as the PROSELECT® 1-1/2 in. Element Socket Tool. This tool features a deep throat design, zinc-plated construction for durability, and fits most screw-in elements. Some stores offer in-store pickup, online ordering, and even commercial delivery services.
Online Retailers
Online retailers provide a wide selection of water heater element sockets. You can compare brands, read product specifications, and choose the correct size for your needs. Reliable suppliers like Ferguson offer multiple purchasing options and professional-grade tools. The table below highlights a popular option:
| 特徴/側面 | 詳細 |
|---|---|
| Product | PROSELECT® 1-1/2 in. Element Socket Tool (Part #PSW12330) |
| 互換性 | Fits most screw-in type water heater elements |
| 素材 | Zinc-plated for durability |
| サイズ | Fits 1 1/2″ nuts |
| デザイン | Deep throat to reach where adjustable wrenches can’t |
| Purchase Options | Online ordering, in-store pickup, shipping available |
| Additional Services | eProcurement, PRO Plus Rewards, branch services, commercial delivery |
| Purchase Requirement | Requires certification to purchase (professional-grade tool) |
| Customer Rating | 5 out of 5 stars |
| Contact for Pricing | Phone: 540-773-6260 |
| 信頼性 | Ferguson is a reputable supplier |
Quick Tips for Getting the Job Done
Ask a Neighbor or Friend
You can often save time by asking a neighbor or friend if they have the correct socket. Many homeowners keep a basic socket set for home repairs. Borrowing a tool for a quick project helps you avoid unnecessary purchases.
Local Tool Libraries
Some communities offer tool libraries where you can borrow specialized tools for free or a small fee. These libraries often stock plumbing tools, including water heater element sockets. Check your local listings or community centers for availability.
ヒント If you cannot access the correct socket immediately, try these quick solutions:
- Apply penetrating oil to the element threads and let it soak for at least 30 minutes to loosen rust.
- Use gentle heat around the element area with a propane torch, but avoid plastic parts and wiring.
- Use a breaker bar with a true-fit 6-point deep socket for extra leverage.
- Secure the wrench with a ratchet strap to prevent slipping.
- Avoid excessive force or improper tools that can damage the element or tank.
- Always follow safety precautions: drain the tank, turn off power, wear safety gear, and refill the tank before restoring power.
By exploring these options, you can complete the removal process safely and efficiently, even if you do not have the correct socket at first.
Common Mistakes to Avoid When Replacing Water Heater Element
When you replace a water heater element, you can avoid many problems by steering clear of common mistakes. Paying attention to details and following best practices will help you complete the job safely and efficiently.
Misidentifying the Water Heater Element Socket Size
Guessing Instead of Measuring
Many homeowners guess the socket size instead of measuring the element’s hex head. This approach often leads to using the wrong tool. If you use a socket that is too loose or too tight, you risk stripping the threads or damaging the element. Always measure the hex head with a ruler or caliper before you start. If you cannot find the size in the manual, check the manufacturer’s website or bring the old element to the hardware store for comparison.
Using the Wrong Measurement Units
Another frequent mistake involves mixing up inches and millimeters. Most water heater elements in the United States use inch-based measurements, but some imported models list sizes in millimeters. Double-check your measurement units to ensure you select the correct socket. Using the wrong unit can result in a poor fit and possible damage.
Tip: Always confirm the socket size before starting work. This simple step prevents frustration and protects your equipment.
Using the Wrong Socket Type for Water Heater Element
Shallow vs. Deep Well Sockets
You may think any socket will do, but using a shallow socket can cause problems. Water heater elements often sit recessed in the tank. A deep well socket provides the reach and grip you need. Shallow sockets may not engage the hex head fully, increasing the risk of slipping or rounding off the corners.
Stripping the Element
If you use the wrong socket size or type, you can strip the element’s head. This damage makes removal much harder and may require professional help. Always use a deep 6-point socket made from chrome-plated steel for the best grip and durability. Never force a socket that does not fit. Forcing the tool can round off the element or damage the threads.
| 間違い | Consequence | 回避方法 |
|---|---|---|
| Using shallow socket | Poor grip, slippage, rounding | Use deep well, 6-point socket |
| Forcing wrong socket | Stripped threads, stuck element | Test fit, never force, measure first |
Damaging the Water Heater Element
Applying Too Much Force
Applying excessive force is a common error. You might think more pressure will loosen a stuck element, but this can break the element or damage the tank. Use steady, even pressure with a breaker bar or torque wrench. If the element feels stuck, apply penetrating oil and let it sit before trying again.
Not Turning Off Power or Water
Safety should always come first. Failing to turn off the power at the breaker or not draining the tank can lead to electric shock, burns, or water damage. Always shut off the power and water supply before you begin. Drain the tank to prevent spills and ensure a safe workspace.
Remember: If you feel unsure or encounter a stuck or damaged element, seek professional help to avoid injury or further damage.
Anode Rod and Anode Socket Size in Water Heaters
What is an Anode Rod?
Purpose of the Anode Rod
You will find the anode rod inside your water heater tank, usually at the top. This component plays a critical role in protecting your water heater from rust and corrosion. The anode rod attracts minerals and impurities that would otherwise attack the steel tank. By sacrificing itself, the anode rod provides cathodic protection and extends the lifespan of your water heater. If you neglect the anode rod, your tank may develop leaks or fail prematurely.
- The anode rod balances aggressive water action.
- It prevents rust by drawing corrosive elements away from the tank walls.
- You maintain your water heater’s efficiency and durability by replacing the anode rod when needed.
When to Replace the Anode Rod
You should inspect the anode rod annually. Over time, the rod deteriorates as it absorbs corrosive minerals. If more than 75% of the anode rod has been consumed, you need to replace it. Some homeowners replace the anode rod every year to ensure maximum protection. If you notice rusty water or reduced hot water output, check the anode rod first. Replacing the rod before it is fully depleted helps you avoid costly repairs.
- Turn off the water heater and let it cool before starting.
- Drain the tank to prevent spills and damage.
- Use the correct socket wrench to remove the anode rod safely.
Anode Socket Size vs. Water Heater Element Socket Size
Standard Anode Socket Size (1-1/16 inch)
You must know the anode socket size before attempting replacement. Most regular water heaters use a 1-1/16 inch (27 mm) socket for the anode rod. This size is smaller than the water heater element socket, which is typically 1-1/2 inch. Some brands, such as Atwood, use a 1 inch socket, while powered anode rods may require a 1-3/16 inch socket. Bradford White water heaters feature a unique design that requires a pipe wrench instead of a socket.
| 成分 | Typical Socket Size | 備考 |
|---|---|---|
| 給湯器エレメント | 1-1/2インチ | Standard size across many brands (Rheem, AO Smith, Bradford White, etc.) |
| 陽極棒 | 1-1/16 inch (27 mm) | Generally smaller than element socket; some powered anodes require 1-3/16 inch |
| Powered Anode Rod | 1-3/16 inch | Larger socket size needed for powered anode rods |
| Bradford White Anode | 該当なし | Requires pipe wrench instead of socket |
How to Measure Anode Socket Size
You can measure the anode socket size by placing a tape measure or caliper across the flats of the anode rod’s hex head. Always confirm the measurement before purchasing a socket. If you have a powered anode rod, check the manufacturer’s specifications for the correct size. Using the wrong socket can damage the rod or tank. When you measure, clean the area to ensure accuracy. If you cannot find the size, bring the old rod to a hardware store for comparison.
| Anode Rod Type | Socket Size | Tool Required | 備考 |
|---|---|---|---|
| Regular Anode Rod | 1-1/16 inch (27 mm) | Socket wrench or breaker bar | Most common size for regular water heaters |
| Bradford White Anode | 該当なし | Pipe wrench | Special design requiring pipe wrench |
| Powered Anode Rod | 1-3/16 inch (31 mm) | Larger socket | Requires bigger socket than regular anode |
Tools Needed for Anode Rod Replacement
Socket Type for Anode Rod
You need a socket wrench that matches the anode socket size. For most water heaters, a 1-1/16 inch socket fits the anode rod. If the rod is stuck, use a breaker bar for extra leverage. An impact wrench can help you remove stubborn rods with minimal effort. Always check the drive size of your tools to ensure compatibility with the socket. If you have a Bradford White water heater, use a pipe wrench instead.
- Gather a socket wrench, breaker bar, impact wrench, and cheater pipe.
- Use spray lubricant to loosen corroded threads.
- Wrap Teflon tape around the new rod’s threads to prevent leaks.
Safety Tips
You must follow safety steps to avoid injury and protect your water heater. Turn off the power and water supply before starting. Drain most of the water from the tank, but leave some to stabilize the heater during removal. Ask a helper to hold the heater if needed. After installing the new anode rod, tighten it by hand and then with the socket wrench. Do not overtighten. Restore water and power, then check for leaks.
Tip: Always use the correct anode socket size and tools to prevent damage and ensure a secure fit. Proper maintenance of the anode rod extends the life of your water heater and keeps your system running efficiently.
Tips for a Smooth Water Heater Element Replacement
安全第一
Turn Off Power and Water
You must always start by turning off the power supply at the circuit breaker. This step prevents electric shock and protects your equipment. For gas water heaters, shut off the gas valve and set it to pilot. Next, close the cold water supply valve to the water heater. These actions stop water flow and reduce the risk of leaks during installation.
ヒント Wear gloves and safety goggles to protect yourself from hot water and debris. If you work with a gas heater, ensure proper ventilation to avoid harmful gas buildup.
Let the Tank Cool Down
Allow the water in the tank to cool for several hours before you begin. Hot water can cause burns and make the process dangerous. Open a hot water faucet to help release pressure and speed up cooling. This step also helps remove air from the tank, which is important for safe installation.
Safety Checklist for Water Heater Element Replacement:
- Turn off power at the circuit breaker.
- Shut off the cold water supply valve.
- Allow the tank to cool completely.
- Wear protective gear.
- Ensure proper ventilation for gas heaters.
Organize Your Tools Before Starting
Lay Out Sockets and Wrenches
Organizing your tools before starting saves time and reduces stress. Lay out your sockets, wrenches, and other necessary equipment in a toolbox or tray. Use a printed checklist to make sure you have everything needed for installation and removal. Label wires and parts before disconnecting them. Taking photos of wiring and connections provides a visual reference for reassembly.
- Place all tools within easy reach.
- Use a deep well socket for the element.
- Keep a voltage tester and screwdriver handy.
Keep a Towel or Bucket Handy
Water may spill during removal or installation. Keep a towel or bucket nearby to catch any water and maintain a dry workspace. This simple step prevents slips and keeps your area safe.
Having a helper can improve safety and efficiency. An extra set of hands makes installation smoother and reduces errors.
| 道具 | 目的 |
|---|---|
| Deep well socket | Secure element installation |
| レンチ | Element removal |
| 電圧テスター | 電気安全 |
| Towel/Bucket | Spill management |
Double-Check Everything Before Reassembly
Inspect the New Element
Before you install the new heating element, inspect it for damage or defects. Check the gasket and lubricate it with dish-washing liquid to prevent leaks. Confirm that the element matches your water heater’s specifications.
Tighten Securely, But Don’t Overtighten
Install the new element and tighten it securely. Avoid overtightening, which can damage threads or the tank. Reconnect wires to the terminals exactly as noted or photographed. Tighten terminal screws firmly, but do not overtighten. Replace the plastic safety cover, push insulation back into place, and reattach the access panel.
Final Installation Checklist:
- Confirm the element is securely tightened.
- Reconnect wires as noted.
- Tighten terminal screws.
- Replace safety cover and insulation.
- Reattach access panel.
- Check gasket placement and inspect for leaks.
- Ensure the tank is full of water before restoring power.
- Test the element with a multimeter if available.
Never restore power until you confirm the tank is full and air-free. Dry firing can damage the new heating element. Allow up to two hours for the tank to heat after installation.
Selecting the right socket size makes your water heater maintenance easier and safer. Using the correct socket ensures a secure fit and prevents leaks, which helps extend the life of your equipment. You should always measure the hex head, check the manual, and test fit your socket before starting.
- Use a deep well socket for a firm grip.
- Bring the old element or a photo to the store if unsure.
- Hand-tighten first, then snug with a wrench.
- Follow safety steps and inspect for leaks after installation.
Taking your time and following these steps helps you avoid mistakes and keeps your system running smoothly.
よくあるご質問
What is the standard socket size for most water heater elements?
You will usually need a 1-1/2 inch (38mm) socket for most residential water heater elements. Always measure your element before starting, as some models may require a different size.
Can I use an adjustable wrench instead of a socket?
You can use an adjustable wrench in emergencies. However, a socket provides a better grip and reduces the risk of rounding off the element. Always choose a deep well socket for best results.
How do I measure the socket size if I lost the manual?
Use a tape measure or caliper to measure across the flats of the element’s hex head. Record the measurement in inches or millimeters. Compare your measurement to a socket size chart for accuracy.
What happens if I use the wrong socket size?
Using the wrong socket size can strip the element’s head or damage the threads. You may also find it difficult to remove or install the element securely. Always test fit your socket before applying force.
Do water heater anode rods use the same socket size as elements?
No, most anode rods require a 1-1/16 inch (27mm) socket. Water heater elements typically use a 1-1/2 inch socket. Always check both sizes before starting your maintenance.
Where can I buy a water heater element socket?
You can find water heater element sockets at hardware stores or online retailers. Look for deep well sockets labeled for water heater use. Staff at hardware stores can help you select the correct size.
How tight should I install the new water heater element?
Tighten the element securely by hand, then use a socket wrench for a snug fit. Do not overtighten, as this can damage the threads or tank. Always check for leaks after installation.
What safety steps should I follow before replacing the element?
Always turn off power at the breaker and shut off the water supply. Let the tank cool before starting. Wear gloves and safety glasses to protect yourself from hot water and debris.

