
You rely on your oven for daily meals and special occasions. When the heating element on oven fails, you may notice uneven cooking, longer preheat times, or visible damage to the heating tubes. Quick action becomes essential because a faulty heating element can affect performance and safety. As heater elements grow more complex and appliance prices rise, repair remains the smart choice for many. Appliance repair revenue reached $6.3 billion in 2023, and supply chain delays make fast repairs even more valuable.
Signs your oven’s heating element is broken
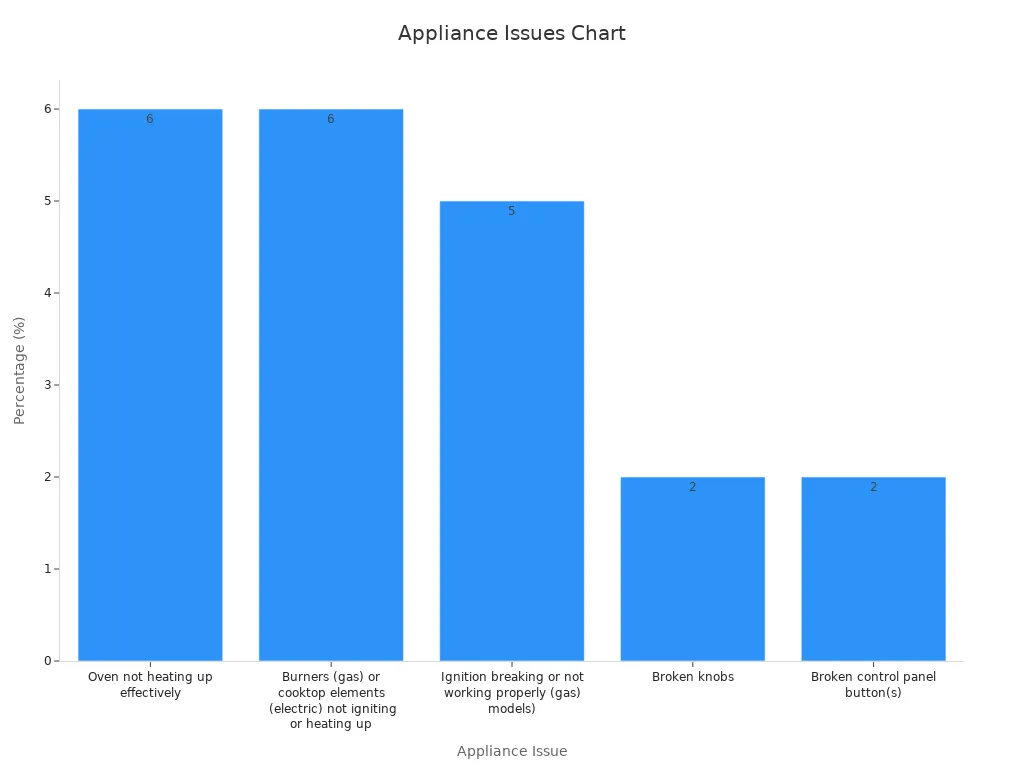
Recognizing the signs your oven’s heating element is broken can help you avoid ruined meals and costly repairs. You need to watch for several key symptoms that indicate a failing heating element. According to Consumer Reports, 6 percent of homeowners report problems with ovens not heating up, most often due to a faulty bake element. This makes heating element failure one of the most common appliance issues.
Uneven Cooking and Temperature Issues
Food not cooking evenly
When the heating element does not distribute heat properly, you may notice that your food comes out undercooked in some spots and overcooked in others. This symptom often appears as cakes that brown unevenly or casseroles that remain cold in the center. Scientific studies confirm that temperature variations inside the oven cavity lead to non-uniform baking results. If you see these patterns, you should suspect a problem with the heating element.
Hot and cold spots in the oven
Hot and cold spots signal that the heating element cannot maintain a consistent temperature. You might find that one side of a tray cooks faster than the other, or that baked goods rise unevenly. Computational studies show that poor heating element performance or placement causes significant temperature gradients. These temperature differences directly result in uneven cooking, which can ruin your recipes and waste energy.
No Heat or Insufficient Heat from Oven Heating Element
Oven not heating up at all
If your oven does not heat up, the heating element may have failed completely. You may set the temperature, but the oven remains cold. Consumer Reports data shows that this is a leading complaint among homeowners. In most cases, the heating element is the root cause. You should also check for error codes or warning lights on digital ovens, as these can point to a failed element.
Oven takes longer to reach set temperature
A slow preheat time often means the heating element is not working at full capacity. You may notice that your oven takes much longer to reach the desired temperature, or it never gets hot enough. Measurement data from repair surveys confirm that users report slow heating and insufficient temperature as common symptoms of a malfunctioning heating element. Technicians use multimeters to test for electrical continuity and confirm the diagnosis.
| Evidence Type | Description |
|---|---|
| Measurement Data | Multimeter resistance tests on heating elements and temperature sensors to diagnose faults. |
| User Reports | Symptoms reported include ovens not heating, heating too slowly, or heating unevenly. |
| Visual Inspection | Observations of blistered or non-glowing parts of heating elements indicating malfunction. |
| Electrical Supply Data | Reduced voltage (e.g., 180V instead of 240V) causing insufficient power to heating elements. |
| Professional Diagnostics | Electrical continuity tests and temperature calibration measurements to confirm faults in elements/sensors. |
Visible Damage to Heating Element on Oven
Burn marks, blisters, or cracks
Physical damage is a clear sign of trouble. You should inspect the heating element for burn marks, blisters, or cracks. These defects indicate that the element has overheated or suffered electrical damage. Repair surveys show that visible damage is one of the most reliable indicators of a failing heating element. If you see any of these issues, you should stop using the oven until you can repair or replace the part.
| Common Sign | Description |
|---|---|
| Element Not Glowing Bright Orange | The heating element should glow bright orange within 10 minutes of heating. If it doesn’t, it may be broken. |
| Visible Damage | Burns, cracks, blistering, or scorch marks on the element indicate wear or failure. |
| Poor Cooking Performance | Food may be undercooked or unevenly cooked due to uneven heat distribution. |
| Excessive Oven Dirtiness | Heavy buildup can damage the element and affect oven performance; cleaning is recommended before repair. |
| Unexpected Increase in Electricity Bills | A failing element may draw more power, causing higher energy costs. |
Element not glowing red during use
A properly functioning heating element glows bright orange or red when in use. If you notice that the element stays dark or only glows in certain areas, this points to a break or internal fault. Repair professionals recommend checking the element after the oven has been on for at least ten minutes. If it does not glow evenly, you likely need to replace the oven heating element.
Tip: Always let the oven cool completely before inspecting the heating element to avoid burns.
By staying alert to these symptoms, you can catch problems early and keep your oven running efficiently. Regular inspection and prompt action will help you avoid more serious damage and ensure your meals cook as intended.
Electrical and Safety Warning Signs
When you troubleshoot an oven, you must pay close attention to electrical and safety warning signs. These signs often indicate deeper problems with the heating element or the oven’s electrical system. Ignoring them can lead to serious hazards, including fire or electrical shock.
Tripping circuit breakers or blown fuses
If your oven repeatedly trips the circuit breaker or causes fuses to blow, you face a clear warning of electrical trouble. This issue often points to a short circuit or a failing heating element drawing too much current. You might notice the oven shuts off suddenly during use, or the breaker trips as soon as you turn it on. These symptoms require immediate attention.
注: According to the National Fire Incident Reporting System and Consumer Product Safety Commission, thousands of household fires each year involve electrical faults in appliances like ovens. About half of these fires result from appliance defects rather than user error. You should always inspect power cords and consider upgrading home wiring to reduce risk.
Error codes or warning lights on digital ovens
Modern ovens use digital displays to alert you to faults. If you see error codes or warning lights, your oven’s control board has detected a problem. Many codes relate directly to the heating element, such as open circuits or temperature sensor failures. You should consult your oven’s manual to interpret these codes. Do not ignore persistent warnings, as they often signal a failing heating element or a dangerous electrical issue.
A quick reference table can help you understand what these signals mean:
| Error Code Example | Possible Cause | Recommended Action |
|---|---|---|
| F1, F2, F3 | Heating element fault | Inspect or replace element |
| F9 | Electrical supply problem | Check wiring and breakers |
| E2 | Temperature sensor failure | Test sensor and connections |
If you see repeated error codes, stop using the oven until you resolve the issue. The U.S. Consumer Product Safety Commission has recalled electric ranges for fire hazards caused by electrical failures. This highlights the importance of taking digital warnings seriously.
Strange noises or burning smells
Unusual noises or burning odors coming from your oven signal immediate danger. You might hear popping, buzzing, or crackling sounds when the heating element operates. These noises often result from electrical arcing or a damaged element. A burning smell can indicate overheating insulation, melting wires, or a failing heating element.
- If you detect a burning odor, turn off the oven and unplug it right away.
- Do not attempt to use the oven again until a qualified technician inspects it.
Fire investigators and safety agencies report that electrical failures in ovens and other appliances have led to millions of product recalls and thousands of fires. The complexity of modern ovens increases the risk of hidden faults. Always treat strange sounds or smells as urgent warning signs.
You protect your home and family by responding quickly to these electrical and safety warning signs. Regular inspection and prompt repair of the heating element and oven wiring reduce the risk of fire and costly damage.
How to Test an Oven Element: Step-by-Step Diagnostic Tips

Testing your oven’s heating element requires a careful, step-by-step approach. You need to prioritize safety, use the right tools, and follow a logical process. This section guides you through each stage so you can diagnose problems with confidence.
Safety First When Diagnosing Oven Heating Element
Unplugging the oven and letting it cool
Before you test an oven element, always disconnect the oven from its power source. Unplug the appliance or switch off the circuit breaker. Wait until the oven cools completely. This step protects you from electrical shock and burns. The Occupational Safety and Health Administration (OSHA) mandates regular inspections and strict diagnostic protocols for ovens in commercial settings. These rules exist because improper handling of heating elements can lead to hazardous conditions. You should treat home ovens with the same level of caution.
ヒント Never attempt to test or repair a heating element while the oven is plugged in or still hot.
Wearing gloves and using proper tools
Wear insulated gloves to protect your hands from sharp edges and residual heat. Use only tools designed for electrical work, such as a multimeter and insulated screwdrivers. Proper equipment reduces the risk of injury and ensures accurate test results.
Visual Inspection of Heating Element
Checking for cracks, breaks, or discoloration
Begin your diagnosis with a thorough visual inspection. Look for cracks, breaks, or discoloration on the heating element. These signs often indicate overheating or electrical failure. Visual inspections play a critical role in early detection of maintenance issues. Many professionals rely on this step to identify problems before they escalate. Cities and regulatory bodies require regular inspections because they help prevent costly repairs and ensure safety.
- Examine the entire length of the heating element.
- Check for any areas that appear blistered, burned, or warped.
- Note any unusual marks or corrosion.
Inspecting connections and mounting points
Next, check the connections and mounting points. Loose or corroded terminals can cause the heating element to fail. Make sure all screws and brackets hold the element securely in place. If you see any signs of damage or wear, you may need to replace the part.
注: A careful visual inspection often reveals issues that electronic tests might miss. Always include this step before moving on to electrical testing.
How to Test an Oven Element with a Multimeter
Setting the multimeter to the correct ohm scale
To test an oven element accurately, you need a digital or analog multimeter. Set the multimeter to the lowest resistance (ohm) setting. This allows you to measure the electrical resistance of the heating element. Most oven elements should show a resistance between 10 and 50 ohms, depending on the model.
1. Turn the multimeter dial to the lowest Ω (ohm) setting.
2. Confirm the device reads zero when the probes touch each other.
Performing a continuity test on the oven heating element
A continuity test checks if electricity can flow through the heating element. Touch one probe to each terminal of the element. If the multimeter beeps or shows a low resistance reading, the circuit is complete. If you see no change or the display reads “OL” (open line), the heating element is broken.
- Remove the element from the oven if necessary for better access.
- Place one probe on each end of the element.
- Observe the multimeter reading.
Interpreting multimeter readings for diagnosis
Understanding your multimeter readings is essential for a correct diagnosis. A good heating element will show a steady resistance value within the manufacturer’s specified range. A reading of zero or infinite resistance means the element has failed.
| Multimeter Reading | What It Means | Next Step |
|---|---|---|
| 10–50 Ω | Normal resistance | Element is functional |
| 0 Ω | Short circuit | Replace the element |
| OL or ∞ | Open circuit (no continuity) | Replace the element |
If you are unsure about your test results, consult your oven’s manual or contact a professional technician.
Testing an element with a multimeter gives you a clear answer about its condition. You can avoid unnecessary repairs and ensure your oven operates safely. Always follow strict diagnostic protocols, as required by safety standards, to prevent hazards and maintain compliance.
Checking for Error Codes and Digital Diagnostics
Modern ovens use digital technology to help you diagnose problems quickly. You can use error codes and built-in diagnostics to pinpoint faults with the heating element or related components. Understanding how to access and interpret these codes gives you a significant advantage when you need to test or repair your oven.
Accessing and reading oven error codes
You can access error codes on most digital ovens by following a specific sequence of button presses. Manufacturers design these codes to alert you to faults, including issues with the heating element. You should always start by consulting your oven’s control panel. Many models display an error code automatically when a fault occurs.
To access error codes, follow these general steps:
- Turn off the oven and wait for it to cool.
- Press and hold the designated diagnostic or “menu” button. Refer to your oven’s manual for the exact button combination.
- Watch the display for a code, such as “F1” or “E2.” The code may flash or remain steady.
- Write down the code for reference.
Tip: If your oven does not display a code, you may need to repeat the process or reset the appliance before you try again.
Some ovens use a series of beeps or lights instead of a digital display. In these cases, count the number of flashes or listen for the beep pattern. Each pattern corresponds to a specific error. You can use this information to test the heating element or other components.
A quick reference table can help you identify common error codes:
| Error Code | Likely Issue | Next Step |
|---|---|---|
| F1 | Heating element fault | Test element continuity |
| F3 | Temperature sensor problem | Test sensor resistance |
| F9 | Power supply issue | Check wiring and fuses |
You should always test the heating element if the code points to a heating fault. Use a multimeter to perform a continuity test and confirm the diagnosis.
Using the manual to interpret error messages
Your oven’s manual serves as the best resource for decoding error messages. Manufacturers include a list of error codes and their meanings in the troubleshooting section. You should keep the manual in a safe place for easy access.
When you see an unfamiliar code, follow these steps:
- Open the manual to the troubleshooting or diagnostics section.
- Find the error code in the provided table.
- Read the description and recommended action.
Note: Manuals often include step-by-step instructions for running a diagnostic test. Follow these instructions carefully to avoid damaging the oven or voiding the warranty.
If the manual recommends a test, use your multimeter to check the heating element or sensor. Always disconnect power before you begin. If you cannot find the code in the manual, visit the manufacturer’s website for updated information or contact customer support.
You should never ignore error codes or warning lights. These signals help you identify problems early and prevent further damage. By learning how to access and interpret digital diagnostics, you can test your oven’s components with confidence and accuracy.
Essential Tools and Safety Precautions for Heating Element Repairs
Tools Needed to Test an Oven Element
Multimeter for continuity testing
You need a reliable multimeter to diagnose issues with your oven’s heating element. A multimeter allows you to measure resistance and perform a continuity test, which helps you determine if the heating element is functioning correctly. Many professionals trust models like the Fluke 87V for their accuracy and durability. Users appreciate the clear continuity tone and the device’s ability to withstand tough conditions. Even for home use, digital multimeters such as the VEVOR model offer user-friendly features and portability, making them suitable for appliance maintenance. The growing complexity of ovens, especially with the rise of smart and energy-efficient models, increases the need for precise testing tools. Accurate measurements ensure that your heating element operates safely and efficiently.
Screwdrivers and pliers for removal
You should keep a set of screwdrivers and pliers on hand when working with oven components. These tools help you remove the heating element and access electrical connections without causing damage. Choose insulated handles to reduce the risk of electrical shock. The demand for specialized ovens in industries like food processing and electronics has driven the need for robust, high-quality hand tools. Using the right screwdriver size prevents stripping screws, while pliers allow you to grip and disconnect wires securely.
Flashlight and protective gloves
A flashlight helps you see inside the oven cavity, especially when inspecting the heating element for cracks or discoloration. Good visibility ensures you do not miss signs of damage. Always wear protective gloves to shield your hands from sharp edges and residual heat. Personal protective equipment, such as gloves and oven mitts, is essential in any kitchen or repair setting. You reduce your risk of burns and injuries by using proper gear.
Tip: Keep your tools organized and within reach before you start any repair. This practice saves time and helps prevent accidents.
| Market Aspect | Key Insights Relevant to Testing Oven Heating Elements |
|---|---|
| Market Size & Growth | Industrial ovens are widely adopted across automotive, electronics, food processing, and pharmaceuticals, driving demand for quality. |
| Critical Needs | Precise temperature control, uniform heat distribution, energy efficiency, and reliability are emphasized for industrial applications. |
| Technological Trends | Automation and smart technologies increase complexity and testing requirements, making accurate tools like a multimeter essential. |
Safety Tips for Working with Oven Heating Elements
Avoiding electrical shock and burns
You must always unplug the oven before starting any repair. This simple step protects you from electrical shock, which is a leading cause of kitchen injuries. Over 200,000 kitchen accidents occur each year in the U.S., with burns being among the most common injuries. Use dry gloves and avoid touching hot surfaces. Never use damaged cords or extension cables, as these can increase the risk of fire or shock.
Protecting oven components during inspection
Handle all oven parts with care. When you remove the heating element, avoid pulling on wires or forcing connectors. Use your multimeter to check for proper resistance without damaging terminals. Keeping flammable materials away from your work area helps prevent accidental fires. Promptly report or address any electrical issues you find during your inspection.
Ensuring proper reassembly after diagnosis
After you finish testing or replacing the heating element, make sure you reassemble the oven correctly. Tighten all screws and reconnect wires securely. Double-check that no tools or debris remain inside the oven. Proper reassembly ensures safe operation and prevents future malfunctions. Regular safety reminders and careful attention to detail help you avoid costly mistakes and keep your kitchen safe.
Safety Reminder: Never leave your oven unattended during repairs. Always have a fire extinguisher nearby and know how to use it.
By following these guidelines and using the right tools, you can safely and effectively repair your oven’s heating element. The right approach protects both you and your appliance, ensuring reliable performance for years to come.
When to Repair or Replace the Oven Heating Element
Assessing the Condition of the Heating Element on Oven
Minor vs. major damage indicators
You need to evaluate the extent of damage before deciding on repair or replacement. Minor issues, such as slight discoloration or small surface marks, often allow for a simple fix. However, major problems like cracks, splits, or visible breaks in the heating element require immediate replacement. If you notice the element does not heat evenly or fails to glow, you likely face a more serious fault. In most cases, you cannot repair a cracked or split element, so you must replace it.
Age and wear of the oven heating element
The age of your oven plays a significant role in your decision. Ovens over 10 years old often have worn parts and may require more frequent repairs. Parts for older ovens can be difficult to find, which makes replacement more practical. Most ovens last between 15 and 20 years with proper care. If your oven heating element fails repeatedly or the oven shows signs of frequent breakdowns, you should consider a new unit.
Cost-Effectiveness of Repair vs. Replacement
Comparing costs of new heating element vs. repair
You should compare the cost of repairing the heating element to the price of a new oven. Repairing a broken oven heating element typically costs between $150 and $400. If the repair cost approaches half the price of a new oven, replacement becomes the better option. Frequent repairs can add up quickly, making a new oven a smarter investment. Newer ovens also offer improved energy efficiency, which can lower your utility bills over time.
Considering the overall condition of the oven
When you decide between repair and replacement, look at the oven’s overall condition. If your oven has multiple failing components or needs frequent service, replacement may save you money in the long run. You might also want to upgrade to a model with advanced features or better energy ratings. If your oven is still under warranty, repair is usually the best choice. Reliable brands such as Bosch, KitchenAid, and Whirlpool tend to last longer and are often worth repairing if the damage is minor.
Tip: Always consult a professional if you are unsure about the cost-effectiveness of repair versus replacement.
When to Call a Professional for Heating Element Repairs
Signs DIY repair is not safe or effective
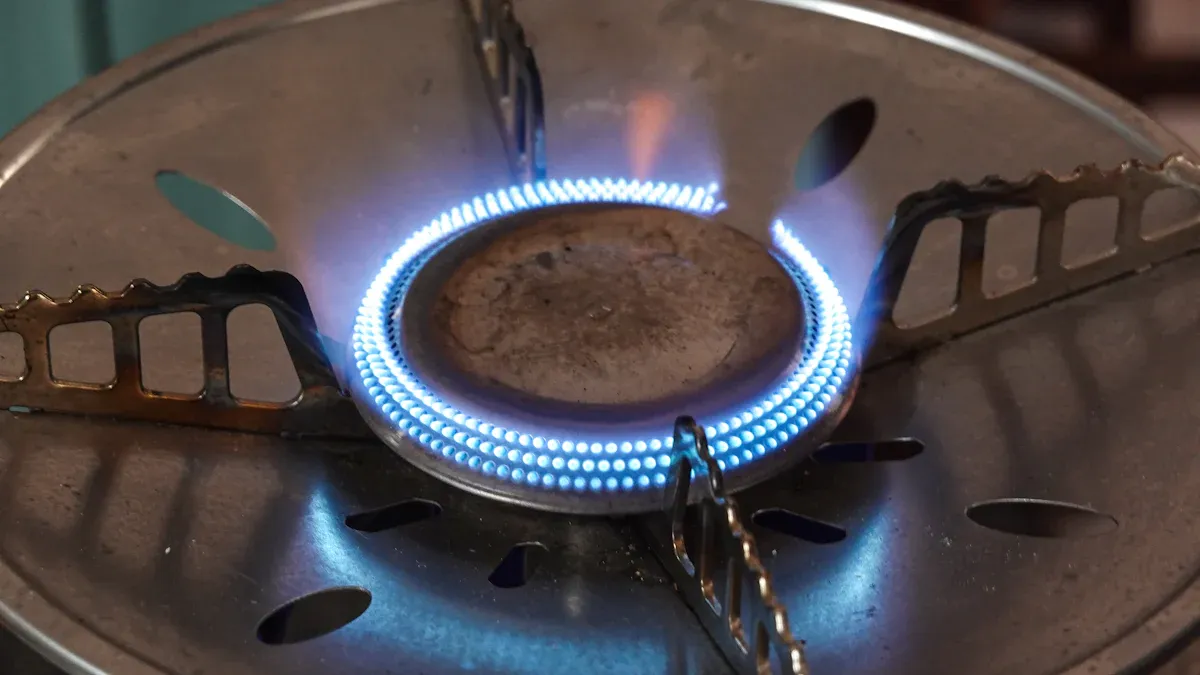
You should call a professional when repairs involve complex electrical wiring, gas lines, or advanced diagnostics. If you notice gas odors, flickering flames, or persistent ignition failures, do not attempt a DIY fix. These issues pose serious safety risks. Repairs that require you to remove the old element, install the new element, or test the new element can be straightforward, but only if you have the right skills and tools.
Risks of attempting complex repairs without experience
Attempting to repair a heating element on oven without proper experience can lead to electric shock, fire hazards, or further damage to your appliance. Professional technicians have the training to handle high-voltage elements and sensitive electronic controls. They follow detailed diagnostic steps and ensure all repairs meet safety standards. If you feel unsure about how to replace an oven heating element or face any uncertainty during the process, you should seek expert help.
Note: Professional intervention ensures your oven operates safely and reliably, especially when dealing with complex repairs or safety-sensitive components.
Preventing Future Problems with Your Oven Heating Element
Regular Maintenance Tips for Heating Element on Oven
Cleaning and inspecting the oven heating element
You can prevent most heating element failures by making regular cleaning and inspection part of your routine. Dust, carbon, and grease buildup reduce power and cause uneven heating. You should inspect the heating element on oven for dirt or discoloration at least every few months. Use a soft brush or a damp cloth to remove debris after the oven cools. Avoid using harsh chemicals that may damage the element’s surface.
- Schedule inspections based on manufacturer recommendations and how often you use your oven.
- Clean electrical components to prevent heat dispersion issues and short circuits.
- Use a flashlight to check for hidden buildup or early signs of wear.
ヒント Preventive maintenance schedules help you catch problems before they lead to costly repairs.
Avoiding common causes of heating element failure
You can avoid many common causes of failure by following a few best practices. Overloading the oven or placing foil directly on the element can cause overheating. Rapid temperature changes, such as turning the oven on and off quickly, create thermal stress and shorten the element’s life. Stick to the recommended maintenance schedule and keep records of each inspection.
- Do not block airflow inside the oven.
- Avoid using the self-cleaning cycle too often, as it exposes the element to extreme heat.
- Monitor maintenance tasks with a checklist or a computerized system to ensure nothing gets missed.
Regular, proactive maintenance improves reliability and extends the life of your oven’s components.
How to Extend the Life of Your Oven Heating Element
Using the oven properly to prevent damage
Proper use of your oven plays a major role in extending the life of its heating element. Always follow the manufacturer’s guidelines for temperature settings and preheating. Avoid rapid heating and cooling cycles, which cause thermal stress and lead to early failure. The lifespan of a heating element depends on the material, how you use the oven, and the operating environment.
- Use the oven for its intended purpose and avoid continuous high-temperature operation unless specified.
- Allow the oven to cool gradually after use.
- Do not use damaged cookware that may touch or stress the element.
Manufacturers typically only cover defects, so correct operation and regular care are essential for long-term performance.
Monitoring for early warning signs
You should watch for early warning signs to catch problems before they become serious. Uneven cooking, longer preheat times, or visible discoloration signal that the element may need attention. Condition monitoring techniques, such as thermal imaging, can help you detect wear or damage early. Keep an eye on key performance indicators like mean time between failures and maintenance compliance.
| Early Warning Sign | What to Do |
|---|---|
| Uneven heating | Inspect and clean the element |
| Discoloration or marks | Schedule a maintenance check |
| Slow preheating | Test for electrical continuity |
Transitioning from reactive to proactive maintenance helps you avoid unexpected breakdowns and keeps your oven running efficiently.
You can keep your oven running safely and efficiently by following these top tips:
- Inspect the heating element for visible damage or uneven heating.
- Use a multimeter to test for continuity.
- Clean and maintain your oven regularly.
Always follow safety protocols during DIY checks. If you notice persistent electrical issues, error codes, or feel unsure about any repair, contact a certified technician. Your safety and the reliability of your appliance should always come first.
よくあるご質問
How often should you inspect your oven’s heating element?
You should inspect your oven’s heating element every three to six months. Regular checks help you spot early signs of wear or damage. Early detection prevents costly repairs and keeps your oven running safely.
Can you replace an oven heating element yourself?
You can replace most oven heating elements yourself if you follow safety guidelines. Always unplug the oven and wear protective gloves. If you feel unsure or see complex wiring, contact a professional technician.
What tools do you need to test an oven heating element?
You need a digital multimeter, insulated screwdrivers, pliers, and protective gloves. A flashlight helps you see inside the oven. These tools allow you to test for continuity and safely remove or install the heating element.
Why does your oven heating element stop working?
Heating elements fail due to age, frequent high-heat use, or buildup of grease and debris. Electrical faults or physical damage, such as cracks or blisters, also cause failure. Regular cleaning and proper use extend the element’s lifespan.
Is it safe to use an oven with a faulty heating element?
You should not use an oven with a faulty heating element. Continued use increases the risk of electrical shock, fire, or further appliance damage. Always repair or replace the element before using the oven again.
What does it mean if your oven trips the circuit breaker?
A tripped circuit breaker often signals a short circuit or electrical overload. The heating element may draw too much current or have a fault. Stop using the oven and inspect the element or call a professional for diagnosis.
How do you know if your oven heating element needs replacement?
Look for uneven cooking, visible damage, or the element not glowing red during use. If a multimeter shows no continuity, the element needs replacement. Error codes on digital ovens also indicate when the element fails.
Can you clean the heating element with water or chemicals?
You should only use a damp cloth or soft brush to clean the heating element. Avoid harsh chemicals or soaking the element in water. Chemicals and excess moisture can damage the element and create safety hazards.

