
To check a heating element in your water heater, start by making sure you power down your water heater to prevent electrical hazards. Gather a multimeter and the necessary tools. Access the heating element by removing the access panel on your electric water heater. Test the heating element terminals with the multimeter. Read the display to see if the element works or needs replacement. This simple process helps you keep your water heater running efficiently.
Safety Steps Before Testing a Water Heater Heating Element
Before you begin any work on your water heater, you must take safety seriously. Electric water heaters operate at high voltage and can pose significant risks if you do not follow proper procedures. This section will guide you through the essential safety steps to protect yourself and your home.
Turning Off Power to the Water Heater
Locating and Flipping the Circuit Breaker
You must always power down your water heater before starting any inspection or repair. Locate your home’s electrical panel. Find the circuit breaker labeled for your water heater. Many electric water heaters use a 240-volt supply and may have two breakers. Flip both breakers to the “off” position. If your unit uses a 120-volt supply, unplug it from the outlet. These steps help prevent electrical shock and reduce the risk of fire.
Verifying Power is Off at the Water Heater
After flipping the breakers, confirm that the power is truly off. Use a non-contact voltage tester to check the wires at the water heater terminals. This tool detects live voltage without direct contact. Never skip this step. Most safety incidents occur when people assume the power is off but fail to verify. Double-checking can prevent electrical shock and injury.
Gathering Tools for Testing Heating Elements
Essential Tools for the Job
You need the right tools for safe and accurate testing. Professionals recommend the following:
- Multimeter: Measures voltage, resistance, and current. This tool is essential for diagnosing heating element issues.
- Screwdriver: Removes access panels and terminals.
- Electrical tape: Secures wires after inspection.
- Non-contact voltage tester: Confirms the absence of live voltage before you touch any wires.
Recommended Safety Gear
Wear protective gear to reduce risk. Heavy gloves protect against accidental contact with hot surfaces and electrical components. Safety glasses shield your eyes from debris or sparks. Insulated tools add another layer of protection.
Key Safety Precautions When Working with Water Heaters
Preventing Electrical Hazards
You must always disconnect the power supply before touching any part of the water heater. Never attempt repairs if you feel unsure about any step. Improper handling of live electrical components is the most common cause of injury. Avoid overloading circuits and keep the area around the water heater clear of flammable materials.
Protecting Yourself and Your Home
Set the thermostat to 120°F or below to minimize scalding risk. Flush the tank annually to remove sediment and maintain efficiency. Inspect the tank for leaks or corrosion. Schedule professional maintenance each year to ensure all safety devices function correctly. If you encounter complex issues, contact a licensed technician. Proper safety steps protect you, your family, and your property.
Locating and Accessing the Heating Element in Your Water Heater
Finding the Heating Element Access Panel
Identifying the Correct Panel on the Water Heater
You need to identify the correct access panel before you can inspect or test the heating element. Most electric water heaters have one or two rectangular panels on the side of the tank. These panels usually sit near the bottom and middle of the unit. Look for a label or diagram on your water heater that marks the location of the water heater element. If your model has two panels, the upper panel covers the upper heating element, while the lower panel covers the lower one. Always check your owner’s manual for specific guidance.
Removing the Panel and Insulation Safely
Once you locate the correct panel, use a screwdriver to remove the screws holding it in place. Set the screws aside so you do not lose them. Gently pull the panel away from the tank. Underneath, you will find a layer of insulation. Carefully fold the insulation outward and away from the heating element terminal block. This step exposes the wiring and the water heater element terminals. Make sure you do not damage the insulation, as you will need to replace it after testing.
Tip: Allow the water in the tank to cool completely before you begin. Open a hot water faucet and check that the water runs cool. This step prevents accidental burns and electrical hazards.
Exposing the Heating Element Terminals
Disconnecting Wires for Accurate Testing
To test the water heater element accurately, you must disconnect the wires from the terminals. First, use a non-contact voltage tester to confirm that no electrical power is present at the wires. Safety always comes first. Once you confirm the power is off, loosen the screws holding the wires to the terminal screws. Gently disconnect the circuit wires and move them aside. This process ensures you get a true reading when you test the heating element with a multimeter.
Steps to Safely Expose Heating Element Terminals:
- Allow the water in the tank to cool completely. This may take two hours or more.
- Open a hot water faucet to verify the water is cool.
- Turn off the power supply to the water heater.
- Remove the access cover panel and insulation.
- Fold the insulation outward and away from the heating element.
- Use a non-contact circuit tester to confirm no electrical power is present.
- Loosen the screws and disconnect the circuit wires.
Spotting Signs of a Burned Out Water Heater Element
When you expose the water heater element, look for visible signs your water heater element is burned out. Several symptoms can help you identify a burned or failing element:
- Lukewarm water from faucets or showers.
- Hot water running out quickly, especially if only one element works.
- Unusual noises, such as popping or hissing, which often result from sediment buildup on the heating element.
- Cloudy or discolored water, which may indicate corrosion or sediment.
- Higher energy bills, as the water heater works harder to maintain temperature.
- Frequent tripping of the circuit breaker, which can signal a short-circuit or overheating.
If you notice any of these issues, you likely have a burned out water heater element. Addressing these problems early can prevent further damage and restore your water heater’s efficiency.
How to Test Heating Elements with a Multimeter
Testing your water heater element with a multimeter is the most reliable way to determine if it is functioning properly or if you have a burned out water heater element. You can follow a systematic approach to ensure accurate results and maintain safety throughout the process.
Setting Up the Multimeter for Testing
Selecting the Correct Resistance (Ohms) Setting
You must set up your multimeter correctly before you begin testing the heating elements. Follow these steps to prepare your device:
- Turn off the power to your water heater at the circuit breaker. Always verify that the power is off using a multimeter set to AC volts on the upper thermostat screws.
- Remove the two power wires from the upper heating element. This step isolates the element for accurate measurement.
- Set your multimeter to the resistance (ohms) setting. Choose the lowest range, such as 200 ohms, to detect the typical resistance values found in water heater elements.
- Turn on the multimeter and confirm it is functioning.
Tip: Always disconnect the heating element from any power source before you test heating elements. This step prevents electrical shock and ensures you get a true reading.
Testing the Multimeter for Accuracy
Before you test the water heater element, check your multimeter for accuracy. Touch the two probes together. The display should read zero or very close to zero ohms. If you see a different value, replace the batteries or recalibrate the device. This quick check helps you avoid misreading the results when testing your water heater element.
Testing the Heating Element for Continuity
Placing Multimeter Probes on the Terminals
After you have set up your multimeter, you can begin testing the heating elements for continuity. Use the following steps:
- Loosen one of the screws holding the heating element and remove the attached wire. This step ensures you do not get a false reading from the rest of the circuit.
- Place one probe on the loose screw and the other probe on the opposite screw of the heating element.
- Hold the probes firmly to ensure a stable connection.
If your water heater has two elements, repeat this process for the second element. Always keep the wires separated from each other and from any metal parts during testing.
Reading and Understanding the Multimeter Display
Once you place the probes on the terminals, observe the multimeter display. A properly functioning heating element typically shows a resistance reading between 10 and 30 ohms. If you see a low or zero reading, or if the display shows infinite resistance, the element is likely burned out. These readings help you understand how to tell if your water heater element is burned out.
Note: If you hear a beep or see a near-zero reading, your heating element may have a short circuit. If the display does not move or shows “OL” (open loop), the element is burned out and has no continuity.
Interpreting Test Results for Water Heater Elements
What a Normal Reading Looks Like
A normal resistance reading for a water heater element falls between 10 and 30 ohms. For example, a 240-volt, 3500-watt element should read about 14 ohms. The exact value depends on the wattage and voltage of your specific heating element. You can use the following table as a reference:
| Element Power Rating | Typical Resistance Value | Pass/Fail Criteria |
|---|---|---|
| 3000W at 240V | Approximately 16.1Ω | 15.3–16.9Ω (±5%) |
| 4500W at 240V | Approximately 11.6Ω | 11.0–12.2Ω (±5%) |
If your reading matches or is close to these values, your water heater element is working as intended.
Identifying a Burned Out Water Heater Element
You can easily identify a burned out water heater element by interpreting the multimeter readings:
- A low or zero reading means the element has a short circuit. This condition often causes the circuit breaker to trip.
- An infinite resistance reading (open circuit) means the element is burned out and cannot heat water.
- Readings outside the typical range, such as much higher or much lower than expected, indicate the element is failing.
If you want to know how to tell if your water heater element is burned out, look for these signs during testing:
- The multimeter shows infinite resistance or “OL.”
- The display reads zero or near zero ohms.
- The resistance value falls outside the 10–30 ohm range.
Callout: Always reconnect the wires, replace the insulation, and secure the access panels after testing the heating elements. Restore power only after you complete all reassembly steps.
Knowing how to tell if your water heater element is burned out helps you decide whether to replace the element or seek professional help. If you find a burned out element, replace it promptly to restore your water heater’s performance.
What to Do If the Heating Element Is Faulty
When your test confirms a faulty heating element, you face an important decision. You must choose whether to handle the replacement yourself or call a professional for water heater repair. Understanding the risks and the process helps you make the right choice for your safety and your home.
Deciding Between Replacement and Professional Help
When to Replace the Heating Element Yourself
You can replace a heating element yourself if you feel comfortable working with electrical appliances and have the right tools. If you have experience with home repairs and understand basic electrical safety, you may find this task manageable. Always follow the manufacturer’s instructions and use caution. Make sure you turn off the power and verify it is off before you begin any work on the water heater.
Tip: Take a clear photo of the wiring before you disconnect anything. This step helps you reconnect everything correctly after the replacement.
When to Call a Professional for Water Heater Repair
If you feel uncertain about any step, or if your water heater is under warranty, you should contact a licensed technician. Professionals have the training and tools to complete the repair safely and efficiently. You should also call a professional if you notice signs of more serious problems, such as leaks, corrosion, or repeated tripping of the circuit breaker.
The risks of replacing a heating element without professional help can be significant. Review the table below to understand the potential hazards:
| Risk Category | Explanation |
|---|---|
| Electrical Hazards | Electric water heaters operate at high voltage. Incorrect wiring or handling can cause electrical shock or overheating, leading to fire hazards. |
| Voided Warranty | DIY repairs often void manufacturer warranties, eliminating coverage for defects or future replacements. |
| Gas Leaks | For gas water heaters, improper repair risks gas leaks, which can cause explosions, carbon monoxide poisoning, and other health hazards. |
| Water Damage | Incorrect installation can cause leaks, potentially leading to extensive water damage, especially in hidden areas like basements or crawl spaces. |
| Time and Money | Amateur repairs often take longer and risk costly mistakes, whereas professionals complete repairs faster and more safely. |
Note: If your water heater uses gas, never attempt to replace the heating element yourself. Gas appliances require specialized knowledge and tools.
Steps to Replace a Faulty Heating Element
If you decide to proceed with replacing a burned-out water heater element, you must follow a careful process. Gather all necessary tools and materials before you start. You need a water heater element wrench, a multimeter, screwdrivers, a garden hose, a new heating element, and a replacement rubber gasket.
Draining the Water Heater Tank
You must drain the tank before you remove the faulty element. Follow these steps:
- Turn off the power to the water heater at the circuit breaker and verify with a multimeter that the power is off.
- Shut off the water intake valve to stop water from entering the tank.
- Attach a garden hose to the drain valve at the bottom of the tank. Run the hose to a floor drain or outside.
- Open the drain valve and allow the tank to empty. Open a hot water tap in your home to help the tank drain completely.
- Wait until no more water flows from the hose. This step ensures the tank is empty and safe to work on.
Alert: Hot water can cause burns. Always let the tank cool before draining.
Removing and Installing the New Heating Element
Once you have drained the tank, you can remove the faulty heating element and install the new one:
- Use a water heater element wrench or a 1 1/2″ deep well socket to loosen and remove the old heating element.
- Check that the new element matches the voltage and wattage listed on your water heater’s data plate.
- Clean the threads in the tank opening to ensure a good seal.
- Place the new rubber gasket on the new heating element. Lubricate the gasket with a drop of dishwashing liquid to prevent damage.
- Insert the new element into the tank. Hand-tighten it, then use the wrench to secure it firmly, but do not overtighten.
- Close the drain valve and open the cold water intake valve to refill the tank. Open a hot water faucet to let air escape as the tank fills.
- Remove the aerator from the nearest hot water faucet. Run the water at full stream for three minutes to remove air from the tank.
- Check for leaks around the new heating element. If you see leaks, turn off the water, drain the tank, and reseat or replace the gasket.
- Reconnect the wiring to the heating element. Refer to your photo to ensure correct connections.
- Replace the plastic protector, insulation, and access panel securely.
- Restore power at the circuit breaker. Allow up to two hours for the tank to heat the water.
Tip: Never turn the power back on until the tank is completely full of water. Running the element dry can cause immediate failure.
By following these steps, you can complete the replacement safely and restore your water heater’s performance. If you encounter any problems or feel unsure, stop and contact a professional for water heater repair.
Troubleshooting Water Heater Problems Beyond the Heating Element
When you complete water heater troubleshooting, you may discover that the heating element is not the source of your problem. Many other issues can affect your water heater’s performance and lifespan. Understanding these problems helps you take the right steps in the troubleshooting process.
Common Issues Not Caused by the Heating Element
Thermostat Malfunctions
The thermostat controls the temperature of your water heater. If the thermostat fails, you may notice inconsistent water temperatures, no hot water, or overheating. A faulty thermostat can cause the unit to shut off unexpectedly or run continuously, leading to higher energy bills. You should check the thermostat settings first if you experience temperature fluctuations. Sometimes, the thermostat may need recalibration or replacement. If you see no improvement after adjusting the thermostat, you may need to test it with a multimeter or call a professional.
Sediment Buildup in the Tank
Sediment buildup is a common problem in water heaters, especially in areas with hard water. Minerals settle at the bottom of the tank, causing rumbling or popping noises. Sediment can also lead to overheating, reduced efficiency, and even cracks in the tank. You may notice rusty or discolored water, foul odors, or low water pressure from hot water faucets. Flushing the tank annually helps prevent these issues and extends the life of your water heater.
Other problems unrelated to the heating element include:
- Foul odors from bacteria growth when water sits too long.
- Leaks from pressure valve failure, loose drain valves, or corroded anode rods.
- Mold growth due to leaks.
- Blocked valves from mineral buildup.
- Hot water shortages from overall degradation.
If you notice water leaking from the tank, this usually signals corrosion or structural damage, not a heating element issue.
When to Seek Professional Water Heater Service
Warning Signs of Larger Problems
You should seek professional service if you encounter any of the following:
- Visible leaks or water pooling around the water heater.
- Persistent foul odors or discolored water.
- Frequent repairs or recurring issues.
- Mold or mildew growth near the unit.
- Unusual noises that do not resolve after flushing the tank.
- Safety concerns such as gas leaks or electrical problems.
These signs often indicate problems beyond a simple thermostat or heating element failure. Professional technicians have the expertise and tools to diagnose and repair complex issues safely.
Finding a Qualified Technician
Choosing a qualified technician ensures safe and effective repair. Look for professionals with proper licensing, insurance, and experience with your specific water heater model. Ask about warranty coverage, as DIY repairs can void manufacturer warranties. Professionals follow safety codes and use quality parts, reducing the risk of future problems.
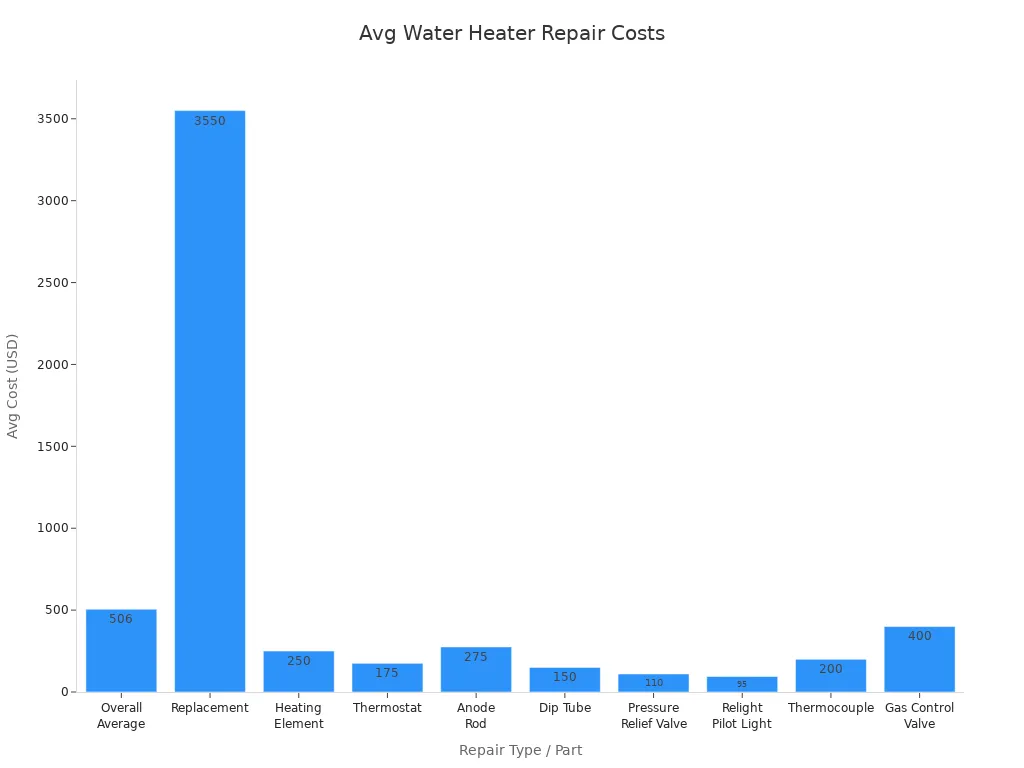
Here is a table of average costs for common water heater repairs:
| Repair Type / Part | Average Cost Range (USD) | Notes |
|---|---|---|
| Overall Average Repair Cost | $506 | Typical cost for general water heater repairs |
| Water Heater Replacement | $1,600 – $5,500 | Average replacement cost around $3,550; usually for non-repairable leaks |
| Thermostat (Electric) | $150 – $200 | Parts $20-$30; affects water heating efficiency |
| Anode Rod | $250 – $300 | Part costs about $50; prevents corrosion; replacement extends unit life |
| Pressure Relief Valve | $20 – $200 | Releases excess pressure; failure can cause leaks |
Timely professional repair can prevent more expensive damage and restore hot water quickly.
Maintenance Tips for Water Heater Heating Elements
Regular Testing and Inspection Schedule
How Often to Test Heating Elements
You should schedule annual maintenance for your water heater to keep it running efficiently and safely. Every year, inspect the water heater element for corrosion or scaling. Clean or replace the element if you find any buildup. Check the wiring connections for looseness or fraying, and tighten or replace them as needed. Perform a continuity test on each water heater element to confirm proper function. If you find no continuity, replace the element right away. This annual routine helps you avoid unexpected breakdowns and extends the life of your tank.
A yearly inspection and testing routine ensures your water heater operates at peak performance and reduces the risk of a burned out element.
Other Water Heater Parts to Inspect
During your annual check, look at more than just the heating element. Inspect these parts as well:
- Thermostat: Verify the setting is at 120°F and test for accurate temperature control.
- Anode rod: Check for corrosion and replace if it appears worn out.
- Pressure relief valve: Test for proper operation to prevent dangerous pressure buildup.
- Tank: Look for leaks, rust, or signs of wear.
- Wiring: Examine all visible wires for damage or loose connections.
A thorough inspection of these components helps you catch problems before they lead to a burned out water heater element or a complete system failure.
Preventing Burned Out Water Heater Elements
Flushing the Tank to Remove Sediment
Sediment buildup in your tank can cause the water heater element to overheat and burn out. You should flush the tank every 3 to 12 months, depending on your local water quality. In areas with hard water, flush the tank more often. To flush, turn off the power and cold water supply, attach a hose to the drain valve, and let the water run out until clear. This process removes minerals that insulate the element and cause it to overheat.
Regular flushing prevents sediment from shortening the life of your water heater and keeps your tank operating efficiently.
Monitoring Water Quality and Usage
Water quality plays a major role in the health of your water heater. Hard water leads to mineral deposits that can burn out the element. Consider installing a water softener if you notice frequent scaling. Always ensure the tank is full before turning the power back on to avoid dry firing, which can immediately burn out the element. Set the thermostat to 120°F to reduce strain on the water heater element and prevent overheating. Monthly, inspect for leaks, corrosion, or unusual noises, and test the safety valves.
| Maintenance Task | Frequency | Benefit |
|---|---|---|
| Flush tank | 3–12 months | Prevents sediment buildup |
| Inspect heating element | 6–12 months | Avoids burned out elements |
| Check thermostat | Annually | Ensures safe, efficient operation |
| Test pressure relief valve | Monthly | Prevents dangerous pressure buildup |
| Professional inspection | Annually | Comprehensive safety and performance |
By following these maintenance tips, you can prevent a burned out water heater element and keep your tank in top condition.
Mistakes to Avoid When Testing Heating Elements
When you work on your water heater, you must avoid common mistakes that can lead to injury, equipment damage, or inaccurate results. Paying attention to safety and accuracy ensures you protect yourself and your home.
Skipping Essential Safety Steps
Risks of Not Turning Off Power
You must always turn off the power before you begin any work on your water heater. Failing to do so exposes you to serious hazards. If you skip this step, you risk electrical shock, which can cause severe injury or even be fatal. You also increase the chance of a short circuit, which can damage your water heater or start a fire. Always verify the power is off using a voltage tester, not just by flipping the breaker.
| Risk | Potential Consequence |
|---|---|
| Electrical shock | Severe injury or fatality |
| Short circuit | Fire hazard, equipment damage |
| Water leak | Property damage, slip hazard |
| Missing safety gear | Cuts, burns, eye injury |
| Skipping cover replacement | Accidental contact, electric shock |
Alert: Never restore power until you have replaced all covers and secured all wires. This step prevents accidental contact and electric shock.
Incorrect Tool Handling
Using the wrong tools or handling them carelessly can cause accidents. If you use a screwdriver with a damaged handle or skip insulated gloves, you risk burns or cuts. Not wearing safety glasses leaves your eyes unprotected from sparks or debris. Always use insulated tools and wear proper safety gear. Clear your workspace by removing unnecessary items, and make sure the area is dry to prevent slips.
- Skipping safety gear can lead to burns or injuries.
- Careless wire disconnection may cause short circuits.
- Failing to drain the tank when needed increases the risk of water leaks.
Misreading Multimeter Results During Testing
Common Testing Errors to Watch For
Reading a multimeter incorrectly can lead you to replace a good element or miss a faulty one. You must understand what the readings mean:
- A resistance reading between 10 and 30 ohms usually means the heating element works.
- No reading or infinite resistance means the element is open and needs replacement.
- A zero or very low resistance reading signals a short circuit inside the element.
- Resistance below 5 ohms also points to a short circuit.
- Resistance above the recommended range or infinite resistance means the element is burned out.
- Detecting resistance between the element terminal and the metal tank shows a short to ground.
Tip: Always test both heating elements if your water heater has two. Failing to do so may cause you to miss the faulty one.
Double-Checking Your Work for Accuracy
You can avoid mistakes by double-checking your setup and results. Follow these best practices:
- Set your multimeter to the correct resistance range before you start.
- Test the probes for continuity to ensure they work.
- Disconnect wires from the heating element to prevent interference.
- Clean the terminals to remove dirt or corrosion.
- Tighten all wire connections for reliable measurements.
- Replace the multimeter battery if readings seem inconsistent.
- Inspect probes for damage and replace if needed.
- Calibrate your multimeter under test conditions.
Taking a few extra minutes to double-check your work can save you from costly errors and ensure your water heater operates safely.
You must prioritize safety at every step when testing or replacing water heater heating elements. Always turn off the power, inspect for corrosion, and use your multimeter correctly. Regular maintenance offers long-term benefits:
- Extends the life of your water heater.
- Improves energy efficiency.
- Reduces costly repairs.
- Ensures a steady hot water supply.
If you feel unsure or encounter complex issues, consult a reputable plumbing professional. Expert advice and prompt service protect your home and keep your system running reliably.
FAQ
How often should you check your water heater’s heating elements?
You should test your water heater’s heating elements once a year. Regular checks help you catch problems early and keep your system running efficiently.
Can you test a heating element without a multimeter?
You need a multimeter for accurate results. Visual inspection may show damage, but only a multimeter can confirm if the element works.
What resistance reading means a heating element is good?
A good heating element usually reads between 10 and 30 ohms. Check your water heater’s manual for the exact value.
Tip: Always disconnect the wires before testing for the most accurate reading.
Is it safe to replace a heating element yourself?
You can replace a heating element if you follow all safety steps and feel comfortable with electrical repairs. If you feel unsure, call a professional.
Why does my water heater keep tripping the breaker?
A shorted heating element or faulty wiring often causes this issue. Test the element with a multimeter. If the problem continues, contact a licensed technician.
What tools do you need to test a water heater element?
You need a multimeter, screwdriver, non-contact voltage tester, and safety gear like gloves and glasses. These tools help you work safely and accurately.
Can sediment buildup damage the heating element?
Yes, sediment buildup can cause the element to overheat and fail. Flush your tank regularly to prevent this problem.
Note: Hard water areas need more frequent flushing to protect the element.

