You can restore your Kenmore oven’s performance quickly by replacing the faulty elemento calefactor. Most users complete this moderate DIY repair with just a screwdriver and a part tailored to their model. Unlike more complex fixes, this process rarely requires professional help or advanced tools. Calefacción eléctrica Jinzhong stands out among fabricantes de elementos calefactores, supplying reliable elementos calefactores de electrodomésticos that fit Kenmore models precisely. With the right approach, you minimize downtime and get back to baking with confidence.
How to Identify a Faulty Heating Element

Common Signs of a Bad Heating Element
Oven Not Heating Evenly or At All
You may notice your Kenmore oven struggles to reach the set temperature or fails to heat up entirely. Uneven cooking often points to a malfunctioning heating element. Food that takes longer to cook or comes out undercooked on one side signals a problem. When the oven cannot maintain consistent heat, you lose efficiency and cooking quality.
Visible Damage or Burn Marks on the Element
Inspect the heating element closely. Look for cracks, blisters, or burn marks along its surface. These signs indicate the element has suffered physical damage or electrical failure. A damaged element cannot distribute heat properly, which leads to poor oven performance.
Heating Element Not Glowing Red During Use
A functioning heating element glows bright orange or red when the oven operates. If you turn on the oven and the element remains dark, it likely has failed. This lack of glow is one of the most common symptoms reported by users.
Consejo: An unusually dirty oven may also suggest the element is not working correctly, as food residue can build up when heat distribution is poor.
Most Common Symptoms of a Failing Heating Element:
- The element does not glow bright orange when turned on.
- Visible cracks or blisters appear on the element.
- Food cooks unevenly or takes longer than usual.
- Excessive food residue builds up inside the oven.
- Electricity bills increase unexpectedly.
Testing the Heating Element
Visual Inspection Steps
Start by disconnecting power to your oven. Remove the racks and locate the heating element at the bottom or top of the oven cavity. Examine the element for any visible damage, such as breaks, discoloration, or warping. Use a flashlight for a thorough inspection. If you see any of these issues, you likely need a replacement.
How to Use a Multimeter for Continuity
A multimeter helps you confirm if the heating element has failed. Set your multimeter to the continuity or resistance setting. Touch one probe to each terminal of the element. If the reading shows no continuity or infinite resistance, the element is faulty. A working element will show a low resistance value, indicating an unbroken electrical path.
Nota: Always wear work gloves and ensure the oven is unplugged before handling electrical components.
Choosing the Right Replacement Heating Element
Finding Your Kenmore Oven’s Model Number
Locations to Check for the Model Number
You need the correct model number to ensure a perfect fit for your replacement part. Follow these steps to locate it:
- Open the oven door and check the door frame for the model number tag.
- If applicable, open the broiler or range drawer and look for the tag on the door frame.
- Remove any loose items from the stove top and lift the cooktop to check below the burners.
- Inspect the exterior of the stove on each side near the bottom.
- Record the model number by photographing or writing it down.
Consejo: Always double-check the number for accuracy before purchasing any parts.
Why the Model Number Is Essential
The model number acts as your oven’s unique identifier. Manufacturers design each Kenmore oven with specific components. Using the correct model number ensures you select a heating element that matches your oven’s electrical requirements and physical dimensions. This step prevents installation issues and guarantees optimal performance.
Selecting the Correct Heating Element
Bake vs. Broil Heating Elements
Kenmore ovens use both bake and broil elements, each with distinct roles. The table below highlights their differences:
| Elemento calefactor | Amperage | Functionality during Cooking Modes |
|---|---|---|
| Bake | ~10 amps | Cycles on/off to maintain stable temperature after preheating. |
| Broil | ~17 amps | Cycles on for short bursts to assist in preheating and browning. |
You should identify which element needs replacement. The bake element sits at the bottom and handles most cooking. The broil element, located at the top, provides high heat for browning and broiling.
Matching the Part to Your Oven Model
Once you have the model number, search for a replacement part that matches it exactly. Manufacturers often update designs, so even similar-looking elements may not fit or function correctly. Always compare the specifications and connector types before making a purchase.
Nota: Oven heating elements typically last between 5 to 10 years. Usage frequency, cooking habits, and part quality can affect this lifespan.
Dónde comprar un elemento calefactor de repuesto
Online Retailers for Kenmore Parts
You can find genuine Kenmore oven parts from several reputable online retailers. Consider these trusted sources:
- Reliable Parts is a reputable online retailer specializing in appliance parts, including Kenmore oven heating elements.
Shopping online gives you access to a wide selection and convenient delivery options.
Local Appliance Stores and Pricing
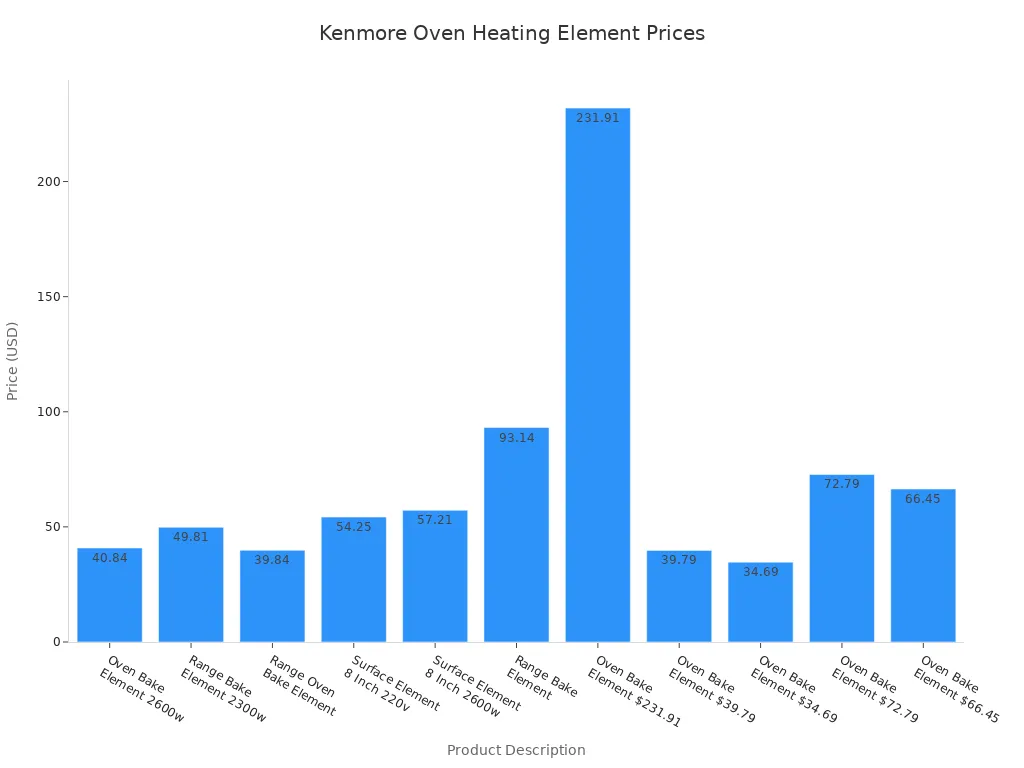
Local appliance stores also stock Kenmore oven parts. Prices can vary based on wattage, voltage, and brand. The chart below shows the typical price range for heating elements at local stores:

You can expect to pay anywhere from $35 to over $200, depending on the specific part and store.
Tools and Safety Precautions for Heating Element Replacement
Before you begin replacing your Kenmore oven’s heating element, you need to gather the right tools and follow strict safety measures. Using the correct equipment and taking proper precautions ensures a smooth, injury-free repair process.
Tools Required for the Job
Screwdrivers (Phillips and Flathead)
You will need both Phillips and flathead screwdrivers. Most Kenmore ovens use Phillips screws to secure the element, but some models may require a flathead screwdriver. Using the correct screwdriver prevents stripping screws and damaging the oven’s interior.
Multimeter for Testing
A multimeter allows you to test the continuity of the heating element before and after installation. This tool helps you confirm that the new part works correctly and that you have resolved the heating issue. Set the multimeter to the continuity or resistance setting for accurate results.
Work Gloves for Protection
Work gloves protect your hands from sharp edges and electrical contacts inside the oven. They also help you avoid burns if the oven or element remains warm. Choose gloves with good grip and insulation for maximum safety.
Essential Safety Steps
Disconnecting Power to the Oven
You must always disconnect power before starting any repair. This step prevents electrical shock and keeps you safe. Follow these steps to ensure your safety:
- Turn off the oven by unplugging it from the wall outlet or switching off the circuit breaker.
- Remove all racks and trays from the oven.
- Take off the cover that shields the element.
- Put on safety glasses and gloves.
- Wait until the heating element cools completely before touching it.
Consejo: Never skip the power disconnection step. Even a small amount of residual electricity can cause serious injury.
Preventing Electric Shock and Injury
Manufacturers recommend several additional precauciones de seguridad to protect you during the repair. The table below summarizes these key points:
| Precauciones de seguridad | Detalles |
|---|---|
| Disconnect power before installation | Prevents electrical hazards and keeps you safe during repairs. |
| Wear personal protective equipment | Use safety goggles, insulated gloves, and rubber-soled shoes to protect yourself. |
| Allow the heating element to cool completely | Prevents burns when handling the element. |
| Keep workspace well-lit and organized | Reduces the risk of accidents during repairs. |
| Use correct tools for each task | Prevents injury and damage to the oven. |
| Reconnect ground wires | Ensures safety from electrical shocks. |
| Do not attempt repairs unless recommended | Avoids unnecessary risks. |
| If you smell gas, leave the area | Call your gas supplier or fire department immediately to prevent hazards. |
By following these guidelines, you reduce the risk of electric shock, burns, and other injuries. Always work in a well-lit area and keep your workspace organized. If you ever feel unsure about a step, consult your oven’s manual or contact a professional.
Guía paso a paso para reemplazar el elemento calefactor

Extracción del elemento calefactor antiguo
Accessing the Heating Element in Your Oven
Begin by ensuring your safety. Unplug your oven or switch off the circuit breaker. Wait until the oven cools completely. Remove all racks from the oven cavity. Some models allow you to remove the oven door for easier access, but this step is optional. Locate the heating element, which typically sits at the bottom for baking or at the top for broiling.
Consejo: Take a clear photo of the wiring before you disconnect anything. This reference will help you reconnect wires correctly during installation.
Unscrewing and Disconnecting Wires Safely
Use the appropriate screwdriver to remove the screws securing the element to the oven wall. Gently pull the element toward you until you see the wires attached at the back. Before disconnecting, double-check that the oven has no power.
When disconnecting the wires, you may encounter several challenges:
- You must ensure the oven is unplugged to prevent electric shock.
- Corrosion or damage can make terminals difficult to remove.
- Proper tools and careful technique are necessary to avoid damaging the connectors.
Grip each wire connector firmly and pull it straight off the terminal. If you notice corrosion or a tight fit, use needle-nose pliers for better control. Inspect the terminals for any signs of burning or wear. If you find damaged connectors, replace them before proceeding.
Instalación del nuevo elemento calefactor
Connecting Wires to the New Element
Before installing the new part, inspect each wire and connector for damage. Replace any worn or burnt connectors. If you find damaged wiring, splice in a new section using high-temperature rated wire, such as 12 AWG. Solder new connectors onto replacement wires for a secure fit. Use quality electrical butt connectors to join new wire lengths to existing wiring. Always match wire colors correctly—neutral to neutral, live to live, and ground to ground. Secure the grounding wire with the ground link screw.
After connecting the wires, gently tug each one to confirm it is secure. Double-check your work against your earlier photo or diagram. Avoid using any damaged terminals; replace the entire part if a spade terminal is compromised.
Fijación del elemento calefactor
Align the mounting holes of the new element with the screw holes in the oven wall. Insert the screws or nuts by hand to avoid cross-threading. Tighten each fastener until snug, but do not over-tighten, as this can damage the threads. Ensure the element sits evenly and does not touch the oven walls. A secure fit prevents arcing and ensures safe operation.
Testing the Oven After Installation
Cómo restaurar la energía al horno
Once you have installed the new element and secured all connections, reinstall the oven racks and door if you removed it. Restore power by plugging the oven back in or switching on the circuit breaker.
Checking for Proper Heating Function
Turn on the oven and set it to a standard baking temperature. Observe the new element. It should begin to glow red within a few minutes. Listen for any unusual sounds and check for even heating. If the oven heats properly and the element glows as expected, you have completed the repair successfully.
Nota: If the oven does not heat or you notice any issues, turn off the power immediately and recheck your connections.
Solución de problemas de sustitución de la resistencia
Oven Still Not Heating After Replacement
Even after you install a new heating element, your Kenmore oven may still refuse to heat. This situation can feel frustrating, but you can resolve many issues by checking a few key areas.
Double-Checking Electrical Connections
Start by inspecting every electrical connection you touched during installation. Loose or improperly attached wires often cause the oven to malfunction. Use a flashlight to examine each terminal and connector. Make sure you push each wire firmly onto its terminal. If you see any corrosion or discoloration, clean the contacts or replace the connectors. A secure connection ensures the element receives power and heats as expected.
Consejo: Refer to the photo you took before disconnecting wires. This step helps you confirm that you reconnected everything correctly.
Inspecting the Oven Control Board
If the wiring checks out, turn your attention to the oven control board. This component manages power delivery to the heating element. A faulty control board can prevent the oven from heating, even with a new element installed. Look for signs of damage, such as burnt spots or a burnt smell. If you suspect the control board, you may need to test it with a multimeter or consult your oven’s service manual for diagnostic steps. Replacing a control board requires technical skill, so consider professional help if you feel unsure.
When to Call a Professional for Help
Some oven problems go beyond a simple heating element replacement. Recognizing when to seek expert assistance protects both you and your appliance.
Signs of More Serious Electrical Problems
You should contact a professional if you notice any of the following:
- The oven trips the circuit breaker repeatedly.
- You see sparks or smell burning plastic.
- The oven display malfunctions or shows error codes.
- The oven fails to respond to temperature settings.
These symptoms often point to deeper electrical issues that require specialized tools and knowledge.
Safety Concerns That Require Expert Attention
Certain safety concerns demand immediate professional intervention. Always prioritize your safety and the safety of your home. Common risks include:
- Using the wrong tools for the job can cause damage or injury.
- Sharp edges inside older ovens may lead to cuts.
- Complex repairs, especially those involving gas lines or advanced electrical systems, should only be handled by qualified technicians.
Nota: If you ever feel uncertain or unsafe during any repair, stop immediately and consult a professional. Your safety always comes first.
By following these troubleshooting steps and knowing when to seek help, you ensure your Kenmore oven operates safely and efficiently.
Maintaining Your Kenmore Oven Heating Element
Regular Cleaning Tips
Preventing Buildup on the Heating Element
You can extend the life of your Kenmore oven’s heating element by keeping it clean and free from residue. Food spills and grease can accumulate on the element, leading to uneven heating and potential damage. Regular cleaning not only improves performance but also reduces the risk of smoke or unpleasant odors during use.
To maintain your heating element, follow these effective cleaning methods:
- Wipe Away Loose Debris: After each use, allow the oven to cool. Use a damp cloth to remove any loose food particles or crumbs from the element and oven floor.
- Run the Self-Cleaning Cycle: If your oven has a self-cleaning feature, activate it periodically. This cycle burns off baked-on residue at high temperatures, turning it into ash.
- Cool Down and Wipe Clean: Once the self-cleaning cycle finishes and the oven cools, use a soft cloth to wipe away the remaining ash.
- Baking Soda and Vinegar: For stubborn spots, make a paste with baking soda and water. Apply it to the element, let it sit, then spray with vinegar. Wipe clean with a damp cloth.
- Lemon Juice and Baking Soda: Mix lemon juice with baking soda to create a grease-fighting paste. Apply it to greasy areas, let it sit, and then wipe away.
- Salt and Baking Soda: Combine salt and baking soda for tough stains. Gently scrub the affected area, then wipe clean.
Consejo: Always disconnect power before cleaning the heating element. Never use abrasive pads or harsh chemicals, as these can damage the element’s surface.
By incorporating these cleaning habits, you help prevent buildup that can shorten the lifespan of your oven’s heating element.
Periodic Inspection of the Heating Element
Spotting Early Signs of Wear or Damage
Routine inspection of your heating element ensures safe and efficient oven operation. You should check the element every few months, especially if you use your oven frequently. Early detection of problems allows you to address issues before they lead to costly repairs.
Look for these signs during your inspection:
- Discoloration: Areas that appear darker or lighter than the rest of the element may indicate overheating or wear.
- Cracks or Blisters: Surface cracks, blisters, or bubbling suggest the element is deteriorating and may soon fail.
- Pandeo: A bent or misshapen element can signal internal damage.
- Conexiones sueltas: Check that all wires and terminals remain secure and free from corrosion.
If you notice any of these issues, replace the heating element promptly. Regular inspection and timely maintenance keep your Kenmore oven running safely and efficiently.
Nota: Consistent care and attention to your oven’s heating element help you avoid unexpected breakdowns and maintain optimal cooking results.
Common Mistakes to Avoid When Replacing a Heating Element
Skipping Important Safety Steps
Olvidar desconectar la energía
You must always prioritize safety when working on your Kenmore oven. One of the most common mistakes involves forgetting to disconnect power before starting the replacement. If you leave the oven plugged in or the circuit breaker on, you expose yourself to the risk of electric shock. This hazard can cause serious injury and damage your appliance.
Consejo: Always unplug the oven or switch off the circuit breaker before you touch any internal components. This simple step protects you and ensures a safe repair environment.
Wearing gloves during the replacement process adds another layer of protection. Gloves shield your hands from sharp edges and electrical contacts inside the oven. You should also use a Phillips screwdriver for most bake element replacements. This tool fits the screws securely and helps you avoid stripping them.
Safety checklist before starting your repair:
- Unplug the oven or turn off the circuit breaker.
- Remove all racks and trays from the oven cavity.
- Put on work gloves to protect your hands.
- Gather the correct screwdriver for your oven model.
Skipping these steps can lead to accidents and costly mistakes. You maintain control over the repair process by following each safety measure.
Using the Wrong Heating Element Replacement
Importance of Matching the Model Number
Selecting the correct heating element for your Kenmore oven requires careful attention to detail. Many users make the mistake of choosing a part that looks similar but does not match their oven’s model number. This error can result in poor performance, installation issues, or even damage to your appliance.
The bake element sits at the bottom of the oven and plays a crucial role in baking. If the element burns out or becomes defective, you need to replace it with a part designed for your specific model. Manufacturers design each heating element to fit certain electrical requirements and physical dimensions. Using the wrong part can prevent your oven from heating properly or fitting securely.
Nota: Always locate your oven’s model number before purchasing a replacement. You can find this number on the door frame, under the cooktop, or near the bottom exterior of the appliance.
When you match the model number, you ensure the new element will connect correctly and restore full functionality. The replacement process involves unscrewing the old element and reconnecting the new one. If you use the correct part, you avoid unnecessary complications and achieve reliable results.
Steps to ensure you select the right heating element:
- Identify symptoms of failure, such as little to no heat or food taking too long to cook.
- Locate and record your oven’s model number.
- Compare specifications and connector types before purchasing.
- Confirm the bake element’s position at the bottom of the oven.
- Replace burnt out or defective elements with compatible parts.
By paying close attention to these details, you prevent common mistakes and keep your Kenmore oven operating safely and efficiently.
Replacing the heating element in your Kenmore oven restores reliable performance and ensures even heat distribution. You gain several long-term benefits:
- Improved cooking performance for consistent baking results
- Enhanced energy efficiency, which can lower utility bills by up to 20%
- Extended appliance lifespan for years of dependable use
You can complete this repair with basic tools and the right part. Take action now to enjoy efficient, worry-free cooking.
PREGUNTAS FRECUENTES
How often should you replace your Kenmore oven’s heating element?
You should inspect the heating element every 1–2 years. Replace it if you see visible damage, uneven heating, or if the oven fails to reach the correct temperature.
Can you use your oven if the heating element is partially working?
You should avoid using the oven with a faulty element. Partial function can cause uneven cooking and may damage other components. Replace the element for safe and reliable operation.
What tools do you need to replace a Kenmore oven heating element?
You need a Phillips screwdriver, a flathead screwdriver, a multimeter, and work gloves. These tools help you safely remove and install the heating element.
Where can you find the model number on your Kenmore oven?
Check these locations:
- Door frame (open the oven door)
- Under the cooktop
- Inside the broiler drawer
- On the exterior near the bottom
How long does it take to replace a heating element?
Most replacements take 30–60 minutes. You can complete the process faster if you have the right tools and follow the instructions carefully.
What should you do if your oven still does not heat after replacing the element?
Double-check all electrical connections. Inspect the oven control board for damage. If the problem continues, contact a professional technician for further diagnosis.
Are all Kenmore oven heating elements interchangeable?
No, heating elements are not universal. Always match the replacement part to your oven’s model number. Using the wrong element can cause performance issues or damage.


